


Stem stitch is a versatile stitch. Not only is it great for outlining, but it works really well as a filling, too. I’m using it to fill the letters on the pall I’m embroidering, and even though it’s slower going when compared to just outlining, I do like the results.
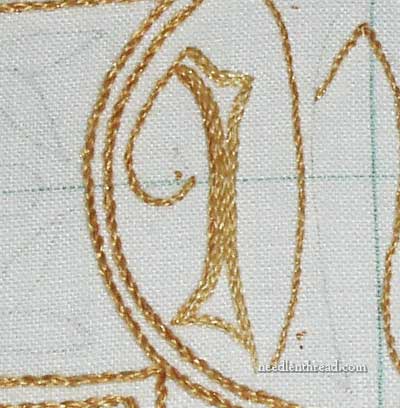
When you begin to fill an area with stem stitch, the first thing you do is outline the shape. Then, you work inside the outline, filling around and around towards the center of the shape. With irregular shapes like letters, you’ll end up with small areas cut off from the rest, like the small blank areas at the top and base of the “I” in the photo above.
Keeping working the stem stitch around those blank areas, until the middle fills to the point that the only thing left to do is to fill with a few straight stitches. In the “I” on this project, notice that the corners are all very sharp angles. So when working the stem stitch around the inside to fill it up, when you come to a sharp, angled corner, you stop the line you’re working on by taking your thread down into the corner, and then you begin the next “side” of the shape with a new stem stitch line.
Working with one strand of fine thread in a very small space can get tricky, but the thing to remember is that you’re working to an overall effect of filling. Not every single line of filling is going to be perfectly symmetrical, if you’re filling an odd shape. Just work it until it’s full, and then, in the tiny bit that’s left in the center, fill with a couple stitches.
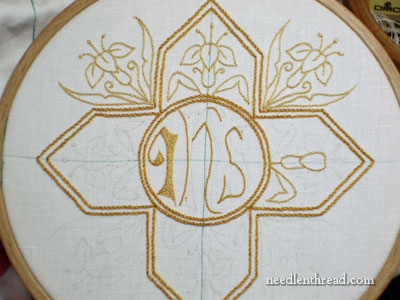
I was supposed to have this project finished by the end of yesterday. As usual, my estimation of time is completely off! I’ve had a thousand and one interruptions, too, and about sixteen million other things that need doing just reared their ugly heads. When it rains, it pours.
And can anyone tell me how the beginning of August got here so quickly?!?!
It’s ok, though. I’ve got everything under control!
…. except for the things that aren’t!
Enjoy your Monday!
Your work is so perfect!!!
I would have never thought to use stem stitch for filling. I am sure that it is a painstaking task to fill in the letters with stem stitch.
Time flies when you are enjoying what you are doing… so August has gotten here so fast
Perfect! It’s perfect as usual Mary!
Indeed time flies…and must confess I have very few things under control…
Have a great week Mary.
(your niece is so sweet – lovely to have her embroidering with you)
Mary,
I do a lot of embroidery on vestments…stoles, chasubles and dalmatics… and I use this technique quite a lot for filing in letters and also crosses and other symbols. I’ve also used stem stitch to fill in complete areas of figures… like the Holy Family or saints… for faces, hair, clothing, etc. I use a somewhat darker shade of a color to do the outlines on parts of a figure and get a “stained glass” look when I’m finished. I pay attention to the “curve” of a piece, such as the sleeve or bodice or skirt and keep the lines or direction of my stitches in line with the folds and curves of the piece I’m working on. It takes a bit of planning, but it works out really well in the end.
Tess
Mary, you’ve been told seventeen million times NOT TO EXAGERATE!
Sorry, coudn’t resist that one.
You’ve been so busy, and there is nothing like deadlines to make the time go quickly even, or especialy, if you are enjoying what you’re doing, as Jayashree commented. Don’t forget to stop and smell the roses, even if it’s only over lunch.
This stem stitch filling has had me going in cirles mentally for a long time. And that is what I should have been doing with it literally! I suppose a largish area would be worked the same way if one wanted the effect of stem stitch and the ‘grain’ didn’t matter.
I find stem stitch filling really appealing.
I’m sorry you are time challenged at the moment but you can be encouraged with how wonderfully it is shaping up.
Bye for now, Cheers, Kath.
Mary aqui se pueden crear muchas ideas sobre este tipo de articulos ya sea para eclesiastico,banderas o estandartes
lo que mas agrado me dio, es el material en el usado,las puntas muy acertadas
Mary, it’s looking fantastic – if still SLIGHTLY unfinished. :o) I’m doing a City and Guilds in embroidery and one of the most difficult things, I find, is to estimate how long something will take. (The next most difficult thing is to estimate how long something actually DID take, as I tend to grab twenty minutes here or half an hour there to fit it in!)
I’m sure it’ll be finished soon, and be absolutely gorgeous!
Your project looks really great Mary. I love these golden shades.
Hi Mary,
I am overawe by your work – its really inspiring to see where I could be after a year (or ten) practise 🙂
One question: how do you avoid ‘furring’ the stitches you’ve already completed (by catching the threads with the needle as you make new stitches)? I never considered stem before because of this problem, it’s difficult to avoid already-stitched work even with stitches that do not stick out from the fabric as much as stem.
Or is this a function of my inexperience (just as likely)?
Thank you again for a great website
Tessa
Hi, Tessa – I think the trick is not to catch them :-/ I normally work on a frame or a hoop, which I attach to a floor stand, so that I have two hands available for stitching. This makes it a little easier to manipulate the needle in tricky spots. Also, I don’t use the “sewing” method of stitching the stem stitch (that is, “scooping” the fabric from back to front again in one movement with the needle) – I plunge the needle to the back, pull the thread through, put the needle back to the front, and pull the thread through. This way, I have control over exactly where my needle goes up and down, and what it runs into (or doesn’t run into) en route. This doesn’t always solve the problem of not hitting your other stitches, but it helps. Otherwise, it’s just a matter of being careful, I think…
Hope that helps!
~MC
Ah. Thank you; I did rather suspect the answer lay in “more practice required” 🙂
I’ll try that method of stem stich again; I was struggling to avoid poking my needle through the stitch but my control /is/ now better, so time to try again.
Thank you for your feedback!
Tessa