


Last week, I introduced you to my current “15 Minutes at a Time” needlework project – a micro-stitching project featuring a miniature Cluny tapestry. Here’s my update for this week on the project, just to establish that 15 minutes here and there (admittedly, sometimes 30, and sometimes 10!) can add up!
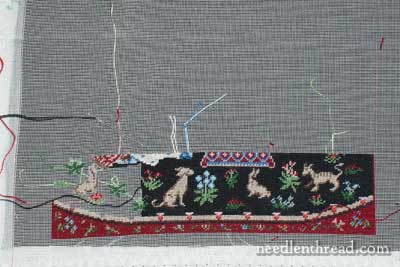
Well, you can see what a sloppy mess the project is, once I’ve got several embroidery threads going. From corner to corner (in the red there) that’s about 5″ wide. The strip is about 1.5″ tall.
This is where I was last week:
Quite a bit has gone in this week. I’m cheating, though, now that I’ve moved towards the left edge! Technically, in work like this, I think it’s better to work the background first, as it gives you somewhere to hide the threads as you cross from the smaller little elements within the piece, if you cross from them. Some stitchers think you shouldn’t cross from one element to the next, but considering that some of those elements are maybe a quarter inch away – perhaps half an inch at a stretch – I figure more thread is used in running under on the back and ending, and then using a waste knot to start a new thread. If the background is stitched first, then you can move to each element, running a thread under the background threads on the back, and keeping things pretty neat.
The difference between carrying your threads before the background is stitched is that, as you stitch the background, you have to be very careful about how you stitch over the lighter and colored carried threads. The placement of a carried thread can put a background stitch out of whack, leaving space around it, so that the lighter or colored thread shows through. And this can look pretty bad if it’s happening all over that dark background!
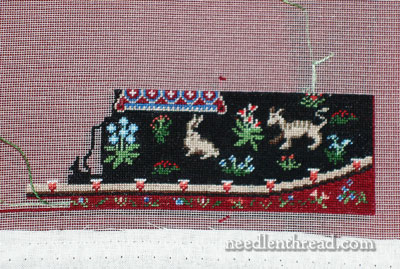
So – anyway! – I did cheat, going against my better judgement by stitching in the little elements on the left side of the design before stitching in the background. But I think that’s helped a bit in speeding things up, even though I’ve had to be careful about how I place my background stitches. My latest 15 minute sessions have been pretty fruitful, since right now, I’m just stitching background.
And speaking of background stitching…. is it boring? On this type of work, which is counted work done in one stitch only (tent stitch), it can definitely tend towards boring. If I were doing this as full-sized cross stitch or counted needlepoint or what-have-you, I probably wouldn’t be doing it. The fascination of this project for me is its miniature size and the Cluny tapestry subject-matter. With this piece, as the background fills in, the elements that are already stitched really pop out. So the background stitching is kind of like reading a good, meandering but suspenseful book. It takes a while to get there, but I’m eager the whole time to see the outcome. And that makes the journey a bit more pleasant!
Some tricks to speed up your 15 minute sessions with your stitchery:
1. Prepare your needle and thread for your next encounter at the end of a stitching session. That way, when you get the chance, you just pick up your project and start stitching. You don’t have to fiddle with threads.
2. Keep tools in a definite location (a little tray, a magnetic tin, a needlebook made to hold scissors, too – whatever!) and keep everything together in one spot. That way, you don’t have to search for tools each time you sit down for a short session. (You know: “Where the heck did I put my scissors?!”)
3. If you’re doing counted work, keep your charts in order. If it’s a multi-page chart (the whole chart for this project is 9 pages!), then keep out only the chart you’re working on, and put the others away so they aren’t cluttering up your work space or confusing the issue on which chart is which. I staple mine together in the order I plan to work them (which isn’t necessarily the “recommended” order!) and then I remove each chart from the stapled bunch as I need it. When I’m finished with each chart, I file them away in a folder, to keep them from getting lost.
4. Find a reasonable way to organize your threads for a project. If you’re working with stranded cotton, pre-cut your threads to your desired length, and put them on something like thread drops. You can keep the whole bundle of thread drops in a zip-lock to keep the threads clean while you’re not using them, and then, when you sit down to stitch, take the bundle out and hang it on the knob of your light or somewhere like that. Hanging these types of organizers is better than having them lying on a surface – especially a cloth surface – where the threads can get more easily tangled up. If you’re working with spooled threads (like certain silks), a small wooden spool rack (they sell them at sewing stores, with space for 12 spools or fewer) can be a great accessory.
5. If your living quarters don’t allow for leaving your project out, conceive a convenient storage method so that you can quickly pack up and quickly retrieve your project. Don’t store anything else with the project – just the bare essentials that you need for this particular project. A basket, a small box, a tote bag, a large zip-lock bag – something just large enough to hold the project, but small enough that it isn’t intrusive – are all good options. It should be something that you can slide the project into after working your short session, and something that’s easily transportable, in case you have some sessions on the go.
What about you? Any pointers to add for making short stitching sessions fruitful? Feel free to leave a comment! You can also check out the comments that were left on last week’s article. Some great ideas there!
Have a terrific weekend!
Mary,
This reminds me of Nancy Zieman’s principles of ’10 20 30 minutes to sew’. I have made many dresses using this practice, a seam here, some pinning or basting there, and in a week there is a new dress. I have not applied it so much to my embroidery but now I will! Thank you for reminding me.
I have two tips for stitching on silk gauze. #1 – If you are using silk thread, keep your ends away from the edges as silk wiggles free and it’ll peek out into the unstitched areas. Often folks don’t stitch the backgrounds on silk gauze so they can mount the gauze over a mirror or gold lame. This makes the gauze itself disappear and the stitched area appear to float.
#2 – Use an old fashioned wire threader to thread a beading needle to use on 40 count or higher silk gauze. You can make the threader last longer by putting a drop of Super Glue on the base where the wires attach. Here are the threaders I use.
http://sewing.about.com/od/notions/ss/needlethreader.htm
Golly- I REALLY LOVE that tiny piece!
Cannot get enough of staring at it!
Different question about another topic-
I am finally setting up a hand-stitching corner for myself and wonder what type of chair or seat is best. Currently I use a non-caster stool for my sewing machine work and a dining chair and table for lacework & needlepoint.I ordered a work stand that has a built-in frame so I need to get a seat that goes with it. From your photos I saw that you set up in front of a stuffed recliner. How does that work for you? I tend to “perch” at the edge of the chair, rarely using the back! What do you recommend, Mary? or Mary’s readers?
Hi, All – Thanks for your comments!
Jane – Thanks for the tips on silk gauze. I can get away very easily with a #28 petit tapestry needle on the 40 ct count gauze. It works really well. I’m wanting to “try” a higher count (72) gauze for another project, using single strands of silk, and for that, I’ll definitely be using a beading needle! Interesting idea about the mirror or gold lame. I’ll have to squiz around online to see if I can find a sample of that. I’m having a hard time picturing it. (Obviously, I don’t do a lot of this mini counted work on gauze!)
Laura – for the chair…. actually, I rarely use a sofa or recliner or anything like that when I’m stitching something that’s set up on a frame, using a stand. I’ll do hand-held stuff on the sofa or in a living room chair, but nothing that requires a stand. I pretty much always use one of these when I stitch with a stand: 1. a straight back kitchen-type chair. Like you, I don’t sit back, but pretty much on the front edge of the seat; or a stool; or a computer chair with rolling wheels, especially if I’m sitting at the slate frame trestle set up that I have (which is too big and bulky to move away from the chair, so the chair needs to be able to move easily away from it). The computer chair is the same thing I use at my sewing machine. I don’t find it comfortable to sit on a couch or a recliner with a stand – I’m up and down too much to be “blocked in” by a stand. Most “serious” stitching, I do in a regular kitchen type chair or a computer chair. The seat of the computer chair can be angled and raised and lowered, which makes it perfect for the trestles and for the sewing machine. The problem with a computer chair with the Needlework System 4 stand is that the wheels often get in the way of the front balancing foot on that particular stand. Still, it just takes rolling the base of the chair so that there’s an open space for the front foot of the stand – so computer chairs do work with that type of stand, but I don’t use that chair often with that particular stand.
Lesley-Anne – Isn’t it amazing how much you can get done that way? If we saved that kind of work for “large chunks of time” it would take much longer, I think, to see results!
~MC
Dear Mary,
Could you share the graph that you are working from so we could see what you have to look at the create this work? Thank you so much.
Hi, Angela – I can’t share the chart itself, as it’s copyrighted, but I can show you what a part of it looks like, I guess, in a photo. We’ll see about that. It’s just your basic cross-stitch-looking chart, with colors and symbols in each block that indicate the thread change. It’s printed a lot larger than the actually working canvas (the silk gauze) with about 10 squares per inch, I guess.
~MC
Amazing project Mary!!
I stopped running threads from one motif to another when I made a mistake once…I ended up ripping 4 alphabet letters to fix one.
AS for short stitching sessions, I admire your ability to do them…it just seems to take me longer than 15 mins to get into stitching the piece…my sessions usually last for hours…as my stiff neck today can attest!
Happy stitchy weekend!!
Mary
Yes, I’m a fan of the 15 minutes at a time!!! I love this pattern, and all the Cluny things. LOL, my only problem with threading a n eedle with the next bit of floss, is that that makes me stitch with it immediately!!
Can I ask if you are doing the background row by row, and if so, do you do the first row, starting on the left, stitching each stitch bottom left to top right, and then when you do the second row, do you work right to left, going from the top right to the bottom left (so all the stitches on the back are upright.)?
Or do you stitch diagonal rows in tent stitch!
Btw, your article on long and short stitching, with the outlining done first in split stitch has inspired me to finish a piece with a lot of L & S stitching which I’ve had on a frame for decades (yes decades!!!!). I wasn’t looking forward to the satin stitching, and didn’t know you should do the outlining first (the instructions didn’t say to, but then I’ve subsequently looked into some embroidery books, and they agree with you, although some say just to back stitch the outline, I know why you use the split stitch and it seems the clever way to go). I was worried that it was so hard to avoid seeing some of the pattern lines showing, but obviously not with your technique).
See you can always learn things!!
Thanks for all the hard work you put into your daily essays and the great pictures.
cheers
Julie in Australia
Mary, just lay your current piece on a mirror. The silk gauze surrounding the design will suddenly be much less visible. Then imagine instead of a Cluny piece, you are stitching a butterfly. It will seem to float in the air.
You get a similar effect with gold lame but photographs don’t do these pieces justice since they are small and one needs expensive lenses to capture even a little of the effect, not to mention the shine of the lame or mirror.
This is not a comment, but a question:Dear Mary, thank you for this idea of 15 minutes embroidery. I find this mini cluny project so wonderful I would like to do it also, but I could not find it at the site of micro stitchery. Could you help me with the name of this kit, please? Perhaps I could not find if because my english ist so poor.
If you have time (!) to answer me I will be very grateful.
Best regards
Rita
Hi, Rita – Here is the direct link to the page with the tapestries on it: https://needlenthread.wpengine.com/2008/09/starting-your-thread-anchor-stitches-on.html This one is the “Sense of Hearing” tapestry, though I plan to work both eventually. I wish she had all 6 Cluny ones available! ~MC
Thanks for the tips.
Regarding chairs, I’ve found that I like to use a low footstool. My back felt better, and if I did need to support the work, my knees were a bit higher and I didn’t need to hunch over. I’ve wonder if that’s why some of the old “sewing chairs” are so low? Now if I could find another low stool, I haven’t a clue what happened to the one I had. Oh wait, yes I do – it’s by the bay window so Miss Piddles can get up there for squirrel patrol. I guess I should say, now if I could find another low stool!