


Do you every wonder how to decide on the ground fabric you’ll use on a major embroidery project? I wish I were the type who could definitively say, “This is my design, and this will be the ground fabric I stitch it on.” For some hand embroidery projects – especially smaller, quicker ones – it sometimes goes that way, but for anything that I’ll be investing a lot of time and supply money into, I am not very quick at making a decision on the ground fabric.
The other day, I showed you my design process for this current embroidery project I’m working on. The project will be worked in silk and gold threads, that I know for sure. But I’m still a bit undecided on the ground fabric. So this is what I’ve been doing – trying to narrow down a choice of fabric, based on various considerations.
So, how do I narrow down my choices? By testing. Let me show you what I mean…
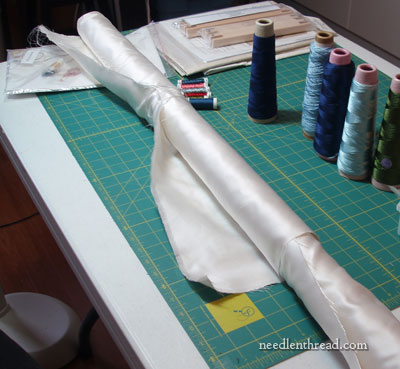
This is a bolt of white Italian silk, in a satin weave. It’s a beautiful, thick, buttery, wonderful silk fabric, and excellent for hand embroidering, especially in silk threads using satin stitch – it’s just beautiful stuff! Note that it’s not a glaring white. Real silk is never a glaring white. It’s a soft white, almost like a pearl. Wow. I just love this fabric!
Since I have it on hand, and since I love it so much, it’s the first fabric that came to mind for this embroidery project. Why not linen? Well, if the ground fabric is going to show, I want this medallion to be on silk, because the medallion itself will be eventually appliquéd to a silk vestment.
This fabric has a lot of body. It isn’t a flimsy, light silk, and it isn’t super crisp, either. It has a rich, beautiful drape.
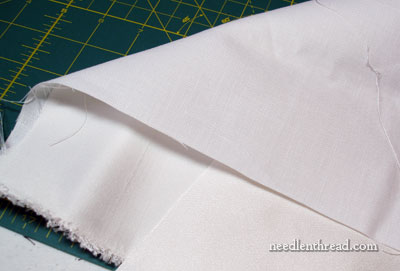
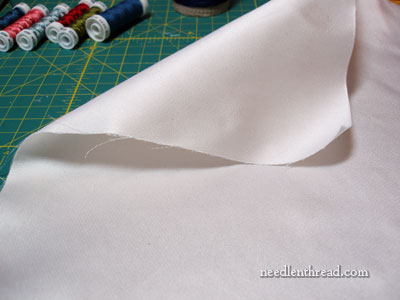
Even though it is a thick fabric, it needs to be backed with something, so I cut out a piece of white linen to go behind the silk.
Right now, I’m just cutting small test pieces, about 9″ square.
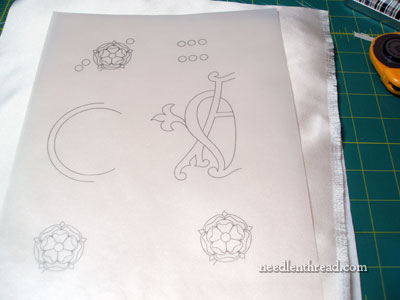
My next step was to take different elements of the design, in the size that they will be stitched, and print them onto a thick vellum. Now, this is not real vellum – it isn’t made from lambskin or calfskin. It’s actually just the kind of stuff you can buy in the scrapbooking aisle at any hobby store – the type of heavier, half-opaque-half-transparent vellum that is often used in card making, on invitation overlays, and so forth. It’s perfect stuff for this part of the work – it is sturdy, so it doesn’t wrinkle if rubbed about; it’s sort of see through (enough to see marking lines); and it prints beautifully in an inkjet printer.
Unfortunately, I actually didn’t have exactly that type of paper on hand. The kind I had has a little pearlescent sheen to it. Oh, well! It’s all I had on hand, but it worked fine.
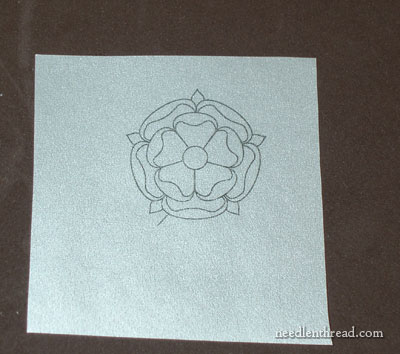
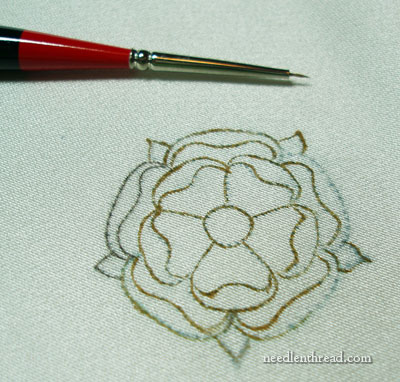
I cut out one of the small Tudor roses that will be repeated five times in the design. I made a mistake here!
I’m using the prick-and-pounce method to transfer the embroidery design. It’s always a good idea to leave a Large margin around your design – several inches at least – so that you don’t risk getting pounce powder all over your fabric. Oh well! It’s only a test design, right? Right!
To prick the pattern, I use a tambour needle holder, fitted with a very fine eyeless (tatoo) needle. Alternately, you can use a cork with the eye of a fine needle pushed into the cork. Underneath the pattern, I have sheet of craft foam, which you can buy at any craft store for some 25 cents or something. (Don’t pay $5 for a “pricking mat”! That would be silly! They’re made out of the exact same material.)

Once the pattern was pricked, I held it up to the light and made sure all the lines were covered with little holes. And they were!
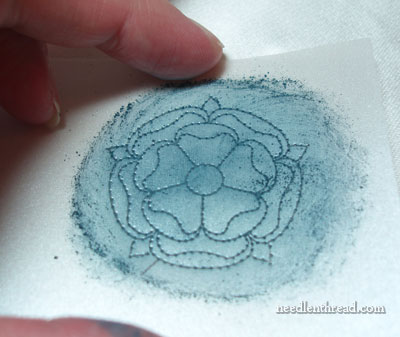
I put the pattern on the silk, and rubbed on the pounce…
Ahhhh. Life is good.
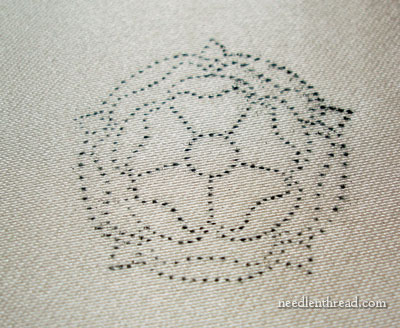
Now it’s time to test how I would connect the dots on this type of silk. Remember, this is a satin weave – and that makes a Big Difference in the way it takes pens, pencils, and so forth. It is, in a sense, almost spongy.
And when I applied a sepia colored micron pen with the barely lightest touch I could, yep – I got a major bleed. (I knew that would happen!)
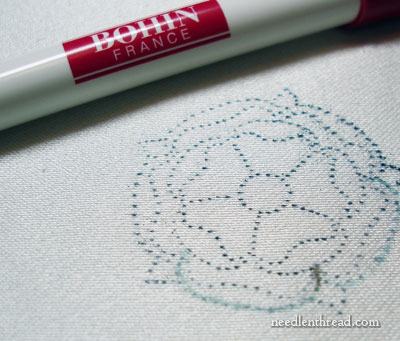
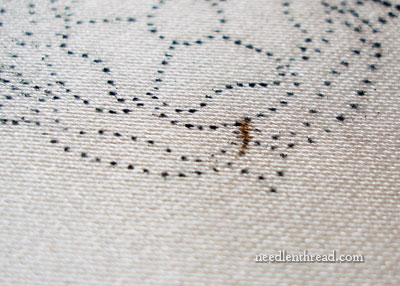
Then I took out the Bohin ceramic pencil, to see if I could get a satisfactory fine line. The ceramic pencil skips in the threads of the weave. Not very fun to draw on this kind of silk! And it left a dusty looking line, which I didn’t like.
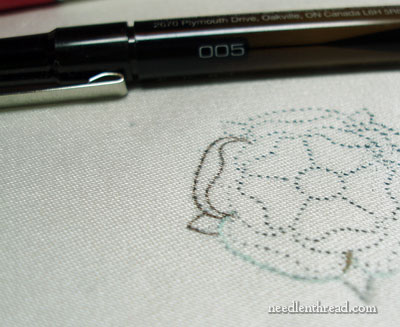
Next up was a Prismacolor art pen, just for kicks. The bleed, actually, wasn’t as bad. It’s still there, but it wasn’t as bad as the first pen I used.
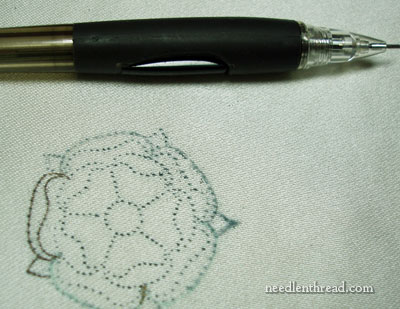
Then came the mechanical pencil. Same problem as the ceramic one: it skips in the weave, and it creates a dusty looking line. For a project that’s going to be up for a while, that’s going to take some time to complete, and that’s going to have a cloth lying over it in the areas where I’m not stitching, pencil is just not the right option, anyway. And I’m glad, because it is a Pain in the Royal Neck to draw on this fabric with a pencil!
But I didn’t think it would hurt to try.
You know what this is, don’t you? Not always considered an essential tool of the embroiderer’s trade, the fine paintbrush can become the stitcher’s best buddy, in a pinch.
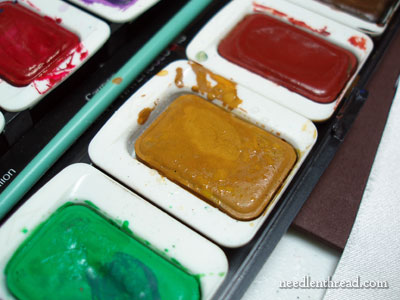
Couple that sweet little brush with a palette of mucky paints, pair those up with prick-and-pounce, and you have one of the truly original methods of transferring embroidery design onto fabric.
It’s time consuming, yes. And it’s not to be done when you’re in a hurry. But it has some definite advantages, the greatest of which is that once the design is on, it’s on, and you don’t have to worry about it fading, smearing, or anything else. But it requires a steady hand (steadier than mine was when I finished this little guy up), and it requires time. And a certain relaxed approach. You have to be calm. A coffee buzz when you apply that brush to your fabric is not a good thing!
I will never fault the paint transfer. I do love it.
But…..
But…..
I’m not sold on this fabric, so…. back to the drawing board with another fabric! I’ll show you that test a bit later, and we’ll discuss the difference between silks used for ground fabric in embroidery. Any questions, comments, suggestions, frustrations, scoldings, and the like? Feel free to leave a comment below!
What kind of paint? Oil, watercolor, acrylic?
Good Morning: My name is Ellen and I am new to your site, but I think I will find it quite enjoyable. I want to learn to paint, since I seem to have an ability to paint. Every time I took a painting class, the instructor seemed to appreciate my work by telling me so. I also love to quilt, embroider and crochet, still have to get much better at knitting and with practice I will. Not enough time in the day, much less in my lifetime, to do all I want to do. My sewing room is my whole entire basement and is in a big mess right now. Also, I am unemployed at this time, having been laid off june 2010. ( a whole entire year and I still have not cleaned it up!)
Well, thanks for listening. I look forward to your newsletters in the future and any information or ideas you can give are appreciated greatly.
Ellen
I would recommend a small glass of wine about 30 min. before you start connecting the dots. It works wonders with my crochet projects.
Louise B.
Transferring the pattern is always the hardest part, it seems. It never turns out like the original pattern and is always thick and mucky. I’m glad you had this transferring option in your library. It will give me another method.
Thanks for all your posts! I really enjoy each one!
Your patience are just incredible. No wonder you do such beautiful work because you do such meticulous prep!
Helpful and interesting as always Mary. It’s this kind of careful testing and preparation that I fall down on but it so obviously pays to take the time.
Watercolors?!?! Huh – I never would have thought of using those. But then, I’ve never had such good luck getting the watercolor to be thick. Maybe I just always used too much water and not enough patience to let it soften up? So I’m guessing that this would be only for non-washable projects? What about using acrylic or oil paint – or would that leave the fabric too stiff?
I’m always learning some new tricks here!
What about the basting method? Or would this leave permanent holes in the silk satin? I know this is a problem when trying to mark a quilting design onto peau de soie. (don’t ask!) I have always thought that the transfer process was one of the most difficult of needlework preparation. For Madiera embroidery they have a blue wash (instead of pounce powder) that they run over their prickings. It can be removed w/ a lye soap after the embroidery is complete IF you want to subject your threads to lye. And I have read (in old Victorian publications) about concoctions of sugar water and bluing to create a sort of “paint” – that was suggested to be washable. I’ll “stayed tuned” for further comments.
Thank you, Mary. Your instructions are very clear and your photos are the perfect compliment to your explanations. This whole process is going to be quite enjoyable.
Can’t wait until tomorrow, and the next day, and the next!
Warmly,
DorisHH
Mary: I prefer to transfer designs like yours by first tracing the pattern onto thin tissue paper, then pinning the paper to the right side of the ground fabric; then, using sewing thread that matches the ground fabric and using a small back-stitch, I “trace” the pattern through both the tissue and the ground fabric. When this step is finished, I tear the tissue paper away, pick out all the tiny pieces of paper (pearl-knotting tweasers make this much easier), and voila! I have the pattern transferred precisely where I want it. This won’t rub or smear no matter what I do to it and, best of all, if I change my mind about any part of the pattern, I can pull out the sewing thread and leave no mark on the ground fabric. Most of the time, I just stitch over the sewing thread with the embroidery thread, but if any does show later, it can easily be picked out. Sometimes, I baste the design this way through both the ground fabric AND whatever I put behind it to add support; this has the additional benefit of holding the two layers together very firmly for the actual embroidery. Janet
I’ve done the prick and pounce… not hard, I ended up using a wax crayon for one project and a coloured pencil (yellow) for another, both on dark fabrics.
What type of paints do you use? Water colours?
When I had to do a very complex embroidery on slubbed raw silk, I put the design on a (basted on) webbing sheet on the BACK and used that as a guide. No marking on the front at all. Since my project was a copy of an illuminated manuscript, everything was outlined in black. Once I had the outlines, I could work solely from the front. Worked a treat!
this is interesting, but what happens if the watercolor gets wet? For instance if you want to damp stretch the finished work? Will it run?
Wow, I would have never thought of using paint.
I must have missed it, but I didn’t see where you told what kind of paint you use. It looks like just watercolors? How can it be since you have to keep water off silk?
Hi Mary,
What kind of paint did you use for the paint method? I thought it might be tempera paint; but that is water soluble even after it dries and might bleed if the item were laundered. So I’m stumped. Could you relieve my curiosity, please?
Thanks,
Jen
What a wonderful lesson in fabric choice and the P&P technique! And the MOST valuable part is your thought process behind the decisions you made. The why of a technique is at least as valuable as the what and how. Thank you!
I just got home from work and read this post. I have a whole new appreciation for counted cross stitch! 🙂
Hey, Mary, My LEAST favorite part of embroidery. I’ve tried everything you mention. In JE we have to use shell powder painted onto the reverse of tissue with a design to put small motifs onto superimposed work. It works, but I hate it.
I’m not at all good with a brush. With some designs I’ve done recently, it took me a week to transfer the design by stitching onto the tissue.
But, now I have found the digital printing at a local screen printer and I will never transfer a design any other way. It is perfect and took 1 hour!
Now, a question: where did you get the silk satin?
I’m using a linen silk blend with no backing fabric and it’s working great!
Hope you get the transfer done soon, Anne
I’ve found that satin weave is hard to embroider on – the needle seems to split the threads of the fabric. Not in a huge way, very subtle. Has anyone else noticed that?
Hi, Lori – yes, I have, too, depending on the type of embroidery. With mostly satin stitch, though, worked with a #10 or #11 needle, with one strand of silk, I’ve had great success on this silk satin. In fact, this stole here is done on the same fabric, different color: https://needlenthread.wpengine.com/2006/10/silk-on-silk-satin-stitch.html It worked really well. I’ve decided not to use the satin weave with the goldwork though —- more on that today! MC
I’ve recently done prick & pounce with gouache water-based paints, onto silk taffeta. I think I used a 10/0 brush. Regular watercolor didn’t give much actual color onto the dark red/black of the fabric, which is why I used the gouache instead – opaque pigment which shows up better.
The only issue I am finding as I am doing up the stitches, is some of the paint flakes off as the needle goes in or out – but by that point the paint has done its job. I also don’t plan on washing the paint off later, just covering the lines with gold threads.
I did appreciate seeing all the different items you tried on your project, and seeing how they worked or bled. This will help me with future project plans, as I have some silk satin I want to embroider on in the future.
How very precise you are in your preparation Mary. Very impressed!
Have you thought about silk dupion? I use it for silk and gold embroidery and it has just enough sheen to act as an excellent background.
Mary, you are the perpetual and ultimate student, yourself and we are the fortunate onlookers…!
Mary, I think that it’s your attention to the pre-work detail and your test pieces that make you work come out so extraordinary. You put the extra time and effort in and it shows. You treat each piece and a friend and a masterpiece and it shows!
Testing, testing. Thanks Mary for posting the results of your samples. I’m fond of the *basted line* technique because it allows me to adjust as I stitch. That said, may I suggest using a cork hot mat/trivet for pricking small motifs? Lacemakers use them & 8″ rounds are sometimes available in a 3-pack at the dollar store. They are thick & rigid enough to keep from inadvertently scrunching your paper out of position. When you’re not using them for embroidery or lace, you can use them for hot food on your dining room table! Win-win.
So much work to prepare for the project. I do admire your patience. With the prick and pounce, the marks are so very close together I don’t understand why you have to connect the dots at all. Each time you place your needle for the next stitch, you eye it carefully to make sure it lines up anyway. Or you do a back stitch of some kind before you do the satin stitch. It seems the dots would be enough. ???
Another little thing: doesn’t it break your heart to waste those bits of fabric for testing? Whether it’s needlework or quilting, I try to find a use for all the left over bits. With cross stitch I can easily “test” a color then remove it if it looks wrong with no damage. If I was working with silk, I’d be especially fussy.
just a tip I thought I’d share as a surface designer I work with a lot of gouache: when going for a super fine line with water color or gouache it is actually easier and quicker to use a bigger brush– not just any brush but a good kolinsky sable brush, ideally the kind with a pointed tip. I use a #8 raphael brush (like these: http://www.raphael.fr/en/catalog/watercolor/watercolour_finishing.php) for pretty much everything, and I do a ton of super fine line work. You hold the brush vertically and move your hand, always in control. The brush holds more paint, with the tiny brushes you have to dip every 5 seconds, with a bigger brush you have a reservoir to work from and far more control because you are just using the tip.
Won’t the water color paint be permanent? I thought we wanted the tracing of the pattern to disappear once we did the stitching. Although you might have a very unique finished piece–half painted/half embroidered. I love Louise Browns idea!
Louanne Miller (Paradise Ca.)
Hi, Louanne – Thanks for your question! It’s a good one! For techniques that won’t completely cover the design outline, yes, you want it to be able go away. There’s nothing more disappointing than putting in hours on a project, only to find that your design lines are still visible, is there? But with this type of embroidery, the design lines will be completely covered, so their permanence is actually a good thing. It takes a long time to do this type of work – I estimate, if lucky, the piece might be done by November or December? Maybe sooner, if I have lots of time to devote to it, but otherwise, it’ll be up for a long time. Permanent lines will withstand that amount of time, whereas other transfer methods might not. Even methods that are “permanent” – like a pencil or dressmaker’s carbon or the ceramic leads from certain types of transfer pencils – can wear off if they’re rubbed. I’ll be keeping this piece covered with other cloth while I work on certain sections, so that I can still get away with resting a hand on the frame if necessary, and so that it is protected from dust. Still, even the rubbing of cloth-on-cloth when a piece is in storage can smudge out certain types of transfers.
Hence, tacking and tracing paper are a good choice for design transfer, because the marks won’t disappear, and paint and prick-and-pounce are a good choice, too. Micron pens that are very fine and permanent work well, too, when you’re going to cover the line completely. So there are several options available, but I’ve found prick-and-pounce and a paint brush ideal for me. Now, I may very well eat my words later on – and if I do, I’ll definitely tell everyone about it!
Thanks, Ninadora, for the tip on the paint brush! I may have to invest in the type you recommend – I’ll keep an eye out for one!
MC
Mary: Have you ever used the Sewline mechanical pencils to trace from each pin prick to the next? I use the white on darker grounds and love it but am cautious with the red. Have not yet tried the green on anything I wish to wash out. So far my ground fabric has either been linens or tight weave cottons. Also, I’ve been backing my embroidery pieces with cotton batiste basted onto the back of the ground fabric. Maybe I need to consider a heavier backing?
Hi, Linda – Yes, I have tried them. I don’t particularly like the red, but that’s just me. I’ve not used them on anything like this, though. It can’t hurt trying – maybe I’ll give one a test next time I’m fiddling with the transfer!
I find batiste a little too thin for backing when doing a lot of goldwork. I’ve used muslin and I’ve used linen, depending on how much goldwork I’m doing on a piece. But if batiste has worked well for you, then I’m sure it’s fine!
~MC
Hi Mary- I was looking through my stash of books the other day, and one of them recommended using your sewing machine (without thread) to prick the holes in the pattern. Have you ever tried this? The main reason I don’t like prick and pounce is that my hand cramps from the pricking.
Hi, Lisa – I haven’t tried it, but I’ve read about it. For detailed areas, I think you’d have to go really, really, really slow with the machine, but if you can’t do the pricking, it’d be worth a try! You know what else may help with the hand cramps? Using a pricker tool (it can be a tambour hook with an eyeless needle in it, or the paper piercing tools that you can buy from places like Nordic Needle in their embroider-on-paper supplies) with one of those cushiony rubbery pencil or pen sleeves pulled over it. I’m going to give that a try, because my hand gets weary when piercing larger designs. I’ll let you know if it helps at all!
Mary, I love your research for every new project. In my younger years, I couldn’t wait to start on a new project and did not take the time to be certain of my “tools” Of course, the price paid was always a not so satisfactory result.
But now I lean towards following your research techniques and am more pleased with the end product.
Love your website, so complete and informative in every way. No need to check out any other sites. Thanks to you and congratulations! Carolyne – Daphne, AL