


After satin stitching the outer leaves and petals on the goldwork & silk Tudor rose, and then working the long and short stitch embroidery on the inner petals, the next step was the first layer of gold around the outside petals of the flower. Let’s see how that was done.
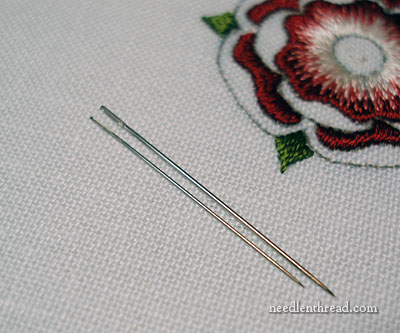
First, let’s talk about embroidery tools and supplies for this part of the project. In the photo above, the needle on the right (towards the top) is a #10 crewel needle, which I used for all the silk embroidery on the piece. Next to it, on the left (the lower needle) is a #12 crewel embroidery needle, which is what I used for all the goldwork. You can get away with a #10, and they are a lot easier to come by, but if you have a #12, you might find that it’s easier to get in and out of the tighter spaces with the smaller needle. But when it comes to doing the chip work for the inside of the rose (which is done in #10 gilt wire check purl), you’ll definitely need a small needle. You can use a beading needle if you have to, but I prefer the #12 crewel needles, though they are hard to come by.
For couching thread, I used YLI silk #100 in color 215 (it comes on a spool and looks pretty much like sewing thread, but a lot finer). I kept a chunk of beeswax on hand to coat the couching thread. Beeswax helps strengthen and protect the couching thread from abrasion from the gold.
Finally, the gold: I’m using gold tambour thread #7, which is a flexible gold thread, slightly finer than #5 passing thread. You can substitute some of the finer imitation Japanese threads (I’d say around a size 3 or so?), or you can even use a #5 smooth passing thread, but the results will look slightly different. In total, including plenty of plunging ends, I figure about 3 yards of the #7 tambour thread will do for the 1.5″ flower.
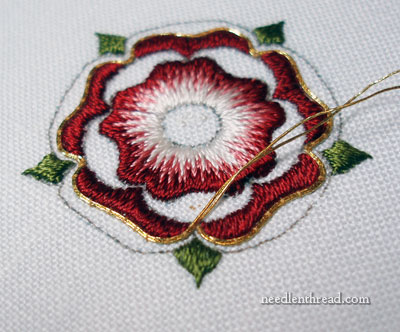
Pick any “valley” at the base of a leaf, between two satin stitched petals, and use this as your starting point. The gold thread is couched in pairs, and you can go about couching it in several ways. I’m going to tell you what I did, but I’ll mention some alternatives for you, too.
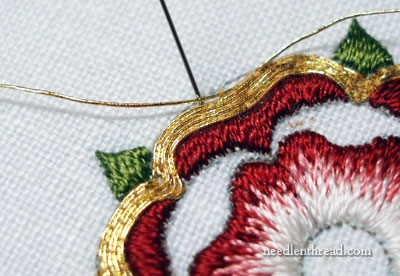
I cut about a 10″ – 12″ piece of tambour thread and folded it in half. I used tweezers to pinch the fold and get a good sharp fold. I couched the fold at my starting point, in the “valley” between the satin stitched outer petals. You can see in the photo above where my starting point is (right under the thread ends that are sticking up there. Then I proceeded around to the left, couching the gold thread right next to the petals, down into the “valleys” between the petals, and all around the rose. This was my first round of gold.
When I arrived back at the starting point, I plunged my threads and anchored them on the back. For the majority of this project, I plunged as I went. There was only one point in working the project when I didn’t plunge all my ends right away, and I regretted that. I found it a lot easier, working in these small spaces, to plunge whenever I had to!
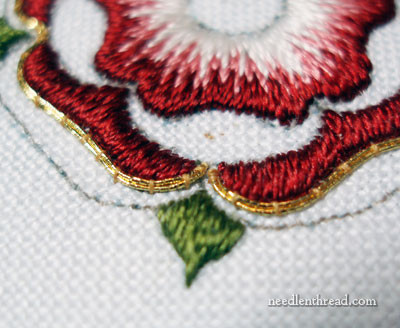
After working the first round of gold thread, I worked a second round the same way. Now, since you can easily work two rounds of the gold tambour thread around the flower, between the leaves and the petals, you can, in fact, just keep going with your thread and not plunge it after the first round. But you need to make sure you have enough thread to do that. So if you decide to go two whole rounds around the flower, cut your original thread a bit longer – maybe around 20″ before folding it in half. This is probably a little long, but it’s better to have too much thread than too little.
After working around the flower twice, the rest of the petal is filled with shorter pairs of the gold thread, couched. For these pairs, I cut two small lengths. I didn’t fold – I plunged both ends.
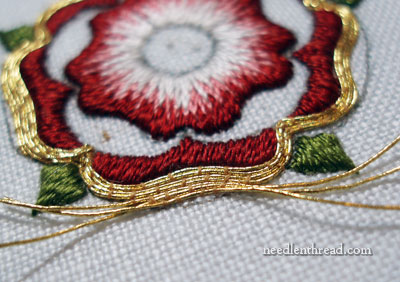
When couching the threads, try to couch between the stitches on your previous row of couching, as it will look a little nicer. The YLI silk really disappears into the tambour thread – you can hardly see it when not zoomed in with the camera – so you don’t have to be completely fanatical about absolutely perfect spacing and alternating of stitches here. But when you can do it easily, you should alternate the placement of the stitches.

I found a plunging lasso a Whole Lot Easier to use on these smaller pieces of gold, than using a plunging needle. With the plunging lasso, you can actually get away with shorter lengths of gold thread, too.
As you work outwards to the edge of the petals, the pairs of gold will get shorter, and finally, you may end up having to finish the gold with only one strand of tambour thread, rather than a pair. Plunge the ends of the gold just on the design line, fitting the threads into the petal and following the contours of the petals as you fill them.
That’s the outer ring of gold – next up, when we revisit this project, we’ll look at the gold on the inside petals!
You can visit the Goldwork & Silk Tudor-Style Rose index for a list of all the tutorials for each stage of this project!
I love the project and all the details and tips that you add so generously in your tutorials. Thanks Mary
Thank you Mary for the great tutorial. As always I have learned so much from it. You are a wonderful person for teaching us so much for free. I love knowing what things are all about before buying a kit or class. Thank you again.
Thanks, Mary. You really are a wonderful teacher.
The gold is sort of ‘dessert’ sewing!
Off to buy some of that YLI, and #12 crewels! Thanks so much 🙂
Mary – I have a question about finishing the ends of the gold threads. Not a gold worker normally but I’m finishing up a kit with a bit of goldwork on it. I get the plunging and the couching no problem but once I’ve plunged the little suckers, how do I anchor the metallic pieces? They just say ‘anchor’… into what? And how? I can’t form a knot (obviously :)), so where do I put them? And how short do I cut them once I’ve secure them?
If it isn’t too much trouble, any chance you could show us the underneath bits of your rose so I can see how you handle those stiff ends?
Hi, All – Thanks for your comments!
Claire – I kind of showed a little bit about securing ends in this post here: https://needlenthread.wpengine.com/2010/03/goldwork-embroidery-smooth-passing.html – keep in mind I’m using smooth passing thread there, which is much more wiry than this tambour thread. I don’t always “strip off” the gold when securing the ends of passing thread, but sometimes, I do, just because it’s easier to “over sew” the ends on the back. You’re pretty much just turning them back on themselves, underneath the work, and overcast stitching over the goldwork end, with your couching thread, securing the overcast stitches into the back of you couching stitches (or other embroidery stitches). Anyway, take a look at that link – it’ll show you some of that. ~MC
Perfect! Thanks, Mary.
Mary:
Just received my new issue of Inspirations – and, lo and behold, this months’ “Inspired by the needle” column features your blog and info on antique, out-of-copyright patterns! I remember seeing this info in your blog, and it is great to see Needle’N Thread getting international recognition! Congratulations, Mary!
Thanks, Janice! 🙂
Hi Mary:
I’m really loving the tudor rose piece. I’ve been researching “imitation” gold threads for my first foray into actually working this piece as i don’t want to experiment with the real (expensive) deal. can you give me some substitutions from the Kreinik line of metallic threads shown here: http://www.kreinik.com/kshop/home.php?cat=20
i want to be able to do the stitching with less expensive threads until i feel like i half way know what i’m doing. thanks ever so much