


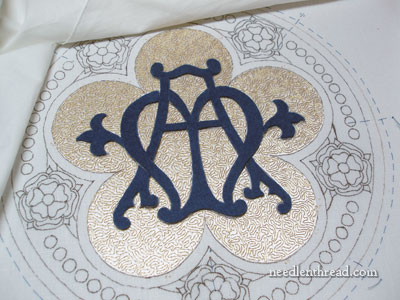
This is how I cut the felt shapes to use for padding under long & short stitch filling on the monogram in the middle of the Medallion project. There are various ways and products you can use for cutting clean shapes from felt. Those of you who do a lot of appliqué are probably familiar with all kinds of ways to go about cutting shapes, and you’ll find that this particular method I’m using is not anything new!
But what I’ll point out here is why this method works well for padding for hand embroidered objects, whether you’re doing goldwork or working regular embroidery stitches in floss on felt.
What Kind of Felt?
The felt I used to cut out the parts of the monogram above is high quality, 100% wool felt. It’s around 1/16″ thick – maybe slightly thicker – but not “very” thick. You can use thicker felt, if you want thicker padding or more “rise” in your stitched area.
Where to Find Felt
For good pieces of felt in a nice color range, I usually order from Wooly Thread. They have a good selection of 12″ x 15″ pieces of wool felt in a variety of colors, and they’re just the right weight for this kind of work. There are other suppliers of felt out there who deal in various weights, types, and thicknesses of felt. Weir Crafts, for example, carries 3 mm thick felt (1/8″), which I’ve used successfully for goldwork padding when I wanted a thicker felt. And of course, with the interest in felting and felt appliqué, there are plenty of other suppliers out there who carry 100% wool felt. A note: I would not use “craft felt” from a sewing or craft store for this type of work. Why not? It is not consistently dense, it’s a lot fuzzier, and it doesn’t hold together as well, especially when cutting detailed shapes. Good wool felt is usually consistently thick, it has a relatively smooth hand with minimal surface fuzz, and it takes detailed cutting well.
Other Needful Things for Successful Cutting
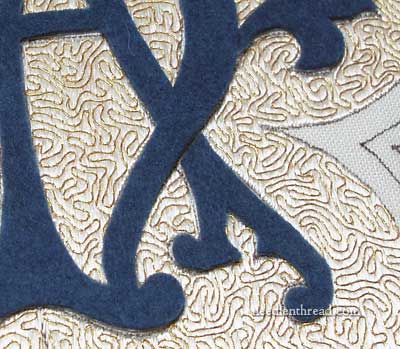
With this particular project, I used interfacing – lightweight, fusible interfacing. Why use interfacing rather than just transferring the design straight to the felt and cutting it out? When you are going to embroider over padding, you need your design transfer to be super-accurate, and you need your edges to be super-clean. To get those really sharp, clean edges and to cut the design out accurately, your felt needs a little help. The interfacing ensures the felt will cut the way you want it to.
Besides lightweight fusible interfacing, other similar products will work. In the past, I’ve used Mistyfuse quite successfully for this type of job, too, but I didn’t have any on hand, so I stuck with the fusible interfacing that comes with a paper backing (Mistyfuse doesn’t have a paper backing – you have to use freezer paper with it). You can also buy fusible interfacing products that can feed right into your printer, which is very convenient, but I didn’t have any of those on hand, either. Now, if you happen to have freezer paper on hand that will fit your printer, and you happen to have fusible interfacing on hand with the paper backing (it won’t work in your printer even if you cut it to fit, because the backing will separate from the interfacing and you’ll end up with a gummed-up printer mess), you can always print your design on the freezer paper sheets, and then just peel the interfacing off the paper backing and use the printed freezer paper in place of the paper backing.
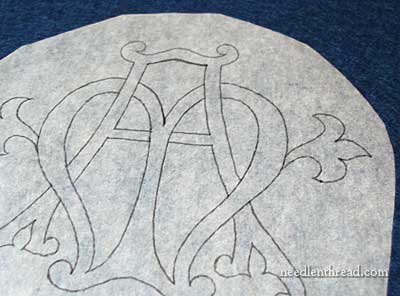
I didn’t do any of that. I just traced the design outline onto the paper backing of the interfacing. Why? Because I’m lazy and I didn’t want to go inside, set up my printer and pull out the freezer paper, resize my design, and all that. So now you know! Lazy, lazy, lazy.
But it worked.
Method of Preparing & Cutting
If you’re cutting out a design that is not a mirror image on each side or that must face in a specific direction, you’ll need to flip your design before printing or tracing it.
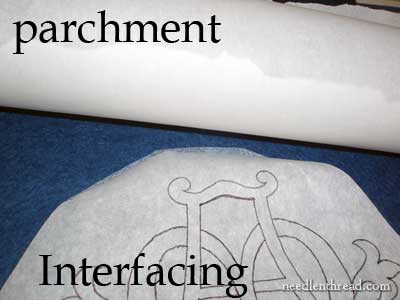
Put the interfacing (which by now has probably separated from its backing paper) on top of the felt, put the backing paper on top of the interfacing, and then lay a sheet of unused baking parchment (from the kitchen) over everything to protect the iron from any stray bits of interfacing that may gum things up.
Iron on a wool setting, until the paper sticks to the interfacing which in turn sticks to the wool.
Tips on Cutting
Using a sharp pair of scissors, cut out the design following the outline on the paper. A larger pair of scissors is a lot easier to use for this than a small pair of embroidery-sized scissors, even in the detailed areas of the design. Larger scissors are more comfortable to hold when cutting and easier to control. Cut with the fabric far inside the scissors, using (as much as possible) smooth, longer and continuous cuts instead of small tiny cuts. When you come to sharp little corners and so forth, that’s where you take little snips if you have to. But on the longer lines of the design, try to start way down in the cross-section of the scissors and cut the longer lines in a continuous cut.
Peel the paper off, turn the felt pieces over so the interfacing-side is down, and you’re ready to go. Do not attempt stitching with the interfacing up (it’ll flake and speckle up your threads), and Do Not Iron the Felt onto the Fabric! The interfacing isn’t there to stick the felt to the fabric. It’s there to stick the design paper to the felt and to make cutting smooth, sharp edges on the felt a lot easier.
Tack the felt on with thread, and then work your embroidery over it. Just sew through the felt as if the interfacing isn’t there. Lightweight interfacing like this (as long as it’s face down on the fabric) won’t be noticeable – it won’t gum up your needle or make it more difficult to stitch through the fabric.
And there you have it – that’s how I cut out the felt padding shapes for the Medallion project. Any feedback? Better ideas for cutting out felt? Other preferences for materials? Any hints, tips, suggestions, questions? Leave a comment below!
If you want to catch up on the rest of this project, you’ll find all the articles related to the Medallion Project listed here.
If you’d like access to all the tips and techniques discussed in the Medallion Project, including complete step-by-step coverage of the Tudor-Style Rose, conveniently collected in one document, interlinked, referenced, and indexed, why not add the Marian Medallion Project e-book to your library? It’s packed full of all kinds of embroidery tips for undertaking a project like this, all in a convenient electronic format for easy searching.
What did you do about the felt that overlapped on the monagram? It’s not clear from the picture.
Thanks for your comments, ladies!
Joyce, that’s exactly how I see it! LOL!!
Jeanne – actually, none of the felt overlaps on the monogram. Cuts are made anywhere the monogram would overlap in the design, and the felt is cut just inside the design line, to give enough space at the edges for the filling stitch to be worked over the edges, and for the gold outline to fit in once the filling is finished. Hopefully, this will be a bit clearer when you see the filling part worked out.
MC
Mary, you are not being lazy, you are “working smart”. Since you’ve already expressed concern about making your deadline, I see nothing wrong with making the process as efficient as possible. I can’t wait for the next update!
Would an ACCU-QUILT cutter work?
Forget the interfacing and just use freezer paper. Trace your pattern on the paper side, cut around but not on the line, iron waxy side down on wool, cool, cut on the traced line, peel freezer paper off, and then baste.
Hi, Karen! Thanks for the suggestion! I’ve tried plain freezer paper several times, with different types of felt, and every single time, I’ve been sorry for it. The freezer paper does not come away from the felt as cleanly as it does from the interfacing. It pulls the “hair” up on the felt when you peel it off and loosens up the fibers. Also, because it’s tougher to pull away freezer paper that’s stuck to felt (without interfacing in between), you can pull the little fine tips of the design out of shape when you remove the freezer paper (or just pull them completely off – or into a fuzzy mess). If you only do a quick, light ironing with the freezer paper so that the bond is not strong, the freezer paper separates from the felt while cutting. Plain freezer paper is fine when cutting out shapes for felting, and it works fine, too, when cutting shapes out of regular fabric, but when you’re cutting out felt to use under goldwork or embroider, you need the felt to stay in its original compact state as much as possible. The interfacing releases the paper very easily without disturbing the fibers of the felt. Anyway, that’s been my experience, and that’s why I vastly prefer the interfacing! ~MC
Great hint…!!! Thank you so much!
Celestina
Mary – Have you ever tried the Fiskars craft knives for this? Here is a link to their page. http://www2.fiskars.com/Products/Crafting/Craft-Knives. I have the fingertip knife and it sure is slick for cutting detailed areas cleanly and accurately!
Wondeful Mary! I’ve been reading this site for weeks now and it’s like a drug….first thing i check every morning is to see if you’ve added anything new. this morning i checked a couple of times before i started running errands and i was dissapointed when there wasn’t anything new….but this kind of addition i can live with….lol. btw, i ordered a hoop from Hedgehog and can’t wait to get it. i’ve several hoops in wood and plastic that i’ve collected over the years, but i know they won’t compare so i took the plunge and ordered a good one. i’m really anxious to get it as i’m planning to do a monogram from that set you posted about from the Antique pattern library site. i’ve simplified the K as i don’t think my skills are equal to the original. if you want to see what i’ve done with it i posted it on my blog at http://cibsplace.blogspot.com/. i’m still trying to figure out what stitches to use though. thanks for all the information you’ve given us. after all the weeks i’ve been reading on this site, i still find something new just about every time.
I learn so much from your posts, thank you!! I’ve referred back to your videos many times (French Knots eluded me until your tutorial) and I LOVE this idea of using felt padding. Must try this.
Thank you sincerely for sharing so much excellent info for free. Sending you good vibes and blessings.
I love the interfacing tip – not lazy – EFFICIENT.
🙂
Only one thing to add, after cutting out felt shapes, going over the edges a second time and cutting on a slant – so that you’re planing the edge height will give you smoother coverage for threads like silk and especially goldwork threads you have to sink at the edges as they sort of slant down to the fabric instead of going over the sharp edge of the full height of the felt. Am I making sense?
Sometimes this is the difference between bits of felt showing through your stitching or not.
Thanks Mary. I didn’t take the “fuzzies” into consideration when you peel the freezer paper.
I just wanted to comment on Sharyn’s comment! I have been doing the same thing for a couple of years now and learn something new almost every day. Its like a drug, gotta have my fix every morning LOL! Thanks Mary for all the lessons and tips, keep up the good work! I’m watching this project with great interest. I don’t know if I will ever do one but I would like toi do something for my church, just can’t decide what!
THANK YOU!! That’s a really useful tip! I’ve tried freezer paper too and found that for things like sharp points it tends to pull the wool away and fray them so that they’re not sharp any more! I’ve also tried a craft knife, though not the one suggested above, and that was an unmitigated disaster, so I look forward to trying this method!
This is a big job now to cover the initials and I await with bated breath for you to get it done.
Looking at the first picture I can see in my mind’s eye the red and gold roses in place.
It is coming a long swimmingly Mary, so I hope it continues to be problem free and give the effects you want.
I remain just another who is excited to see how the whole work comes together.
Best wishes.
Mary,
What is your trick for cutting away the inside portions of the pattern-especially the smaller areas. Am I making sense? How do you get a hole started to begin cutting to remove the pieces?
Wow!!! I love this web site. I don’t aspire to this level of embroidery but I enjoy reading and learning about it. Thank you all for all the input so I can learn. Mary, the piece is beautiful. I know it will be even more beautful when you are finished. Look forward to future updates.
I’ve never used felt as embroidery padding, but I’ve gotten very frustrated with cutting it out for other purposes. This is extrememly useful. And I love this project! How many hours a day do you stitch?
This is Lovely! I have just started embroidery and crewel and your site has been a huge help and motivator.
Very good instructions. Just an added bit of caution. I put parchment paper or a teflon pressing sheet under everything I fuse so that I don’t get the ironing board cover dirty with glue. If I forget that odd piece of glue attaches to the next project I do. Since it dries clear it is hard to see it.
Also, when done with pressing sheets or parchment paper wipe them with a coarse paper towel to get off any stray pieces of glue so that you can reuse them.
Mary