


Welp, I managed to make a smidgeon of progress on the Medallion Project – and when I say smidgeon, I mean smidgeon!
One fleur de lis on the side of the monogram in the Medallion Project is finished. The fleurs de lis are embroidered in all four shades of blue that I’m using on this project. Unlike the rest of the monogram, they aren’t padded with felt, but they are worked in long and short stitch.
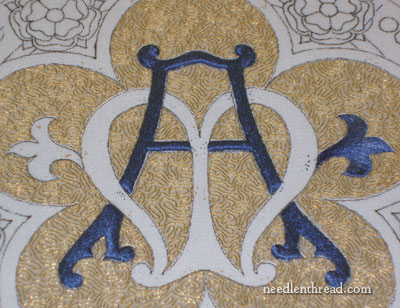
It looks a bit lopsided with just one side embroidered, but hopefully, it’ll balance out soon enough! This photo was taken from farther away and cropped, and you can see how the light plays on the silk and gold. Up close, the gold doesn’t gleam so much, and the silk doesn’t shine so much, or so it seems. But once you step away from the project, depending on how the light is shining or where it’s shining from, all kinds of interesting things happen with the silk and the gold.
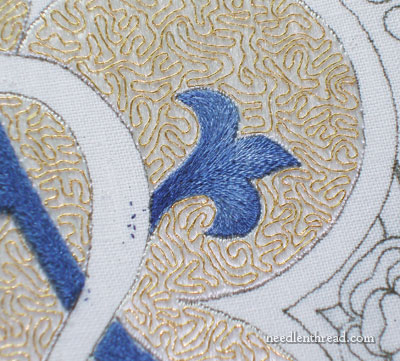
Under a brighter light and closer up, the gold doesn’t reflect as much, and the silk doesn’t shine as much. But you get a better sense of the stitching and shading.
I didn’t pad the fleurs de lis with felt. Instead, I outlined the area of the design with split stitch and proceeded to fill with long and short stitch in all four shades of blue. Do you know, it seemed like heaven stitching the fleurs de lis because there was no felt to stitch through! It was so much easier to stitch without the felt! Still, I do like the raised effect on the lettering that the felt provides, so I’m not complaining. I was just surprised at the difference! (Selective memory?)
That is where I am now, and still plugging away. I would love to have the whole central monogram finished by the end of this week, so that’s what I’m shooting for. I figure if I set small goals along the way (for example, for each section), I’ll be more likely to achieve the small goals within a reasonable time frame, and that will take me ever closer to the final goal. I’ll show you my “goal chart” on this project a little bit later!
If you’d like to see this project develop bit by bit, you’ll find all the articles on the Medallion Project listed in this index.
And, as always, if you have any questions or anything about the project thus far, feel free to leave a comment below!
If you’d like access to all the tips and techniques discussed in the Medallion Project, including complete step-by-step coverage of the Tudor-Style Rose, conveniently collected in one document, interlinked, referenced, and indexed, why not add the Marian Medallion Project e-book to your library? It’s packed full of all kinds of embroidery tips for undertaking a project like this, all in a convenient electronic format for easy searching.
Come on, Mary, last time you had less than half the A finished, so I think this qualifies as more than a smidgeon! In the first photo I can see the difference the felt padding makes, and I’m sure it will be a nice, subtle difference when viewed from afar. It’s coming along beautifully,
This is more than a smidgen. In comparison to my output, this qualifies as a great deal done. It’s interesting how the eye (and camera) see things at different distances.
I agree with Cynthia, Mary, that smidgeon is probably hours of work. sometimes you sell yourself short. i have no doubt you’ll accomplish your april deadline even if it means a couple of all nighters….lol….how do you determine how to position the shadings in the fleur de lis? your work is always so beautiful. i’ve never done any short/long stitch shading, so i’m curious.
You may have explained before, so if so, just refer the information on your site to me.
Question — What do you do with your completed embroidery pieces?
Do you put them in books , frame as a picture, attach them into other items, give them gifts….? Just what do you do with your beautiful worked pieces?
Mary:
It has been most fascinating to watch your progress currently. I love the fleur de lis. It is lovely the way you used the different shades of blue to give some contrast. I outline a lot with embroidery (after the work is done to hide my applique edges) but nothing as gorgeous as the work you do, but it does make the applique stand out. Thank you for sharing your time and efforts.
Jane
Georgia Gal
Interesting how the shading produces a 3D effect. Did you know that would happen? Beautiful and intriguing
This is fascinating. I love watching your progress and can’t wait to see it finished. Thanks so much for sharing.
Mary it is beautiful. You’ve got to hurry for your deadline! 🙂
I’m panic-ing for you!
Bravo Mary!! You are an inspiration! Thank you for showing us.
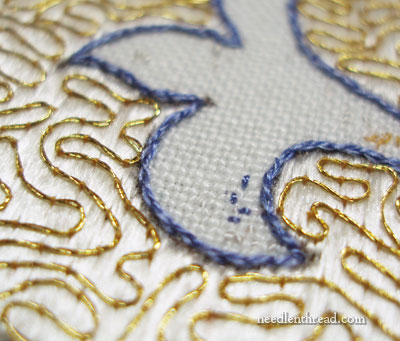
It is really looking nice. I would like to know why there are those little blue stitches in the white unworked portion? Are they from you working on the Fleur de lis or ???
Hi Mary,
I am somewhat new to all of this and am just blown away by all you do and all you share. What is the pen you use to mark the fabric with the pattern? Does it fade away, get covered up with the stitching, vanish in time? Thank you so much for this wonderful website. I have spent hours on it exploring and then visiting the links you have. So gorgeous.
Libby
Hi, All – Thanks for your comments – I’ll try to answer your questions here!
Hi, Libby – for this type of project, I use prick and pounce to do the initial transfer (you can search that on the website – I’ve got quite a few articles on it) and then I connected the dots on this project with a micron art pen These are fine, permanent pens that are used for drawing (you can find them in the art section at hobby and art stores). They’re NOT guaranteed permanent on fabric, though (the disclaimer from the company), so if you are planning on washing the piece (submerging it in water), you’d definitely want to test it first. I’ve never had a problem with them, but projects like this one don’t get submerged in water, so it’s not really a problem. On projects that would be washed in water (say, a flour sack towel or something like that), I use regular pencil or ceramic lead pencils. (Bohin and Sewline make these).
Hi, Judi – the little blue thread spots are anchor stitches, for starting and ending the threads without a knot and without having to turn the work over. You just take little tiny stab stitches (about 3) in an area close by to your stitching, that will be covered up with other stitching, and those little stitches secure your thread without having to turn your work over to run the thread under other threads. They’ll be stitched over, so they won’t be visible.
Chris – thanks for the panic! 🙂
Garnett – this piece is a commissioned piece for the back of a vestment for a priest. So it will be applied (by the seamstress who’s making the vestment) to the vestment after it’s finished. I give most of my work away, except for prototype pieces (for kits or classes or tutorials here on the website) and small “samples” (small partially stitched pieces that are meant for demonstration). The prototypes stick around until they are well and truly photographed and enough time has passed that I know I won’t need them – then they usually end up as gifts or household decor (I actually only have one piece of embroidery that I’ve stitched in my house). The sample pieces are put into a binder, in a plastic sleeve, so I can refer to them when needed.
Sharyn – the shading on the fleur de lis sort of “organically” developed. I decided where I thought the light would shine if this thing were a dimensional object, and I worked the two lightest blues to give a sense of the light coming from above and in front of the thing. Then I worked down to the “stem” in the darker colors to intentionally give it a look of dimension – as if it is coming out of the M or the fabric or what-have-you.
Well, I hope to work a few more hours on this today and get the blues completely finished on the monogram! We’ll see what happens!
~MC
Thank you again Mary for a very well presented tutorial, so very helpful. On your referral I purchased a millenium embroidery frame and absolutly love it, thank you
Hi Mary. I have enjoyed following your progress on this. Have you ever videotaped yourself sewing a project (a smaller one!) start to finish? I think it would be fun to watch in fast forward mode.
Thank you for the information on split stitch versus felt It came at just the right time am doing a monagram for my dtr and the design is so small was sure wheather to do satin over satin stitch but will now do your combination
Fleur de Lis is just perfect. Maybe my eyes or the photo which gives the medallion a certain roundness. Just wish my smidgeons were as long & perfect as this.
Fantastic! Do you ever sleep! 🙂
I’m simply enjoying following the progress on this project…you will definitely need to make a daily plan with goals in order to finish this well in time of your deadline.
I’m curious, what colour scheme have you got planned for the Tudor roses and outline. I’ll just wait and see as it unfolds!
Mary, the explanation on transferring the pattern reminds me – I don’t know if I posted this before or not. A while back, someone was lamenting the disappearance of the .005(? – the thinnest one) Micron pens in sepia, as individual pens, not sets. In my “local” Michaels crafts, they have a Pigma case where you can buy the thin size, in sepia, separately. I *think* they are equivilant to Micron, at least they say “permanent, archival” and such on them.
Beautiful, Mary. I love the contrast with the padding and flat.
I was thinking how it would look if, instead of padding you were to use card for sharp edges rather than the softer padding. Also, is there some kind of card you could use that would stand up over time?
Hi, Anne – Card works well when using metal threads, but not so well when using silk. It limits you to satin stitch, and the silk doesn’t work as well over heavier card with sharper edges. With metal threads, you can use anything from very thin vellum to archival mat board or very thick paper. It just depends on the look you want… MC