


Here it is, the final article on the Medallion Project, and a little how-to bit on one way to appliqué a piece of hand embroidery to another ground fabric.
Yes, I thought I was finished with the whole project, too!
Initially, I didn’t plan to appliqué the piece to the back of the vestment (called a chasuble). I expected to deliver it to the seamstress making the vestments, and that would be The End. What actually happened was a little different. When discussing the finishing with the seamstress, we had this conversation:
Her: Do you want to do the appliqué or do you want me to?
Me: Oh, if you want to, that would be great with me!
Her: Ok, that’s fine! Will the zipper foot be ok, do you think?
Me: Ummm….I’ll do the appliqué.
Sewing machines, even with zipper feet, and goldwork embroidery don’t go all that well together.
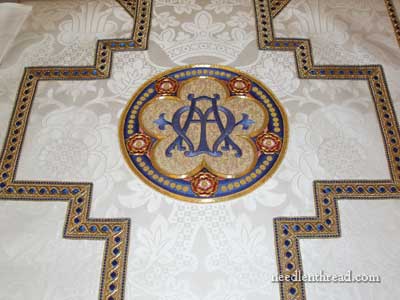
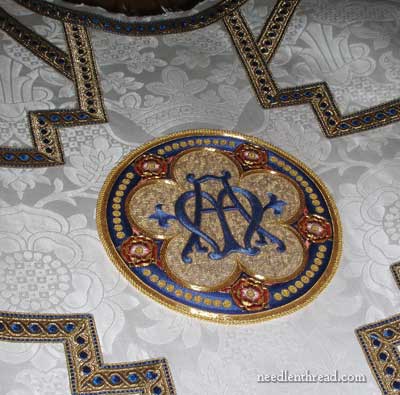
In the photo above, you can see the medallion cut out of the frame and situated on the back of the chasuble. The cross on the back of the chasuble is much larger than I thought it would be, leaving a lot of space around the medallion. At first, I thought this might be a bit of a drawback, but in fact, the seamstress was right – if the cross were smaller in the center, it would crowd the medallion and lose the focal point.
The cross on the back of the chasuble is marked out in a kind of “ribbon” or trim called a galloon. These decorative bands can be anywhere from narrow (1/2″) to wide (a couple inches). This particular galloon is 1″ wide. Along the edge of the vestment is a 1/2″ wide matching galloon.
I thought the seamstress was very clever in the way she situated the design of the fabric to work with the embroidery. The offset pattern in the fabric is a crown, and she was able to situate the design so that a crown would float just above the embroidered medallion. You can see the rose repeat in the fabric situated to the right and left of the medallion. It’s quite a large pattern, and it looks really good from a distance.
I’m going to explain here how I appliquéd the piece to the ground fabric, but keep in mind there’s more than one way to appliqué. This is the way I do it; others may have better suggestions for similar situations.
Before Removing Embroidery from the Frame
While the embroidery was still on the frame, I turned the frame over and beat the living daylights out of it. No, seriously – I did! Using a sort of weighty little soft pillow, I beat the back of the embroidery. I wasn’t overly aggressive with it, but it did get quite a bit of a pounding. This loosens up dust and particles that may have collected over the past many months while the piece was on the frame.
Pasting Embroidery and Why I Didn’t
Now, at this point, there are many different approaches to the finish work. In most old ecclesiastical embroidery books, the experts suggest pasting the back of the work lightly, using a wheat paste on the back of all the threads. Wheat starch mixed with water is commonly used to make the paste, which is rubbed on lightly with the fingertips, just over the back of the embroidery threads. The concept is that it will further secure the threads and add some stiffness to the appliqué. Initially, I was going to do this, but after reading other books that advised against pasting, I was a bit hesitant. I sought advice from some experts today (a couple RSN graduates and a textile expert). They strongly suggested I didn’t paste the back. Over the years, restoration specialists have apparently noted that wheat starch is a very tasty treat for wee little bugs. They sniff it out and eat it, and as a result, eventually the threads are weakened. Also, if any repair work on the medallion is required down the road, the paste makes it really difficult to do it. Since I had three sources who agreed with this view, I decided to skip the wheat paste.
Great way to save a step!
Appliquéing Embroidery
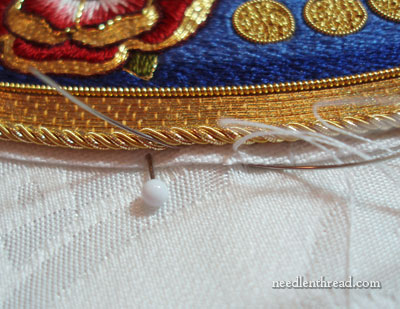
I cut the fabric from around the medallion, leaving about an eighth of an inch all the way around. I measured carefully to center the medallion, and stuck straight pins in to hold the medallion in place. The pins only enter the fabric once, straight under the edge of the medallion (you can see a pin in the photo above). They don’t “scoop” back up and come out of the fabric again. This helps avoid wrinkles.
Then, using sewing thread doubled in a curved needle, I worked a backwards slip stitch around the medallion, bringing the needle up just under the Grecian Twist on the outside edge of the embroidery. The long stitch of the slip stitch is on the back of the ground fabric, with a small straight stitch just over the edge of the linen and into the ground fabric. You can see the white straight stitches in the photo above.
Once this was finished, technically the appliqué part was done, but the edge of the linen still needed to be covered. This is called “neatening” the edge.
Neatening the Edge of the Appliqué
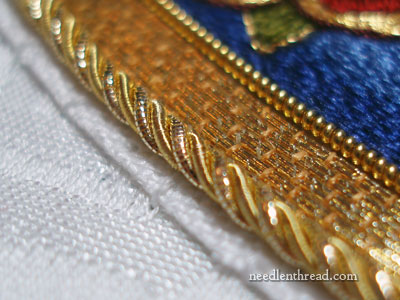
Neatening the edge of an appliqué worked in this manner is usually done with some kind of cord or trim, which is couched over the edge of the linen fabric and into the ground fabric, further strengthening the attachment of the appliqué and covering up the linen fabric that is visible beyond the edge of the embroidery. You can also use embroidery stitches to neaten the edge, working, for example, a stem stitch outline around the outside of the appliqué. If you do use an embroidery stitch at this point, it is best if the stitch creates a solid line. A more open stitch, like chain stitch or buttonhole stitch, would look a bit rough here. Still, the most common way of neatening the edge of an appliqué on vestments is by using a cord of some sort.
Initially, I planned to neaten the edge with a thin dark blue twist made from the dark blue silk used in the medallion. In fact, it simply didn’t look good. And of course, I forgot to take a picture to clarify the point. For one thing, any imperfection in the cord was visible, given the high contrast between the dark blue and the white ground. For another, it almost looked cartoonish, with the dark edge around the medallion. Whereas I liked it when I tested it in the finish photos, I just didn’t like it on the vestment.
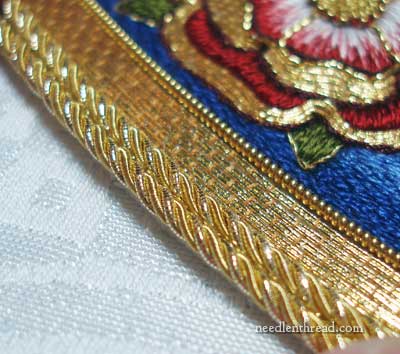
The only thing for it was to use a gold cord, and after testing a few different options, I opted for another line of Grecian Twist. This pulled the gold out a little farther and gave some more “thickness” to the outside of the medallion. I couched the Grecian twist in the same manner as before, passing through the linen and the ground fabric of the vestment.
Finished Appliqué
The lighting conditions where I was working were not the best, but this is the appliqué attached to the vestment:
I never did get a full shot of the whole chasuble back, I’m afraid. The vestment will be assembled with a gold lining on the inside of it, and it will surely be quite striking. If I ever get a photo, I’ll share it with you!
And that, my friends, is the Absolute End of the Medallion Project.
Amen to that!
If you would like to read the backstory of this project and follow it step-by-step as it progressed, you are welcome to visit the Medallion Project Index, where all the articles are arranged chronologically.
If you’d like access to all the tips and techniques discussed in the Medallion Project, including complete step-by-step coverage of the Tudor-Style Rose, conveniently collected in one document, interlinked, referenced, and indexed, why not add the Marian Medallion Project e-book to your library? It’s packed full of all kinds of embroidery tips for undertaking a project like this, all in a convenient electronic format for easy searching.
It is indeed great. The ribbon I initially thought as embroidered as well. But the color of gold shows it is not. The antique gold color of ribbon highlights the medallion further!
Hi, Dhivya – yes, I really liked the trim as well. The blue “dots” on it work really well with the medallion. I’m glad they went with the antique-ish gold, rather than the bright gold, because on trim like this, the bright golds always look a bit too bright. – MC
WOW, Mary!
I feel bad that this is the only think I can say to you, but really. I am speechless. I think years from now, our daughters and granddaughters are going to quote your website and say, “Mary C. used to say this about gold and ecclesiastical embroidery”. Truly, this is a piece of embroidery for the ages. 🙂
Thanks, Vivian!
You did a magnificent job, Mary! Truly a work of art. I do have a question – approximately what does the finished applique weigh?
Hi, Diane – the medallion cut out weighs around 5 oz, so not a lot! It looks a lot heavier than it is…
wonderful!!!!
I was beginning to miss the medallion.
You must be so proud, I am for you. To be a part of such a beautiful thing.
Goa Bless You.
Magnificent Mary!!! It’s absolutely WONDERFUL!
I can only imagine how great you must feel. I’ve enjoyed the entire process from beginning to end. Thank you for taking the time to not only stitch it, but to photograph it and write about it. You’re a real treasure to the embroidery world!
I have one question…How did you reach the center of the chasuble to applique? I can’t imagine you balled in up in your hand…it looks like it was stretch onto something??
Love love love the second band of grecian twist. Did I say Bravo Mary? BRAVO!!
Thanks, Susan! Well, that is the tricky part. The chasuble couldn’t be balled up while stitching, nor could it be stretched on a frame, because there was no extra material around the shape of the chasuble. So, I just worked on it with it lying on the work table. The initial appliqué with the sewing thread was done with a curved needle, which made it easier, and I stood over the table most of the time to do that part. Then, with the gold thread, I worked with one hand slid under the chasuble to receive the needle and send it back up, and the other on top. When I had to turn the whole thing and couldn’t reach the medallion (it was easy to reach width wise, but turning it length wise, it was impossible), I loosely rolled up the bottom half of the chasuble. The vestment is lined already with an interfacing that’s sewn on through the balloons and held in place that way, so it was somewhat stiff, but not inflexible, so rolling it loosely got me a little closer to the appliqué. MC
OMG Mary, this is exquisite. I’ve had a wonderful time watching this come together. Thank you so much for giving me this magical experience; I feel I have been a little bird on your shoulder watching your every stitch. Thank you, thank you, thank you.
Hugs, Colleen in Canada
Stunning! I’m so glad you shared the applique process, as seeing the medallion framed on the background fabric with the crown floating overhead and the repeating pattern of the rose certainly takes ones breath away! Well done!!
Wow! It’s been such an interesting journey with you. I have never had the privilege of seeing how it’s done from beginning to end and I found it fascinating! Thank you for that. It has turned out beautifully and I congratulate you!
Congratulations! You know, although I didn’t comment on it at the time, I also preferred a gold edge to the dark blue line. The gold edge makes it look more like part of the garment, whereas the blue edge pops it out a little too much.
I guess it depends on the look you want to achieve!
While I’m sure you are relieved to reach the end of this project and get on to something new, I will miss it. I enjoyed watching every step unfold. Seeing you applique it to the background of the chasuble was a wonderful finale. Thank you for documenting all of the steps. While I may never (make that definitely never) undertake a project like this, the skills translate to other projects.
Now I have that yucky “it’s gone” feeling. 🙁 I agree with Vivian, this is a part of history. I feel honored to have been a witness. Thank you.
It is so, so beautiful! Congratulations Mary. As a child I was always fascinated by the embroidered vestments worn by the priests. Now I know just how much work goes into making them. Thanks for sharing the journey as you went along.
G’day Mary,
Like Vivian, I’m speechless.
And, for me, that’s REALLY SAYING SOMETHING!!
Cheers, Kath.
I can’t begin to tell you what a privilege it has been to watch this whole process. While I will probably never have the opportunity (or skill) to do something like this, I feel like I have been a part of it. Thank you for sharing it with us and for documenting it so fully.
Phyllis
I know I have said this several times before but I just have to say it again, Mary this is STUNNING!
I have really enjoyed watching the whole process. No wonder you wanted to put off the appliqué but I am very pleased that you did not let the seamstress near it with her zipper foot – you must have been mortified at the very thought.
You have said several times that this is a commision, is it intended for a special cerimony?
Absolutely wonderful Mary! You’re a better man than i am…lol. my motto is “i’ll do the handwork, let somebody else screw up the finishing”….lol!…but that’s because i’m a coward.
All I can say is: Wow!
Jane
Great and beautiful piece.
You’ve done a great work Mary. Congratulations!
This is stunning. Now I want to learn to do some goldwork. Please tell us about the background fabric. What is it and where was it purchased?
Louise B.
I am speechless. What a work of art. Truly beautiful. Brava Mary!! You may have told us this already, but who will be wearing this wonderful vestment?
I remember the last piece of eccleisiastical embroidery you completed and I asked if you had photos of the work once it was mounted on the chasuble – you weren’t given one. Now you (and we, your loyal followers, too) have the pleasure of seeing your work in its proper setting. Stunning, absolutely STUNNING!!!
WOW is right! There are no words to express my amazement and awe of your work. That is truly a magnificent piece of art! Congratulations on such success!
Heaven forbid that the medallion be machine sewn in place! Yikes. My heart did a little skip when I read that. The project turned out beautifully. I agree with another writer’s comment that a short video of the vestment being worn would be great! If that is allowed, of course.
Wow! This is such marvelous work, and we are so lucky to have been able to follow your work step by step. A simple thank you seems inadequate, but I, and I’m sure all of us, are so grateful. I would think this garment would be going to Rome, as it is certainly meant for a Pope!
Congratulations on your mastery of this wonderful craft!
Excellent series of articles and a beautiful work, Mary! Thanks so much for sharing. So… has postpartum depression set it yet? What’s next?
OH Mary, My priest would “drool” to get this. So magnificent ! I learned so much watching you do this one since I’m a stumpwork addict …..Judy in Pittsburgh
Did you leave out the shriek of horror at mention of a sewing machine and zipper foot in that transcript of the conversation? If I had worked so long and so hard on that medallion, I’d have probably handled it much less gracefully, I fear.
I know I’ve said it often before, but I don’t think you can hear it enough – this came out absolutely gorgeous. That 2nd round of grecian twist was a wonderful finish.
What a journey you have taken us on! And a delightful one it was. I have learned so much and gone back to daily handwork….with delight!
Can’t wait to see your next project!
Lynn
Your work is amazing, so is your storytelling way!!!
I did enjoy this project very much.
Thanks for sharing.
Hi Mary,
Wonderful job! Thanks for the information on the wheat paste. I wondered about whether the wheat paste on the back would be a problem for restoration in the future. Thanks for sharing what you learned from the RNS.
Would you share information about the style of the chasuble. Is it a full cape style or more of the narrow fiddle back style? Some refer to Roman or Gothic. With the medallion on the back and the galloon trim cross, was there anything done to the front?
It has been so fun going on this journey with you for the past year. I’m looking forward to your next big project!
Oh Mary, how beautiful… it is so stunning and must feel wonderful to have it done. yet I know that completing a project also has a bit of a sad tone because we become so attached and to “lose” it is like losing a friend. Enjoy the freedom from this project with a cup of tea and start something new (or two or three new projects… that’s what I do). Have a great day!
I loved reading this final chapter to the medallion story. But I kept looking at the fabric edge, thinking this will fray over time. Surely, she won’t leave it raw like that. And of course you didn’t. Thank you for the grand finale. It’s beautiful.
Did you know they were going to have those ribbons of blue dots before you started stitching? Or did they pick something to match your blues and dots?
Ah, but it’s not the end…it’s just the beginning. This beautiful piece of artwork will long outlive you and people will marvel at it for many years yo come. It’s like a commencement. 🙂
We all agree it is absolutely beautiful and it has been a delight to watch it being created. A wonderful offering to God. The zipper foot conversation was a good lesson for everyone who might be involved in this type of work. I was very surprised to read about the wheat paste. Even I, who have no experience at all with this, immediately thought it a poor choice for the very reason you mention (probably because I’m in the process of cleaning my mother’s attic and finding damage caused by silverfish, which is sickening). Hasn’t anyone come up with a fabric safe temporary adhesive for this type of work? It seems there are thousands of task-specific adhesives on the market. Again, a beautiful creation.
Oh Mary, what a gorgeous project! I have sooooo enjoyed the journey through all your stitching. I truly don’t think that I could have appreciated all that has gone into this work without seeing it step by step. Thankyou so much for taking us along. I will NEVER look at a vestment again without thinking of you and that’s good! xx
🙂 Thanks, Penny!!
No Mary, this is not the end of the project, but it’s birth and first breath. Your labors are done, but this baby now has a life of its own. Just as you eschewed the wheat paste, I hope you gave future conservators a little treat. Was a tiny archival note slipped in between the medallion and the fabric before you stitched it down?
This is a magnificent piece and it would be a great addition to the video library if you could post a minute or so of it in ‘action’. I suspect the real glory of this work, especially with its terrific placement on the perfectly chosen and sewn ground fabric with its galoon edging will only be revealed on wearing.
I know you must be worn out with this piece…but like any new ‘mom’, you must also be grateful that the labor and delivery went so well…
zipper foot!!!??? arggggh! at that point what’s a few more stitches – right! LOL
Thank you for letting us be with you…
Hi, Elisabeth – Lots of questions about whether or not I signed the work somehow or left something inside to indicate maker, date, etc. I know it will come as a surprise to most stitchers, but no, in fact, I didn’t. The primary reason for this is that this kind of work for this purpose is not really about the artist. And if posterity really wants to know…. well, there’s plenty of recorded information for them to hunt me down! 🙂 ~MC
I admire your stand, Mary, and fully agree with
it.
When I started reading your posts, I kept up with them from the time I started but also read from the beginning. I came to the project late but have read and admired all the posts.
The work is absolutely beautiful.
I have learned a great deal from the posts and the discussions on how to do things, errors and how to correct them and the discussions of materials ahd reasons for choosing them.
Congratulations on the work and thanks for recording it.
Helen
The hardest part for me would be to turn this work over–it is just breathtaking. Now you can stand back and admire your art work. It has been a learning journey,and thank you for sharing.
Yes, it was a little hard, Joan, on one hand. I kept thinking it would look GREAT framed on the wall! But on the other hand, I was elated to turn it over, because… well, it’s going to be put to its intended use, and, of course, it was finally finished and off my hands!
As a quiler, I know the starches (and Elmer’s Glue is a starch) are also detrimental when storing quilts. Alot of the newer quilt techniques use Elmers glue for a temporary adhesive but then recommend thorough washing when completed. Sharon Schamber, one of the current multi-award winning quilters does this method, but gives the above caution. I guess anything that silverfish wouldn’t eat is something we wouldn’t want in our fabric either! Sorry about your mother’s attic damage. It is sad.
This turned out so amazingly beautiful! Perfect, really. Thanks for sharing the process, Mary. I learned so much just from following the posts.
Mary, I can only echo the words of others – stunning. leaves me speechless, and a privilege to make this journey with you! Thank you so much for the documentation of this process – I know it added time to the entire project. Once again, a spectacular piece of work!
Thank you, Mary, for showing this last step.
I would like to suggest one more article 🙂
It would be great to see some pictures of the chasuble being used/worn!
This is a beautiful piece of work, and the priest who will receive this will treasure it, I’m sure. I would love to see it finished AND being worn!
Wow. I have always watch clergy treat their robes with reverence. Boy did I not have a clue how well deserved the reverence was. So glad this beautiful garment was created and glad it will be cared for with love for years to come.
Yes, I’ll have to include some “instructions for care,” methinks, Debbie. They are usually treated well, but I’ve seen some sacristies where they aren’t!! 🙂
I can’t add anything to the praise already heaped on this masterpiece; I share the awe.
But I am wondering: if the priest celebrates the Eucharist facing the people, as is usual now, putting the medallion in the traditional place on the back of the chasuble seems a little bit of a waste.
My church recently took an impressive piece of embroidery off the back of a worn-out chasuble and placed it on the front of a new one. Now when our priest faces the congregation over the altar, we can all see the embroidery.
Perhaps the chasuble will be used during processions, so that people can see the medallion.
Mary
ce médaillon est absolument magnifique.
je suis époustouflée par le rendu.
Bravo, Bravo
Merci, Michele!
Oh my word. That is absolutely *beautiful* – congratulations on the months of hard work, planning, and dedication; and thank you so much for sharing the journey with us!
Your Medallion work has been a fascinating journey. I cringed when I read the word zipper foot. I don’t embroider as much any more but I do applique my quilts by hand. I can’t let them go to a machine quilter to be quilted. I love the handwork and the machine doesn’t produce the same quality and can even ruin the design. My mouth further dropped when I started to read about the wheat paste. I was starting to yell, “No!” but was relieved to read that you decided against it because you had read of the nasty critters that love to eat wheat or any organic substances. Truly beautiful work. Congratulations on a fabulous work of art.
Mary, it is absolutely wonderful! And I love the way the galloon compiments your medallion with the reversed blue and gold colours. I am sure it will be greatly admired by all who see it (especially embroiderers).
I have been following your progress on this medallion from the beginning to end and have enjoyed the trip. Thanks for sharing and for inspiring me to do more intricate work.
Mary, this is absolutely stunning! What a gift to have your work at the altar during Mass! Thank you for sharing and teaching as you worked on this embroidery.
Dear Mary,
Thank you so much for sharing the progress of this magnificent project! I do hope that you will someday be able to add a post-script and show a picture of the finished chasuble.
I have a couple of questions, if you have the time and energy to answer:
1. What style of chasuble will it be?
2. I noticed rather late in the going that the roses and the groups of gold dots form a rosary around the medallion. I don’t think I ever saw mention of that but, once I saw it, it seemed so obvious that it must have been deliberate. Was it really?
Again, thank you for sharing your exquisite work.
Katherine
Hi, Katherine –
1. The style of the chasuble is “Roman” or “Romanesque” (as opposed to “Gothic”). Both styles are somewhat of a misnomer, but that’s what they’re called, nonetheless. Within both styles, there are variations. For example, some “Roman” style vestments are “fiddleback” (they have indentations on the sides, and are shaped somewhat like a fiddle), while others are straight backed. This one is straight backed. The way the cross is formed on the back is another variation. Some call the variations “French” or “Spanish” or “Roman,” depending on the shape of the back and the layout of the cross – or whether it is a full cross, or just a “pillar” on the back (a straight column). So, lots of variations, but what it boils down to is that it is “Roman” in style, with a full cross on the back.
2. Yes, it was intentional, as was the coordination between the roses on the medallion and the roses in the fabric, and the blue “dots” in the trim and the gold “dots” on the medallion. When a set of vestments is planned from scratch, including embroidery, fabric, and embellishments, normally all the aspects are designed to work together to make a complete whole.
Hope that clarifies! Thanks for asking!
~MC
I’m glad of your question and Mary’s answer. I had missed the fact of the rosary around the medallion.
The work is beautiful.
Oh my, Mary!!! The beauty and grandeur of this piece reflects the greatness of the Lord! I am reminded of the passages in the Old Testament when God gave directions for the Temple and only the finest embroidery was used. Your work would exceed them all and certainly brings honor to the Lord! You have surely used your gifts in His service and the priest, and all who see the vestment, are so blessed to enjoy your wonderful talent!
Blessings to you!
Laurie
The medallion looks magnificent in situ – a masterpiece indeed.
Thank you so much for sharing the journey with us – I have looked forward to each stage, and learned so much.
You must be very proud of your work – how wonderful to see it on the vestment.
Thank you again.
Just adding my voice to so many others.
This piece is absolutely stunning and I have so enjoyed seeing the project from start to finish. You are truly a master.
Thank you for this journey – I had forgotten just how awesome well done ecclesiastical embroidery is.
Blessings
Maxine
It looks amazing–this project has been amazingly inspiring. One question–how will the chasuble be used? I take it–since you won’t get a chance to photograph it in use, it’s not going to your home parish…
Wow! Beautiful Mary! It was worth all the time and effort. It looks stunning. The end makes for new beginning. Whoot Whoot!
Just beautiful. All of your hard work and attention to detail definitely paid off. You should be very proud!
Mary, I do not know what to say to convey the feelings this piece engenders in my heathen heart. It is simply magnificent. Thank you for sharing it with us.
On a lighter note, your story of the wheat starch attracting wee bugs reminded me of my friend who had a wheat-filled cushion on her bed that she used to put in the microwave to heat and give her some relief from the pain of severe arthritis. They went away for a short holiday and on their return the cushion was split open and wheat spread across the bed. Finally the culprit was found – a small mouse!
I think you made the right choice.
When I reached the bit where you had finished slip stitching down the medallion and you said something like ‘the applique was finished’, I thought in horror, surely not. But no, on you went to add the extra row of grecian twist, which looks fabulous.
Chris
Brilliant idea of the seamstress to centre that crown over the medallion. The finished product: wow! You have created a treasure beyond value. People will still be marvelling over it in 500 year’s time.
This is gorgeous!
What is a chasuble? I’m assuming vestments are the robes the clergy wear, but beyond that, I’m lost. Baptist Pastors wear a suit.
Since no one else is answering–the chasuble is the “poncho” that the priest wears over everything else when he or she is presiding over a Communion service. It’s used by Roman Catholics, Anglicans (Episcopalians), and liturgically-minded Protestants. It can be full or skimpy, rich and elegant or simple and folksy. It’s actually derived from ordinary dress of the late Roman empire, although it has gone through a lot of stylistic changes over the centuries. In this age of jeans and tee-shirts, your Baptist pastor’s suit might be bordering on a similar anachronism!
Absolutely fantastic Mary!
Congratulations!
Thank you so much for sharing this journey, it has been amazing to watch and will remain a valuable resource for those who want to delve into the world of gold and silk embroidery!!
Mary, that is incredibly beautiful. Is this for the Pope – or at least a Cardinal? Absolutely wonderful.
Thanks so much for sharing the process with us.
Simply amazing. You did an incredible job on it.
Ohh… I am sorry almost to see the project ending. I have eagerly looked forward to every picture, every story, every consideration about picking out and redoing or keeping, about changing colours and shading. I have learned so much.
Yesterday I had the incredible good fortune to be able to photograph several of the Virga Jesse vestments in the Cathedral of Antwerp. I THINK they are 17th century but they could be even earlier. The Cathedral was empty (after hours) and it was just me and the embroidery work. I was so grateful for the low light camera I had.
Then I had the added opportunity to photograph the robes of the statue of Our Lady which are also several centuries old and among the most detailed work I have seen. I LOVE the fact that such embroidery work is alive today, and I love the fact that I have been able to stand and peek over your shoulder a bit this way.
So Eva, when do we get to see these pictures? 🙂 Perhaps Mary would let you guest blog one of these days?
Your pictures are wonderful. It is so helpful to see the detail of the stitches. Thanks for that.
I used that same fabric in red for my husband’s ordination chasuble and I absolutely loved (and still love) the pattern in that fabric! It looks wonderful “in action.” I would love to see the finished chasuble!
Dear Mary
Just wanted to join in and say BEAUTIFUL, AMAZING, ARTISTIC, CREATIVE embroidery. I love the double Grecian twist, thanks you Mary for the clear instructions on how to applique a project very informative.
I will definitely have to get myself some of that gold for future projects.
Regards Anita Simmance
If I haven’t told you before, Mary — this is really breath-taking. And such a labor of love for a wonderful purpose. I just love how the fabric was set so the crown could be above – wow. What a special gift your hands have made!!
Mary, your work is breathtaking. I have so enjoyed the progress you’ve posted. And the fabric of the chasible is also fantastic. I hope the recipiant cherishes it as the work of art it is.
Thank you so much for sharing your journey,
Mary, you & your medallion are so deserving of all the praise & well wishes! Superlatives are not superlative enough!! I’m not Catholic & have no clue–so–will there be a dedication ceremony in which the chasuble will be presented to the congregation & worn for the first time? It would be extra special if you are included as a guest of honor. A recent visit to the Italian Needlework Blogspot turned up a July 4, 2011 article on Goldwork in Bologna. They should have you on speed dial. Just in case they need a chasuble to match their altarcloths, you’re the go-to gal. Thanks again for letting us all look over your shoulder as you created the medallion.
Stunning!
I have loved watching you stitch this piece and seeing it all appliqued onto the chasuble I realised just how amazing it is. The details stitchers see will amaze them and non-stitchers will just see how beautiful it is. Congratulations x
Simply Stunning! Thank you for sharing the process.
Please don’t end this. Can’t you revisit it in a picture of the priest wearing it? Its simply perfect. and beautiful. God ever bless you to inspire us with more ideas for projects like this.
So, do you have any problem with fraying when you cut out your embroidery for appliqué? Or is the linen you embroider on good for not fraying (as all of the fabrics I’ve used to date fray as soon as you look at them). Or did you turn a bit under, so that the outside edge of the appliqué was actually a fold?
Thank you for posting about this final step in the process. The second round of Grecian Twist makes a nice finished look.
The fabric is white St. Margaret, isn’t it? I’ve bought similar fabrics through Elizabeth Morgan before, though I imagine there are other people who import them, as well.
Absolutely beautiful. And once again, I have learned something new from you. Thanks.
Mary,
Thank you so much for sharing the process and details of this WONDERFUL embroidery. Hopefully, I will be designing and embroidering a set of Marian vestments for our parish sometime in the not too distant future and I appreciated seeing how you accomplished the feat.
I do have a question about this type of embroidery. How does one clean vestments which have silk or gold embroidery threads? Does the embroidery withstand dry cleaning? Does the medallion need to be removed before the rest is cleaned? Can the embroidery be covered with some kind of plastic or cloth to withstand the cleaning process? Will dry cleaning just silk threads be OK if there id no goldwork? If it is too much of a big deal or a big expense to actually clean silk or gold, especially, should I just use cotton threads, even though silk adds a lot of beauty? I want to make something practical to care for as well as beautiful. Thanks for your expert advice.
Absolutely stunning ❤️