


If you’re ever stuck wondering just what stitch to use to fill a leaf and you start browsing through a stitch dictionary for a little help, you’ll find out that there’s a regular glut of filling stitches that work well for leaves. But there are two stitches in particular that I think make really nice leaves: the fishbone stitch and the raised fishbone stitch. If you have trouble creating a nice looking satin stitched leaf, never fear! The fishbone stitch and the raised fishbone stitch will come to your rescue. They both create a satin-stitch-like filling, but because the stitches overlap in the center of the leaf, you get a nice, subtle spine right down the middle of the stitch.
Today, I’ll show you how to create a raised fishbone stitch leaf.
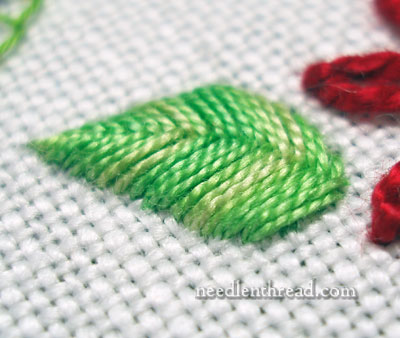
Incidentally, the different between the fishbone stitch and the raised fishbone stitch is more than just the fact that the raised version sits higher on the fabric. It’s also created a little differently – it is stitched practically backwards, when compared to the movement of the regular fishbone stitch.
But you can see in the photo above that the raised fishbone stitch creates a nice, plump leaf that’s quite pretty!
I hope you enjoy the video! I think I sound a bit weird in it, but not weird enough to record it over again…
If you’re looking for other embroidery stitches, please feel free to check out the rest of my embroidery how-to videos!
Looking for inspiration & information on hand embroidery?
There are all kinds of reasons to sign up for the Needle ‘n Thread daily newsletter! Check them out and sign up today!
If you like what you see on Needle ’n Thread, if you want to be a part of keeping the website thriving (and free of annoying network advertising), why not become a patron on Patreon? Check out my Patreon page here, where I’ll occasionally add special needlework bonuses for patrons.
If you shop on Amazon, you can support Needle ’n Thread without any extra expense to you by visiting my Amazon Recommendations page here, where you’ll find books and sundries for the needleworker available on Amazon.
Great video – you’re right, that’s definitely not your usual voice(!), but it’s all perfectly audible so definitely not worth re-recording.
What a great stitch! I had not seen this one before. These videos are such a help, Mary!
Funnily enough I was stitching leaves last night using this stitch!
Sounded just fine to me Mary. I love this stitch and use it often. Your video is nice and clear. Thanks.
Perfect timing! I have a crewel project that has several leaves. I look forward to trying this technique. I’ll be working on it on the long ride home from Maine to Florida so I’ll have plenty of time to perfect it!
Thank you!! Kim
It was mostly my Hungarian grandmother that got me embroidering early on. One of the pieces in her workbasket was a beautiful Christmas table runner loaded with poinsettias. This was the stitch she used for both the leaves and flowers (as my 4-yr.-old brain saw it) — so I always called this the “poinsettia stitch” and have used to SO much through the years (which are considerable!). I changed the name (when describing to it others) to “self-padded leaf stitch.” Now I know what it is!!! Raised Fishbone! (By the way, I use it for my little whitework leaves with floche and/or coton broder.)
i am very happy for this site as i am able to learn lot of stitches to embroider neatly.the videos are very good & easy to understand how to do the stitch.very much thankful to you.
That is on my to learn list. I think it looks so pretty. Thank you for the video!
hola Mary ,,quiero darte las gracias por tus valiosos aportes,,,aqui es muy dificil adquirir,,un libro ese llamado de la A-Z
pero en tus documentos encuentro muchos detalles.importantes
infinitas gracias
lidia ,,,
chile
Hey Mary, me again….probably obvious that you do not understand these other languages…so I know spanish and decided to translate for you 🙂 Lidia says;
Hi Mary,
I want to thank you for your valuable
contributions here…It is very difficult to to buy a book called, A-Z Embroidery Stitches, but I find your documents have many important details.
Infinite Thanks!
Lidia
Chile…
Hope it helped! 🙂
~~~Natalie McClintock
Thanks, Natalie!
Can’t wait to try this!
Hi Mary:
I have stumbled around trying to make my Ghiordes (sp??) knots fluffier (Ah-Ha! Six strands of DMC!!),as well as making the actual knots. I didn’t know it was also called Turkey Work.
Thank you for making a video for it!
Carolyn in SoCal.
Hi, Mary,
thank you.I liked the raised fishbone stich.
I have just had a play with this, love Love LOVE it. Thanks!
Hi Mary, Thanks for the video. I have done the flat version of this stitch before, but it will be great to add some height in my future projects.
Sandy
Rank beginner’s question: how do you get the variegated leaf effect, balanced so perfectly?
Hi, Jusa – it’s just the nature of that variegated thread. I didn’t do anything special with it! 🙂 MC
Hi Mary,
I found your website this week and I´ve done almoust all these tutorials. You´re a born teacher. I don´t understand everything what you say or write, but I watch videos. Thank you very much!!
You have done very beautiful and stunning embroidery projects. Really, they are so amazing.
great video. now i can do it easily without any doubt. thank you.
muy buenas clases de bordado, gracias son excelentes los videos, realmente estoy aprendiendo mucho, Thank you
super et merci
Ruth said; Great, thank you…. 🙂
Ooooh, it’s pretty! I will definitely be using this in the future. 🙂
A big thank you Marie for taking the time to make this video for this item. It seems so easy and so clear with you. A pleasure to follow you.
Very helpful thank you!
Wonderful! Thank you! Your voice didn’t sound weird to me, just a bit muffled.
Thanks again! Will come back for your other offerings.
Love your videos!
Os bordados são muito lindos. Sou uma apaixonada por bordados e gostaria de receber as novidades de Mary Corbet. Parabéns!!!
Hi Mary, I have been watching your videos since about, 2011. I love them! 🙂 You explain and show how to embroider different things so nicely! 🙂 I do have a question though… I went to sew this and I couldn’t get it to ‘go right.’ Like, it tangles and ends up being flat and each one of the leaf stitches are all spaced apart….Help??
Thank you! 🙂 ~~Natalie from Tampa, Florida
Hi, Natalia – Perhaps your thread is twisting up as you stitch? If so, drop your needle towards the floor now and then and just let the thread hang until it untwists itself. Another problem could be that you’re pulling each stitch too tightly. Just put enough tension on it to let the stitch rest on the fabric nicely.
Thank You Thank You for your great video and your site. You are fantastc.
Thank you very much
I am Brazilian and I love crafts. This site has beautiful embroidery. Congratulations !.
Vera Sofia
hola, gracias por tus videos, me han ayudado muchisimo!!!!
I cannot see any of the videos. Do you know what plugin is used to post the videos?
Hi, Melissa – they are YouTube videos, so you just need to make sure flash is updated.
I quilt, embroidery, and other handwork. Your tutorial’s are amazing. I have learned so much and it is so clear the way you filmed each video. Thank you for your site.
–
Your videos make it so easy to follow instructions. Thank you.
Thank you so much for all your tutorials, patterns and all round inspiration
Hello
will Mary’s Tutorial stitch. videos be staying on this website?
Loved her work so much
Hello, Denise – I’m glad you like my stitch tutorials! They’re definitely staying on my website – I don’t have plans to put them anywhere or delete them. I do have plans to expand the tutorials a bit across various platforms, but I’ll talk about that on the blog when we get to that point.