


A couple months ago, in the Stitch Play series, we looked at the raised stem stitch and then at the Super Duper Raised Stem Stitch (Casalguidi embroidery). Well, here’s a video tutorial for the raised stem stitch, which is a relatively quick and simple way to add dimension and texture to your embroidery.
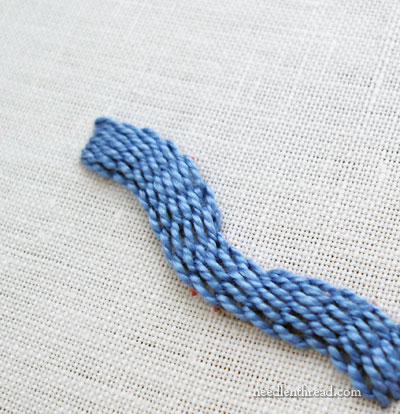
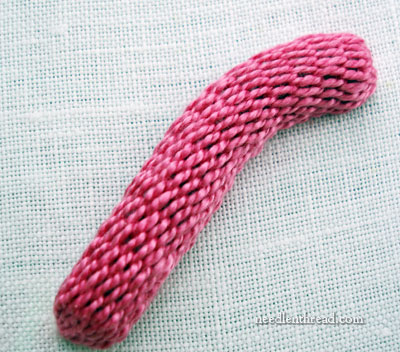
The nice thing about the raised stem stitch is that it is a quick way to fill up a raised space with embroidery. Once the foundation stitches are worked, the thread passes over and under the foundation stitches, but not through the fabric, which moves the stitch along at a rapid rate.
Casalguidi embroidery takes the raised stem stitch to even greater heights by working it over a heavy cord padding. To see Casalguidi stitch worked out step-by-step, you might take a look at this Stitch Play article focusing on Casalguidi stitch.
Raised Stem Stitch Video
In the raised stem stitch video below, I’m working with #5 perle cotton in two colors, so that you can easily see the stitch. You can work the raised stem stitch in the same colors for the foundation stitches and the stem stitch (which is how it would normally be worked as a filling). You can also work the stitch over much larger spaces as a filling stitch.
In the video, I don’t wrap the first or the last foundation stitches in the band. Stitch dictionaries differ in their instructions on this point, but in fact, it doesn’t make that much of a difference either way. In the Stitch Play article on raised stem stitch, I skipped the first foundation stitch, but I did wrap the last foundation stitch. You can experiment with it either way, to see which way you like it best. Personally, I find that wrapping the first foundation stitch makes the beginning too bulky, but wrapping the last foundation stitch works fine.
Here’s the video. I hope you find some good use for this stitch!
Do you want more inspiration & information on hand embroidery?
There are all kinds of reasons to sign up for the Needle ‘n Thread daily newsletter! Check them out and sign up today!
For more video instruction in hand embroidery, feel free to visit my collection of embroidery how-to videos here on Needle ‘n Thread!
If you like what you see on Needle ’n Thread, if you want to be a part of keeping the website thriving (and free of annoying network advertising), why not become a patron on Patreon? Check out my Patreon page here, where I’ll occasionally add special needlework bonuses for patrons.
If you shop on Amazon, you can support Needle ’n Thread without any extra expense to you by visiting my Amazon Recommendations page here, where you’ll find books and sundries for the needleworker available on Amazon.
I am just getting back into embroidery and this is one stitch I would love to try. Thanks for the video instructions!
What a great stitch. I thought I could use it to frame an embroidered picture or even cover the whole sheet with it creating an abstract design.
Thanks for a great website with I find very useful.
I have been searching high and low for different types of raised stitches besides padded satin… and at long last I stumbled onto this glorious site. Thank you times 1 million for all your tutorials and videos on here!!!!! It only took me all night searching to get here. Literally. All night. I am still confused about the difference between surface embroidery, couching, laid work, and victorian needlework, but your site is EXACTLY WHAT IVE BEEN SEARCHING FOR. THANKYOU!!! Now I can finish designing my christmas gift for my sister. Im using raised areas to add dimension ahh.
Anyways, just had to say how much love I have for you creating this site. Its Heaven. Pictures, videos, information…its all so clear and pristine and a paradise. Ty ty ty and I hope you have a wonderful year because your site has enough on it to make my year!
I love your tutorials on the different stitches. I’m currently making squares in
Brazilian Dimensional Embroidery to be incorporated into a coverlet. Most of the stitches you’ve shown can be used and the tutorials have really helped. If you publish any books, I would be interested in how to order them.thanks.
Can you do the raised stem stich in a curve?
Yes you can! Just fan the foundation stitches out to take the curve….
Bonsoir Madame,
Juste un petit mot de France pour vous remercier pour vos mails journaliers que je regarde avec beaucoup de plaisir. Après quelques mois sans toucher une aiguille, je reprends enfin la broderie. Je commence par un sac. J’espère que je pourrai vous transmettre une photo.
Très cordialement.
Gladys
Hello, Gladys! Thanks for your comment! You are most welcome to send photos – I would love to see your bag!
You know french Mary?!?!
~~~~Natalie
I can read it with a little effort – occasionally, I have to look up words. Today, though, any language is pretty much accessible with books like this. If you don’t have a strong background in languages (I have a strong background in Latin, which helps me with lots of languages), whenever you want a translation, you can just type it in to a translator and voilá! you have the gist of the phrase. So even if a person can’t read French (or any language that an embroidery book of interest is written in), it shouldn’t be a deterrent from owning the book, unless the book is all text and would take forever to get through. But instructional books? Books with lots of photo content? Language shouldn’t be a huge barrier. Anyone with a computer can get through books like this easily enough.
Buenas tardes Mary muy buena labor con sus enseñanzas que Dios la Bendiga, me gustaría ver los videos en español ya que soy de Colombia, estoy en proceso de aprendizaje gracias
I tried this today, your video tutorial was super helpful! Thanks so much for the instruction.
So glad to hear it, Carolyn!
how to do raised stem stitch on oval or round shape?
Hi, Joanella – you’d fill the shape with the foundation stitches and then cover them from one side to the other, following the shape of the foundation threads. Hope that helps!
Thank you learning to hand embroidery and your video is very helpful. Do so enjoy your blog.