


Casalguidi is an embroidery technique, rather than just a stitch. It consists of very heavy raised stem stitch worked in curves, lines, squiggles, or what-have-you (whatever the design dictates), usually with a lighter background of pulled thread stitching. Casalguidi is usually a whitework embroidery technique, but the technique can be easily adapted to your surface embroidery, wherever you want a high-relief, textured line that tends to be somewhat heavy. It can be easily incorporated into stumpwork embroidery projects, too.
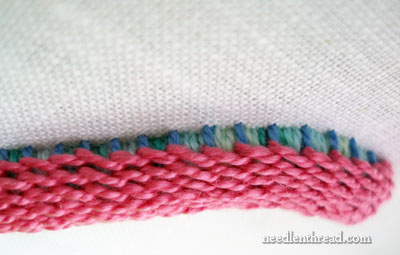
For today’s Stitch Play, as a follow-up to yesterday’s raised stem stitch, we’re going to look at Casalguidi, and hopefully, you’ll find lots of potential for this technique, at the various stages in the stitching. This is what we’re going to create:
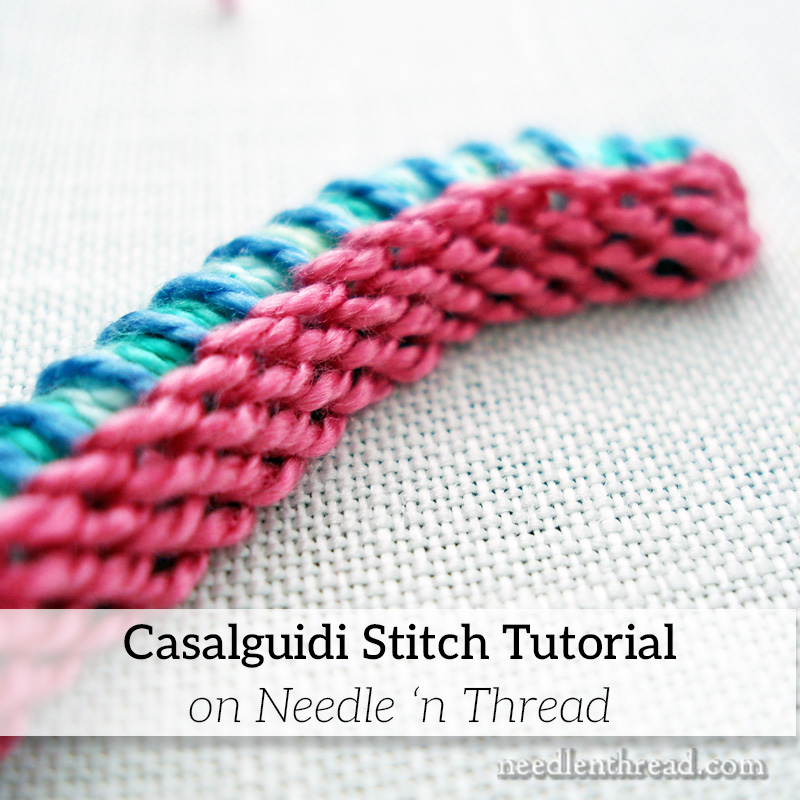
To work the Casalguidi stitch here, I’m using #5 perle cotton, which I think is a bit heavy for this technique. A finer thread can be packed closer, resulting in a smoother finish overall. But the perle cotton serves to show off the technique, and I have to admit, I do like the texture in this sample!

I began with a thick bundle of fine strings twisted into a kind of soft rope. You can use whatever type of string you have about – you can even bunch together a thickness of embroidery floss, if you want. But since I have an abundance of this stuff (not sure what it’s called, exactly!), I tend to use it for padding under raised stitching. (In fact, later on, I’ll show you how to manipulate this kind of padding to achieve both thick and thin areas from the same bunch of string… but more on that down the road!)
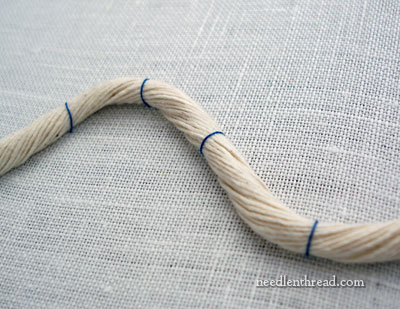
Using sewing thread, I loosely couched the string in the shape I wanted it. I used a contrasting color of thread here so that you can see the development of the technique – when you do this, use a thread that matches your padding.
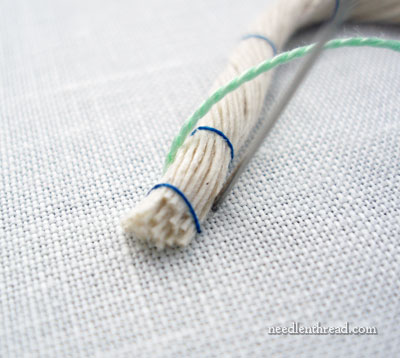
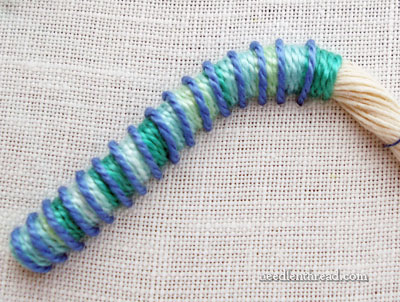
I’m going to use perle cotton at each stage of this sample, but I’ll change the colors so that you can see each stage clearly as the piece develops. The first layer of stitching is simply an “overcast” stitch or a satin stitch straight over the string. The stitches should be perpendicular to the path you’re following (dictated by the string). I started a little way from the beginning of the string padding, worked back to the beginning, and then went back to my starting point and continued down the string.
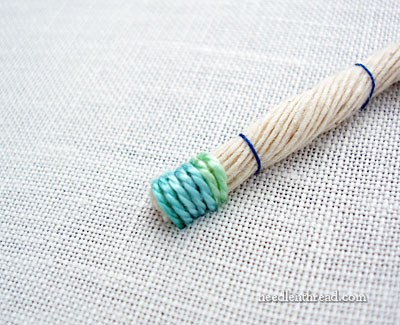
You can see that the satin stitches are close together, just touching shoulders, but not tightly crowded or overlapping. This layer of stitches is pulled relatively tight over the string.
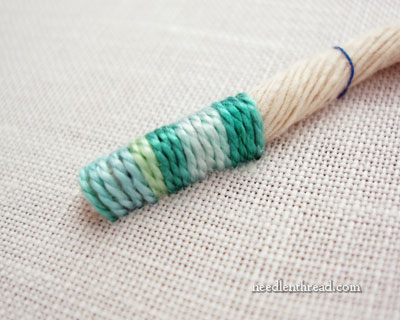
I continued down the line of string, covering it with satin stitches. This happens to be a variegated thread, so you can see a striped effect beginning to develop.
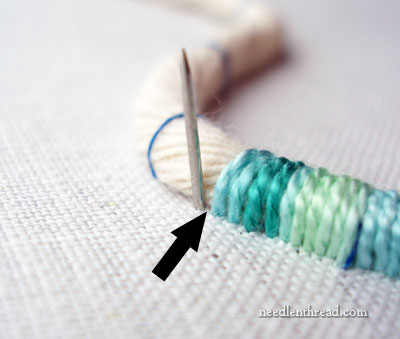
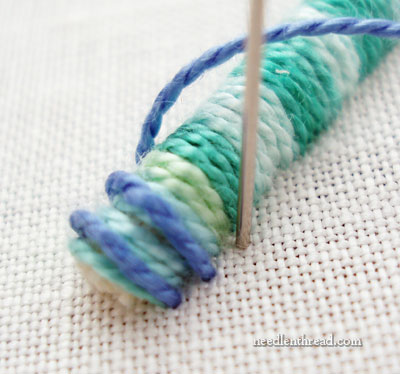
As you come to a curve, you have to “fan” the satin stitches a little bit, so that they take the curve gracefully. In the photo above, you’re looking at the back of the bunch of string. You can see that my next stitch on this side of the string (the top of the satin stitch) is not right up against the previous satin stitch.
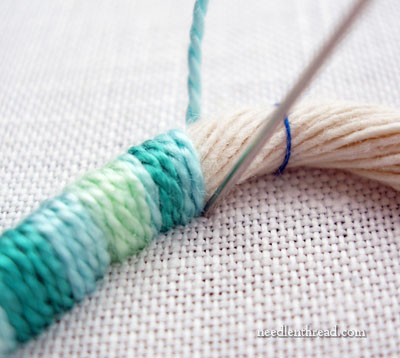
However, on the front side of the string (the side I’m facing as I’m stitching), the needle goes down right next to the previous satin stitch. In this way, you can ease your satin stitching around the curve, maintaining the integrity of the satin stitch, but taking the curve without losing that perpendicular angle to the string.
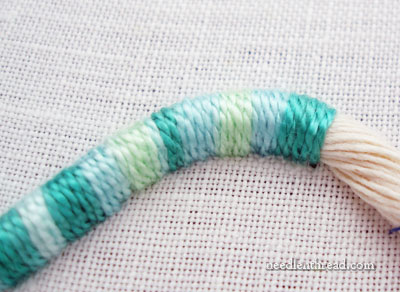
You can see that the satin stitches take the curve, but remain looking like satin stitches, even though I “fanned” them out a bit at the top, and they also remain perpendicular to the string padding.
Now, at this stage, you could actually stop and just enjoy a very nice, high-relief, satin stitch line!
But let’s keep going…
Once the string padding was covered with the satin stitches, I went back to the beginning to stitch the “bars” over which the stem stitch will be worked. I switched to a different color thread here so that you can see it clearly.
Maintaining equal spacing along the string, I’m stitching over the satin stitch layer rather loosely. This layer of stitches should just barely lie on top of the satin stitches. If you pull this layer too tightly, then it will be difficult to do the stem stitch in the next step.
Here, you can see the second layer of “bars” over which the stem stitch will be worked.
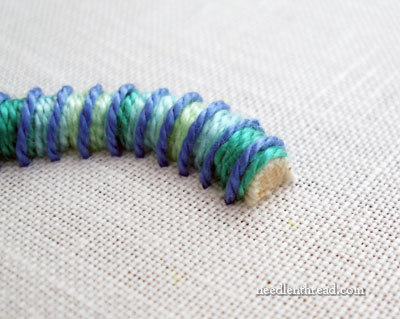
Initially, I was going to show you a trick with the rest of the string there, but this tutorial is long enough, isn’t it? So I cut the rest of the string off at this point.
Now for the layer of stem stitch!
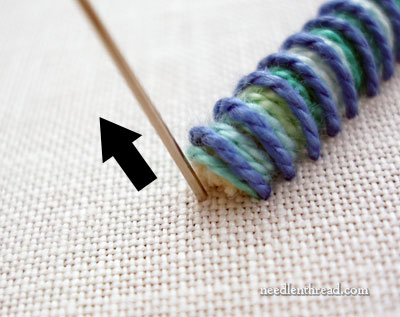
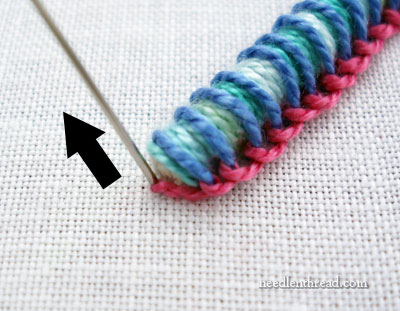
At this point, you may wish to switch to a tapestry needle. It will be easier to work the stem stitch with a tapestry needle, which has a blunt tip! But if you don’t have one, don’t fret. You can always work the stem stitch eye first (pushing the eye of the needle under the bar stitches, rather than the point of the needle). This way, you avoid sticking the sharp point of your needle into any of the previous layers of stitching.
Bring your needle up in the fabric, at the center point in front of the rope.
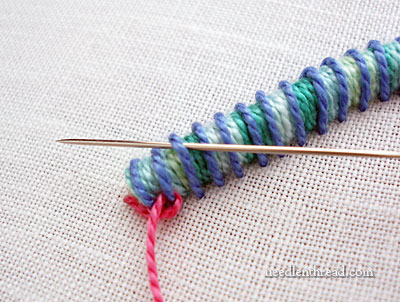
Begin working the stem stitch over the bars, going between the “bar” stitches (that’s the blue layer of stitches) and the satin stitches, and be very careful not to pierce any of the threads in either layer. (You can see how the stem stitch worked over “bars” in this article on raised stem stitch.)
Work all the way down to the other end of the rope.
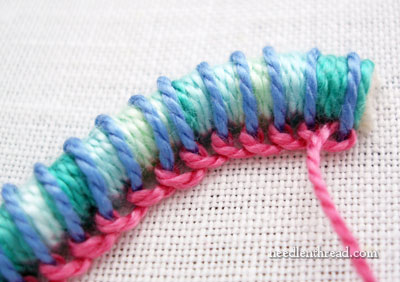
This is the first line of stem stitch. Now, at this point, you could say you’ve created a pretty interesting line (something akin to a centipede again!), and call it quits!
But we’ll keep going…
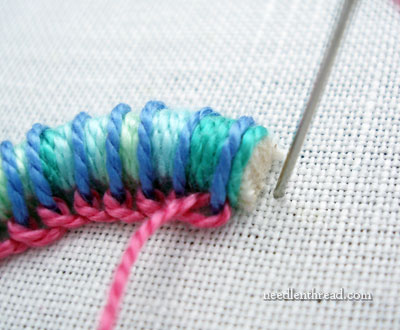
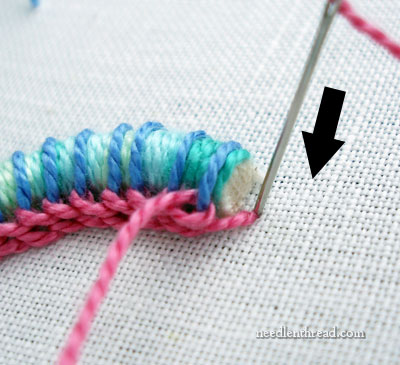
To end the first line of stem stitch, take the needle down in front of the end of your rope, in the middle. Each line of stem stitch is going to start and end in the same place, creating a covered end to the rope.
Start the next line of stem stitch back at the beginning. Each line should be worked from the same direction, so if your thread is long enough, you can run it under the stitches on the back of your work, back to the starting point, or you can end it and start a new thread. You want to make sure your thread is long enough to stem stitch the whole length of your rope.
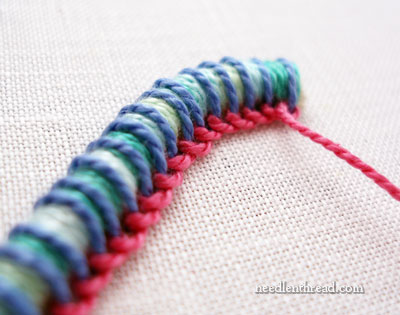
The second line of stem stitch ends in the same hole as the first. Pack your lines of stem stitches close together as you finish each line.
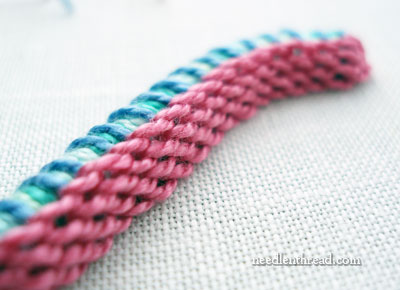
Keep going…
And going…
And going!
Not to make you seasick or anything, but as you stitch over to the other side of the rope, you’re going to feel as if you are stitching upside down. I just put the camera where my hands were working, and this is what it saw!
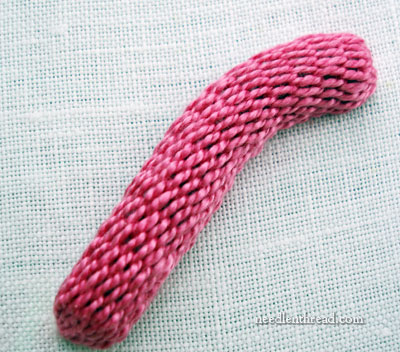
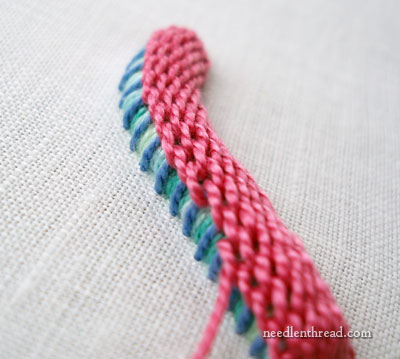
Continue until the whole rope is completely covered.
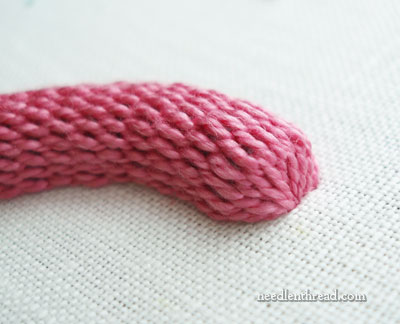
The ends will look like this.
This sample is quite reminiscent of the rare and seldom-seen Kansas Pink Slug. The only thing missing are its notorious googley green eyes…
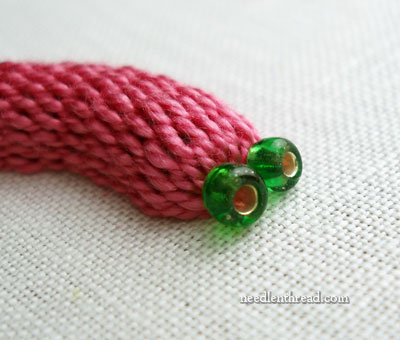
Ah. Much Better.
So that is how the raised stem stitch is accomplished in Casalguidi embroidery. You can see along the way many options for different approaches to your own surface embroidery – from the raised satin stitched line, to a satin stitched rope partially covered with stem stitch – to… whatever else your imagination can drum up! Play with it, and see what you can do!

Mary, you have such a delightful sense of humor – on top of all your other wonderful attributes! Very interesting stitch – I really love this new Stitch Play feature 🙂
Tomi Jane
Hi Mary,
Great slug! It looked rather like a caterpillar before you put the stem stich on, but definitely a googly-eyed slug now.
That cotton padding is called bump, at least here in the UK. Not sure why … although it does create a bump, I suppose!
I’ve just used it in an appliqué and goldwork design, or rather a sort of mini pre-design effort/sampler, including tapering it, but I’m not 100% happy with the tapering so I’m looking forward to seeing your info on it later.
I absolutely LOVE this! I needlepoint and hope to be able to use this quite beautiful decorative stitch soon! Thank you!
you’re a stitch goddess.
i so loved this, mary.
Very interesting, I would like to see the Montmellic(sp)
Stitch, I have trouble even when I watch the videos.
Yes I am a stitch junkie!, great series both visually and the acompanying text. I have to admit it’s more appealing when stitched in colour than when I did it as part of a traditional Casalguidi piece. More Please!
Mary from Glasgow.
Awsome!!! Thank you!
LOVE, LOVE, LOVE!! As someone has already commented, you are the stitch goddess. I must try this technique along with yesterday’s raised stem stitch. Both are enchanting!
Very cool at every stage. Thank you for sharing.
Mary,
My mind is racing with creative ideas! I now have this funky monogram hanging around in my imagination just waiting to be put onto cloth! Maybe atop a yummy tie-dyed cotton of teals, purples and blues on a tote for a lovely friend! I think I’ll start sketching while I drink my coffee!!
My creative inner child thanks you and so do I 🙂
Have a wonder-filled day full of Beauty and Bliss….
Happy Stitcher in Florida.
Sandi
Oh Mary, I look so forward to reading your email every day! Today, you made me laugh out loud. Thank you! Very cool stitch. I’m facinated by stumpwork and this technique will have to be incorporated into my next project! Have a wonderful weekend.
Lynette in Atlanta
Oh my gosh, Mary! Where were you 5 years ago? I took a Casalguidi class through our EGA group here in KC. It was the WORST experience I have ever had and I swore that I’d never work another casalguidi piece in my life. Your instructions are wonderful and I wish I’d discovered your website back then. Thank you for helping me reconsider this stitch.
Wonderful tutorials, Mary! As a newbie stitcher, I’m curious about how many strands of perle cotton you’re using? And what size needle? Thanks so much!
Just imagine trying to work that in the lovely varigated or overdyed threads and being able to work the varigations as shadowing.
I adore this. I can see a bunch of these along with butterflies stitched onto a child’s quilt. Imagine the fun you could have with different colors on the worms/caterpillars/slugs. And it would be easy enough to stitch tiny legs out to the side. Now that I’ve seen the famous but elusive pink slug, I can’t think of any other way to use this stitch. This is fine.
Another voice chiming in that I LOVE the Stitch Play feature. I recently taught myself Raised Stem, but this looks like even more fun! And your directions are always clear and easy to follow. New favorite embroidery site!
Anastasia
PS – Crochet cotton can be used to pad things as well; I use it for the underneath side of Padded Satin all the time with great results.
Oh “MM”…(Marymentor 🙂
This is adorable. And I’m all ears/eyes now because your demonstrating lots of stitches in my all-time “fav”. The pastoral that I’ve been working on forever (Jeez…I really should send you a pic ) has been “sitting forever” because it’s primarily, purposely, mostly, stumpwork. And this stitch would serve beautifully as the stems for my weeping willow at a brookside. Still can decide as to how to do the leaves, but I know “you’ll 🙂 ” come up with something. And “HEY” what happened to Spring ? ? …Judy in PIttsburgbh
Woo-hoo!
Now I can gift my little nephew with embroidery and still be a popular aunt!
As long as I make worms, snakes and slugs I’ll be safe *lol*
Who would have thought?
Great stitch.
That is AMAZING.
Oh,these are all just wonderful. The site in general is just wonderful, honestly. One stitch I would personally like to see is the Elizabethan double plait braid stitch. It’s that fancy one that is used as vines in the embroidery that was done in the 1600’s (the Plymouth Plantation used it in their reproduction of the bodice). It looks super tough but I would love to use it and I haven’t found any good, clear resources for it. If you could do a tutorial that would be super awesome.
Hello Mary,
I love, love your new feature “Stitch Play“
What a great idea you had. I started embroidery again after eye surgery, Gosh, I missed it… I browse through your site everyday, it is like a therapy to read the comments from the viewers. Thanks for the joy you spread around…and YES, you are the goddess of embroidery.
France
Are your Kansas Bluebirds drawn to the pink slugs? You left out the trick though. When will we learn the trick?
Very interesting stitch; love the slug! Here in the Pacific Northwest we have Banana Slugs, but how unique that you have PINK slugs with such amazing eyes. All I can say is I’m jealous! When those critters invade our tulips and grape hyacinth foliage, I’d love to be able to spot that vibrant color instead of having to hunt for ours that blend in with the dirt.
i am going to make it today.. loved it.
waiting for more ..
Thank you so much for this tutorial, it’s a long time I want to try this stitch . Your stitch play serie is very interesting
Severine
Hi Mary
What is the scale on this? How wide is the string?
Its amazing seeing the photography of your work, but for me it would also be useful to see a scale photo of the end product.
Thanks
Kirsten
hi, Kirsten – you can make the string as thick as you want, really. In this sample, I’m working with a string that’s about 1/4″ – 3/8″ in diameter. ~MC
every thing is fine. ok. Thank you,
Allison and Elizabethan Braid Stitch –
There are good directions for this stitch in the Batsford Encyclopedia of Embroidery Stitches aka The Arco encyclopedia of Embroidery Stitches. I followed these instructions successfully to do Elizabethan Braid Stitch on my doodle cloth in preparation for using it on a project. There are also instructions for this stitch in Volume 2 of A-Z of Embroidery Stitches but I had more trouble with these instructions.
And finally I believe that Jacqui Carey’s new book, Elizabethan Stitches, which I am going to order this month also has many variations of this stitch.
I hope this helps – I will say that the Batsford/Arco Encyclopedias are worth the price of admission as they have many stitches.
Anastasia
Love the googly eyes! Very funny!
You always awe me. Always. 🙂
Thank you so much! I have just found you, and can’t help thinking, ” where have you been all my life?” I really appreciate the time you take to photograph and write so clearly… And you are hilarious, too! I’ve gone back through all the Stitch Plays, and gotten out my tools and played. I feel like I’ve got a whole new vocabulary to express myself now. Sorry this isso long, but I really wanted you to know how much your hard work and experience are appreciated out here. Please keep it up, I for one will be back frequently!!
I just wanted to compliment you on the photos in your tutorial! fantastic
What a fun and lovely stitch! I just whipped one up….it comes along must faster than I would have thought. Very satisfying! Thanks as usual….I’m always lurking around you wonderful blog! 🙂
Hi Mary what a wonderful tutorial so clear and with your great sense of fun too.
I am looking forward to lots more.
I am trying to find instructions for Indian cretan stitch if anyone has any ideas?
Hi Mary. I desperately need to know how to make a Colonial Knot versus the French Knot! I have a Teresa Layman piece of a Scottie dog among flowers that is completely stitched in both knots. I know that it is a figure eight on the needle instead of two wraps around the needle for the French. But, I need to see a video of it like your other stitch videos. I wrote you to let you know that the video for the CK is not there. I did watch the video on the FK, and it was very helpful! I think that both knots are used in the tiny TL rug to keep it from looking all the same. My granddaughter loves Scottie’s , so would love for me to finally stitch it with both knots! I am enjoying your site so much! I just received Trisha Burr’s beautiful book, Needle Painting Embroidery for Beginners, yesterday! I am truly excited to learn how to do needle painting. It looks really hard, but, I am persistent and will keep practicing until I can do it! I noticed that you have a tutorial on long and short stitches, so I am going to take a look at your article also.
So, if you could do a short piece on The Colonial Knot, my granddaughter would love you! She asks me every few months if I’ve stitched her Scottie rug! I’m not sure why TL calls it a rug, unless she designed it for a dollhouse ! No matter what stitches you show us, I learn something new. Thanks Mary
Hi, Kay Lynn – Well, just for you… I updated the Colonial Knot video today! I’ve been working on rolling out some stitch updates, so I moved this one to the top of the list. This video is a lot clearer than the old one! Here’s the link to the post:
https://needlenthread.wpengine.com/2007/03/embroidery-stitch-video-tutorial-2.html
MC
What a wonderful stitch and who would have thought to do this! Great for columns, etc. Many thanks.
Mary, thank-you for this fantastic tutorial. I have always been intrigued with Casalguidi embroidery and just hadn’t gotten around to reading about it yet. Your expertise is just what I needed!
Un estupendo tutorial. Es uno de los bordados que tenia pendientes de aprender con este relieve tan impresionante. Gracias por el tutorial.
Los ojos del gusanito muy divertidos.
I just love your pictures, they are so clear and the directions ahhhhhhh I feel like I’m learning so much . A big thenk you for your series. Carrie
Wonderful! I’m going to play around with the raised satin only. Any suggestion for covering the end tips of the base threads?
This is awsome!
Hey Mary,
For quite some time, I’ve been following your website & the lessons! & suddenly it occurred, how mean I’m that I’ve not said anything abt it.. OMG! I must say u drove me really maniac & i’m with the embroidery stuffs all day long trying out new things… 🙂 Learned a lot! Learned a really lot! :)… God bless you… Loves to you…
Parabéns Maria, seu trabalho é encantador!!Obrigado por compartilhar, amei!!Abraços!
Adorei este trabalho, vou tentar pois acho que conseguirei facilmente. Maravilhoso. Parabéns.
that is so awesome. when i saw the completed picture, i thought there is no way i could do that, i thought it was stitched all through the fabric in crazy ways… this is so cool. 🙂
There.s a technique similar to this used over a needle or heavy yarn on the sewing machine. I believe it was called charted needle work although it’s been awhile since I used it. You could make really cool kids things with it.
This is nice but I would have the patience to do this. Looks like it took you some time to finish this project. Thank you for the tutorial anyway!
Hi Mary,
Your site is wonderful. I’ve learned so much. And now we have Stitch Play.
I’ve been trying to find the technique for the Victorian Cross Stitch. I thought it might be a reversible stitch. Can’t find it in any of my books or online.
Can you help?
Happily,
Linda
Mary, I’d like to receive your news letter so I did the request with my e mail but as of yet I have not recieved an e mail back so I can confirm.. Please can you look into this for me! Thank You
Maryanne Bailey
It is great Idea for making Eastern Women dress.
I like it very much the way of demonstrate.If you have some more ideas please shear me on email.
regards
Laeeqe
I did something like this when I was in high school art class. But we made baskets out of the weaved cord
Mary,
I can’t tell you how happy I am to have found your site. I got the “Stumpwork Flowers” book you recommended and it’s everything you said it would be.I’ve even done a few of the project and thought they were wonderful.
I’ve been sewing all my life and just found this book to be so very helpful in the craft of raised embroidery.
Just as some background, I run a sewing studio at Hallmark Cards Inc. I know, most people don’t even think about Hallmark as a place where people use needle and fabric only paint and canvas, but it is. We are involved in quite a few things fiber and embroidery related.
Anyway I’ve been looking at your work and it’s exquisite and I’m in your debt.
Thank you so much for sharing your love for sewing with me.
Ty for sharing the knowledge you have. It’s nice to see somewhere where you can actualy see very clearly how the stitches are being done.This site is a blessing for me i do so much better with visual for learning. TY Ty again for sharing this wonderful site. carol
I could see that pink slug working it’s way through some beautiful embroidered watermelon slices. What a fascinating and fun stitch. Thanks Mary hope you are feeling better.
Would I be able to take this concept and apply it to a signature? I wanted to take the signature of a loved one and make it into a nice piece of wall art. I just didnt want it to be very flat and I know something like this would make it come out. Any suggestions on what would be best for this type of project are welcome though!
Could work! It depends on how complicated the lettering is.
Honestly its just a signature on a card that says “Love noni” but I was worried of the overlap since it was cursive. But really, I want to make the signature stand out. So any suggestions would be very welcome. I am very new to this and love that I found these great tips here!
There are other stitches you could use – something like a whipped chain stitch would give some dimension to the signature, but would still allow you to work the overlaps and curves in the letters easily.
That is a pretty stitch, I am just worried it won’t give it the “pop” I really want it too. And just curious (really, I am very new here) what material did you use for this since it would be so heavy?
With something as heavy as Casalguidi, you’d want to use a good medium weight to heavy weight linen.
very Nice job! I love it! Congratulations!
I have just found your site and you are a real gem of a find. I teach Creative crafts (mostly textile work) and am always on the look out for good explanations of stitches to send my students too. Thank-you.
Julia
Quiero ser partícipe de tan hermosos
Trabajos gracias por compartirlos.
Dios les bendiga
Thank you for the thorough instructions on these stitches. Take care, MEV
Maravilhoso, fácil e lindo!
DEUS os abençoe muito!
Beijos!
Just a FYI: The Antique Pattern Library just published the Adele Della Porta book Ricamo di Casal Guidi, free for noncommercial use.
Best wishes,
Sytske
Una hermosura, me encanta la creatividad de la gente, intentaré hacerlo
Dear Mary, you are inspirational! Your videos and emails and tutorials make my fingers itch to pick up a needle. I’ve seen a finished Casalguidi stitched piece and tried it, but it was a fail because I didn’t understand what I was supposed to be doing. Now I’ll be trying it again – and I expect success!
This stitch is exactly what I was looking for!! I googled “how to stitch a stumpwork centipede” and your tutorial is just perfect. I’m a huge insect/bug lover and I’m planning on making a centipede to hold straight pins for my stumpwork casket of insect and bug toys. I’ve already made a wee dragonfly that holds just one needle. Plans are for a violin beetle to hold scissors, a click beetle to hold a wee ruler, and many more insect/bug toys. I can’t thank you enough for this centipede. As I said, it will be just perfect. I love your tutorials.
Diane in North Carolina
Oops – I forgot to say that the points of the pins will be the legs of the centipede.
Diane
Hi Mary Thank you. I am a quilter and have wanted to make a quilt incorporating Casalguidi embroidery. Regards elly Van Oirschot.
I’m wondering why you satin stitch first? It seems superfluous- if you held the rope in place and then did your ‘bar’ stitches’ then the pink stiches- wouldn’t that work as well or is it about achieving the smooth finish?
Well, that’s a very good question! Besides building up a solid base (casalguidi produces a very sturdy, almost hard raised rope – nothing soft about it, and I don’t think that could be achieved with just the string padding, or at least not as well), there’s the direction of the string padding to consider. The direction of the string padding, left by itself without the satin stitch, flows in the same direction that you take your Needle when you work the stem stitch over the bars. So the stem stitch would sink a bit more into that padding, I think – and you’d also run the “risk” of stitching into the string padding and picking up string as you make your stem stitches. The satin stitch, because it’s perpendicular to the direction of the needle when you work the stem stitch, keeps your Needle from going into that base at all. That’s probably as clear as mud! :-/ but, in thinking about the whole structure of the technique, I’m thinking these are both probably the main reasons for the layer of satin stitching over the padding – that it makes the resulting rope very firm, and that it prevents the stem stitches from working into the padding.
This stitch might offer an interesting finish to a punch needle project, as an outline!
Hi Mary
If you are going to cover the entire string with the raised stem stitch using the bars, why do you need to cover the string first with the satin stitch? Many thanks, Mary
Hi, Mary – the satin stitch provides a firmer, consistent support for the stem stitching. The padding can be a little troublesome if you try to stem stitch over it directly, as it’s easier to catch your needle in it. The satin stitch makes the resulting rope nice and smooth and firm.
STITCH Play is wonderfully informative and entertaining! I hadn’t heard of your infamous Kansas Pink Slug. In Texas we only have the
boring, grayish ones!! Love the eyes … looked like a hot dog before you added them. Thanks so much for your website!!!
merci
pour vos explications , beautiful
I just love, love, love this. I’m new at sewing but I think I can do this. It beautiful and can’t wait to try this and it won’t cost a lot to try. Thank you so much for sharing and you explained it all very well. Karen
https://www.smh.com.au/environment/conservation/one-will-really-amaze-you-the-other-just-eats-his-mates-20130528-2n9ik.htm
Maybe not the Kansas Pink Slug, but Australian? xD (I know this isn’t stitching related but I couldn’t help looking it up.)
LOL!!!
Wow this is exactly what I need! Thanks for sharing 🙂
Mary, Have been peeking in on your blog for years and have referred my students to your site. But have never actually told you what a wonderful site this is. Thank you for sharing your Joy of needlework with all of us. Myra
Thanks, Myra! 🙂
LOL!!! Kansas Pink Slug! is that l;Ike the Southwest’s Jackalop!!!!!???? Funny!~
LOL! Yes, I think they are closely related, actually…. minus the ears. And legs. 🙂
Very nice
Merci beaucoup pour ce tutoriel très bien illustré et commenté.
Je vous souhaite une merveilleuse année 2020.
I really enjoyed this. It was exactly what I was looking for. I want to make a embroidered block for a quilt I’m making. I now know how I’ll make my catapillar. Is this how I would get started on a tree limb? I love the look of the wrapped trees that I’m seeing on Pinterest. Thank you.
Thank you so much. The instructions are really great and easy to understand.
Buenas tardes, me fascinó tu artículo. Gracias por compartirlo, la manera que lo explicas es fácil de entender. Un abrazo desde Tijuana Baja California.
Loved this thankyou, learning all the time
Please please make a video of this
bonjour, je suis en admiration sur votre site ! quel travail merveilleux vous faites. que de patience.
il n’y a pas longtemps j’ai dû refaire un collier en très gros fil sorte de boudin avec de grosses perles céramique à gros trou et ce que vous avez partagé avec ce Stitch m’aurait bien aidé à faire un entourage du boudin régulier.
merci et joyeuses broderies telles celles pour Noël, ou le St Mathieu magnifique…
I am always grateful for your stitch tutorials when I need to review a stitch! This one, like all, is excellent! Thank you.
I’m glad you shared this, Mary.
I keep forgetting all the stitches waiting patiently for me.
This was so helpful! Thank you.
Thank you for this very well presented casalguidi embroidery l have never come across this before. As l am left handed sometimes l need to work things out myself, any possibility to add left handed variations to your demonstrations?
This is so interesting. Thanks for the great directions. Can’t wait to use it on a piece. Any suggestions on where to use it?
Re: post “Stitch Play: Casalguidi Stitch – or Really Raised Stem Stitch!”
you say “(In fact, later on, I’ll show you how to manipulate this kind of padding to achieve both thick and thin areas from the same bunch of string… but more on that down the road!)”.
Where are those directions posted? I love this idea but would want to vary the thickness. Thanks
It’s called “trailing” – I never actually wrote up a detailed tutorial, but you can see the concept at work in this post:
https://www.needlenthread.com/2022/01/my-case-for-trailing-exploring-whitework-options.html
Hello Mary,
My project for this winter was to teach myself hand embroidery and I can’t thank you enough for the wonderful “lessons”. They are so incredibly detailed and easy to follow. Thank you!!! You do beautiful work. Marj.
Thank you, Mary. Your videos are a great as a refresher and for the beginner enthusiast. The tutorials are easy to follow and the quality is wonderful. Thanks again for sharing your knowledge. Laurie