


Here’s a little corner leaf hand embroidery design for you! It would work well for adding just a little touch of hand embroidery to your fall kitchen and table linens, and it would also work well for card-making and similar crafts.
I like this leaf design. The swirly parts give the leaves a sense of movement – like a windy day in autumn!
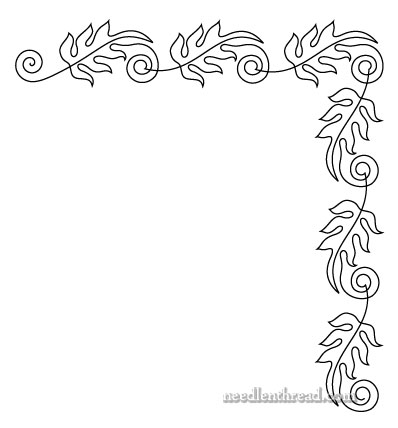
If you look closely, you’ll notice that this embroidery pattern is one continuous line. The only sharp angle is inside the little swirly bit, where the new stem attaches. So, using a simple line stitch like stem stitch, backstitch, or chain stitch, you can work up this pattern quickly.
You could also use pre-made fine braid (or a heavier embroidery thread) and couch it along the lines, for a raised effect. This type of braid work is called “soutache” embroidery. If you happened to have something on hand like coronation cord, it would work well for this design, too – but you’d have to enlarge the design quite a bit, to work with it.
The original for this design comes from an old book in my collection. The original design was just a line of the leaves with no beginning and end, so I re-situated it so that it takes a corner, and I gave the lines a beginning and an end. You can expand the length of either side by tracing duplicates of the leaf element until you get the length of the pattern you want. You can also just use the top side of the corner, if you just want a straight line.
Here’s the PDF:
Leafy Corner Hand Embroidery Design (PDF)
You can enlarge or reduce the design to fit whatever project size you need.
Hope you enjoy it!
If you’re looking for something to stitch up this weekend, you can find plenty of free hand embroidery patterns right here on Needle ‘n Thread!
PS. Don’t forget the William Morris calendar give-away! If you haven’t signed up yet, do it before Monday morning, my time!
Looking for inspiration & information on hand embroidery?
There are all kinds of reasons to sign up for the Needle ‘n Thread daily newsletter! Check them out and sign up today!
Hi Mary,
One continuous stitch is such a clever idea. It will give a chance to conquer managing curves and starting and ending thread in the middle of a line. Or perhaps couching — a new technique to start and finish just in time for the Thanksgiving table. The ability to finish is motivating!
Thanks, Mary!
I’m just now starting to collect quilting patterns and this is a great one… 😉
Thank you so much ! Just what I need, when I need it !
If you like continuous line designs, you might want to look at quilting designs.
The newer designs are created for machine quilting so they follow a continuous line. No stopping and re-starting when you have your machine chugging along!
The Stencil Company at quiltingstencils.com is just one of the many sources for these designs.
Dear Mary
I really like this design especially the swirly bits and yes I thought stem stitch would be good on this pattern. I hope you have a great weekend. I’m thinking of stitching a small Garden of Eden and this would look good as part of a border. Thanks for this Mary
Regards Anita Simmance
Oooo, I LIKE this simple design. It suits me just fine. Thanks, Mary!
G’day Mary,
This pattern is appealing and would be nice in variegated thread I thought. The swirls are like snails with their heads going into the negative space of the top leaf. It would be an easy pattern for Holbein Stitch. No working out the route so it works to come back again.
Thank you, Cheers, Kath
I think this would make a lovely border quilting pattern too!
Amazing! Also nice for machine quilting. It would work fine for a quilt border.
Or tambour. Mary, you are _so_ bad for my project list!
I really like this leaf pattern. Thank you for sharing it, Mary!
Thank you, Mary! I can just see this worked up in an over dyed thread of autumn colors, or lighter greens for spring.
I’ve seen similar continuous-line designs in an old book that specified it was for chain stitch embroidery, the kind that is made with a crochet hook like Indian Zardozi. Skilled workers can do it very fast and it doesn’t matter that the length of the line is very long. But if you stitched it with any other stitch by hand it would be extremely time consuming.
The reason the line is continuous for chain stitch is that it is time consuming to stop the thread and start again. These designs are meant to be done in one single color.
Could you please make a recommendation of what pattern would be best to try twilling.
Have never done this and would like to give it a try, but don’t know what pattern would be an easy one to try first. Also, is there a particular type of material to use for twilling.
All suggestions would be greatly appreciated.
Thank you.
Any line pattern works well with Twilling, which is usually done on cotton, as it is normally a technique (it’s actually just Palestrina stitch) used to decorate quilt blocks. But you can, of course, use Palestrina stitch on any line pattern, as decoration for any type of fabric, for all kinds of finished projects (household linens, ornaments, what-have-you…) MC
i love these disgines
How would you trace the pattern onto a mesh canvas? I love doing embroidery and this is my first attempt at more advanced hand embroidery than already stamped pillow cases and things like that.
Hi, Julia – most surface embroidery is done on fabric as opposed to mesh. Needlepoint is usually done on canvas, but it is a different type of needlework altogether. If you want to do needlepoint on canvas, you just need to print the pattern large enough to work with the size mesh you’ve selected, and then lay the mesh over the pattern and lightly trace the lines in as best as you can. They you can fill or outline on the mesh, using the stitches that work best. On other fabrics like cotton or linen, I think tracing is the easiest way to get the pattern on – you can always tape the pattern to a sunny window and tape the fabric over it, to be able to see the pattern better, if you need to. Hope that helps! -MC
Love your designs.
Dineen