


Well before posting this Hungarian redwork embroidery pattern a week or so ago, I knew it was a design I wanted to work up into a small table runner or centerpiece. Being a bit unsure how to tackle the whole pattern, I’ve been sitting on it for a while. But once I started working with the pattern to make it available for you on Needle ‘n Thread, the juices started flowing, the Muses started humming, and next thing I knew, an idea sprang into my head.
I don’t know if it’s a good idea – many times, when I set out on an embroidery adventure, I start by feeling my way forward in fits and starts, until settling with certainty on the approach. So far, this is the approach I’ve settled on.
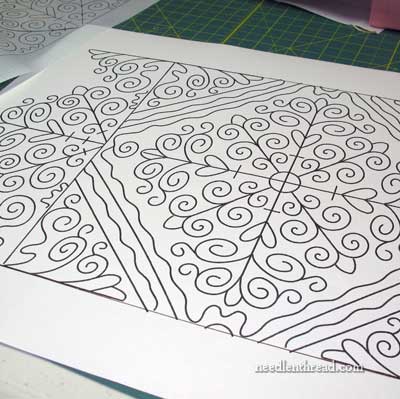
Enlarging the Hungarian Redwork Embroidery Pattern significantly was the first step. The pattern is sized to fit an 8.5″ x 11″ page, for easy printing. Since my printer can’t handle anything much larger than that, I took the design to a local copy shop and had it enlarged. I told the gal at the counter that I wanted the copies to come out with the design 14″ wide and 16″ wide, when turned horizontally. For a mere 37¢, I had two workable copies to use as a starting point.
I took these home and thought about them. I knew I wanted a rectangular linen for the center of a table, with the design on each end of the rectangle. But what about making more of a “frame” around the whole linen, so that the inside portion of linen between the two end designs didn’t look quite so blank?
Ponder, ponder….
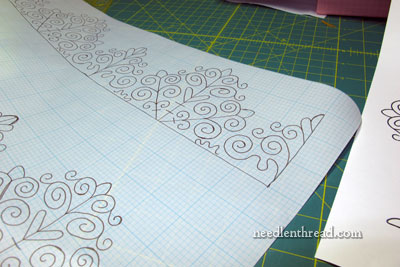
The only thing for it was to take out some graph paper and a pen, to see which parts of the design would make a logical edge repeat on each side of the linen. I traced parts and worked repeats, and the answer became obvious pretty quickly.
I betook myself to the computer, to play around with parts of the design – nothing too neatly done, just enough to see a rough layout of possibilities.
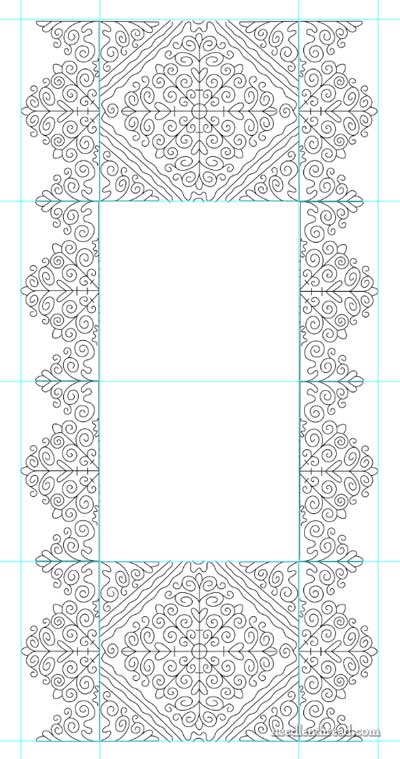
This is what I’ve come up with at this point. See how the scallops run down the sides? I’m pondering recreating that look on each end, as well. To do so would require a little more sketching and altering the design a bit. On the other hand, I do like the straight edges on the ends, because it gives me ideas about the hem treatment of the cloth on those short edges. What do you think? Straight edges on the ends, or try to work up a scallop repeat similar to those running down the sides?
After playing about on the computer, I could have traced the whole design out on large tracing paper, to prepare the design for transferring. Instead, I cut the design in half in Photoshop and enlarged it to fit within the printable area on a regular sheet of paper, like this:
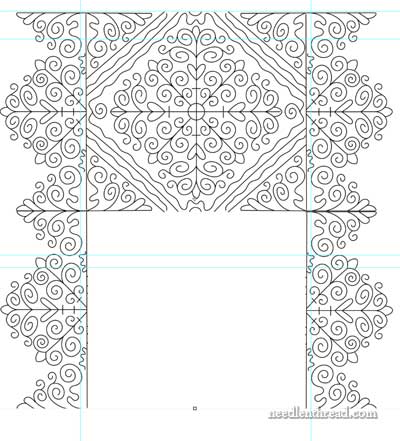
And now I will take this half of the design to the copy shop, and have them enlarge it so that the end design is 16″ wide again. I’ll have them print two copies (each half being a mirror image), and I’ll attach them in the center along the line, for the complete design. Much more efficient than hand tracing that whole design!
I’m thinking about working some of the main lines in the piece quite heavy, and then the scrollies a bit lighter. I’d like to use a combination of different braid-type stitches on the whole piece, so it won’t necessarily be “authentic” Hungarian redwork. I’ve contemplated using plaited braid stitch for very heavy line areas, Hungarian braided chain stitch for medium heavy line areas, and chain stitch for the more delicate areas. I may pitch the idea of using plaited braid – it may be too heavy.
Fabric: Alba Maxima linen by Legacy
Thread: not sure yet – there are two possibilities: perle cotton #12 or floche. The floche is much more delicate, so it would work well on the smaller tendrils and curls. I don’t particularly care for the idea of combining the two threads, as they are so different from each other. In any case, it has to be cotton, as the piece needs to be easily washable.
I’ll keep you posted on the progress of this piece! It doesn’t promise to be too complex once the stitching starts, so it should work up quickly.
But oh – that design transfer’s going to be a bear, isn’t it?!
Any questions, comments, suggestions? Feel free to have your say below!
G’day Mary,
Mmm…I do think it looks a bit cut off on the ends. Looks a bit blocky when the rest is so free flowing. That was my first impression before I read your query on the same. I thought first up that the triangels each side of the ends needed to be mirrored to make on point squares to make it fit with the long sides. But what would you do with the gap in between them?
I’d need to do some doodling with it to get anywhere much.
It seems like it might be a bit wide to fit 3 scallops exactly like they are on the sides but I guess the edges of the short end wouldn’t miss a line or 2 off the ‘pointed’ ends.
It’s looking good though Mary. It should be lovely to work.
Cheers, Kath
I agree about the ends being kind of ‘blocky’, (don’t know if that is a word?), I think if you can incorporate the side scallops somehow. I was invisioning maybe even a lace? Just a thought. I believe I will do this project along with you. I love it. I stitched the ‘scrolly medallion’ pattern and it turned out beautiful. I love embroidery with alot of lines. There is something about how it turns out so delicate looking. Anyway you go I know it will be beautiful.
Sincerely,
Melissa Bird
Are you familiar with Sulky 12 wt. color # 713. Not too heavy and 100% cotton–would be my choice. Your project idea looks great. I have wanted to make a Redwork table cloth (covered with stitches)–holding off until other projects are further along…
WOW!!!! This is going to beautiful. I think the flat ends would be OK. neena
O, I can not wait for you to start working on this! I have always wanted to do a table cloth and this will be BEAUTIFUL! Im looking forward to your tips on handling such a big piece! Personally, I Like the pattern the way you have it. I think it’s fresh and more interesting than having the scallop all the way around. I also think it makes an interesting reference to ethnic embroideries that frequently end just this way.
I really like this project, Mary, and I appreciate that you have us in on it from scratch. It’s so much fun! I do think that the ends need scallops, too. Are you set on the four-patch on-point motif? If not, I think it would be better to remove one row of squares before adding the scallops. Looking forward to the progress!
I definitely vote for scallops on the ends. The scallops themselves are very lovely, and the short ends seem to stop very abruptly when cut straight across. I believe the design would have a much more integrated look if you incorporated scalloped ends.
My two cents, :0
Susan
I’m not sure I like the abrupt cut off of the design on the ends but then again, I can’t visualize what you have in mind for finishing. I kind of like the idea of the design coming to a point on each end. That means removing the 1/2 scallop on the right and left and tweak the design so you can use a “scallop” on the ends. That may be my own preferences showing since I like runners with pointed ends.
You’ve got some lovely possibilities here Mary! An embroidered centerpiece is more likely to have a border in which sides & ends are highly similar in size & design. A table runner that falls over the table edge is more likely to have decorative ends that mimic the sides but are not necessarily identical. It looks like you want to use the “square on point” motif on each end (wonderful!) but it seems to need “something” to blend with the sides. Is there a way to make the ends pointed by continuing the “side points” around the “square on point”? Taking a look at some vintage table linens might help settle the question.
I do not work with embroidery as much as I use to, but still love it.
I do a suggestion so that you do not have to run to the copy shop as much 😀 Check out PosteRazor http://posterazor.sourceforge.net/index.php?page=download&lang=english
It is a free program that let you enlarge a photo and print it out on your home printer. It has been very helpful to me.
Dinah
Mary, I love the way you have it laid out. With the plain in the middle makes it nice place to put things w/o interfering with the design. I know whatever you decide, it will be a beatiful art piece.
How are you going to transfer the design and what thread will you use?
Hi Mary,
It’s going to be beautiful, but may I make some suggestions? I would enlarge the center area, and try to make the ends mirror the sides in depth. Maybe cut the large square in half and take out the two filler triangles on each side of the short end. I think this would balance out the embroidery.
Transferring will be difficult no matter what you do. I learned a trick from a whitework teacher. Use a repositionable glue stick, available at Staples or other big office supply stores to keep the fabric from moving. This is more accurate than pinning the fabric to the paper.
I like the floche, as you can use the thicker stitches for the heavier lines. You’re right, I don’t think it would look good with perle cotton. It will be fun seeing what you come up with. Will it really be red? Or another color?
Here’s another vote for scalloped ends. It seems a little too blocky on the ends with your more dainty sides. I would probably modify the sides to fit the ends and save the heavier squares of the ends for another day.
Repositionable glue on the back of the paper is helpful for tracing around something like an applique, but to actually transfer from one layer to another, I would think you would end up with glue on your linen and I wouldn’t want to stitch to something sticky from residue on my linen because you could not wash it until it is all stitched in. No matter how you choose, the transfer work is always the tedious part of any design, but so important to beautiful stitching.
You are one brave soul Mary. That is a huge project one that I love to look at but not to tackle. I think I agree with Debbie M about dropping one row of squares at the ends.
But again its an ethnic piece and they did designs exactly like you have it. Does not matter which way you do it Mary it will be beautiful . Good luck with it.
I love your design so far. Whew-what a task. Personally with all the work you have done so far I would scallop the ends too. Definately continue the design off the on point triangle and then fudge the design on the two ends. Just a suggestion to get you considering some more possibilities.
Thank you for your wonderful site and stitch videos. I just completed an enlarged workbox fron the Home Sweet Home book and your videos were the reason I was able to complete.
Can’t wait to follow your progress.
Donna
Beautiful! I can’t wait to follow this project as you work it up. Ends: I think the straight ends with a nice hem will look fantastic. Really, you could go either way. But I like the clean finish of the straight end.
Mary, I love the looks of this design, but if I were personally using this as a runner I would carry the peaks out into the end. There are so many possibilities to this design it is challenging in itself to decid how to approach this, but I am sure you shall.
Oh Jeez Marymentor, I’m going to watch this one with a keen eye. Because, of course, my love of any Eastern European needlework runs neck and neck with my love of boldly textured embroidery.
This piece conjures in my head, the sound of Jeeepsy Wiolins !!
And I’d like to do one. All red would be perfect for Christmas….well…..maybe next Christmas, knowing me !
An example of my workspeed is I’m still taking measurements to drill holes lower down the the legs of the trestle frame I bought through you, so that I can use it sitting down. For us short short people, I’d have to work standing up when using the frame….which I DO intend to use….a LOT ! 🙂
Anyway, wanna, gonna, gotta, follow you closely on this particular piece. Thanks for continuing to be a source of help and inspiration in my beloved hobby Mary.
Judy in Pittsburgh
Mary, Mary, Mary: I will follow you any where if you can send this out to us! I will purchase it even! With two very lovely quilted blocks for the middle (or three) it will be Stunning! I Love it! yours- Collette
Yes, the design transfer will no doubt be a bear, but oh! What fun you will have with this! Can’t want to see how it turns out.
whew, that will be a piece of work! I like how the scallops came out. Would you use a tranfer pen to trace with so you can iron onto the linen?
I can’t wait to see the finished piece. I think it looks cut off with the straight end. For me I would put the scallops on the ends but hem the end straight. I hope that makes sense. Diane
I like this much better with the scallops running down both sides of the runner. Now it just looks like something’s missing on the ends. If I were doing the project, I’d replicate the scallop design on the end and figure out some sort of continuation/variation to turn the corner. Also, it looks like something is missing at the ends on the side toward the middle of the runner. (Er… this is difficult to describe.) The way the design sort of comes to a hollow point with diagonal lines flowing into… nothing. It just looks like there should be a little scallopy curly thing-a-ma-bob in the middle of the design where the point of the square should be, as well as some sort of spandrel covering the corner. What would it look like if you put one repeat of the scallop edging across that space? It would need some tweaking or something, but I think it would give a much better look–perhaps along the lines of the “frame” around a Persian carpet, if you get my meaning.
Mary . What if you did the scallop all around and a block design in the middle? Maybe a clear spot in center with two blocks and then border all around? I am sure it will be beautiful anyway you do it. Judy
I think I would prefer the scollops at the ends also.
Hi Marymentor:
This is my second comment on this piece. Now I’m “really” interested, as you might guess. Question: (actually a pretty good piece of advice for me that will cover many projects )
I note you’re considering the Alba Maxima Linen by Legacy. Where can I buy this ? Jo Anne Fabric I hope ? And…big “and”…should I wash this before starting the project ? And how washable will the end product be with red cotton thread on white linen ? After all that work, I would hope to have a family heirloom……Thanks…..Judy in Pittsburgh
Thanks for the questions and comments, Judy! (And everyone) …. Never fear, more on this project coming up – I’ve changed a few things since this morning’s post (busy day!) and I’ll update you all on that soon.
For the record, I’m now oscillating between a white linen and a natural colored linen. If I go with white, it will be Alba Maxima by Legacy. This is available through Hedgehog Handworks. It’s a linen made specifically for hand embroidery and makes the most beautiful table linens. If I go with natural, I’m bouncing some ideas around in my head. I will probably go with Strathaven linen in natural (also available through Hedgehog), though I might go with something a little more coarse. Still some thinking on that one!
The whole design, when enlarged for a table centerpiece, ends up rather large – I’ll give you dimensions and so forth next time up!
~MC
Thanks. It’s interesting to hear about the gestation of projects. Too often we just see the final result.
Dear Mary
Beautiful design but what a transfer!!! quite big. I love the scrollies these would look good at either end. I hope you will show photos when it’s completed. Must get into Redwork when I have completed my other on going projects.
Regards Anita Simmance
Thank you for sharing your design process with us! I definitely think that the beautiful scrolls along the sides call for scrolls on the ends as well, but that’s just my opinion 🙂
Sincerely,
Lori
Hello Mary,
That is a beautiful design! I’ve never tried it, but I thought that if one printed a pattern with a laser printer that uses toner, rather than ink, that it will transfer if ironed on. I could be wrong, and of course it would require a test (or many!) but if it worked it would certainly make it easier, wouldn’t it? What transfer method were you considering using? I know I’ve read articles here about transferring patterns, but it’s it been awhile and I read a lot so I get mixed up about who does what. I usually use Sulky transfer pens to outline or trace designs and then iron them. The pens come in different colors now, not just black. I still don’t know the secret of the pre-made patterns I’ve bought that iron-on repeatedly* – I don’t know if it is a special kind of printing ink, or something like heavy toner. I wish I knew! If you did experiment with a commercial copy machine, you might want to try different settings to see what works best. Machines usually have settings between “High Quality” and “Draft”. Less toner would probably be lighter (which may be better if you are worried about it showing through) and more toner darker (if the lighter isn’t transferring). I think I’m now stating the obvious. ;> Please let us know how you did go about transferring this design! I have a feeling that I’m going to post this and then search your site and find that you prefer transfer methods that rinse out completely (I now recall some tests you did with a particular writing pen), so my idea won’t work for you. Best wishes to you in this and everything!
* I’m referring to Jenny Hart’s patterns printed with “magic transfer ink”. Her first book/kit (with included patterns printed this way) is what first got me embroidering, although I branched out very quickly and learned everything I could… and of course I’m still learning! I was so happy to discover your videos and site years ago – I always recommend that people come here to learn from you! I’ve followed every one of your videos and they are enormously helpful!
I love the straight edge on the short side.
I can’t wait to see the finished project and am hoping to stitch it also.
Ah ! I just love this pattern. It looks so pretty and I am very curious to see what you will have made of it. mmh! You have received so many interesting suggestions how to continue with the pattern that I can hardly wait to see! Greetings from Germany
Mary,I love the design and I like the idea of the heavy and lightweight stitching but I would be tempted to fill the centre as well with two more complete motifs. If the cloth is for show rather than for general use it would make a spectacular centrepiece. I think I would use mountmellik threads in the different thicknesses. They are matt,easy to use and hard wearing.
Happy stitching,
Liz
Hi, Mary, Thanks for the pdf of this redwork. Its lovely, and love the changes you have made. In the grand scheme of things, it is the perfect design for my new home on my new table. Really love your website, I have learned so much from you. Thanks
I like to change. Hungarian redwork is completely new to me. Now a question – this is not stitched with regular embroidery floss or silk, but rather heavier thread?
Hi, Pat – Yes, it will be worked with heavier thread than regular floss. Actually, I’ve tested various threads for it over the weekend. The closest thread we have to what would normally be used with “real” Hungarian redwork (this isn’t exactly going to be authentic, I’m afraid) is DMC retors mat (DMC retors mat art 89) which is a heavy, mat (non-mercerized) needlepoint thread that’s almost yarn-like. It is a 4-ply, heavy thread, and slightly heavier than would normally be used in Hungarian redwork. But other than the slightly heavier weight, it’s pretty close. However, it’s far too heavy for this design! I’ll have thread tests up for this later on during the week, so you can see the various thread options I’m playing with! ~MC