


After showing you yesterday’s interlaced chain stitch, I thought I’d follow up with another composite embroidery stitch that involves lacing – Guilloche Stitch.

Guilloche is a term found in art and architecture for a repetitive design of intertwined ribbon-like curves that form circles on a border. Guilloche stitch, when worked with regular thread (it can also be worked with metal thread in a few different variations), is made up of four different stitches. All four stitches work together to create this very pretty stitch that is excellent for borders in hand embroidery.
Guilloche stitch can be worked on even-weave or plain-weave fabric. If you’re working on even-weave (or close to even-weave) linen, it’s much easier to calculate the spacing of the whole composite border without having to mark any lines. If you’re working on plain-weave fabric, though, it is helpful to mark out two parallel lines and to mark the placement of the little stacks of satin stitches, too. Once you read through the tutorial, you’ll see what I mean…
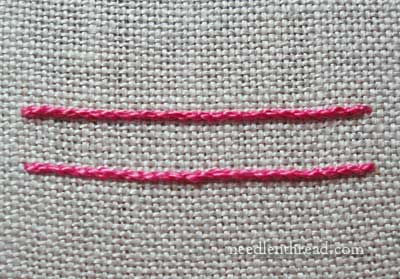
Guilloche stitch begins with two parallel stem stitch lines. Before stitching the lines, consider the spacing between them. You’ll have to fit three short satin stitches stacked on top of each other between the two stem stitch lines, with a little space on each side of the stack of satin stitches, between them and the stem stitch lines.
Since I’m working on an even-weave linen (Montrose 1750), I calculated my lines like this: stem stitch line, skip three threads, 3 satin stitches, skip three threads, stem stitch line. There are 8 threads, then, between the stem stitch lines.
After working the parallel stem stitch lines, work small stacks of three satin stitches, evenly spaced inside the stem stitch lines. Again, even-weave fabric makes it a breeze to do this. If you’re using plain-weave, it is helpful to measure and mark the stacks of satin stitches, so that they are equally spaced down the line.
For the stitch to look nice, the satin stitches should be the same size, and they should be spaced equally. I try to make my satin stitches and the space between them about the same length.
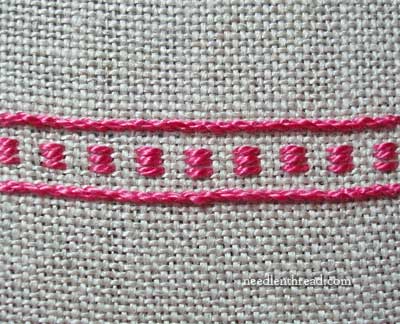
When you’re finished with your little stacks of satin stitches, this is what you’ll have. It makes a nice border by itself, but we can dress it up even more!
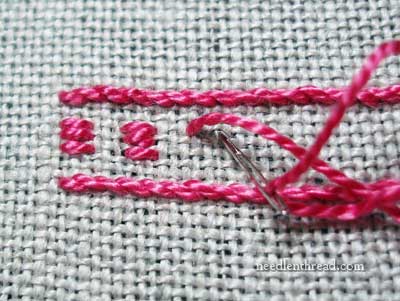
For the lacing part, you might switch to a tapestry needle if you aren’t already using one. You can also change the color of your thread, if you want.
Bring the needle and new thread up behind the first stack of satin stitches, between two of the stitches in the stack (it doesn’t really matter which two, as long as it’s between two). Pull the thread through.
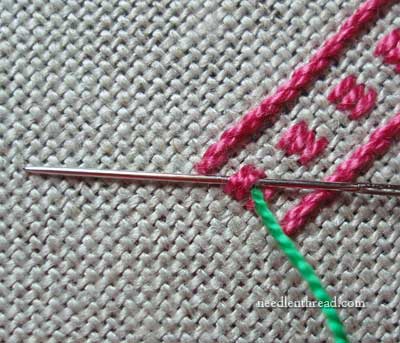
Now, take the needle up towards the top stem stitch line, underneath the satin stitches without picking up any fabric. This will hide the beginning of the lacing thread.
See how the beginning of the thread is hidden behind the first stack of satin stitches?
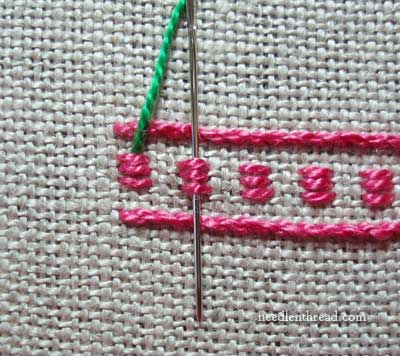
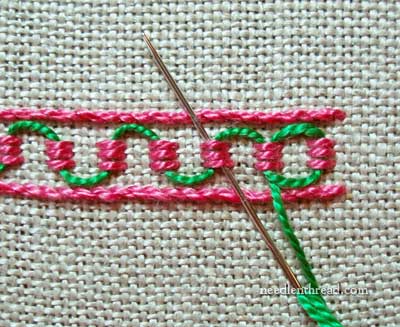
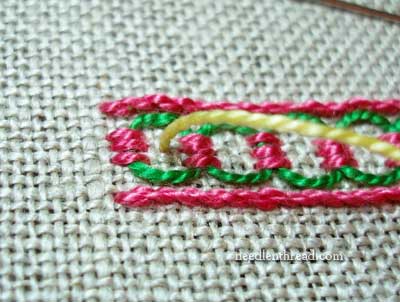
Now, take the needle behind the second stack of satin stitches, pointing down towards the lower stem stitch line. Don’t pick up any fabric – just slide the needle behind the satin stitches.
Move down to the next stack of satin stitches, and pass the needle behind them, pointing the needle upwards to the top row of stem stitch.
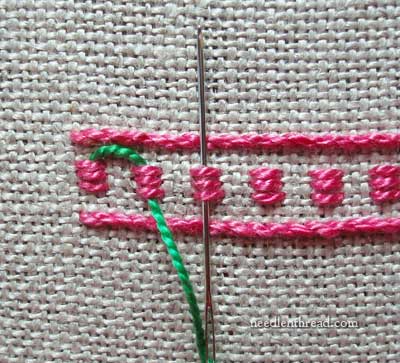
Then down behind the next stack…
… and continue lacing in this manner all the way to the end of the line.
When you reach the end of the line…
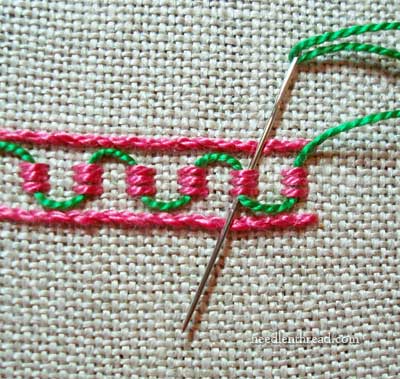
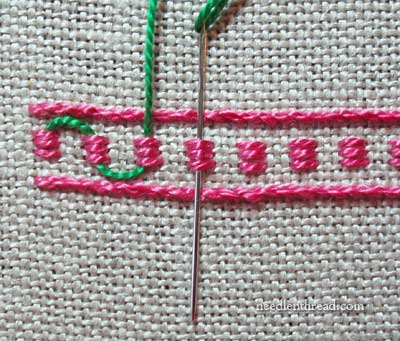
… it’s time to return, lacing in the opposite direction…
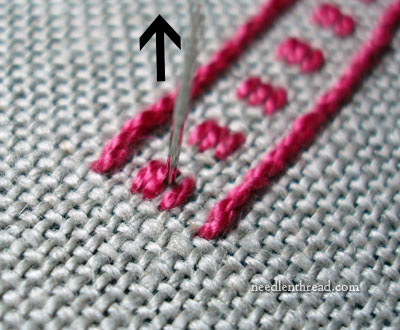
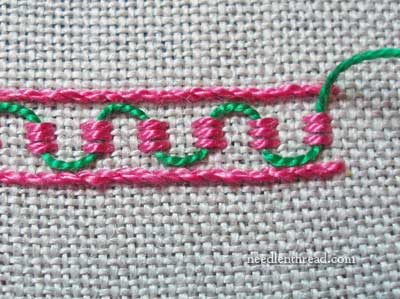
…until you have formed little interwoven thread “circles” that are empty in the middle (the “guilloche” of art and architecture).
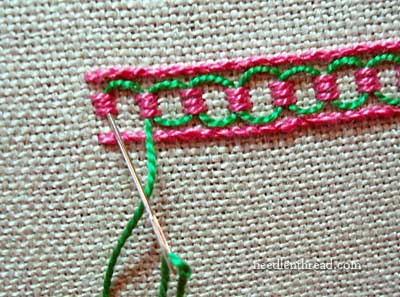
When you get to the first stack of satin stitches in the line, take your needle underneath them, and then into the fabric, hiding the end of the thread behind the stack of satin stitches!
Now, thread a new thread into your needle – it can be a different color, or one of the colors you’ve already used. I went with a third color, just for the fun of it.
Come up in the middle of each empty circle created by the lacing stitches, and make a French knot right smack in the middle of each circle down the line. (If you don’t know how to make a French knot, check out my French knot video!)
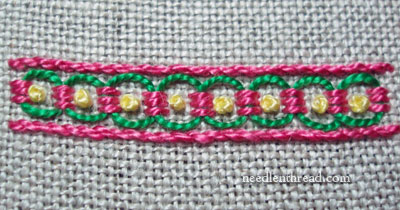
Festive, isn’t it?
Guilloche stitch, when worked with regular embroidery thread, is usually used for borders. If you’re working a sampler or something similar, guilloche stitch would be a pretty way of framing off an area of text.
Try it!! It’s fun, it’s easy, it’s pretty – what more could you ask of an embroidery stitch?
Stitch Play is a series here on Needle ‘n Thread that focuses on fun ways to use embroidery stitches. I’m writing the series in the hopes that it will encourage stitchers to try out a variety of stitches and to play around a bit with their embroidery. Developing a repertoire of embroidery stitches is an excellent way to gain confidence in hand embroidery, so … Play!! If you’d like to read previous articles in the Stitch Play series, please visit the Stitch Play Index, where you’ll find an ever-growing list of stitchy adventures!
Like What You See?
If you like what you see on Needle ’n Thread, if you want to help keep the website thriving and free of annoying network advertising, why not become a patron on Patreon? Check out my Patreon page here, where I’ll occasionally add special needlework bonuses for patrons.
If you shop on Amazon, you can support Needle ’n Thread without any extra expense to you by visiting my Amazon Recommendations page here, where you’ll find books and sundries for the needleworker available on Amazon.
I have recently learnt guilloche stitch and some gulloche stitch variations and added them to a gold work sampler.
http://www.threadsacrosstheweb.blogspot.co.uk/2012/09/guilloche-stitch.html
http://www.threadsacrosstheweb.blogspot.co.uk/2012/09/guilloche-stitch-variation-cross.html
It is a fun stitch. I especially liked the cross variation.
They’re beautiful! I was going to do a post on metal threads with this stitch. I suppose I do it a little differently – the cheater way, with three threads going at once. It makes the ending / beginning a bit chunkier, because there are three threads in the entry and exit points, but it makes the lacing part a lot easier! Thanks, Carol-Anne! ~MC
G’day there Mary,
New to me and…I LIKE IT, I LIKE IT, I LIKE…get the idea!
Very pleased to see your’s too coral-seas. Thank you.
Thanks Mary, Cheers, Kath.
Hi Mary,
I would like to mention your website on the Needlepoint Study Hall blog, especially about today’s Guilloche Stitch. Is it OK to use the finished image of your stitch as the introductory image on the blog? I would also like to use a screenshot of your Header so folks and recognize your site.
Your work is inspiring and your video work is brilliant.
Looking forward to hearing from you. Robin
Hi, Robin! Of course you may! Thank you! 🙂 MC
Thanks, Mary. I’ve published. Here’s the link. Again, your work is so helpful and inspiring. Robin
http://needlepointstudyhall.blogspot.com/2012/10/needle-n-thread-is-must-visit-website.html
My goodness, thank you, Robin! I appreciate that! And I’m so glad you like the stitch – and the raised fishbone!
Dear Mary
Thanks Mary for this beautiful stitch I really like the Guilloche stitch and I would love to see it stitched in a metal thread that would be interesting.
Regards Anita Simmance
Did you use pearl cotton and what size would be best. I am thinking of beginning your series and eventually get them all stitched!
Yes – perle cotton #5, which is a good size all around for most practice / demo work. Works really well on 25 ct Round Yarn linen by Legacy (available through Hedgehog Handworks) for stitch samplers. ~MC
A beautiful looking stitch. Thank you for the excellent written instructions and pictures!!
This is a very pretty stitch combination, indeed. Many thanks!
What a beautiful stitch! Thank you for sharing it with us.
Deb
wow, easy! 😀 i have been filling in your jacobean sampler with pencil marking different stitches. maybe this would work on the outermost border? love this!
I am a newbie to embroidery. I havent done any since my childhood cross stitching samplers but my mum has encouraged me recently to do something nice for myself instead of making for others… I have been attempting crazy patchwork with lots and lots of embellishments including embroidery stitches which I am learning. I am going to frame them. Thank you for your lovely tutorials which explain things so easily. All the tips are so useful too.. I will be back!
Hola,que lindas cosas me manda estoy probando de hacer todo y me queda muy lindo, este verano van a vemir mis nietas que tienen 11 años y 9,para que les enseñe, así que estoy copiando todo lo queme mandan, muchas Gracias con cariño, Mariana
You’re welcome, Mariana! I’m glad you enjoy it!
Hola..me encanta sus bordados…espero que me sigan regalando sus experiencias..FELICIDADES
Hola le quiero decir que tiene unas manos maravillosas…que hermosos trabajos elavoran me facinan…FELICIDADES..
SALUDOS
Alicia
Gracias por tan hermoso trabajo.
Beautiful work and superb ideas. Definitely going to try them. Please keep posting such patterns esp the tutorials. Thanks
Hello! I am your fan! Everything you do is absolutely beautiful. I am so glad to follow and I am learning so much because of you and your wonderful work and tips. Thanks a lot and I hope your health is ok (excuse me for my English, my natural language is Spanish!) LOL!
Gabriela from Argentina.
🙂 Thanks, Gabriela!
Beautiful and so decorative.