


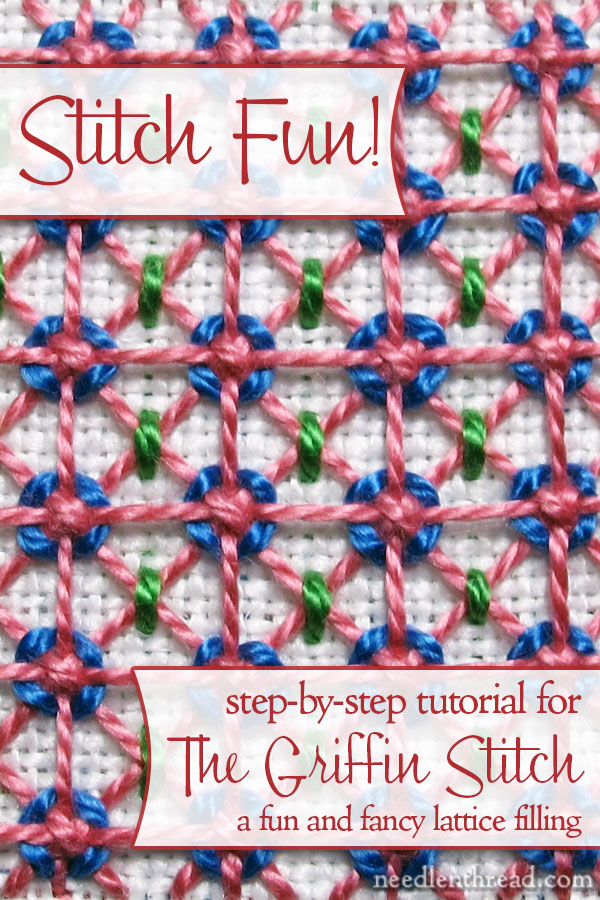
Time to play with a stitch and have a bit of Stitch Fun!
This stitch is particularly fun, because it’s colorful, it’s a little complex, but it still works up fairly quickly.
Griffin Stitch is a lattice filling used in hand embroidery, counted work, and canvas work. As with most lattice fillings, it’s easiest worked on an even-weave fabric, but it can also be worked on a plain weave fabric, and I’ll talk about that as we go through this tutorial.
Let’s make the stitch. Ready?
I love this particular lattice filling technique! I’m almost tempted to relegate it to the “cute” category, but depending on the way you mix your colors, the threads you choose to use, the size of the area you’re filling, and whatnot, the look of the stitch can change quite a bit. You can add metallics in here, for a bit of glamor and sparkle, too. So when you play with Griffin Stitch, feel free to experiment with different threads, ok?
For this sample, I’m working on Legacy’s round yarn linen, which is a nice, all purpose, medium-to-heavy 25 count linen with very plump threads. It’s a great fabric for working samplers and the like! I’m using #5 perle cotton in three colors for the sample, but you can easily use four colors (and if you wanted to get Really Wild, you could use as many as six colors, but that might be a bit much…)
When working on linen or other fabric, use a hoop or frame when working lattice fillings.
For needles, I used a crewel needle in size 3, switching to a size 22 tapestry needle for the final step.
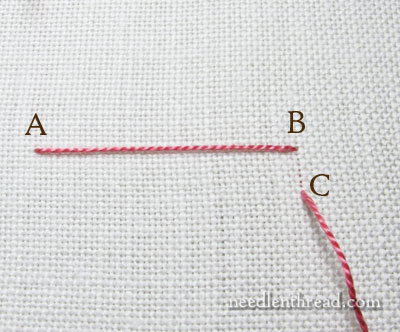
When working any kind of lattice filling, instead of taking a long stitch from A to B, and then coming up again under A to take another long stitch, step down to C for the beginning of the next stitch.
This stepping to the side for the next stitch instead of crossing again across the back of the fabric with a long stitch is called “laying” your threads. “Laid threads” are made with stitches taken in this side-stepping manner.
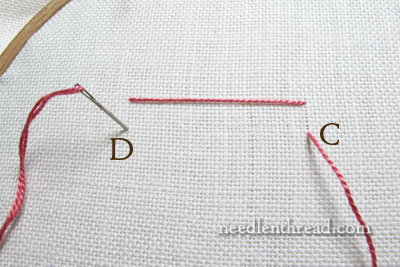
After coming up at C, take the needle and thread to the back at D.
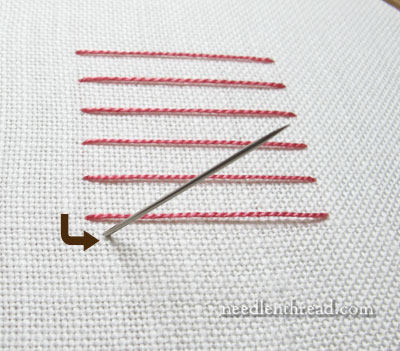
The trick to a nice-looking lattice filling like this is that your laid stitches are equally spaced. Equal spacing is crucial to a satisfactory finish with any kind of lattice stitch.
Achieving equal spacing on even-weave fabric is easy enough – you just have to count the threads of the fabric. To achieve equally spacing on plain-weave fabric, you can either eyeball it (estimate the spacing by looking at it), or (for better accuracy), you can measure the distance with a ruler, and mark of the spacing on the sides of the filled area. If your marking is small and done with a light pencil in the direction of your laid stitches, you should be able to cover the marking up easily enough. Don’t mark the whole line, though – just mark enough so that you can see where each laid stitch should begin and end.
When you reach the base of your filling area and you’ve completed the horizontal stitches, take the corner to begin the vertical stitches in the filling. Your first vertical stitch should be just inside the corner, not a whole stitch-width away.
You can also start with your first vertical stitch just below the very center of the last horizontal line, and build your vertical stitches out from there, to ensure that the vertical stitches are centered over the horizontal.
In this case, since I’m working on even-weave fabric, I’ve already counted out the spacing, so I don’t need to start in the center.
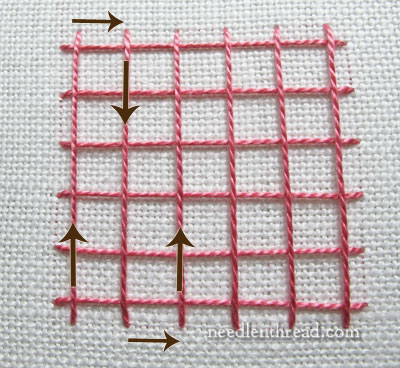
Work the vertical laid threads the same way you worked the horizontal ones, stepping to the side for each stitch. The arrows map the direction of the stitches.
When you finish the second layer, you’ll have a nice boxy grid.
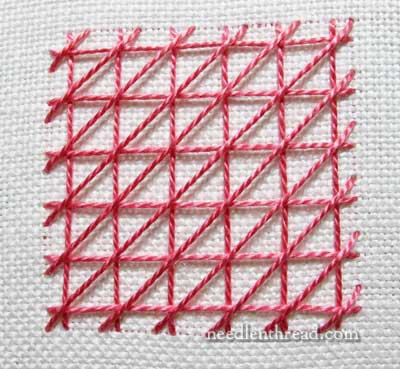
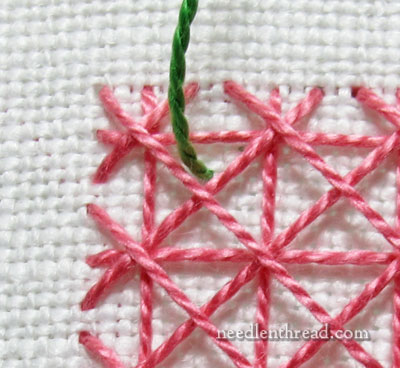
Now, following the same method of stitching, cross the grid with diagonal laid stitches. These stitches should cross over every intersection of the first two layers.
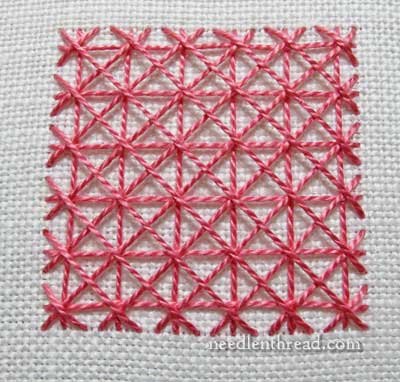
And then finally – you guessed it! – work the diagonal in the opposite direction. Notice that the four layers create first a box-like pattern, and on top of that, a diamond-shaped pattern with an “X” over every intersection and in the middle of every box of the lower grid.
These intersections are important to note, because each intersection will be couched in a certain way.
Now it’s time to change your thread color. I like to use contrasting stitches as the couching stitches in this type of work, just because they show up better and I think it looks neat. But you can actually do the whole filling in the same color if you want – the color scheme is entirely up to you!
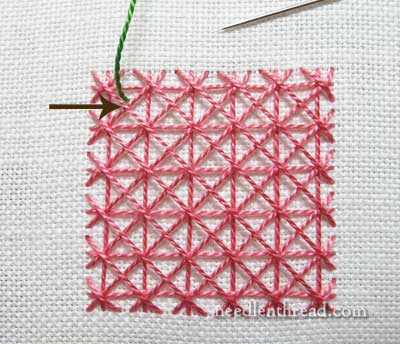
So now we’re going to work with the first couching thread, which I’ve brought up in the top left corner of my lattice, just above the intersection of the “X” formed in the middle of the first full box on the left corner.
With this first pass of couching stitches, I’m going to couch all of these “X” intersections in the middle of each box, by traveling down the first column, up the second, down the third, and so forth, using the running stitch.
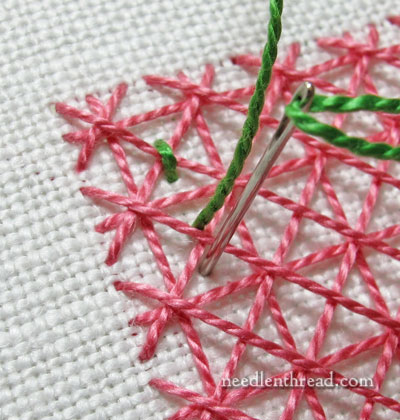
Each running stitch will pass over that “X” intersection and couch it, to hold it securely in place.
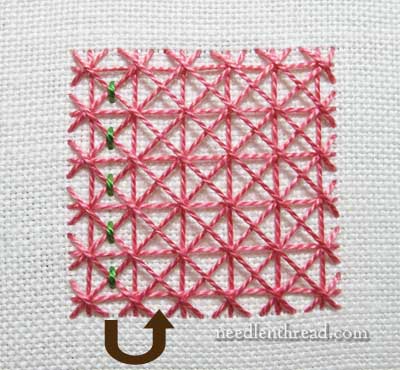
When you get to the base of the first column of boxes, head up the second column…
… and continue couching the whole lattice in this manner.
You could stop at this point if you wanted to. It looks ok, and the lattice threads are secure enough. But then, it wouldn’t be the Griffin stitch, would it?
And now, it’s time for the last step! This is the fun-fun part. We’ve had fun up to now, but this is when the whole thing comes together, and especially if you’re using contrasting colors, it’s exciting to see these last stitches go in!
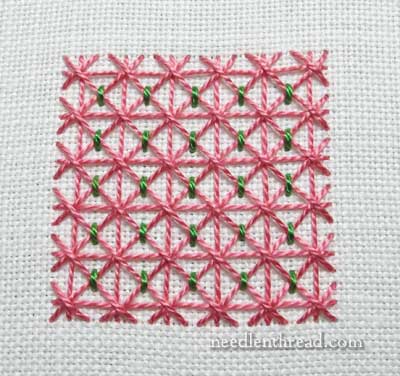
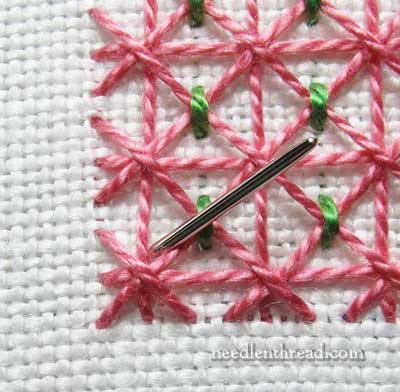
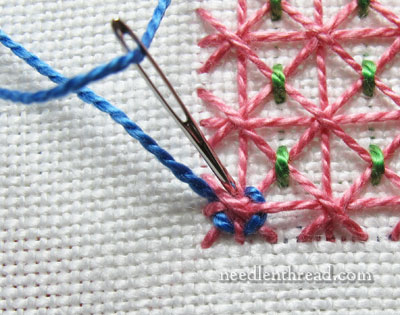
I’ve switched to a tapestry needle now, and to a blue perle cotton. The area of the lattice we’re going to concentrate on now is the “X” that’s formed over the corner of each box from the lower grid. Notice that we have 8 threads intersecting at the corner of each box – four from the lower layer of horizontal and vertical lattice, and four from the diagonal lattice.
Bring the needle up just behind the top vertical thread. You’ll have to angle the needle a bit to get it to come out on the side of the thread.
Now, you can actually do this lacing part in either direction. I’m going to work clockwise around the intersection, but if you’re more comfortable working counter-clockwise, that’s fine, too!
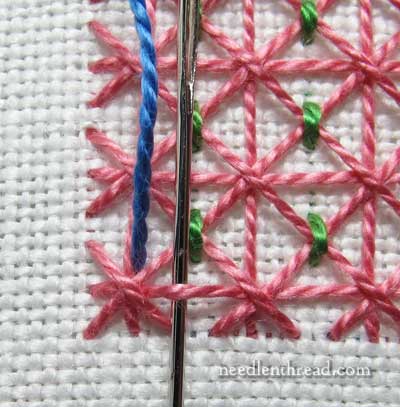
The needle is going to go over the diagonal threads and under the horizontal and vertical threads, in an over-under movement around the whole intersection.
The needle does not pick up any fabric – it just passes over and under the threads.
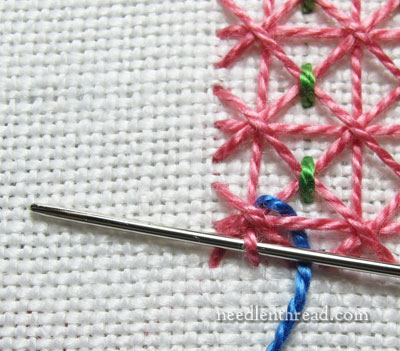
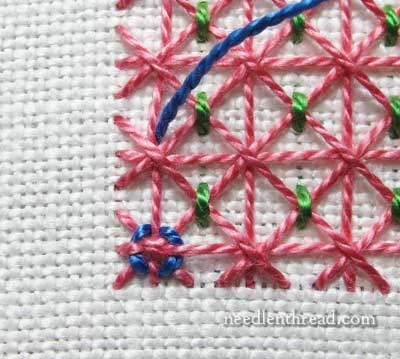
Continue all the way around the intersection, going over and under and over and under…
… until you arrive back at the starting point, where you take the needle and thread to the back again, going down in the same hole that you originally came up in, behind that vertical thread.
Don’t cross over that vertical thread to go down in the hole! Go down on the other side of the vertical thread, right next to where you began, to give the illusion of a ring around the intersection.
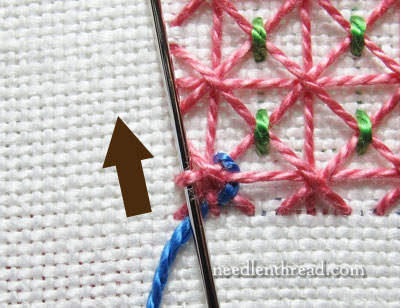
Now, move up to the next intersection up the column…
… and work the same “circles” around the intersection.
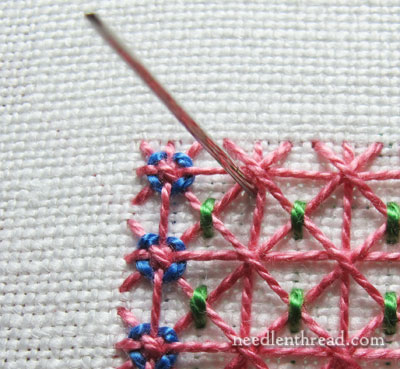
Then step over to the next column and work your way down.
When I’m moving down a column, I start the circular lacing below the intersection, since I’ll be moving down in that direction.
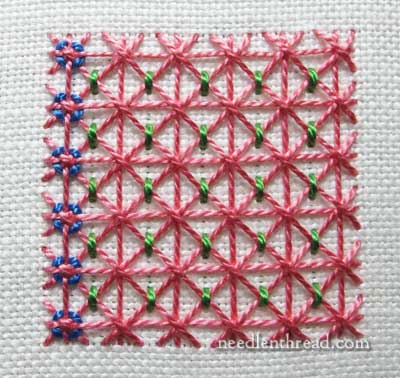
Lace all the intersections, filling the whole lattice grid!
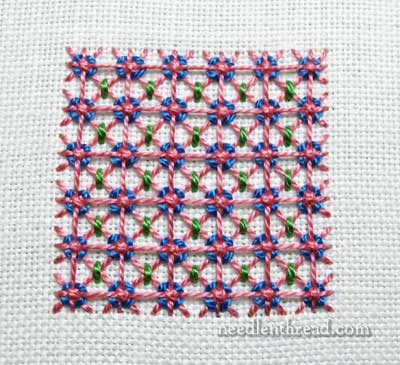
And this is what you end up with!

Isn’t it fun?! Gosh, I love embroidery!
Next time, we’ll look at some of the nitty-gritty involved in lattice fillings. It’s easy enough to work a lattice like this in a little square, and end up with a nice even lattice. But what about filling up a wonky shape with lattice work? We’ll go over that shortly, so you can start adding fun lattice fillings to all your embroidered shapes!
Stitch Fun is a series of tutorials here on Needle ‘n Thread, where we play with different embroidery stitches and combinations of stitches, just for the fun of it. If you’d like to see the other tutorials in this series, feel free to visit the Stitch Fun index, where you’ll find links to all the articles in the series. And remember – have Fun with your embroidery!
love,love,love this stitch!!!! As I was reading my questions forming in my mind were 1)wonky shapes – TY for addressing that one soon and is there a book on lattice designs?
Hi, Heather – you can find lattice stitches in all kinds of stitch dictionaries. Whether or not there’s a whole book of them is another question. I’ll be covering several of them coming up in Stitch Fun (including some fun things you can do to mix things up or get certain results), and I think once you get them down, you can pretty much “run with it” and do your own thing. The wonky shape thing will be up within a week! ~MC
This looks so lovely! I definitely have to give it a go. Thx for the excellent tutorial!
Dear Mary
I love stitch fun and the Griffin Stitch looks so interesting I will have to include it in my future projects I love lattice stitch it looks so pretty can’t wait for filling up wonky shapes that will be interesting.
Thanks
Regards Anita Simmance
Looks easy enough. My question is when you’re couching with the green and turn the corner so to speak, do you go straight across to the next row or slide your thread under some of the pink stitches on the back to hide the green and anchor it a bit?
The blue makes me think of those spider web type stitches I’ve seen, can’t think of the name of it right now. Lots of spokes with a wind and a wrap round and round.
Hi, Irene – I just jumped right across on this one. With this fabric (and with the amount of filling done with the stitch), the short thread jump is not really noticeable. But I think it would depends on the type of fabric you’re using, the color of the thread, and how far apart your lattice lines are spaced. ~MC
I love embroidery, too! And this was much fun to see come together, step-by-step. Thanks, Mary!
I love it!!! Thank you very much. Kisses.
Thanks for the response about crossing the thread on the back of the fabric. The diagram shows kind of a U shaped direction so I wondered if you slid the thread around/under the pink threads. Makes sense to watch for thread showing through to the front.
Hi mary,
thanks for this lovely tutorial, i am definitely going to try this, but i want to know if i can try this using plastic canvase? and thanks for the whitework and canvas embroidery link in your earlier post, it was very informative.
Hi, Mary – you can, but you might have a problem with threads showing – depends on the thickness of the thread. Hope that helps! MC
Brilliant Mary. Thank you.
Hi Mary,
Lovely pics in the tutorial. I’m so use to DMC floss and crewel wool I didn’t recognize the thread type for the pink & green stitches. Is it a lighter weight perl or the floche you mentioned in the earlier posts. (The thread of which you now have ALL the colors! …envy…
Hi, Cynthia – it’s actually all perle cotton #5. It’s easier to photograph tutorials with thicker threads, generally, so I mostly use perle cotton for these types of demos… Though the next one is with a finer thread! -MC
Wow, that’s a really pretty stitch! I’ll definitely have to give this one a go, thanks~
Stitch fun, indeed! I can’t wait to get supper out of the way so I can go try this out. And the menu just changed from pork chops to grilled cheese sandwiches!
Way cool Mary, thanks! Your colorway makes it look like a miniature knot garden. On a non-counted ground, I would be tempted to use Tiger Tape to mark/delineate the grid rather than mark the fabric. It’s easy to reposition & the same strip may be used multiple times. Usual disclaimers, satisfied customer etc.
G’day there Mary,
Beaut, thank you. It’s like blue flowers amongst some greenery. Growing up a lattice framework perhaps. Nice filling stitch for Jacobean elements, including the traditional pomegranate.
Cheers, Kath
Oh Mary, this is PERFECT. The idea, your neatness, the explanation, the bee-u-tiful floss, the colours. You’re such a blessing to know.
I just got to office and now I can’t concentrate knowing that my head is going to be preoccupied with trying this stitch out.
Hy Mary, this is wonderful and I’m going to try it. Just a question about the back of the stitch, I’d like to make it as neat as possible, so… can you show me your?
I love your website!
Angela from Italy
Hi, Angela – when we visit it again in a couple days, I’ll try to remember to take a photo of the back! MC
This stitch looks a lot of fun and will be on my stitch list to do!
You make that look so easy and almost actually fun! I wouldn’t have thought it before I read the whole tutorial.
Hi Mary, I enjoy reading your tutorials so much but this one pushed me to immediately pick up some thread and try it out. Now I’m in love with this pattern. I want to edge a teatowel with this but am wondering about how to work the pattern so that it looks continuous over 12 inch length? My biggest hoop is 10 inch (one oval one circle).
Thanks for any advice and thanks for your wonderful site.
I think it would look neat, Jen! But I’m not sure how you would handle it with a smaller hoop, since the threads really need the go the whole length of the area. Maybe you could map off and center three (or four?) blocks, separated by equal spaces of white or something, and do it in blocks? That might look interesting…? MC
This is a really beautiful stitch and so easy although it looks complicated. Thank you Mary for the fantastic ideas and stitches . I’m absolutely fascinated by your skill with needle and thread!!!
I definitely have to try this stitch at some point! Your instructions/tutorials are so thorough and easy to follow. Thanks for sharing your knowledge!
Hi Mary, Thank you for this lovely tutorial, I’m definitely going to try this stitch. Your instructions are easy to follow. Thanks for sharing your knowledge!
I love your tutorials and love this one so much! My maiden name was Griffin so this one I definitely plan to give a try to use on a crazy quilt block.
Hi Mary,
Thanks so much for your generosity with this website and tutorials. Don’t recall how I came across your site, but am I GLAD I did. I am a BEGINNER, truly beginner – still trying to find my way to learn the basic stitches. Your beautiful works really inspired me to learn something new.
Would you recommend what type of fabric I should start with and where I might get it?
Thanks Mary.
Love this stitch. Am trying to learn how to embroider and would love to use this stitch on simple crocheted squares which would then be joined to make an afghan. My question is: what does the back of your finished piece with the lattice filling/griffin stitch look like? Is it “neat” enough to be seen when the back of the afghan is visible?
Hi, Etna – the back is pretty clean, actually. The only stitches you see on the back are the straight stitches between each laid thread, so they’re along the outside perimeter, and then you see your stitches lines from the couching stitches. If you’re careful to work in a specific order as described above, you end up with a perimeter of straight stitches, and columns from the couching. Hope that helps! MC
Thank you, Mary! 🙂
Dear Mary,
You yourself is an artwork. I am fan of your work. The embroidery which looks so complicated you are able to define it in in such a precise and simple way. Yes with you Mary embroidery is a great fun. Thanks a lot for all the effort.
Regards,
Bharti Tripathi
lovely thanku so much
Its simply awesome, somply WOW. Wonderful
Thank you for the wonderful and versatile stitch pattern.
Your instructions are well described and very comprehensive.
Oh! it’s so gorgeous, I want to make it right now, I am always been a cross stitcher, but now I’m trying to learn some other techniques and your site is now my place thanks
Hello, i just came across this post and i totally love love love this stitch. I would like to do a big piece of 40×70 cm and fill it up with this stitch do you think it would work well? What do you think are the challenges to consider?
Thank you for the inspiration and help
Elena
Lindo, lindo, lindo!
Parabéns!
Fascinante! La explicación y las ilustraciones,Son concisas, exactas y muy motivadoras.
Muchas gracias por compartir tus experiencias. Pareciera que con los hilos del bordado, se fuesen tramando lazos de amistad.
Soy encajera. Hago Encaje de bolillos y bordo mucho. Tus páginas me traen alegría.
Es bueno sentirse cerca de quienes tienen nuestras mismas inquietudes!!!
Un abrazo. María del Carmen
I recently went to Needle n Thread to find directions for doing stitches–and found only videos. I prefer to use the step by step photos that predated the videos on your site. Are they still available and I missed finding them? Where should I look to find more of hem?
I ask today because I looked at the instructions for the Hearty Kaleidoscope and find that the very first stitch listed–the Griffin Stitch–is the step by step photos. When I am stitching, I don’t want to be chained to my computer –wet up in a corner of the bedroom–to watch a video: I want to print off the photo instruction and have it with my threads and fabric to use in my stitching chair!
Thanks for a link if your step by step stitch instructions are still available on your site.
You’ll find a lot of step by step photo tutorials in the Stitch Fun series, here: https://needlenthread.wpengine.com/2012/05/stitch-play-index.html You can also go through the alphabetic listing of stitches (there’s a button to get to that alphabetic index right at the top of the how-to video page). Many of those link to the Stitch Fun articles, which are photo tutorials.
Muito esclarecedor esse passo a passo. Lindo trabalho, amei!
Una explicación muy clara y muy bien ilustrada el paso a paso con las fotografías. El resultado es innovador y alegre, me gusta mucho. Muchas gracias por las publicaciones. Saludos desde Gran Canaria, España.
Love the pice