


Remember last week when I mentioned that I’d taken up embroidering on eggs? Well, it’s a mammoth subject to write about!
To make it more manageable, I’m going to divide the instructions over several articles that will appear intermittently over the next few weeks. The articles will be filed away into a series under “Tips and Techniques” here on Needle ‘n Thread, so that they are easily accessible for you.
Today, let’s talk about preliminary supplies.
Now, keep in mind, this is my approach, developed from piddling around with the concept for the past year. It’s just the way I do it – and there are always other ways to do things. So if you find a better way, don’t hesitate to use it!
Before you launch into the challenging but rather addicting practice of embroidering your Easter eggs, there are some preliminary supplies that you’ll need to gather.
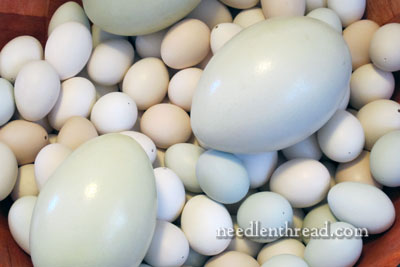
Eggs for Embroidering
The most obvious? Eggs.
And this is a subject unto its own, because there are All Kinds of Eggs in the world.
In the photo above, you can see my collection (rather vast) of bantam chicken eggs (which are about half the size of a regular chicken egg), and on top of those are three rhea eggs. Rhea’s are a South American version of the ostrich, and they produce eggs similar to emu eggs, but instead of being blackish green, they are pale yellowish-greenish-ivory-ish in color.
I don’t know if I will ever embroider those. But I have them. So I might.
There are turkey eggs. These are royal palm turkey eggs, speckled with brown. They have a nice shell and are teardrop shaped.
These are blue rouen duck eggs, and possibly my favorite eggs ever. They have a beautiful, porcelain-like shell that is glassy-smooth, and they are pale, pale blue.
And there are goose eggs. I have one underway right now – I don’t really like the shell as much, as it has a chalky feel to it, but it’s a tough egg shell, which is good!
And there are regular chicken eggs, which are just grand.
My advice on eggs: if you can, use eggs from fowl that are raised free-range, and not eggs from the grocery store. The shells are much stronger. (And the eggs taste better all around, too!)
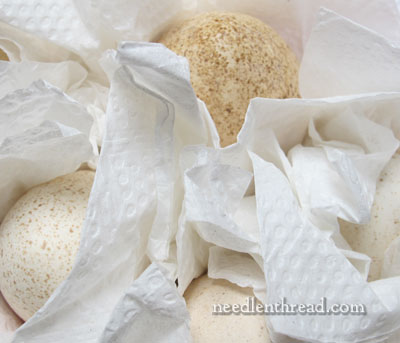
Preparing Eggs for Embroidery
You will need to empty and clean the eggs. There are all kinds of ways to do this. I like the Blas-Fix Egg Blower – it’s fairly easy and painless to use. But you can also blow the eggs by mouth (clean them first) or even use a baby’s medicine syringe or a…. mmmm… can’t think of what it’s called, but in our house, we call it by the rather vulgar name of “snot sucker” – one of those squeezy bulb things you use on a congested baby.
The concept is pretty simple. If you’re using a tool like any of those mentioned above, pierce a hole in the egg, insert the tip end of the tool into the hole, and pump air into the egg. The air will displace the insides and force them out of the same hole. Do this over a bowl. And then cook me up a nice egg casserole for breakfast tomorrow morning, will you? Seriously, if you can use the eggs, do – why waste them?
Alternately, you can buy eggs, already emptied, from a variety of sources online. Check around! Pysanky supply stores often sell prepared eggs, and you can find several suppliers on eBay, too.
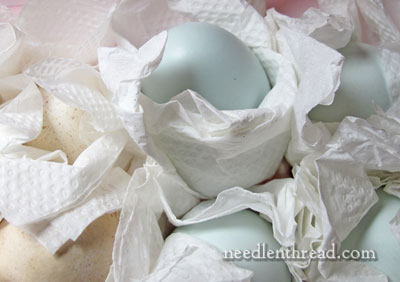
Once the eggs are empty, pump warm soapy water into the eggs and clean them out really well by shaking them around and emptying them and shaking them and emptying them. If you want to go a step further at this point, squirt in a bleach solution and let it swash around a bit for a while (a few minutes or so), and then empty and rinse the egg and let it dry completely. Alternately, you can save the bleaching part until after you’ve drilled your egg.
Hardening Eggs before Embroidering
The option of hardening the eggs before you embroider them is up to you. On more delicate eggs (like the bantam chicken eggs), I think hardening is pretty essential. On tougher eggs like goose eggs, I don’t use a hardener.
One reader suggested that the eggs should be hardened, because over time, the calcium will disintegrate. Many readers suggested using Modge Podge as a hardener.
I’ve talked to a few egg artists and egg embroiderers, and the most common recommendation I’ve received for a hardener is sodium silicate.
If you choose to go the route of hardening the shell, you might want to experiment with different options.
We’ll revisit this topic a little later.
Tools for Drilling Eggs
You will need something with which to drill holes into the eggs. What you use is up to you. I’ve heard of folks using hand-held push drills (that are used for making miniatures), or even using pins to prick holes.
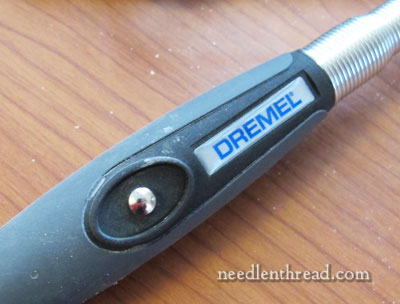
Personally, I prefer using a Dremel drill. I have learned how to wield this Dremel drill (with the flex shaft attachment) with Great Finesse this past year. You don’t actually need Great Finesse – in fact, I don’t have Great Finesse when it comes to power tools, as I’m rather a chicken and prone to accidents, but the drill was easy to learn how to use. You do need a steady hand, though.
This isn’t the place for a how-to on using a Dremel. If you haven’t used one in the past, then do some research or ask a friend. And if you don’t have one, maybe you have a friend who does and would be willing to lend it to you.
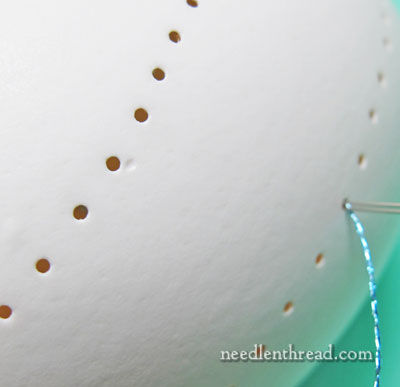
Some folks pierce their eggs with pins or small nails, but the results that I’ve seen are a bit chippy. The nice thing about a using a drill is that you get nice, smooth little holes in the eggs, without having to put much pressure on the shell. And smooth holes don’t wear the embroidery thread out as quickly, either.
Anyway, you need something to make holes in the eggs.
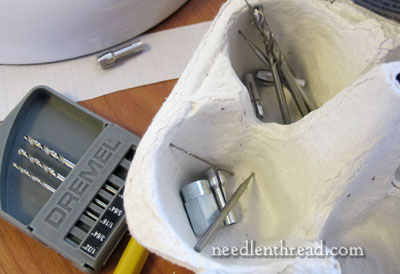
If you’re using a Dremel, you’ll also need a collection of drill bits or engraving bits. I’ve used both successfully, but I find I like the smaller drill bits best. I use the 1/32″ bit and the 3/64″ most frequently, though the 1/16″ works well for larger holes for ribbon and heavier threads. Along with the bits, you’ll need the collets that the bits fit into.
Egg Safety
As a final note on the preliminary preparation of the eggs, you might take a look at these safety tips on working with eggs, especially if you plan to drill a lot of them.
Some sort of eye protection is a must. And, especially if you are sensitive to dust (but even if you aren’t), a dust mask is nice to have.
Other Preliminary Supplies
There are a few other supplies you’ll want to have on hand, most of which you may have floating about the house already.
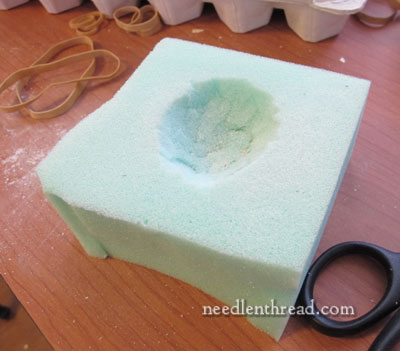
A bit of soft foam will come in handy. This is leftover upholstery foam cut into a square, with an indentation cut in the middle. I rest the egg in this while I drill it. You’ll also want a separate, clean soft something-or-other on hand for when you’re embroidering the eggs. Much better to rest them on something soft than to have them rattling around loose on a hard table.
How do I know? Well, after a few crack ups, you figure these things out!
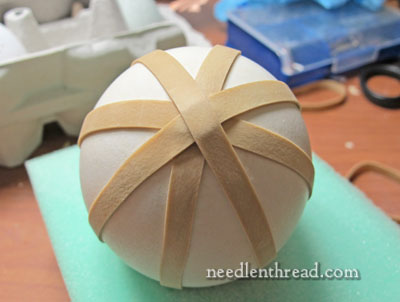
A supply of wide rubber bands in different sizes is helpful for marking out vertical and horizontal lines or dividing segments.
You’ll need a good sharp pencil for marking the drill spots on your eggs.
And of course, embroidery supplies!
Final Shot:
This whole embroidered egg thing has been a trial-and-error process. It’s fun, it’s a little addicting if you like slow craft, and it can be quite surprising sometimes.
Word of advice: once you’ve finished embroidering an egg, don’t try to drill more holes into the shell! There’s something rather messy about a drill running at 35,000 rpm entering an egg filled with thread…
Next time we visit this topic, we’ll talk embroidery supplies. You probably have everything you need in your stash, except for two small (inexpensive) highly recommended, downright indispensable tools.
Any questions? Feel free to ask ’em below!
You can find all the articles in this series on embroidery on eggs here, including tips and techniques on how to get started, some easy stitches, and so forth!
The word you were after is PIPETTE! Snot Sucker has a certain charm though…!!
Ahhhhh. Thank you! 🙂
It’s certainly what we called ours!
We call them bulb syringes.
I was hoping you would do this, Mary! Thank you. I love your play by play, especially on something I really want to try. We use a lot of eggs here, so my first step is to start practicing blowing out eggs and collecting them. I also would like to buy a dremel tool. Gotta start investigating that, too. Can’t wait for the continuation. Hopefully, there won’t be any more like in your last photo, LOL!
Dear Mary
Thanks sooooooooooo much for this wonderful article. Dremel drill essential I use a 7700 Hobby drill which comes with a charger and it’s small easy to hold. I agree with you I do like duck eggs wonderful to work with. Good idea about the elastic bands hadn’t thought of that one. I have to say putting my duck eggs in cold salted water and boiling them for ten minutes after they come to the boil has helped them to harden,I’ve completed 3 eggs and one in the process of embroidering and no accidents so far. Can’t wait for more on this addictive I definitely am.
Regards Anita Simmance
very interesting. Can you make a video when you start embroider the egg??
Oh, yes! A video would be awesome!!! I’m dying to try this…I told my husband about this project and said I would have to try it…his response: of course you do (plus a long suffering sigh)!!
oh yes!! a video! Please!
If it’s possible to consume the egg itself, that’s kinda nice,because when I first discovered this type of … finish, I read/saw the tutorial and the person said that if the drill (or something) was used, it’s better to throw the contents away… :/ personally I don’t know. The drill can be well cleaned and all… But a beginner might have to give tries to too many eggs at first, too many to eat in 1 day :0)
I just use the little puncher that comes in the Blas-Fix kit to open the hole, and I keep the equipment nice and clean. I also wash the eggs first. But yes, often it’s just too much egg to get used.
I’ll see about some videos, folks… I don’t promise, but one never knows! 🙂
I use a Dremel tool to drill our eggs, which we do eat. I sanitize it between uses with bleach.
Let them eat cake!
Hi,
Nice collection of eggs, Thank you for the wonderful tutorial. When i showed my mom that “real” eggs were embroided she said she wouldn’t believe it, when i showed her the you tube video she said we can’t do this, now when i show her your tut she’s ready to try it, all thanks to you. Waiting to see your embroidered eggs (and also what happens at my mom’s place). Take care.
Oh I can’t wait for the next update! I can not imagine this project!
Can’t wait for you to continue. This is so intriguing. Your collection of eggs was so educational. Wish I still lived on a farm so I could raise some of the blue shelled ducks. I had pet rhea ducks years ago. Great pets! (Outdoors of course)
Thanks again for your detail instruction.
Hi Mary, There are some cake receipies that call for 10 eggs. I would stress the bleach part so the thin membrane inside the egg doesn’t develope a smell later on. ji
Yes, exactly! I usually bleach after drilling – takes care of pencil marks, too!
Bonsoir,
SVP comment nettoyer les oeufs.
Merci pour votre réponse.
Cordialement
M.
I got so much egg on my hubby’s old Dremel (which needs new bushings but he won’t admit it) that he gave me one of my own for Christmas a few years ago.
I favor the use of painter’s gesso on egg shells, at least when trying to make scenic eggs with little gewgaws inside. (Never have figured out the opening/closing doors thing though)
Your embroidering eggs project is fascinating.
Dollhouse hinges and hot glue. I have successfully latched an egg door with a loop of wire and a head pin but I find that gluing a bead “doorknob” is sufficient enough because the doors don’t swing open on their own.
Thank you Mary and the other lady …to this work ^^
G’day Mary,
All so very interesting. Thank you. The colours of the eggs are so lovely.
The first time I heard the word ‘piddling’ was in a rather embarrassing situation. I was waiting for an elderly American man, visiting his son and daughter-i-l, to finish with his cup. He realised and said “Oh, you’re waiting for this and I’m just piddling with it.” Piddling here is ‘doing a wee’! Your piddling is called ‘fiddling’ here!
Cheers, Kath.
If you want eggs that have hard shells then you should try Guinea Fowl eggs. We keep hens, ducks, geese and guinea fowl and the guineas have the hardest shells. They are fairly small (large bantam size) so might be worth a try.
MIL GRACIAS POR ESTAS BELLEZAS
Please, can you how I can harden the egg shells? And how to use for example sodium silicate? I am from Argentina.
Thanks and regards
Monica
Hi, Monica – sodium silicate comes in liquid or powder form. With the powder form, you have to add water according to the instructions. With the liquid form, you just dip the egg in and then put the egg on a pin board to dry. You can make a pin board by nailing long thin nails into a board, and then turning the board upwards, so the nails are sticking up. Put the eggs on the nails, through the bottom hole. Wear rubber gloves or similar when working with the sodium silicate. The eggs should dry for 24 – 48 hours.
magnifique yo quisiera ensayar me encanta los bordados
You know, when you first started the egg subject, I thought they were beautiful but felt no real urge to adopt another craft. But you know, after reading more and more, I can feel stirrings….
I cannot agree more with the use of a hardener of some sort.
My heart just about stopped this evening when an egg I’m working on for a friend/customer slipped out of my hand mid-stitch and fell to the floor from my lap before I could catch it. Luckily it landed on the rug (and not the hardwood floor!) and was okay, but my gosh, I actually stopped breathing for a second! I’ve had a few that weren’t hardened fall on the same rug and crack. I had painted and sealed this egg before stitching, because she wanted it a particular shade of blue. The paint and sealer served as a hardener to protect it.
I love this! Now I have another craft to tuck under mt belt. Thank you so much for all the information.
God bless!
Hello Mary. Please write a book on this great subject of embroidering on eggs!!! Please notify me if you decide to let the www in on this wonderful art, Pat Jay, Texas
I would love to learn to embroider on eggshells. Could you give me some advice on where to get the needles and a book on where to start or a video? I have searched and found nothing.
Thank you,
Sally
Hi, Sally – you can find the long-eyed (or big-eye) beading needles on Amazon. There is no book on the topic, to my knowledge, and the videos available just show either finished embroidery or very fast embroidery and are not really very instructive. It’s a matter of feeling your way through it. A lot of room for experimentation!
Just stumbled across your site-I’m a neophyte in world of technology & a wanna be egger. Where can I find the i structions for hardening egg shells. Thank you and I’ll be back.