


So you want to embroider eggs, and you’ve gathered all your supplies. You have the preliminary tools necessary, you have your embroidery supplies (including some specialty needles), and you’re ready to start!
Now it’s time to sit down with your eggs and work out your designs and do your drilling. This is the process I go through for the final egg preparation right before embroidering it, including getting the design on the egg, drilling, and final cleaning.
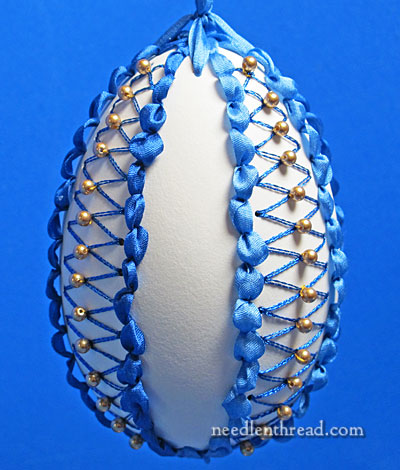
Here’s the last egg I finished. It’s a goose egg. You’ll want to start simply, and this is probably not the simplest way to start, but it wasn’t super difficult. The only hard part was adding the beads after the diamond lattice was stitched – kind of difficult to find the holes again!
Remember that there’s no “access hole” in the back of the egg – the whole egg, all the way around, looks like this. It’s divided into these four ribboned and lattice sections. Because there were holes on all four sides of the egg, from top to bottom, I was able to work the design without a large access hole. I just used the holes in the design.
So, when you design your egg, remember that the design must allow you to move back and forth with the needle from lots of angles around the egg.
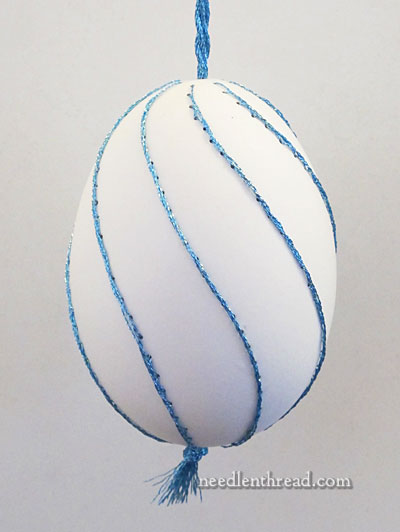
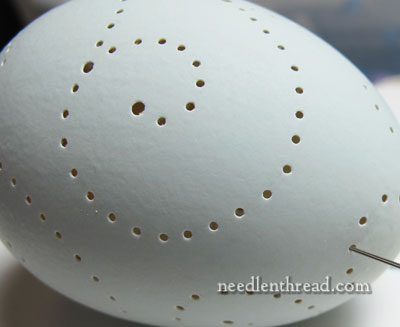
This egg is much simpler – it’s one of the first ones I did. It’s a regular chicken egg. These gently spiraling lines work all the way around the egg, so that, from all sides, I have access to holes to pass in and out of with the needle. I also have the top and the bottom hole on the egg, and these are a little bit larger than the thread holes, so they allow me to manipulate the direction of the needle a little bit more.
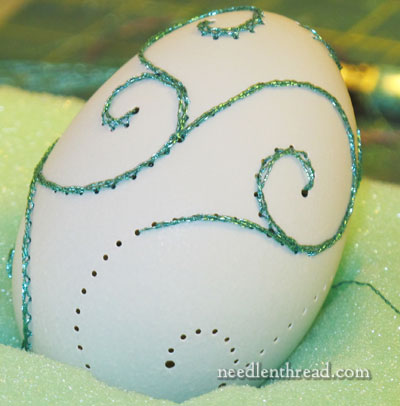
Here’s another example of a simple design. This egg – a light blue rouen duck egg – is just covered with large swashy swirlies around the whole egg, which gives me access holes all around, and from all angles.
So that’s the first thing you have to keep in mind – make sure you can access all parts of the egg from all around and from all angles, with the holes in your design.
To get the design onto the egg, grab a pencil and start sketching. Unless you’re working an obvious line drawing of swirls and so forth, it’s a good idea to make a preliminary sketch in a sketch book, so that you can refer to the sketch for your layout. Once you have a perforated egg in front of you with no design lines on it, it might be tricky to remember what you intended to do!
Think in terms of the stitches you will use, and how they will work on an egg. Some stitches work better than others and are a lot easier to make than others. Fly stitches, buttonhole, chain, stem stitch, straight stitches, ribbon stitch – these all work well. Any kind of stitch that requires you to “scoop” your fabric is not so easy. Woven stitches like ribbed spider web and woven wheels work well. And detached stitches (detached buttonhole, etc.) work well, though they are a little thick-ish looking on the delicate eggs. So, keep stitches you can use in mind while you conceive your designs.
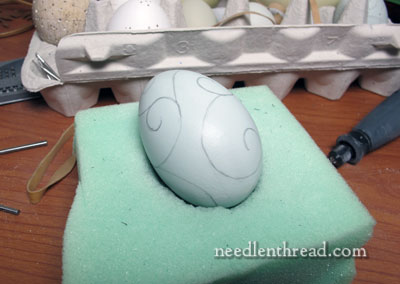
With a simple swirly design like the one above, free handing it directly on the egg with your pencil is just fine.
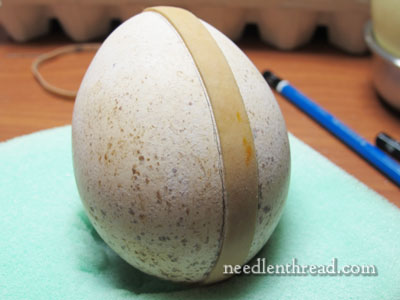
You can use rubber bands to help you mark off wide lines or center lines, like I’m doing on the turkey egg above. Just place the rubber band around the egg (it needs to fit a little snuggly). Work the rubber band into place carefully, and examine it all around to make sure it’s centered and where you want it. Then gently draw your line on one or both sides. It’s pretty easy to scoot a rubber band out of place, so make sure you’re not pushing on the rubber band when you draw the line.
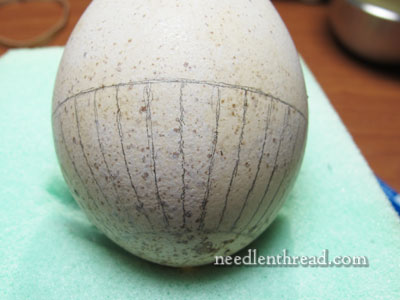
If you need to make divisions in an area, start by dividing first in the center, and then dividing the resulting to halves in half, then each of those in half, etc. This will keep your spacing a little more accurate and consistent.
You can literally sketch everything out on the egg, or your can sketch just the lines that indicate the stitches. If you sketch out things, you’ll get a better idea of how the design will fill the egg.
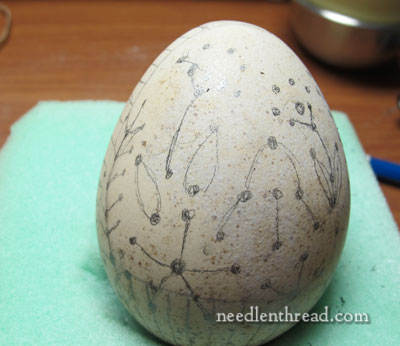
Once I’ve sketched out the basic skeleton on the egg, I go through and dot all starting and ending points of every movement of each stitch – any place the stitch would pass through the fabric gets a dot.
Wherever several stitches converge, I mark in a really big dot, because that hole will need to be larger than most of the other holes.
Also, ribbon holes need to be larger than thread holes, so as you dot up the starting / stopping points on your egg, keep all this in mind. When it comes to drilling, you’re more likely to drill accurately in the first sitting if all your threads and starts and stops are thought out in advance.

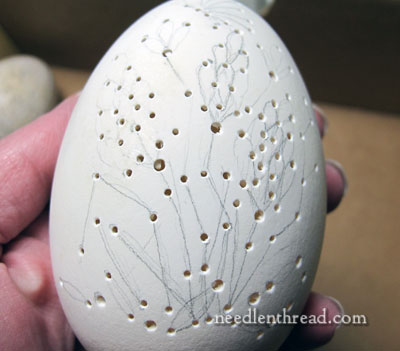
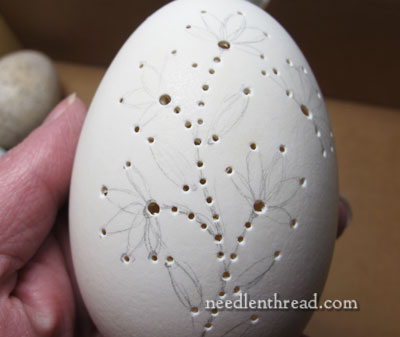
Here’s a goose egg, all dotted up and ready to drill.
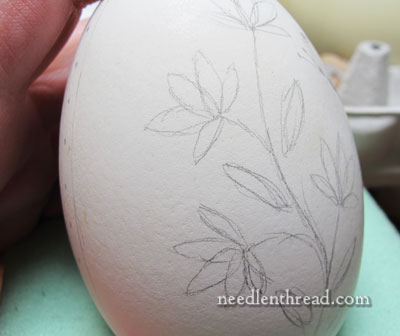
Here’s the other side of the same goose egg, with the design sketched on, but no dots yet.
Remember – you definitely want a design on both sides! On this egg, because the designs are far apart, I’m also going to do a decorative edge around the vertical perimeter of the egg, to give me holes on all “four” sides of the egg.
When I drill, I start with the large holes first. These, I make with the about a 3/32″ bit made from the Dremel. Then I switch to a small engraving bit, and enlarge the holes with an engraving bit if necessary.
On goose eggs and other tough eggs, it’s easier to put the initial hole into the egg with a drill bit than with an engraving bit, but it’s easier to enlarge a whole will an engraving bit as opposed to a drill bit.
With chicken eggs that are not quite as tough, I find I can put holes in with the small engraving bits pretty easily, but I like the 1/16″ bit for regular thread holes.
Play around with the different drill bits and engraving bits you have, to get familiar with what they can do.
In any case, I drill the big holes first all around the egg, then I switch bits and drill all the smaller holes.
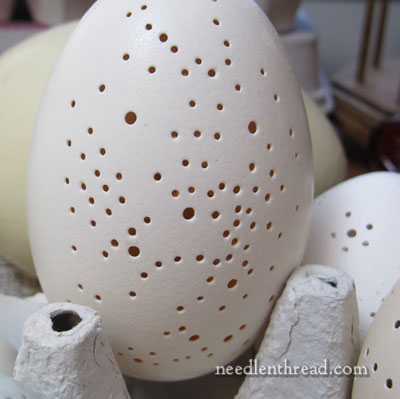
You can see that the egg looks pretty rough at this point. Up until now, it has only been cleaned with hot soapy water, so you can still see bits of the membrane in there. No worries – we’ll take care of that in a moment.
Here’s the back of the egg, drilled and ready for a final cleaning.
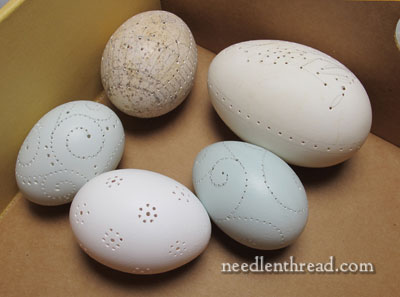
And here we have a group of drilled eggs, waiting. From the bottom, around clockwise, there’s a white chicken egg, a blue rouen duck egg, a turkey egg (royal palm turkey), a goose egg, and another duck egg.
If you’re planning on doing a lot of eggs, but you haven’t done one yet, do one first, to get the feel of the drill, of what size holes you want, what kind of alterations in your approach you’ll need to make, and so forth. Then, once you’re comfortable with the whole thing, work in batches. Design and drill and clean several eggs at a time, so that they are ready for you to embroider without having to go back to the designing and drilling table.
Clean!
To clean the eggs after drilling and to remove most of those bits of membrane that might be visible, fill up a little bucket or glass bowl with bleach. Work with rubber gloves, in a ventilated area, and dip the eggs in one at a time. Leave them for a few minutes, and then, working with your hands (hence the gloves), rub the surface of the egg while it’s in the bleach. Make sure you’re getting all the pencil marks off. Then rinse the egg in warm, soapy water and check it. You may need to give it another dunk in the bleach.
Goose eggs take a little longer in the bleach bath – about five minutes. Chicken eggs don’t take as long – about two minutes.
I end up working mine around in the bleach, then rinsing with warm soapy water, then putting them back in the bleach, working back and forth until I’m satisfied with their cleanliness.
When you’re satisfied, clean and rinse them really well with warm soapy water, and then with clear water, and set them to dry for at least 24 hours.
Incidentally, the bleach does not make the blue eggs white, unless you leave it in there for a long, long time. This is about a three minute bath in regular household bleach (straight), and the blue is not diminished at all.
The turkey egg was a little different – at first, it was mottled all over with reddish and dark brown speckles, but these were kind of like rough pigment on the outside of the egg. Much of the mottling game off, leaving just a smooth, light brown egg with some darker brown dappling all over it.
So test the whole bleach thing with the type of eggs you are working with, if you’re working with colored eggs of any sort.
Finally, you might have a different way you go about the whole clean-up, and that’s fine. This is just the way I do it, and it seems to work well.
Now we’re all set and ready to stitch – next time we visit embroidered eggs, we’ll finally do some embroidery!
You can find all the articles in this series on embroidered eggs listed in the Embroidery on Eggs index, in case you want to follow along!
Dear Mary
Thanks so much for this article, I love all your different size eggs it’s so hard to obtain different eggs in North London I can only buy locally duck or chicken eggs I could go on line and order I will have to look into that I’d love a goose egg. Your designs are lovely and thanks for all the tips and techniques, I can’t wait for the stitching.
Regards Anita Simmance
This is exciting, Mary. I’m looking forward to the actual embroidery.
OMG! this is simply amazing Mary. I’m afraid, i cannot find eggs with different sizes here in my country :(.
These are just lovely Mary! I love the idea of decorating the symbolic egg for spring or Easter. I teach Pysanky or Ukrainian Eggs to my International Foods students when we do our Russian Cuisine unit. (I teach high school and middle school.) The students enjoy this process and are quite creative. I have used a few tools that make the process a little easier and accurate for my students, and they would lend themselves quite easily to embroidered eggs as well. This link will take you to the Ukrainian Gift Shop which is located in Minnesota.
http://www.ukrainiangiftshop.com/Craft-Lathe/productinfo/LATHE/
The link will take you to their egg lathe, which my students and I find to be very helpful in drawing lines, and holding the egg in place while we design. I think one of these would be very helpful for someone wanting to get serious about this embroidery option. As is true with pysanky, and I’m sure embroidery, the less you actually touch the egg and leave oils and residue from your hands, the cleaner they stay. This lathe could hold any size egg while you design and drill and perhaps even while you are embroidering it! There are other supplies on this site that might also be of interest, such as egg stands, and egg blowers, and egg shells that are ready to use. I have no connection to the shop other than that I have ordered from them for many years, and I truly enjoy their products and service. Be aware though, Pysanky is as addictive as embroidery, so be forewarned when you get to looking around the website!
Hi, Pamela – thanks for the link! I’ve done Pysanky as well, and taught it to teenagers a couple years in a row. You’re absolutely right about the addictive nature! If nothing else, I just love the smell of the beeswax! Thanks again! MC
What embroidery stitches require you to “scoop” the fabric?
Rosalie
Different braid stitches – such as the cable plait stitch, for example. Anything where both sides of the needle need to be up on the front of the fabric, so you can hold your thread twists with it…
Thanks for all the information about embroidering on eggs. Your eggs sure are pretty.
Embroidering eggs looks like so much fun, delicate, but fun! Thank you for doing all of this “ground” work for people like me! I’m fairly new to embroidery, with no teacher, except your lovely self! I’m loving the lattice sampler, I did the battlement couching in shades of magenta and lighter shades of pink, it was so much fun and I just love ombre!
Thank you for forging a path for me!
~Jillian
Mary: If you could look inside the egg, would you see lines of thread or ribbon criss-crossing back and forth from one side to the other? Do you have to decorate the two sides of the egg simultaneously with the same thread? Do you have to plan your designs so as your thread comes out of a hole on Side A, you are completing a stitch on Side B? Should I hold all these questions until the next installment when all will be made clear? Janet.
Hi, Janet – yes, that will be made clear in the next installment. But generally, no, the threads don’t cross around (much) inside the egg, though occasionally, they do, depending on situations especially involving ending the threads. Mostly, I try to make sure I can start and end threads in the vicinity of the area I’m stitching in, but that’s not always the case. Also, many of the finishes (when a cord is involved at the top of the egg) require a stretch from the top to the bottom of the egg at the very end, but if you’re not using a cord, you might end up with at least one thread or ribbon spanning the inside from top to bottom. It just depends! In fact, a lot of the thread placement depends on what you can reasonably do from the angle you’re working from. But, in general, no, there isn’t a lot of back-and-forth inside the egg. I suppose there could be, but it would end up not only being a waste of thread, but also the threads would eventually build up and get in the way of trying to move around inside the egg. More on that point coming up in the next article! ~MC
Where is your store?
HI! Thanks for a very informative website. I’ve read several of your web pages. I’m a man who wanted a challenge for decorating eggs this year. I knew nothing about sewing let alone drilling eggs. Yet I’ve had a blast creating some very interesting and actually quite attractive eggs! All thanks to you. I’m actually quite proud of my final eggs. I’ve made it even more challenging as I do not cut out the back of the egg and only use a small drill hole through which I pass my needle. I’ve even made a few eggs where there are opposing designs on different sides of the eggs. I sew through one design while creating the other. By the time I tie off the final knot, you can’t tell where I did my sewing from! My designs may not be as intricate as yours, but they are certainly cute and fun!
That’s terrific, Jon! I’d love to see pictures! I totally agree that it’s much more challenging and fun not to cut the backs off – it gives the eggs that Wow Factor!
i just cant believe it is a real egg… oh my god.. simply superb..thanks for sharing
Thanks for sharing… stunning blue .. really attracting.. but still cant believe it is a real egg.
I am in love with the goose egg that looks like a corset! I am trying to replicate one but I’m having a hard time visualizing the top and bottom and I am curious on the order in which you did things. Do you have anymore pictures? Or any additional tutorials on this one? Are the string crossing on the inside of the egg and being used on the other side? If so, it seems like eventually you would have so much string or ribbon in the center of the egg that you might get caught up with the needle adding more string or ribbon. Thanks! I’m just trying to visualize:-)
Hi, Ann – yes, the thread used on one side crosses over inside to make the stitch on the other side. At the top, everything just goes into one big hole, and then I out bows over the ends, one with a loop on it for hanging. I don’t have any other photos, I’m afraid, but I hope that helps a bit!
I love your beautiful eggs! I’m struggling with blowing eggs properly. I use farm eggs and the shells are quite sturdy. I can’t seem to poke a hole without getting a huge hole on one side. Do you have a hint as to how to break the yoke properly to make it easier to blow out? Those farm fresh eggs have very thick yolks, too!
I use one of those blas-fix egg blower kits. They’re not very expensive and they work really well. You stick the needle into the middle of the egg and whip it around a bit to break up the yolk, before pumping the innards out.
You amaze me!
Can you use one of those blue pens that disappears with a damp sponge to mark the egg? I have three goose eggs sitting in my closet…. I have been afraid to start them! Thank you for all the tips on your website – it’s making me a little braver!
I haven’t tried it with the blue disappearing ink pens, but I know that they don’t always stay disappeared – sometimes, the lines come back, or, over time, they can leave a yellow shadow line. I prefer not to use them for anything. The pencil works great – once you drill, you just have to wash the egg one more time to remove any residual pencil marks.
Thank you! I’m just starting to embroider some goose eggshells, I was wondering which bits you use for the Dremel. Thank you for your time!
Shelly
Hi, Shelly – I used the smallest possible bits, and I think I even bought a set of extra-fine bits for the Dremel and used a couple of those. I haven’t gotten back to drilling eggs for a while, so I’d have to dig out the tools to see exactly what I used.
Hi Mary
I’ve just discovered the idea of stitching into/onto an egg. I knew the most obvious thing to do would be to blow a raw egg and just work with the shell, as with egg painting, but being me, a boundary-pusher and not great at delicate/intricate work, I decided to go with hard-boiling the egg just to see what would happen.
It’s all rather exciting and if you’re interested, you’re welcome to take a look on FB or Instagram, under the name of Jet Propelled.
However, I now come to my next predicament of how to preserve the stitched egg. Obviously I don’t want something malodorous in my body of work… unless it was intentional.
So, I’m wondering if you have any ideas. I’ve akso asked a friend of mine who is a chemist and artist. For now, I’m dehydrating it on the radiator, but I’m not sure that will entirely solve the problem.
Any thoughts welcome. And thank you so much for this glorious blog that a friend directed me to. I appreciate not only the art but also your willingness to share your process clearly and generously.
Jet
Hi, there, Jet – Yes, I’m afraid the point of stitching on a hard boiled egg escapes me entirely. It might make it somewhat easier to keep the egg intact when stitching, but I don’t see how it can contribute to any artistic longevity for the egg. So, no ideas on this end – it’s not something I’d do. Just the idea of the smell of rotten egg makes me queasy. :-/ If you’ve ever had a pysanky egg that wasn’t cured completely, break, then you’ll know how bad such things can smell. There’s no chance of a stitched egg curing the same way (over time, without emitting a bad smell, like pysanky does), as the hard boiled egg is more certainly exposed to the air, elements, environment, bacteria, etc., because of the unavoidable holes.
Hi,
I always be passionate with seed beadings, creative anything and art things. I saw one of your egg with sewing, how do you sewing through an egg with needle otherwise the egg will break very easily. How do you that? I am interesting to know how. Amazed…
I hope to hear from you soon.
Thank you.
Kind Regards
Helen
Hi, Helen – you can read all about how I stitched on the eggs in this article: https://needlenthread.wpengine.com/2013/03/embroidered-eggs-stitching-lines-swirls.html