


Last week, we ventured into the subject of hand embroidering eggs by talking about the preliminary supplies you’ll need to undertake this zany operation.
If you’re keen to put your needle and thread through whole, empty egg shells to create rather unique little Easter ornaments (or ornaments for any time of the year), then you’ll also need a few embroidery supplies, one of which I find essential.
So let’s look at the supplies you’ll want to have on hand to embroidery your eggs. Most of these, you’ll probably have in your stash – in fact, embroidering eggs can be a great stash-busting project! Bits of ribbon and specialty thread that might not otherwise get used can be put to good use embellishing eggs.
Needles for Embroidering on Eggs
If you’re going to embroidery eggs, your task will be a whole lot easier with these. To put it frankly, you need these.
Trust me! You Need These.
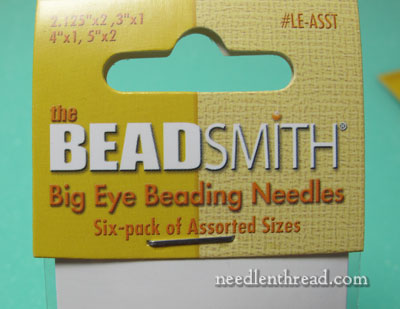
These are Big Eye Beading Needles by BeadSmith. They come in different packages – you can buy an assorted pack that has several different sizes, from 2.5″ long to 5″ long, or you can pick up a 4-pack of 4.5″ long needles.
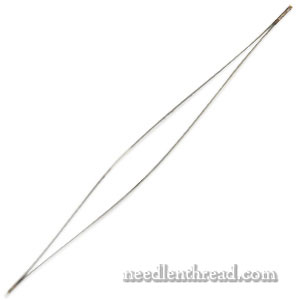
They’re wire needles, made from two wires joined to a tip at both ends, so that the middle of the needle is two parallel wires. When bowed, they look like the photo above. Normally, they just look like a really long, thin wire. They are flexible (to a degree), and though they are so long and thin, they can still easily carry rather thick threads, multiple strands, or ribbon.
Even better, though, is the fact that the “eye” (the opening where the two wires aren’t attached to each other) traverses practically the whole length of the needle. This means that you can stick the needle through the egg, in one hole on one side and out on the other side, with the needle protruding on both sides of the egg – giving you access to the threadable eye on both sides. When we look at techniques, you’ll see why this works out well.
It’s a wonderful tool, and I’d say it’s necessary. If you don’t invest in any other tool for this whole undertaking, at least invest in these needles. They will save you a wee bit of frustration!
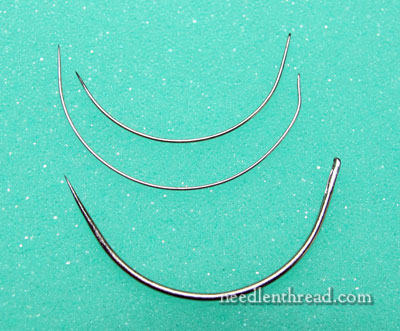
Curved needles come in handy, too. I find the smaller curved beading needles by Clover work great for single strands of thread, but the eye is too small for ribbon. The larger regular curved needles require some really careful manipulation, if you aren’t hardening your eggs. If you’re eggs have been hardened, it’s not as difficult to use them.
I’ve only used the curved needles twice, and both times, I could’ve used the Big Eye Beading Needle instead, but I wanted to try the curved ones. Again, they come in handy – but they aren’t absolutely essential (or at least, they haven’t been so far!).
So those are the two types of needles. You can also use regular needles for some techniques, too, as you need or want to.
Threads for Embroidering Eggs
The threads you use to embroider your eggs can come straight out of your stash – you don’t necessarily need any required thread.

I’ve made great use of the sparkly DMC Light Effects threads. They work well on sturdier eggs. Because they are metallic, you have to work with a little care, but since you’re embroidering on eggs, you have to work with a little care, anyway. What I like about them is that they twist nicely with stem stitch, they come in vibrant (and some soft) colors, and they add a little festive sparkle to the eggs.
And who doesn’t like festive sparkle?
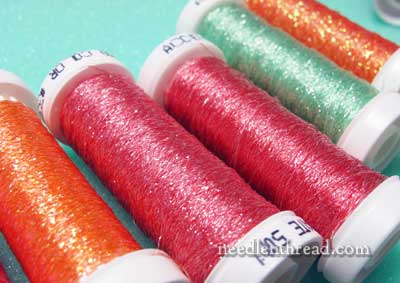
Additionally, if you want sparkle, Accentuate works well, but if you want any noticeably color from it, you have to use several strands at a time. You can also blend Accentuate with similar colors of floss (cotton or silk) for a subtle sparkle.
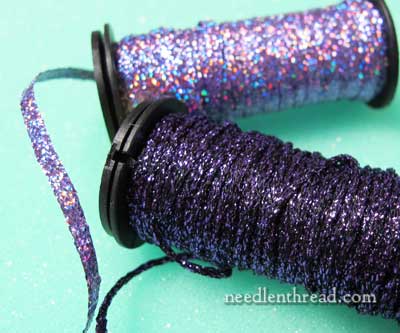
Kreinik makes some fun ribbons and braids that work well, too, with care. They’re a bit stiff to pull through the egg, but if you plan in advance and drill the holes large enough, they work. They can also be couched.
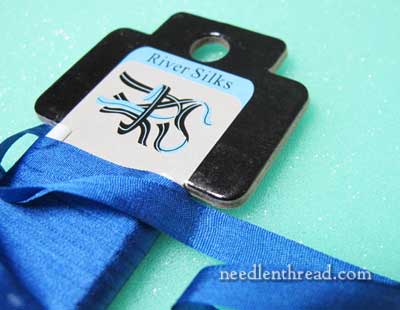
For bold flowers and decorative, bold lines, some silk ribbon is nice to have on hand. I’m using River Silks silk ribbon (really nice stuff!), but if you don’t want to invest eggstra in your eggsplorations, use what you have on hand or whatever is readily available to you at your local needlework shop or craft shop.
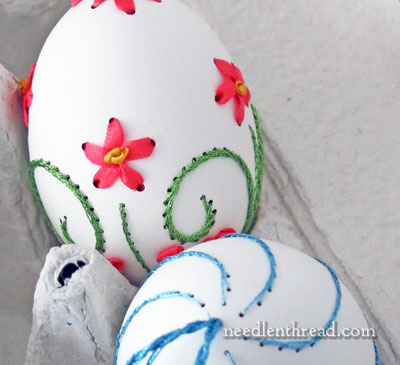
Both 4mm and 7mm are good to have. In the photo above, the first embroidered egg I showed you uses regular 4mm silk ribbon.
The advantage of 7mm ribbon is that you can get nice puffy ribbon petals and leaves, lines, and bows when you pull the thread into the smaller drilled holes. The holes “gather” the ribbon for you, which can be quite effective, and a nice decorative effect can be more quickly produced.
And of course, regular stranded DMC cotton floss is fine to work with, too – and the range of bright colors available at a reasonable price can’t be beat.
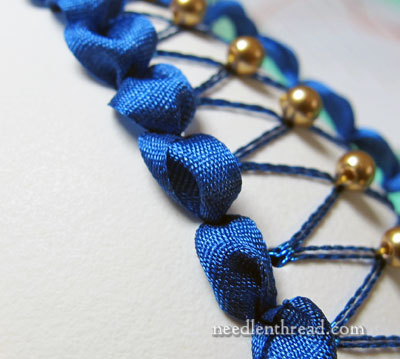
You can use silk floss, crewel wool, perle cottons, regular cotton floss, ribbon floss, silk ribbon, fine decorative braids, metallics, ric-rac, printed ribbon, narrow bands of lace – whatever you have on hand, or whatever you might find that entices you!
Floss and softer threads are easier to work with than metallics. The easiest thread I’ve found to work with so far is 50 wt silk sewing thread. It is strong, it has a wonderful sheen, it doesn’t wear on the edge of the egg, it slips right in and out, and it’s nice to stitch with. I only have two spools, though, and both are gold, so I’m a bit limited.
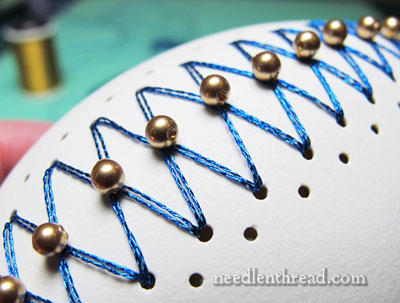
And beads! Don’t forget beads! Round beads, seed beads – whatever kind of beads your little heart desires – with the exception of bugle beads. Because bugle beads are long and straight, they don’t suit the curved surface of the egg so well.
Stash Bust!
Dig through your stash before investing in new supplies for embroidering eggs, especially when you first start out. It is likely that you’ll have a few breakages, so you might want to start with floss first, to get the feel for working with the eggs. Then, as you become more confident, progress to specialty threads and embellishments. This will save some waste.
Next time we visit the subject, we’ll explore some simple egg embroidery techniques.
Questions? Comments? Are you going to try this out? I’d love to see what you do, if you decide to venture into embroidering eggs!
You can find previous posts about embroidering on eggs here. I’ll be adding an index to the site under Tips & Techniques shortly, so that you can easily refer to the articles in sequence.
Hi Mary, I love your site. I’m new to embroidery, so I really love all the info and tutorials you have put together. I don’t think I’ll be doing eggs anytime soon, but I can appreciate the beauty of them. I hope to try it someday though, so thank you for taking so much time putting this tutorial together. Your work is lovely.
Jean Tobey
I am excited to try this technique and will eagerly await your instructios.
Sorry Mary, I don’t plan to try egg-broidery. It sounds too fiddly for me. Out of curiosity, how do you plan to store those?
Yep, it’s probably not for everyone! If I store them, they’ll be in foam boxes. I use upholstery foam a lot, and it’s easy to cut a recess for storing fragile things.
Thank you Mary for yor amazing site! I am curious about the actual eggs. Chicken eggs – yes, pretty simple to find. But all those other eggs – what a beautiful variety! Where do you find these eggs? (I wanted to ask the other day, but for some reason, each time I tried to add a comment, I would get a 404 error.)
I got some of them from different people here in KS who raise fowl, and some, I found on eBay. I notice the price for eggs listed on eBay go up, the closer we are to Easter….
Once again, Mary, you have given us great stuff!
I don’t embroider much, but the eggs have touched the embroider in me. I look forward to more information on the embroidery of eggs…..holding my breath at the wonder of embroidery on eggs…who knew!!!
Dear Mary
Thanks so much for your eggsploration I love it. I’ve just ordered some silk ribbon I was using satin ribbon and it’s so stiff and hard to pull through I have broken so many eggs using the satin. I love the patterns on your eggs I’ve been trying to think about different stitches to use other than straight stitch but can’t think of any yours are lovely. By the way boiled salted water does not stop the eggs cracking. I’m still trying I’ve finished 2 eggs and a third on the way but it’s a slow process as I’m trying to think of different patterns and stitche to use I must buy some light beads.
Regards Anita Simmance
Thanks for the info. I have my eggs blown and washed, but not yet hardened. I’ll do that today and start collecting supplies
Just curious…..how many eggs should we plan on preparing before we start embroidering? I know we should count on breakage and wondered how many you started that never made it to the end. 🙂
I’ve broken three – one was a pretty sturdy chicken egg, when I tried to re-drill it, and the drill caught on the threads and tore the thing up. The other two were bantam eggs, which are much more delicate. If you are using sturdy chicken eggs (or larger fowl eggs) and are very careful, you can probably avoid breakage – but it doesn’t hurt to plan on two or three practice eggs! You’ll want to start pretty simply, anyway, and as you get the hang of it, you’ll end up coming up with more and more ideas for designs and so forth. I’d start with at least half a dozen…. MC
Okay, got eggs, floss, beads and needles. I’m ready…and excited to try this.
Oh Dear! This takes me right back to 1980’s. We had a craft supply shop and creating “Faberge” eggs as they were called them was in vogue. We had trays of little bits of beads, flowers, wires, threads – what looked like row of tiny strung beads,etcetera. People spent hours rummaging through trying to find the exact bit of jewel to complete the job having started with their “spares”. So a word of warning make sure you have enough matching bits BEFORE you start. Colours get dropped and so do sizes – especially in this climate where a wide range is expensive to carry as I know to our cost. Good luck though they can look beautiful. One extra tip they often cut them in half and then covered the seam with pretty braids sometime creatig totally different front and backs.
So happy I found your site tonight! I will definitely be trying this egg embroidery. My kids raise poultry in 4-H and I think it be a wonderful craft to compliment their poultry project. Can’t wait to show it to the group!
I got my supplies and today I finally got on with drilling. I’m using goose eggs. I only had time to do one and based it on a sort of paisley shawl pattern. I was pleasantly surprised to find that the drilling really wasn’t as nerve racking as I’d expected. I haven’t used a hobby drill before but my dad had one in his tool stash (looking rather shiny and new, don’t think he’d used it himself). My kitchen sounded just like a dentist’s room and the smell was a bit like the hot dentist tooth drill smell but all went well after a quick battery recharge pause. This is so exciting, I just had to try this from the moment you posted the first picture. I’ve got to get myself a big eye needle now and I’ll be off doing the next bit. I’ve made pinflair eggs before and they are pretty but this is another league entirely and has that ‘ship in a bottle’ mystery about it. If they work out I’m going to enter them in a local Easter craft display for fun.
Jane azzopardi
Hi Mary your site is wonderfull.i want to know after blowing the eggs what shall i do? what can i use to make the holes in eggs. how should i harden the eggs? how do you start and finish the emb eggs as the egg is closed from everywhere.
i hope i can follow your embroidery tutorial.
Hmmm, as if I need another craft, lol! but you have me intrigued, as I too, love eggs! I might give it a go, I have most of the supplies you listed and am quite a magpie. I don’t know if I hate you or love you for posting this!
I love it and want to try it….there’s so much you can embroider and eggs of all things..you do beautiful work
I’ll be researching this
Thank you
Marian
je trouve votre document très bien
je fais des oeufs décorés mais surtout avec découpes
j’ai 80 ans ,mais je vais faire un essaie de broder ,mais j’ai lu
que vous parlez de durcir les oeufs
pouvez vous me donner un renseignement
je suis en Bretagne mais rien pour les oeufs
depuis 25ans je je commence a en avoir près de 100
j’aime les essaies
dans l’attente de vous lire
Bonjour, Nicole! I have not found anything to suitably harden egg shells. When I do these eggs, I just use the cleaned egg shell as it is. It works best with duck eggs, which are stronger than chicken eggs. 🙂