


Battlement couching is used in hand embroidery as a colorful filling stitch.
Continuing with different lattice stitches in the Stitch Fun series, today we’re going to look at battlement couching and see just how easy it is to do!
I think this is my Favorite laid thread / lattice technique – I love the way it looks when it’s worked with several colors! When it’s just worked with one color, it’s kind of ho-hum, but when you start adding a gradient of color, it’s much more exciting!
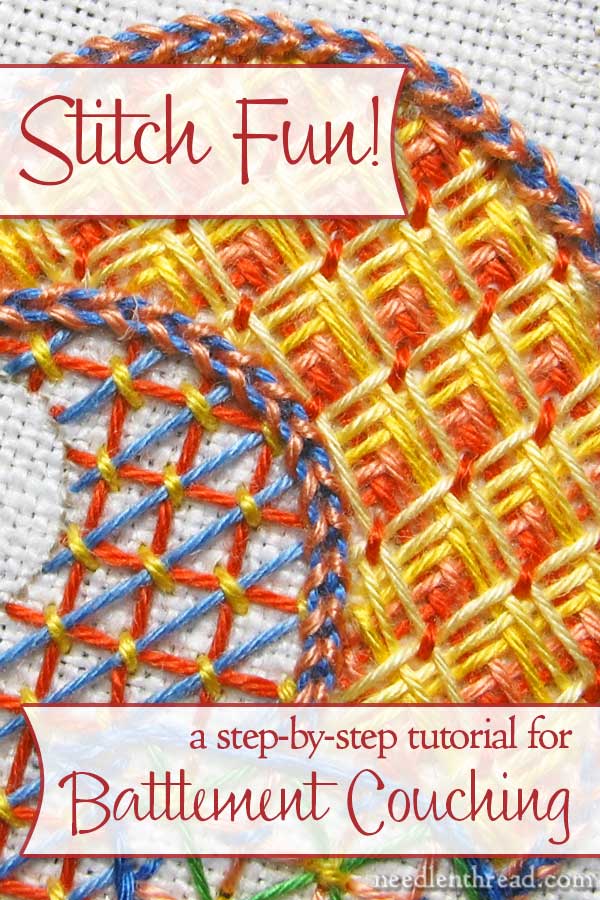
Battlement couching is made up of a series of layers of laid threads crossing over each other, with the last layer of laid threads couched to hold everything in place. It’s a relatively simple technique that creates a pretty impressive effect!
So let’s look at how it’s done!
You’ll start by working a grid of laid threads, just as you do with any other lattice technique. Lay down all the threads that go in one direction first, then cross over the first layer with the second layer in the other direction.
So what you have here (in the photo above) are two layers to make the grid – the first layer slanting from lower left to upper right, and the second layer from upper left to lower right.
Make sure the first laid threads in the first color (the first two layers to make the original grid) are spaced far enough apart to fit all the subsequent lines of color in between the first lines. Here, my grid lines are spaced about 1/4″ apart.
The second color is worked just to one side of the threads in the first layer. Make sure that the first set of laid threads in the second layer of color (pictured above) are stitched in the same direction as the very first layer you put down. This way, each layer of threads alternates direction.
Then, when you work the second set of lines in the same color (crossing over the laid threads you just stitched), make sure that this layer is on the inside of the squares formed by the first grid. You can see a “V” of the lighter thread inside the darker thread grid below it.

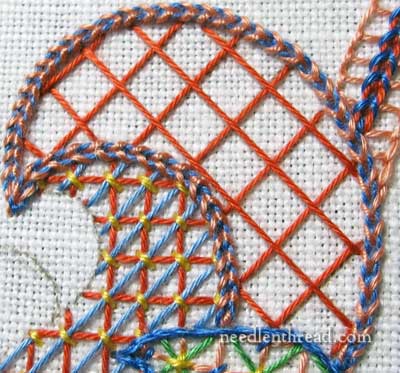
And now you can work a third color in the same manner, just off to the side of the second color. In the photo above, you can see that we are gradually filling in the whole grid.
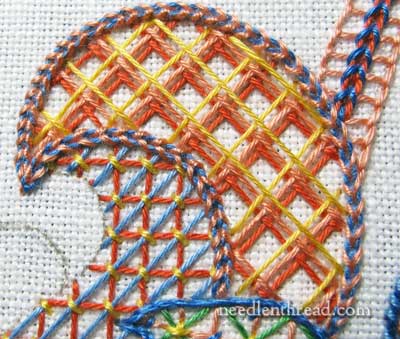
And here’s the second layer of the third color, finished.
You could stop here if you wanted, but I want to fill in the whole grid, so that very little white is showing. But this is where battlement couching is fun – you can change the way it looks by filling it up more, or filling it up less! You can also alter the appearance by working from light to dark, instead of dark to light – it’s up to you!
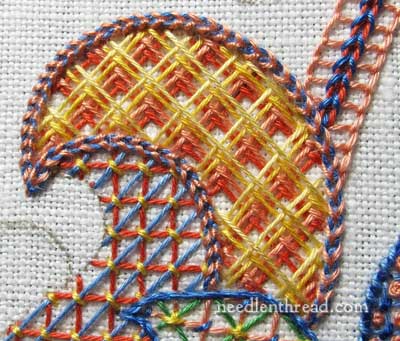
And here’s the fourth color, a slightly lighter yellow, laid down…
…and finally, I added a fifth color in the lightest yellow.
Now all the laid threads are complete.
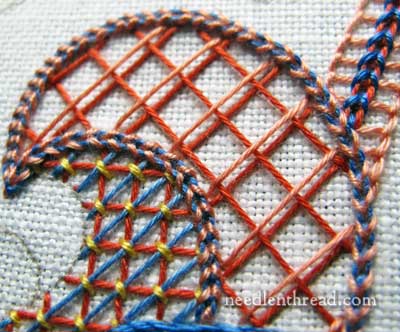
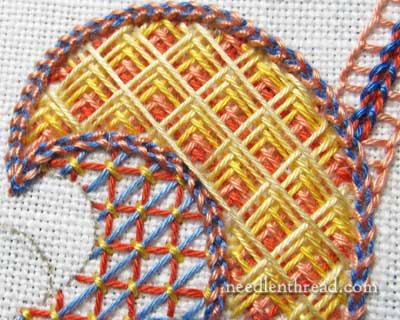
Let’s pause a second, though, and look at that photo above. See the long line of the lightest yellow on the top layer, that stretches across that inside curve on the shape we’re filling?
Here’s the problem area, circled. When your grid lines get this close to the cut off for the shape, you have to judge whether or not you want to stretch the line all the way across the shape.
In fact, this is going to be a little problematic, because when I couch the thread there, I’m going to get a little wiggle in the line. I probably should have ended the line on one side of the apex of that inner curve, and then started the line again on the other side of the apex of the curve. But I didn’t!
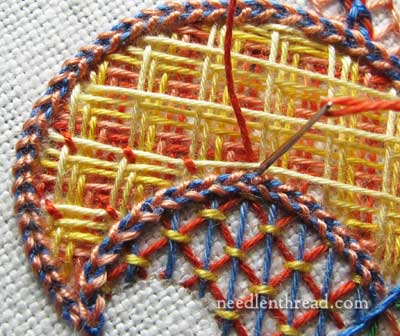
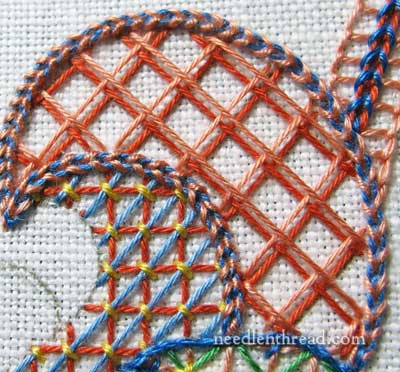
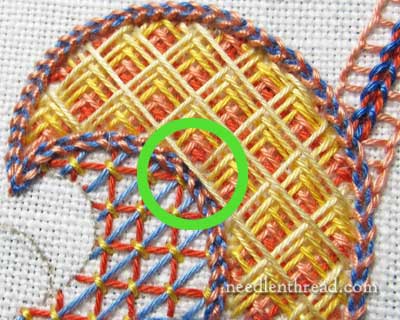
Now, it’s time to couch. I chose the dark red again to couch the final layer down, because I wanted the contrast, and I wanted to accent that dark color again.
When you couch the threads down, you’re only couching the intersections formed by the last color. Once that intersection is couched, all the layers are secure.
Notice in the photo above that there’s a bit of a drift going on in that longer, problematic line I mentioned. Yep – there’s gonna be a wiggle!
Make sure, when you try battlement couching as a filling within a shape, that you judge carefully whether or not your lines are too close to the edge. (Don’t say I didn’t warn you!)
And there it is, the finished battlement couching. The wiggle in the line isn’t too noticeable – it’s just right there at the apex of the inner curve.
So, go try battlement couching to fill a shape! And feel free to play around with it to create different looks, by changing the number of layers (fewer layers will leave your ground fabric showing, which can be a nice effect), by altering the direction of the color gradient (dark to light or light to dark), and so forth.
If you’re working with silk and goldwork, one approach to battlement couching is to use a color gradient for all but the very last grid layer, and for that last grid, to use a gold thread. It’s Very Pretty when done this way!
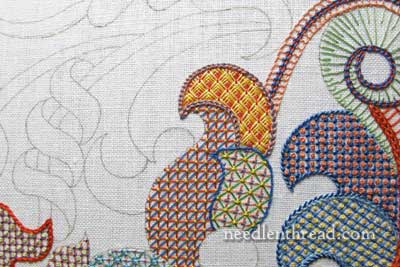
Want to work your own lattice sampler?
You can find similar tutorials for other lattice techniques listed in the Stitch Fun index
If you’re not familiar with laid threads and lattice techniques, you can find basic information on working lattice fillings in the tutorial on Griffin Stitch.
If you want the whole lattice sampler in an easy-to-use layout guide, you can find the Lattice Jumble Sampler Layout Guide available here.
Looking for inspiration & information on hand embroidery?
There are all kinds of reasons to sign up for the Needle ‘n Thread daily newsletter! Check them out and sign up today!
It is really nice tutorial Mary. The details are simply superb. And yes, combination of colors makes it look more exciting, you were right.
Nice, Mary 🙂 thank you.
But the back of the work must look messy… Right?
Dear Mary
Thanks so much for this tutorial I love the stitch fun series and I love lattice stitch. A nice touch with the different colours so effective I love it. This would be very effective on an egg I wonder if it would work, it might as they are all straight stitches I shall have to see.
Regards Anita Simmance
This is so pretty Mary! I will Play around with this stitch once I finish the strawberry class (which I’m really enjoying!).
Great tutorial, Mary.
I first came across Battlement Couching in Japanese embroidery where it is know as 3D Effect and is usually done in graduating shades of flat silk and a final layer of gold thread as you described. I have only done it one and think that it would have looked better with at least one more graduating shade of pink in it.
http://www.threadsacrosstheweb.blogspot.co.uk/2010/12/christmas-ornamentcard-swap.html
Your lattice sampler is looking great now.
LOVE it!
That is visually yummy.
A symphonie of colours and embroidery points. Golden hands you have!
Beautiful! And I might even be able to do that. 🙂 Thanks!
Wow, what a lovely stitch! Thank you for sharing. I’ve really enjoyed this series on the various lattice stitches.
How tightly do you pull the couching stitches? From your pictures they look tall/loose, so the top layer of laid thread is not pulled down to the fabric. Can you please tell us more about this part?
No, the couching stitches are fairly tight – they pull the stitch to the fabric – but they aren’t tight-tight. They just need to hold the stitches down. – MC
I find this really fascinating – thanks for walking us through your process on this sampler. I’m curious though about the scale of it – the grid you started with in this one you said was about 1/4″ apart – but that seems SO tiny to me compared to how big it looks in the picture (you have an excellent camera to show us all these details) 🙂
Mary this is so cool! I love how it looks, and that you can see the different layers…almost like an optical illusion. Thank you.
Oh Mary, You’re God’s chosen embroiderer. How I’d love to meet you.
Dear Mary,
I know you must said before but what fabric and threads are you using in this sampler?
Hi, Suzanne – I’m using DMC coton a broder #25 – love the stuff! -MC
G’day Mary,
I love this. Interesting and fun. Thank you. Cheers, Kath.
Do you ever have classes, or weekend workshops?
Hi, Janet – Right now, no. In the future, I plan to get back to teaching groups. Occasionally, I do host online classes, and I’ve got one in the planning stages right now. Thanks for asking! ~MC
This is a great stitch indeed ! I’ve tried it, and it is quite difficult. It requires a great regularity. But I really love the effect – looks like a pineapple !
Dear Mary, i’ve been following your newsletter with great interest, i’ve been learning a lot with you… and this last one is remarkable, so beautiful!!!
love everything you do! Thank you so much for all your knowledge and for sharing with us.
I bought one book you’ve shown here “Stumpwork” from Artist Kate Sinton from RSN. it’s so, so wonderful, so useful, a cocktail of step by step information. i’m so glad i bought it! thank you. could you please advise me on what to use for drawing on the fabric? is it a normal pen or one of those washable ones? I bought one but it draws before the work is donne so the lines keep disappearing…a normal one kind of blurs in the fabric..i’m sure i’ve miss one of your tutorials i’m such a newbie!!!
best regards, Marina Santos
Beautiful work Mary. Above in the Battement COuching info… what stitch did you use for the blue/peach outside border (and also in the middle)?
I am debating on whether or not to purchase this e-book or the herringbone and plaited stitch e-books.
I am “sorta” leaning towards the jumbler as I eventually want to do gold work and the lattice sample seems like a good “primer” for couching threads. My first attempt at lattice filling had me laughing so hard. It was the saddest looking lattice filling I have ever seen. Do you agree by doing the lattice sampler it would be a good foundation for eventually doing gold work? Gold is going to be a ways off until my stitching is improved. I am sticking with just cotton thread (stranded and perle for now, though in June I have it in my budget to purchase some floche) as ripping out or “unstitching” is being done at a higher rate than just stitching! The alphabet e-book I purchased last month really improved my stitching. Mr. Christi even complemented me on how much my stitching has improved and my stitches are now, more or less, consistent. It made my day, heck, it made my year!
Wednesday my lap stand will be delivered, so I can work on my stitches that I know I need both hands to work. Except, the 12″ scroll rods that come with the stand are the no-baste kind, so I ordered, from Needle in a haystack, the kind with webbing in 2 other sizes (8″ and 10″). I am hoping I can convert the 12″ scroll rod into a basting rod, though the rods are fairly inexpensive so it’s not a big deal to order a set that is the basting kind. I just can’t see putting Velcro on fabric that cost 95.00 a yard, it just seem very, and I mean VERY wrong!
Okay, I will wait to see if you think the jumbler is one that I should go for this month or the herringbone/plaited braid stitch e-books. I am planning on buying all of your e-books in the next coming months, but my budget only allows one (or two for those that are less than 10.00) a month. I have been saving most of my craft budget the last three months so I could purchase quality Hardwicke Manor hoop and a couple of sets of Evertite Stretcher frames with the L-tool, the T-tool will have to wait another month. I have done very well this month and stayed within my budget and have a little left over for next month as I want to purchase my Ottlite magnifier! I should then be set with the main tools for a few years! Then comes the saving for the linen and linen twill! I know I will only be working with premium muslin for a few months until I can afford to purchase some fat quarters of different linens. Budgeting does teach patience and I know I will value these tools and the art that I create with them, because I didn’t impulse buy! I saved and cut some corners and I am very pleased I waited and researched what tools I needed!
Dang, I really wrote a book again. I am so sorry I keep doing that. I am really working hard not to write such long comments, I just really value your advice as I know you will give me honest answers to my questions.
Have a good day Mary!
Christi
Hi, Christi – I think if you’re planning to forage into Goldwork and other types of surface embroidery, the lattice jumble will help you get comfortable with a variety of stitching, including couching. The herringbone booklet is really specific to that stitch alone. The lattice jumble will help you get familiar with more stitches and stitching combinations. Hope that helps!
love your beautiful embroidery.
Loved it.Tooo……….oo good.easy to follow steps .Thank u.
Thank you Mary, for your wonderful instructions on battlement couching, they are most helpful! I am doing “Late Harvest” from Hazel’s “Crewel Intentions” & had undone the pomegranate 3 times before getting it looking almost right now! I really made sure my right angles were very correct this last time so its much, much better, but I still had quite a lot of trouble spacing the beads so they were even, but will persevere because as you say it need not be perfect!
So thank you for your help, I’ll look forward to learning more skills from you in the future.
Many thanks,
Margaret
Your tutorials are inspiring and easy to understand. You have so much imagination with colors and stitches. Thanks for sharing.
I love to see your very beautiful stitching! This looks like a log cabin quilt pattern.
Love this battlement couching.Never heard of it so must give it a go.So many lovely stitches to try.Thankyou Mary for giving me so much inspiration.
So enjoyed reading this. Cannot wait to try it!
Thank you so much for posting this. I’m teaching myself embroidery and this looked so fun I had to try it.
So far I’ve only done a little practice piece- and it’s certainly not perfect- but it’s so COOL! And pretty simple, actually. I absolutely will be using battlement couching in the future.