


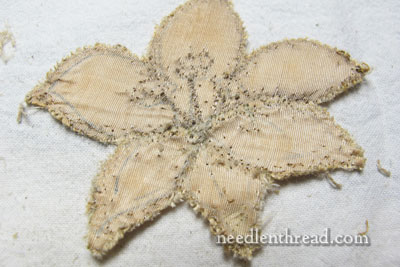
The last time we glimpsed inside this piece of old goldwork ecclesiastical embroidery, we looked at one petal of the lily and talked about how it was created. But the lily has more to show us, so we can’t just leave it and move on to the next goldwork element yet!
In fact, though it was interesting to look at one petal, the Really Interesting Stuff about the lily is ahead. When we take the whole lily apart, we’ll see that there’s a lot more to learn about this type of goldwork than simply how the technique is done.
For example, we’ll find out whether or not the same padding and card were used on the whole lily, we’ll find out how the stamens (stitched in bright check purl, or frieze brilliant) were worked on top of the gold, and we’ll discover the order in which the whole flower must have been worked.
So, let’s dig in!
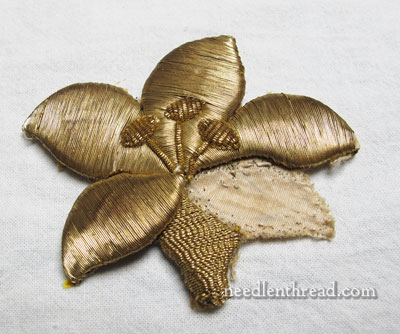
Here’s the lily, with the first petal that we took apart last time removed.
The base of the lily is worked with a very fine rococco thread, which is like the smooth passing thread that’s used on the rest of the lily, but it is crimped and wavy. I’ve written about a goldwork thread called check thread before (I also used it on the goldwork Tudor Rose on the Medallion project), and this is pretty much the same stuff.
The technique used to cover the base of the lily is the same as the one used to cover the petals. But notice that the base of the lily (the part worked in the wavy rococco) is a lot flatter than the petals. We can pretty much guess that the padding used under the rococco is different.
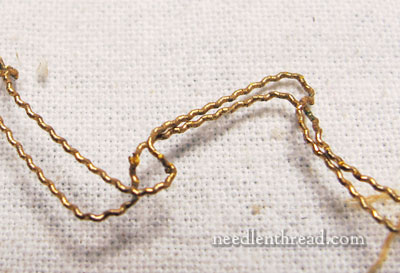
The first move was to take off the gold thread. It came off in pairs, just like the smooth passing thread used on the petals.
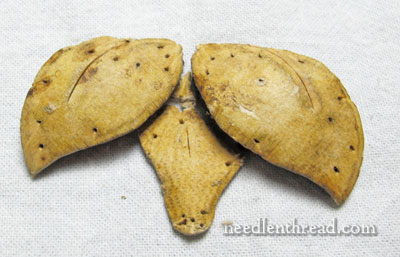
Once the gold was removed, the paper card foundation was revealed. You can see where it is sewn to the fabric still.
You might notice a small split in the center top of the card form. This wasn’t used. If it had been used the way a split like this is intended, there would have been an indentation in the goldwork on the top of this element, where the gold was couched into the split. We see that on the top petals, but it didn’t happen here.
Here’s the rococco thread, up close. See the crimped wave in the thread? Using the wavy rococco adds texture to the design, and makes a visual separation between the base of the lily and the rest of the petals.

Here’s the card, removed from the ground fabric. You can see the dents on the card, where the thread held the card to the fabric.
This is how the base and the first petal we removed fit together. The first petal is so much higher than the base!
There’s no felt padding at all behind the base. It is just the card, which is one of the reasons it lies so flat compared to the other pieces.
I took the goldwork threads off the second lower petal of the lily, and everything was the same as the first petal. Here are both petals in their positions over the card foundation for the base of the lily.
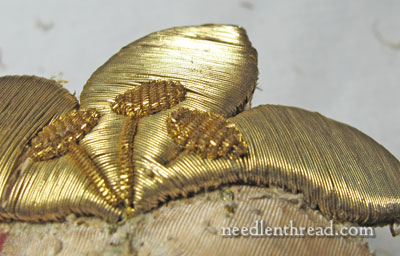
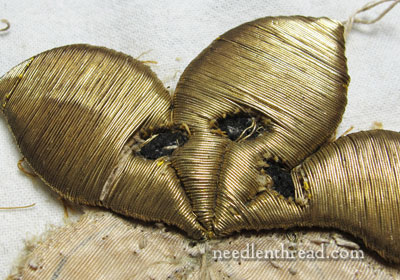
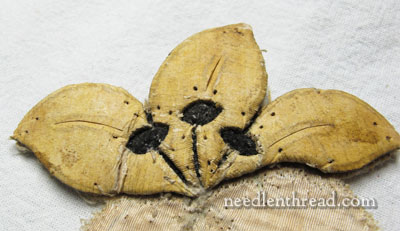
Now let’s move up to the top petals. We’re going to remove the bright check purl (the sepals) from the top of the lily petals, and see what they reveal. When we remove the bright check purl, we’re going to learn a little bit about how the sepals were worked, and also a little bit about what we’ll find when we take the petals apart.
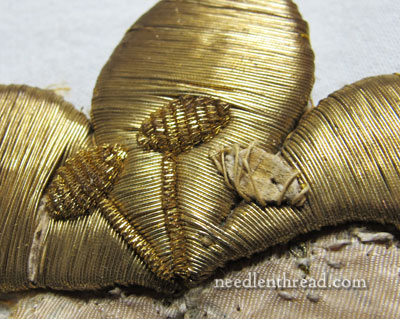
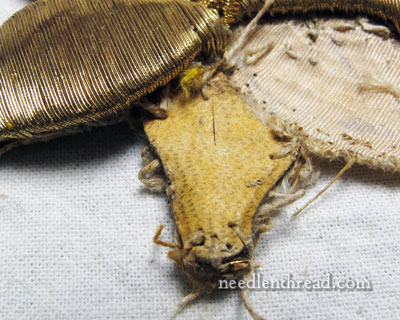
First of all, there’s an additional card foundation under the bright check purl sepal.
Now the question is: is this attached right on top of the gold of the petals? or is there actually a space cut out for each sepal?

Another thing we’ll notice at this point is that the lower part of the right petal and the lower part of the center petal are joined with the smooth passing thread. Looks like the two petals might be one piece!
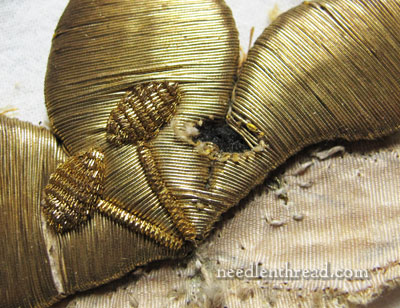
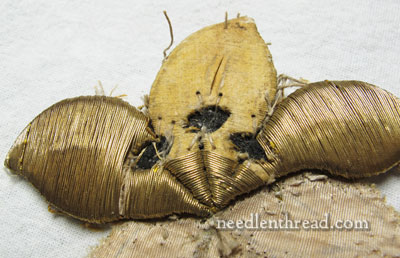
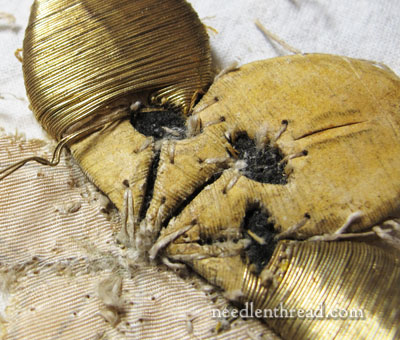
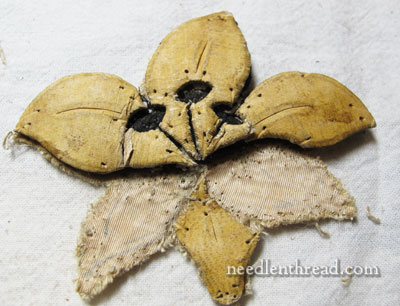
The foundation of the sepal comes off, and there you see a hole! The felt padding is there, but not the card used to form the petals. So, we know there’s a sepal hole in the card. This is detailed stuff! These are little pieces – the sepals no more than a 1/4″ long.
All the sepals are off, and we have three football-shaped black holes there where the felt padding under the petals shows through.
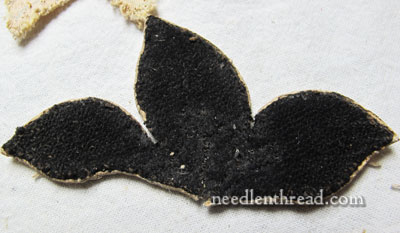
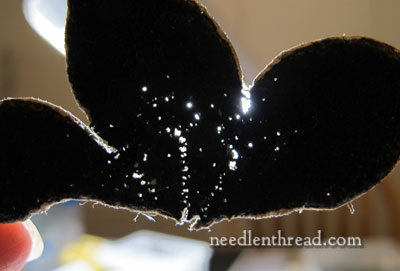
Now it’s time to start removing the gold. I started with the center petal, and starting removing the gold in one long strip (of paired threads) until there was a break in the threads.
And now the gold on the base of the three petals is removed. The base of all three petals shared the same gold thread, up to the lower edge of the sepals.
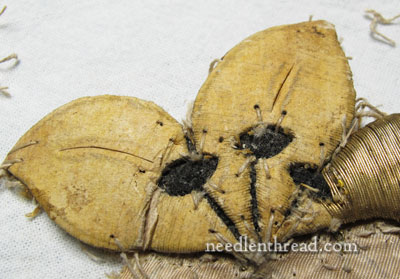
And now the center petal and the left petal are bare…
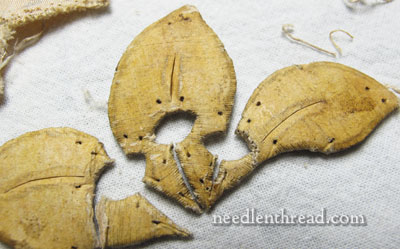
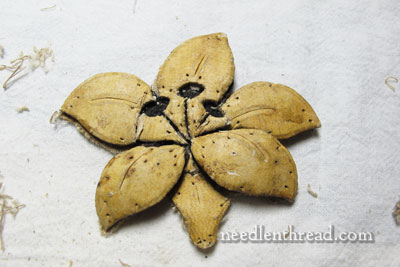
…and finally all three petals are bare! It’s so cool – I Love the card foundation!!
Notice the splits in the tops of the petals. These splits are not separated at all. But notice the split in the lower part of the center petal, where it is separated and dark.
If the embroiderer wanted to create a vein in the petal, the gold thread would have been couched down and pulled into the split (this is what happened below the sepal on the center petal) as the thread passed from one side of the petal to the other. It wasn’t worked that way on these petals – they were perfectly smooth past the sepals – but it could have been done.
Makes you wonder why it wasn’t. The cuts were there. It would have taken more time to couch the extra vein in each petal, and maybe the embroiderer just didn’t bother. Then again, maybe the splits help to shape the petal a little, giving some bend to the card without breaking it. Maybe the original pattern didn’t have veins in the petals. We’ll check that out when we look at the ground fabric.
Turning the group of three petals over, we can see the back of the felt onto which the card forms are glued. The felt is all one piece.
It is not nearly as thick as the felt used on the first two petals – it is just a thin layer of rough felt, with none of the heavier woven felt that was behind the first petals and the goldwork grapes.
Holding the felt up to the light, you can see where the stitches passed through the felt and into the ground fabric.
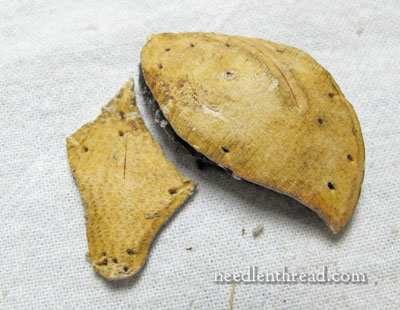
And here is the card foundation for the three petals. And what do you know!! The right petal and the center petal are one piece (you can see the join at the base) and the left petal stands on its own.
I thought each petal would be separate. But this accounts for the sharing of the goldwork thread at the base of the right and center petals.
Here’s the silk ground fabric which is backed with a very fine linen, and you can still see the original pattern lines pretty clearly. No vein lines.
Now let’s put the card foundations in place, in the order in which they would have been worked.

First, the base of the lily would have been worked.
Then the forms for the top three petals would have been attached (all three of them), and they would have been worked simultaneously.
The lower two petals would have been worked one at a time. And finally, the sepals would have been worked.
I love to look at the foundation like this – completely bare. You can definitely see how dimensional the whole lily is, and how the details were planned out, from the layers of the padding, to the placement of the petals, the working of the sepals, and so forth.
WOW. That was fun! Next, we’ll move onto a rose and some leaves, but since we’ve looked at the primary technique now, the next article will surely not be as long!
Thanks for joining me on this journey. I hope you’re enjoying it as much as I am and learning a lot from it, too!
If you’d like to read more about Deconstructing Goldwork as we’ve moved through this piece, including the backstory and the reason why I’m doing it, you’ll find all the articles relating to Deconstructing Goldwork here.
Thanks, mary. i learnt a lot from that process and found it fascinating.
Maravilloso,nunca pense que llevara esta estructura interna,gracias.
I can’t get over the amount of work put in for just one flower. I understand the time it takes to stitch a large item but all these layers and cuts and planning for just one flower? And I grumble when I have to use more than 30 colors in a pattern. Patience is quickly becoming a thing of the past.
Very illuminating!! I love the bare bones, too! Never would have guessed about the sepals having their own holes. This is great, Mary! Thanks!
Dear Mary
Thanks for your deconstruction it must have taken time and patience to get through all those layers and dissect the flower. Imagine using card as a foundation we wouldn’t use that today and there are so many layers to stitch through and all the gold that was used, it must have taken a long time to complete just one flower fascinating stuff.
Regards Anita Simmance
Thankyou, Mary.
Could the card pieces been bought as part of a kit (hence explaining the inclusion but non-use of the splits) or would they have been homemade?
To bardzo ciekawe i odkrywcze w jaki sposób haftowali nasi przodkowie. W naszym kościele jest kilka zabytkowych ornatów, oglądanie ich to prawdziwa przyjemność.
Mary chciałabym Ci wysłać mailem fotografię koronki szydełkowej, która była wykonana dla Królowej Anglii proszę o kontakt.
Pozdrawiam
Hello, Anna! This comment should come to your email, with my email address, and you may reply directly to it. I will be happy to hear from you! -MC
Mary sorry nie mam od Ciebie e-mail
Hi, Anna – sorry about that! You can email directly to [email protected] Looking forward to hearing from you! -MC
It does look as though it was pre-planned for work sequence. Very interesting!
This is lovely, I never knew how these elements were constructed.
I really like the elegance of the bare card/form stock in the last image.
To me it’s more interesting than the finished gold work. The gold work seemed to obscure some to the refinement of the foundation.
Absolutely fascinating, Mary. The “card”. It almost looks like leather in the photos. Is it like matt board used in framing today or something else, please?
Mary, how extremely fascinating. And interesting. I’d have to pay a mini fortune for a tutor to take me through these detailed steps and explanation. But besides the cost, I doubt very, very much if the tutor would share your excitement and wonder at discovering the care and thought that went into creating this piece.
Mary, I’m expecting my second, and recently began my second trimester. I’m tired once I return home from work in the evenings. But I know my second one also deserves some pretty embroidered keepsakes. Though not in goldwork, of course! Keep me in your prayers, please.
this is a great article, sharing the ‘insider knowledge’ you’ve discovered here is a wonderful learning/teaching aid. I write a newsletter on goldwork embroidery in Britain, and hope to construct a similar lily in stages to show the technique to our members.(we happen to be featuring card used as padding this issue).I will of course direct them all to your website to see the original and gain their own perspective from seeing the stages of your deconstruction, I hope you are happy for me to use your article as a source for mine. I am working from my own sketches (based on the lily you show)then making it so that I can show the stages-I don’t at any point use your images but I recommend that the readers look at your article to support what I am writing. if you are interested I would be pleased to email you the finished article for your perusal. I would be very interested in your opinion, thanks Miranda
This is a fascinating series – thanks for taking the time to share your discoveries.