


The Turk’s Head Knot is often seen in knot-making and other cord and rope techniques, but it’s also an embroidery stitch.
As an embroidery stitch, the Turk’s Head Knot creates an intertwined knot that sits up, plump and round, on the fabric. It can be used in place of French knots and colonial knots for a little more texture. Like the French knot and colonial knot, it can be used singly, as an isolated stitch, or it can be grouped together in clusters or used as highly textured filling.
The thing is, it’s a tricky stitch. It’s definitely knot the easiest knot in the book!
The reason I’m doing this particular stitch tutorial is because I received an e-mail from a reader begging me to do a tutorial for the Turk’s Head Knot. This is what she said:
Mary, can you PLEASE help me with the turk’s head knot stitch? I’m working through some of the stitches in Mary Webb’s Embroidery Stitches book, but I can’t believe how incomplete so many of the instructions are! Are you familiar with that book? I bought it because people talked about it but the instructions are really vague. Maybe the turk’s head would fit in your stitch fun blogs? Even though it hasn’t been very much fun so far!
If you’re not familiar with Embroidery Stitches by Mary Webb, you can find the page dedicated to Turk’s Head Knot viewable on Google Books. Take a look at it, and you’ll see what she means by vague.
I checked my copy of the print version, and it is the same. The photo is what makes it vague. The loop formation is not clear in the photo, but the text assumes that it is.
So I promised I would work up some instructions, and here they are! This is a nice looking stitch, but whether or not it is worth the trouble, I’ll let you decide.
So, let’s start!
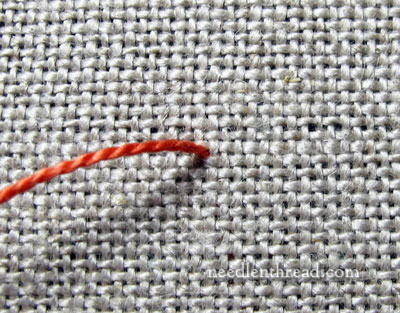
Begin by bringing your needle and thread to the front of the fabric.
For this tutorial, I’m using Montrose 1750 linen (a medium-to-heavy weight natural linen), DMC perle cotton #5, and a chenille needle.
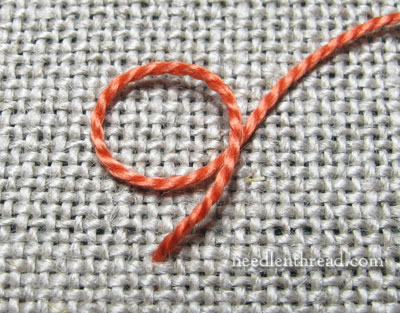
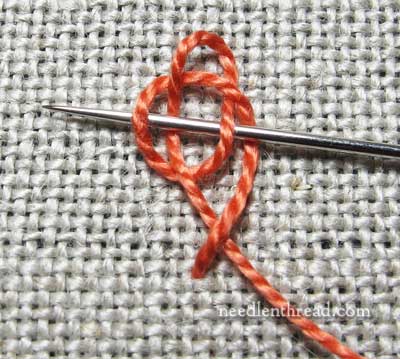
Twist the working thread into a loop on the fabric, as shown above. Notice that, when the loop turns back towards the thread, it passes under the thread, not over the thread.

The easiest way to make the second loop is to pass the needle under the working thread as shown above, without picking up any fabric.
Hold your finger on top of the first loop while you pull the needle under the thread, and only pull enough to form a second loop.
Your thread configuration will end up looking more or less like this:
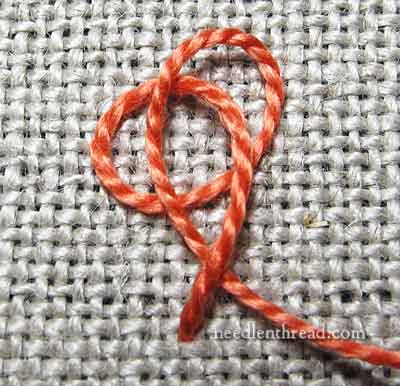
It’s easier if you keep the configuration open like this, so you can really see the threads passing over and under each other.
Now, pass the needle over the outermost lower loop thread, which is the first portion of the loop formed at the very beginning of the stitch, where the thread emerges from the fabric. Then pass under the next thread going into the center of the configuration, then over the next thread passing out of the center, and under the outermost loop of thread.
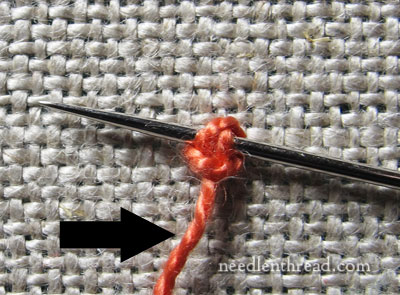
At this point, you’ll want to move this whole configuration – needle and all – down right next to where you first emerged to start the stitch.
Keep the needle in place, woven within the loops, and move towards your stitch starting point while gently pulling on the working thread to tighten that whole configuration around the needle.
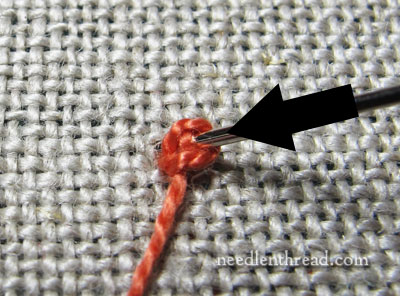
With the knot on the needle, manipulate the needle so that the tip enters the fabric right next to where the thread first emerged. Don’t go down in the same hole, but just right next to it.
This is somewhat tricky to do, and it takes some patience. You don’t want that knot to slide off the tip of the needle, but you also don’t want it to move too far up the needle, because then you’ll end up with extra thread protruding from your knot.
Pull the needle through the fabric, holding onto the working thread until most of it has passed through the knot. It might even help to hold a finger on top of the knot lightly, to keep it in place.
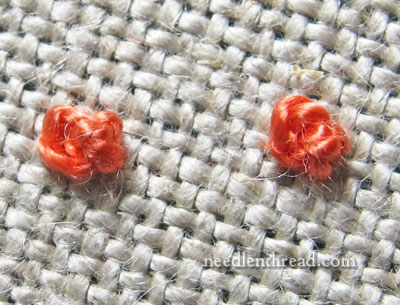
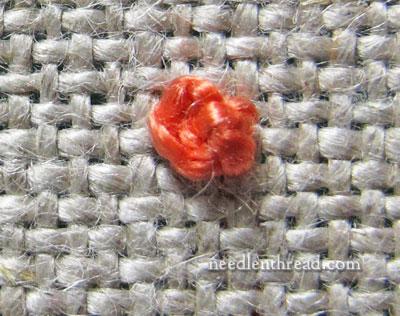
This is what the knot looks like when finished (more or less). This one bulges a bit on the left side.
The Turk’s Head Knot on the right side is better – it has a nice round shape, and it sits up round on the fabric, like an elaborately twisted turban.
So there you go! What do you think? Worth the fiddling to get the stitch right? Or stick with French knots? Opinions? Have you used the Turk’s Head Knot before, and if so, do you have any tips to share? Have your say below!
Stitch Fun is a series of embroidery stitch tutorials here on Needle ‘n Thread, where we explore more obscure stitches, different combinations of stitches, or different uses for stitches. You can find an ever-growing list of tutorials in the Stitch Fun Series Index.
Gracias, tus videos y explicaciones son de gran ayuda.
Estoy intentando aprender a bordar.
Saludos y buen día.
I think I will stick to my easy French knot. But thanks for doing the tut.
You have the best photography skills!
Thanks, Laura – but… truly an amateur here. It’s just a good camera! And if you only knew how many shots I take in relation to One Good One!
Problem with macro shots – you really see the fuzz on the thread, the fuzz on the fabric, the strange things that end up in fabric (like the little twiggy bit in the linen)…
Yikes! Seems like a lot of work for a little knot. My head was spinning looking at the photos. Thank you for the demo…sometimes it is good to know what you won’t be stitching.
Deb
LOL! Ahh – they actually look a little more complex than they are! Well…. sort of. Once you work one and understand the movement, the second one makes a little more sense, and then with a little practice, they go pretty quickly. What I like about them is the really round shape, unlike a French knot, which seems round but is actually flat on top – the top doesn’t dome up in the center (in fact, just the opposite – there’s a dent). These are round, like a little ball. ~MC
I think it’s complicated but after a few tries I think it’s doable.Very interesting. Thanks for showing it.
Wow – it’s a cool knot Mary, but I don’t think I’d be making a lot of them…maybe a few on a crazy quilt seam would be interesting…
This one will definitely NOT be in my “Go To” stitches. Not even in a trial. Stitching is supposed to be fun & relaxing and this one just looks way too frustrating for me. I’ll stick to French Knots… I love them.
But, thanks for a great Tutorial.
It makes for a very pretty knot, but I think I will stick with the colonial knot for the majority of my knot making. I checked out Mary Webb’s Embroidery Stitch on Google Books. While I enjoyed looking at all of the different stitches, I would never consider this a good resource for learning stitches. Although her photos weren’t horrible, the fact that I could discern no usable tutorial which actually explained what the photos were showing was beyond useless. I think if you just wanted a book that showed different stitches, this would not be a bad book to add to your library. As it is no longer sold new in stores, you would have to find it a library sale or some other used book sale. If needleworkers want a good tutorial, right now Mary, your website is hand’s down our best resource!
I see why your reader was asking for help – the loops are way too bunched up in the book photo! Once again, I’m in awe of your photos and clear instructions, Mary. Thanks!
Well, that was interesting. And I don’t think a sketch would be a good way to explain how it’s done. Seeing photos of the thread going over, under, around is much easier to follow.
I think a lot of people are not thrilled doing French knots so this one won’t be very popular. But looking at the 4th photo, I’m going to forever think of it as the “pretzel knot.” The way the thread loops around reminds me of a pretzel. 🙂
Hi Mary, Your hands-on way of explaining things as if you’re right next to a person is very well done. I love that! I’m going to try this one as soon as I have a little time here. Thanks for another GREAT lesson. Theresa
Mary, I have just been making Chinese knots, which look remarkably like this stitch. Using cording, of course. The only difference appears to be the placement of the thread at the very beginning, under instead of over in the directions. Which is also tricky because of cord tension, you really have to “work” the cord to get the proper tension. How does that tensioning work with the needle version of this stitch? This is a stitch I have got to try.
Looks great– and not all that hard to do. I can see lots of uses for it.
Yeah, I think I’d use this knot! I love texture and I’m crazy about knots.
From the pictures in the books, I don’t think I’d have given this stitch a chance. But with your clear pictures, it makes it doable.
Thanks!
Obrigada! Adoro seus tutoriais e já aprendi muito com eles!
Ah… prefiro e vou ficar com os “nós franceses”, este “turco” é muito chatinho de fazer.
Um abraço!
Egléa
I have been looking in every conceivable embroidery book for this knot. Since I did not know its name, I had to rely on pictures, which I never found.
Thank you so much for this wonderful lesson, I shall now go practice and be able to add a new learned stitch to my work. I am so grateful for all you do for us
Excellent tutorial! Nothing vague here at all. In my opinion, turk’s head knots are only worth working with thicker thread. Otherwise, the subtleties are lost and French knots are the better choice.
Dear Mary
Thanks for sharing the stitch fun tutorial on the Turk’s Head Knot stitch. I really want to try this as I like a challenge and it certainly looks like it would be a challenge, but the results look interesting. I’m late today as I’ve been playing around with my new computer Apple Imac to be precise it’s so interesting. Anyway thanks Mary.
Regards Anita Simmance
Aloha Mary,
I think this would look great in a brown/black packed in the center of a large sunflower. It would make great seeds!
Excellent tutorial.
ji
This reminds me of a Chinese Ball button made with cording.
Wow! Thanks, Mary! What a difference your close-up photos made. I definitely prefer these knots to French Knots if I’m going for a full, round knot. I never did like the dimple in the middle of the French Knots unless I was using it for a stylistic reason and Colonial Knots never seemed round at all. Fantastic!
This is great. I have a project in the queue that was going to be all French knots but your beautifully executed tutorial has made me change my mind to the Turks Head Knot. I’ll get plenty of practice and learn a new stitch. Thanks so much!
Thanks for the great tutorial Mary! But I do love French knots – dimples are cute, after all! This knot stitch looks like a bit untidy to me, like a tangle – though I suppose that in person, without the macro lens enlarging it, it would be okay. But if I wanted something very 3-dimensional, I’d probably just cheat and use a bead 🙂
I checked out the stitch in Ms. Webb’s book. There definitely needed to be a series of pictures to fully demonstrate the stitch! If I needed some area with a lot of definition, this would be a great stitch. I like colonial knots because they are more uniform than a French knot, and more visible.
Thank you for sharing the tutorial on the Turk’s Head Knot. That was very helpful on how to stitch this stitch.
I *know* myself, and looking at the sample in Embroidery Stitches, I would have said, “There’s no way in hell!” I am not spatially oriented to make sense of that. With your tutorial, I would give it a go! You were the one that taught me French knots with your video, and that was a Big Deal for me!
I think I will try your Turk’s Head knot. It doesn’t look too complicated. I was able to conquer the Colonial knot fairly quickly. This is just one more loop.
Of course, I’ve tried to show others the Colonial knot, and they either couldn’t understand it or thought it was too complicated.
I learn something every single day from your blog! Today I learned that the Turks Head Knot is the Parallel Parking of embroidery stitches. As a teen I practiced parallel parking until I could do it perfectly, did it just *one* time (for my first driver’s test) then never, never did it again.
I’ll work on this stitch until I can do it perfectly, just so I know I can, but if I ever need something round and proud I’ll use a bead! 😀
Mary, I love this knot! When I need a french knot or colonial knot, I choose the colonial because to me it seems to be the more stable and round of the two.
But this knot is, to my eye, a better knot version that either the french or colonial. It’s a solid, round and full little knot and now that I know how I’m going to use this a lot! Thank you SO much for the tute…I would never have been able to learn this without your clear, great instructions and pictures!
Mary, thanks for the great tute! Your photos are very clear and while the description is a bit mind boggling, I think I do want to try this. This looks like a great knot for a bit of texture to give a bit of interest that is different from a French knot or a Colonial knot. Thanks again!
Do you have a YouTube video of this? I really like your tutorial videos.
Hello Mary, I didn’t know there was such an embroidery stich, the only Turks head knot I knew is the one you’ll find on this link:
http://www.lesnoeuds.com/noeud-80-tete-de-turc.html
Thanks so much for all your generosity
Well Mary, I can make 20 frenchies in the time it took to make 1 turks head. Not worth it.
This stitch reminded me of the Chinese knots I made last year, so I just had to give it a try and compared it with a colonial knot and a French knot. I’m not sure if I would ever use this stitch, but it was fun to try! I wrote about my stitches here:
http://fat-quarter.blogspot.nl/2013/07/knots.html
Thank you. I’m doing a design for the RSN and one of the sections is Turk’s Head Knot, and I have never tried it before. Your instructions are very thorough and the photographic support is greatly appreciated.
Keep up the great work.
Yes, I know. I need to get out *stuff** and try this myself, but … I’m waining on my seat stand from Hawthorn in the UK.
Do you have a comparizon between french knots, colonial knots, and these knots?
Hi, Susan – No, I don’t have a side by side comparison, but I can tell you that the turk’s head is much larger!