


Every time I went out to work on the goldwork on the inner frame of the Mission Rose project, I found myself humming the same song… and humming it and humming it and humming it.
It’s stuck in my head right now, and I can’t get it out!
Occasionally, while stitching, I’d even start singing out loud (good thing no one’s out there but me!). I don’t know all the words, so it’s just the same little bit, over and over again.
Gold fever! Nothin’ can help you but the yellow stuff!
What can stop that itchin’ ain’t around the kitchen!
Gold, gold, hooked am I. Susannah, go ahead and cry!
It’s from Paint Your Wagon – a bit before my time, but my older sister had the record (yes, record, as in LP, on vinyl or something), and I remember hearing the songs as I grew up.
It wasn’t until I was an adult that I went back to discover what that whole thing was all about. The mere fact that Clint Eastwood was singing in a musical… oh dear.
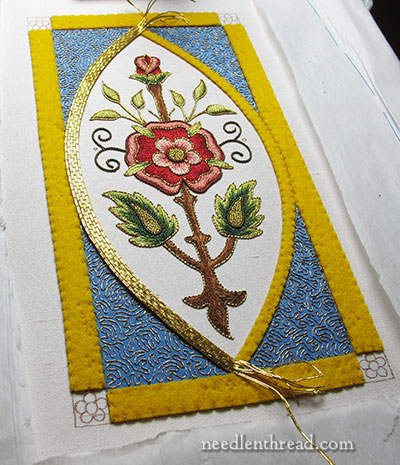
In any case, I have found that, when working on the frame here, I’m struck with gold fever!
I love finally adding gold to a piece of embroidery like this. Oh, yes, there’s a little bit of gold on it already, but when you begin to add the solid gold parts, that’s when things really start coming together!
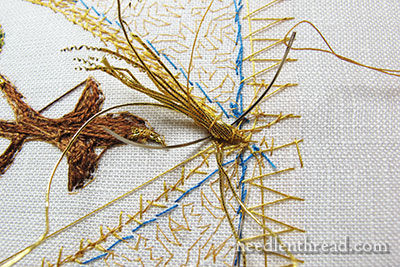
In the photo above, you can see that I’ve couched the gold passing thread we talked about last time onto the left side of the frame.
Incidentally, it worked out to exactly five pairs of threads to cover the whole frame, top to bottom. I do admit to a little squeezing on the upper and lower sides, but it worked out ok.
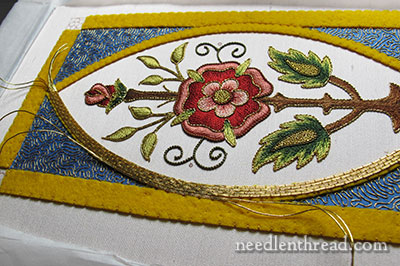
When working the outermost pair of couching threads, I started in the middle of the bowed edge and worked to the two tips of the frame. This gave me the ability to end the outermost thread early if I ran out of space on the felt frame.
You can see in the photo above that the threads are couched in pairs – two at a time – and that I used a standard “bricking” pattern with the couching thread.
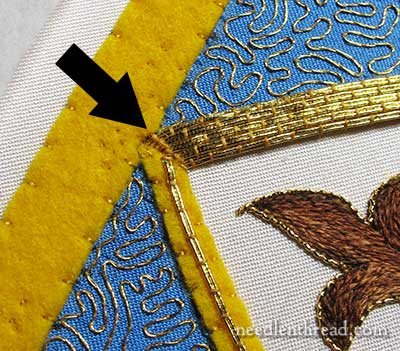
Regrettably, at the tip, I couched over the threads right where they would be plunged. I usually like to have a couching thread right next to where a thread will be plunged to the back, just to keep things in place and secure when plunging the threads.
But I don’t like the little obvious line of couching stitches right at the tip of the frame – the arrow in the photo above points to them. From far away, it’s not really noticeable, but they still bug me!
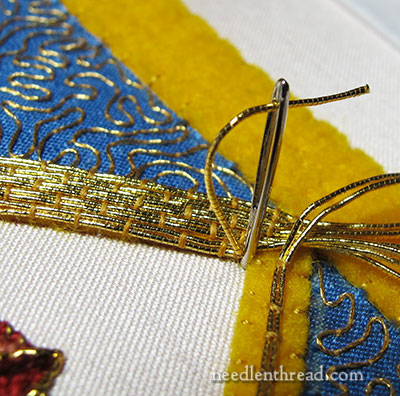
To plunge the threads in this area, I used a chenille needle. I stuck the needle in the fabric where I wanted to plunge the thread, then threaded the needle with the goldwork thread, and pulled the needle to the back.
Why a chenille needle in particular? Because they have long eyes (like a tapestry needle), making them easier to thread, but unlike a tapestry needle which is blunt, a chenille needle has a sharp tip, so it easily pierces through the layers of fabric.

These are all the threads from one side of the frame, plunged to the back.
You could plunge one thread at a time, working in twos, and anchor the two at one time on the back, then flip the frame over, plunge two more threads, turn the frame over, anchor the two threads, and so forth.
Sometimes, when you need to make sure your plunged threads are kept as “slim” as possible on the back (for example, when the front of the embroidery doesn’t have much padding on it), it’s a good idea to sew down the threads two at a time.
But in this case, there’s enough padding on the front of the piece that I’m not to concerned about bunching these guys all up in a tidy bundle and anchoring them all together.
Once they’re all tamed and lying down in the right direction, it’s just a matter of whipping over them with a waxed thread, using a curved needle.
The two threads pointing towards the bottom of the photo above are from the other half of the frame, so I want them to lie in a different direction, so that they are folding back under their half of the frame.
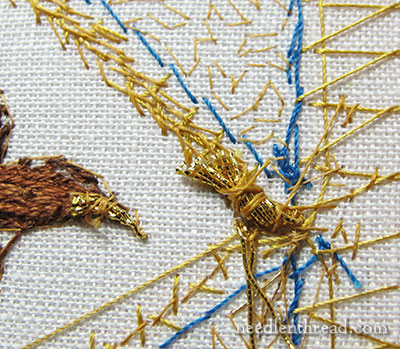
Once the bundle is secure, give it a little trim, and voilá! The threads are anchored!
I plan to work a bit more on the frame today – which bodes badly for any chance of getting this blasted song out of my head!
Gold, gold, hooked am I….
*Sigh*
You can follow the Mission Rose project from start to finish and everywhere in between – in chronological order as the project developed – by visiting the Mission Rose project index.
It looks more beautiful each time I see it! Thank you for the great tutorials and the updates!
I must admit that I had NO idea what you were going to do when you started the frame, but this is BEAUTIFUL! Thanks so much for also showing us the back.
Beautiful! I can’t wait to see how it all comes out.
When I was a kid at Girl Scout camp we learned to sing “They call the wind Mariah.” I was grown up before I realized it’s a song from Paint Your Wagon, and Clint Eastwood sings it. O.o I still haven’t seen the whole movie though.
It’s so very beautiful. And had a good laugh about Painted Wagon. My mom used to sing songs from many old musicals, including that one. It’s one of my favorites.
Hi Mary, I have a question… On the picture above where you are working, I noticed the herringbone stitch that the straight felt padding (that runs east to west of the top of the frame) was secured with. Why use that particular stitch? My choice would have been to use a stitch that used less thread. Does is keep the felt neater or more secure? I have been assessing my stitch choices lately and why I use them, so I’m just curious… Thanks Bunches 🙂
Hi, Sandi! Good observation! I actually used tacking stitches on the front of the felt, working from side to side of the felt strip, so on the back, the threads crossed over, so they look like herringbone. It’s a very tiny space – just over 1/4″ wide (maybe 3/8ths at a stretch) – so the herringbone-like cross overs are not too long, and it really isn’t using that much more thread. When securing the felt, I wanted to secure both sides of it as I progressed up the frame, and this is the only way to do that. Hope that answers the question! – MC
Your work is progressing beautifully! Always love the way each new addition just pops! I know what you mean about the songs running thru your head while you work. When I am working on costumes for a particular show (musicals), I sing all the parts and then for the next few shows (not necessarily musicals) I am still singing the songs! Paint Your Wagon is a great show/movie that can be addictive!
Dear Mary
I’m playing Gold Fever as I write I went to see Paint your Wagon when I was in my early 20s so I can live to tell the tale that it was a good film. Anyway back to the Mission Rose and enough of this enjoying yourself while you work ha ha! it looks absolutely beautiful with the goldwork added I love it. I miss goldwork and your plunged goldwork looks so professional, it’s hard to gather all the stands of gold together and sew them down in one piece. Thanks for showing us how to plunge.
Regards Anita Simmance
Mary:I love this project! About using the gold threads:do you use the scissors that are particularly meant for goldwork? The kind with one micro-serrated blade? If so, do you find they make a significant difference in control? Obviously, a pair of dedicated scissors are necessary, you dont want to ruin your good scissors on the metal threads, but are the special ones different enough to make the purchase valuable? I enjoy goldwork, in fact I am doing this project along with you, and I love it! Ii am just finishing the surface embroidery, almost time to start the goldwork! Yeah! I cant wait…keep up the amazing work, Mary, we love you!
Well, Dix you know Clint is a huge jazz nut & sings one of the songs in the movie Midnight in the garden of good and evil which he produced! Its one of my favorites!
It’s so lovely, Mary. I am a goldwork fiend and am so glad to see the deveolopment of the mission rose in front of my very eyes. I have a question about plunged threads… I was lucky enough to attend a class by Hazel Everett a few months ago, and her guidance on plunging is similar, in that it uses a chenille, but she told us to always secure the plunged thread in the same direction they were running on the front, i.e. not doubling them back. This stops them trying to pull against the couching thread and keeps them flatter, and you don’t need to put in an extra couching stitch right next to where they are going down to keep them secure. Are you doubling back because of the shape, to avoid two lots of plunged threads crashing into each other at the bottom of the lozenge, or do you always double back? I tend to leave all the threads on the surface until the very last moment, tacked out of the way if necessary. I’ve never tried a shape like your frame, so I haven’t got the experience to know for definite, but I suppose my first instinct would be to start right at the bottom, plunge a pair and the pair immediately opposing it, then turn over and cross one pair over the other so that each pair continues traveling in its original direction on the reverse, then secure them with waxed thread. then move up to the next opposing pair of pairs and do the same. It wouldn’t need a solid line of couching threads because the threads wouldn’t be wanting to move, but the effect on the front would be sort of ‘herring boned’ where each pair of pairs meets at the point, which I guess might not be what you were after. And of course you wouldn’t be able to do it until the big outer frame was complete, because the bottom-most pair would be secured on the back of the outer frame…
This is just lovely.
I can imagine stumbling over this small rose embroidery in a quiet little church in the middle of an American prairie with saltbush and dust swirling around outside and being absolutely amazed at what I’ve found.
Re: Paint Your Waggon
I think Lee Marvin singing trumps Clint Eastwood (singing).
Mary, your work is, as usual, beautiful! I know how it goes to get a song in your head and can’t get it out….that usually happens to me with….Where am I going? I don’t know. When will I get there? I’m not certain. All that i know is i am on my way–Also from paint your wagon and unfortunately i can remember seeing it in a theater….lol….i think it’s a given that neither Clint Eastwood nor Lee Marvin can actually sing…lol…but for some insane reason i always liked the music from that movie and have the tracks on my pc…weird i know but then, that’s what make the world such fun….lol
That seems like a large “wad” of gold thread on the back. I’ll be most curious to see how you deal with that in the finished product. That gold work is absolutely stunning.
Gary
I call it “dessert sewing”!!! It is thrilling to see the gold develop!
Mary,
This piece gets more beautiful each time you share it. I love that gold work edging you are working on. Incidently, I had forgotten Clint Eastwood was in Paint your Wagon because I always remember Lee Marvin’s solo, “I Was Born Under a Wandering Star”. For those who were too young to have seen it, it is a great movie/musical and probably available on Netflix. I believe it was an academy award winner the year it came out.
Debbie