


Schedule Reminder: The Studio is closed from Dec 3 through December 18, and I have limited access to email. If you email and don’t hear back from me, that’s why. Please leave all non-urgent communications until after December 18th. Thanks! Blog posts will continue through Christmas as planned, though, and there are a few other scheduled posts for you, too!
Good morning and welcome to Part 5 of Twinkle, Twinkle, this year’s Christmas ornament stitch-along here on Needle ‘n Thread.
If you are just joining us, you’ll find all the previous installments of this stitch-along listed here in the Project Index for Twinkle, Twinkle.
For members of the Needle ‘n Thread Community on Patreon, you’ve already received the PDF that covers all this information. You also have all the video that takes you through the steps in this lesson.
If you are interested in video instruction for this entire project, videos are available for the “Avid Stitcher” membership level, over in the Needle ‘n Thread Community on Patreon ($5 / month). If you’re not interested in a membership, you can also purchase the individual videos that you’d like to view. You’ll find the videos listed under the Twinkle, Twinkle Collection on my membership page. As the videos are published over there, they will be listed in that collection, and there will be an option to purchase access to the individual videos.
Today, we’re going to bead the background of the ornament, and then we’ll prep it for the finishing process.
Ready?

Before you start sewing on the beads, please note the diagram below:

In this diagram, note the placement of the blue dots. Those dots indicate where the blue beads are sewn on. All the other beads on the background are white.
To sew on the beads, I used a good quality all-purpose white sewing thread to attach the beads, and I doubled the thread in the #8 crewel needle.
To double the thread, cut the length of thread twice as long as you normally would, fold it in half, and thread the cut ends into the needle.
Keep in mind that the beads should sit up on the fabric like a tire in relation to the road.

Pass through the center of each bead once (A-B in the diagram above), and then pass through two more times, making (as best as possible) a small cross-stitch through the bead (C-D and E-F).
If your sewing thread is too heavy to make three passes through the bead, then sew at least the “X” part of the stitching, and forego the straight A-B stitch through the center.
This “X” formation helps secure the bead in place, keeping it from being floppy, and supporting it so that it stands upright on the fabric.
As you sew on the beads, sew them in a scattered formation, much the way you would sew seed stitching. You don’t want all the beads facing in the same direction – it would look odd. So try to “scatter” them by making them point in different directions while you sew them on.
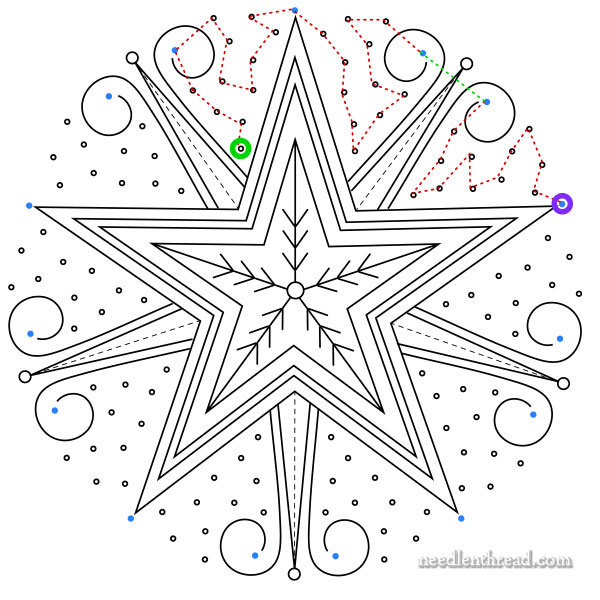
The diagram above illustrates a logical path to follow as you sew around the beaded area. The green dot indicates where you might begin sewing the beads and the purple where you might end your thread.
Think in terms of always trying to move towards the next section, following a path (though it may meander) that takes you the shortest distance between beads.
As you sew on the beads, try to start and end near embroidery stitches, so that you can use the backs of the embroidery stitches to easily start and end your threads. You’ll be glad you did! It’s much easier to end the sewing thread in the back of the embroidery stitches, rather than trying to knot off behind a bead.
If you need to “carry” the thread on the back from one beaded section to the next, turn your work over and run the needle and thread behind the stitches as you cross the embroidered section, so that you don’t have long threads crossing the back of your embroidery.
So that’s how you sew on the beads!
A note on beads: Be careful with your beads! Use a tray or some kind of confined space to hold them while you work. While the kits have plenty of beads to work the whole ornament and the decorative edge (we did it multiple times, with beads to spare), if you are careless with the beads and let them go hither and yon while you work, it may be difficult to retrieve them and you will risk running out of beads. Try not to waste them!
Prepping for Finishing
Once all the beads are sewn on, you’re ready to move into the finish work!
There are a couple of stages in finishing this ornament. We will work the fishing in two stages: constructing the ornament and beading the edge.
Before you do anything else, though, the embroidered fabric must be damp stretched and blocked.
Don’t Skip This Step!
There are a couple tutorials here on Needle ‘n Thread for damp stretching and blocking your embroidery work. I think this one is the most helpful, but you can also refer to this one.
Members on Patreon with video access will also find the process demonstrated in the finishing video, which can be found in the Twinkle, Twinkle collection, here.

The photo above shows one of the smaller stitched samples, damp stretched.
On this project, I placed the embroidery face down when I pinned it. This keeps the water from gathering inside the beads, where it can take longer to dry.
Once you have pinned and sprayed the embroidery fabric, leave it to dry until you’re ready to construct the ornament! I usually damp stretch the day before I plan to do finish a project, so I leave it overnight to dry.
The nice thing about damp stretching is that it eliminates the need for ironing. When the process is finished, your embroidery will be wrinkle free and ready to go!
Coming Up!
In the next installments, we’ll construct the ornament! Stay tuned!
On Friday, we’ll continue with the Alphabetical Dive in the Needle ‘n Thread Archives. We’re on the letter H, and I admit, I stretched it a bit with this one!
Hope your week is going well!
Thank you so much!