


Today, let’s chat a bit about ground fabric for this Secret Garden Embroidery Project.
We’ll look at my choices for ground fabrics, why I chose them, how I prepare them, and how I’m transferring the design.
First off, I should fill you in on my broader plan here for the Secret Garden Hummingbirds.
I’m setting up three versions of this project, with one possible fourth “excerpt” version that, if it pans out, will figure into the picture a little later in the year.
One Embroidery Design, Three Approaches
My plan:
Secret Garden 101 for Beginners (and beyond, if you want): I’ll be using DMC threads and basic surface embroidery stitches to work the project.
Secret Garden 201 for Advanced Beginners, Intermediate Stitchers, and Beyond: I’ll be using silks, working surface embroidery stitches that are perhaps a little more advanced, and developing the design a different way.
Secret Garden 301 in Whitework, for Advanced Beginners, Intermediate, and Beyond: In this approach, I’ll be using whitework techniques to develop the design.
If I do a 401, it will be for intermediate stitchers, and it will involve an excerpt of the design, developed with metal threads and some silk. But that won’t happen until later, since it’s an excerpt.
Ground Fabric
There are two types of ground fabric I’ll be using – but they’re both white linen.
Choosing a good ground fabric is really important, with any embroidery project. The final outcome of your project will depend greatly on the materials you chose to work on.
I’ve said it before, I’ll say it again: linen is a very forgiving fabric! It is excellent for surface embroidery, because it is strong, resilient, and it holds up to “reverse stitching” (i.e. picking out mistakes).
On top of all that, linen is a beautiful fabric.
If you’re going to use linen, you’ll want a linen that is made for surface embroidery (which is not the same thing as linen for cross stitch, and not the same thing as clothing linen from the fabric store). The linen threads need to fill the weave. The fabric should have a good, smooth hand (or surface feel), without rough slubs and without threads that vary frequently in size. And, finally, in the case of this project, it should be translucent enough that you can see through it for tracing.
Linen Choices
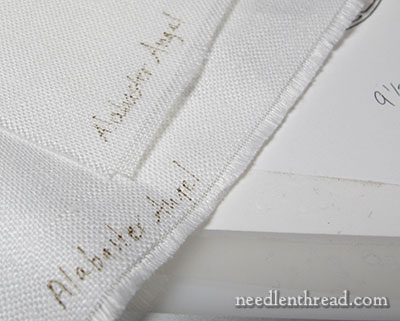
My go-to linens for hand embroidery are usually those made by Legacy, because their linen is made from the ground up for hand embroidery. It is beautiful linen, resilient, strong, and wonderful to work with. For this project, I’m using Alabaster Angel and Shadow Work Linen, both by Legacy. I’ll be using the shadow work linen for the whitework version, and Alabaster Angel for the others. You can both linens any fine needlework shop that carries goods from Access Commodities. If they don’t have it, they can usually special order for you. Online, Needle in a Haystack carries a good selection of Legacy linens. A quarter yard will give you plenty of fabric for the project, plus left overs.
Alba Maxima by Legacy is another good choice for a ground fabric for this project, but it is not as easy to see through when tracing the design. You can still see through it, if you have a good light behind your design, or you can use another method of transfer.
Other Fabrics
For those following along with the project, if you choose to use another fabric (such as cotton), it should be a high quality, firmly woven cotton with a high thread count. You can also use silk or other ground fabrics, but keep in mind that some of the methods of fabric preparation and design transfer (and perhaps even stitching) may change, depending on the ground fabric you choose.
Fabric Size for Project
The design size is 9.5″ round. The standard when setting up an embroidery project is to make sure that you have at least an extra three inches all around the design for hoping or framing up, and for finishing purposes. You can figure that you’ll need at least a 15.5″ square of fabric for this project. I cut mine 16″ square.
Fabric Preparation
Proper Prior Preparation Prevents Poor Performance. Prepare your fabric!!
First thing: cut it along the thread. Make sure when you cut out your 16″ square of fabric, you cut along the thread of the fabric in both directions. This can be kind of difficult – make sure you have good lighting and use magnification if necessary. Cutting along the thread of the fabric ensures that your fabric is on the grain, and that there’s not a lot of waste.
Then, rinse your cut fabric piece out, and pre-shrink it (assuming you’re using linen or cotton). Put a kettle on or bowl about 4 cups of water. In the meantime, place the fabric in a clean bowl in the sink, and run the hottest possible tap water on it. Swish it around so the water absorbs into the fabric. Leave it for a few minutes. Swish it around. Dump the water, and run the coldest possible water on it. Swish it around, squeeze it up gently, and get the water through the fabric. Then dump the cold water, and pour your boiling water on the fabric and swish it around. Let it sit a few minutes – around 10 minutes – and then dump the hot water and fill the bowl with the coldest possible tap water again. This hot-cold-hot-cold method will get most of the shrink out of your fabric and all of the sizing.
Roll the fabric in a towel (the linen should feel extremely stiff at this point), and press the towel to release the excess water. Let it sit for a few minutes (about 30-ish) and then unroll it. It should still be slightly damp. Iron it on a clean ironing board horizontally and vertically, flipping the piece and turning it now and then, using a light hand. Do not hold the iron in one place ever, and do not iron on the bias (diagonally across the fabric). Eventually, the fabric will be mostly dry, though you may have some ripples on the edge. Lay the piece aside to let it dry completely, and then run a hot dry iron just around the edges, to make sure the ripples are gone. When you’re finished, you’ll have a gorgeous piece of flat, smooth linen, ready to go.
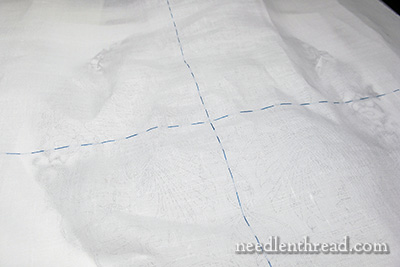
I often baste the center of my linen, to make sure that I square it up correctly over the design when transferring by tracing. You don’t have to do this, but I find it’s helpful for centering the design.
To baste the center, just fold your linen in half and finger press just on the edge of the center on two adjacent sides. Then follow the grain of the fabric (following one fabric thread) down each center, basting with long running stitches. They don’t have to be super regular – just enough to mark the center.
After you’ve basted (if you baste), if your fabric is wrinkled, give it another once-over with the iron.
Transferring the Design
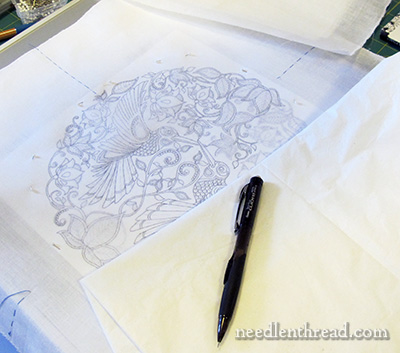
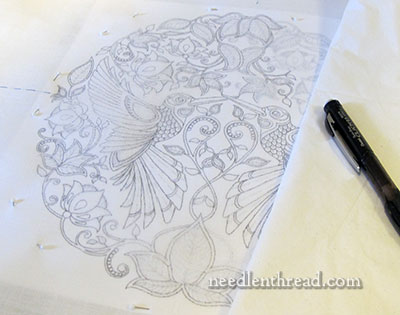
I’m tracing the design on my ground fabric, using my LightPad, which makes tracing super easy. You can also use a sunny window, but be forewarned! The design is complex and it takes a while to trace!
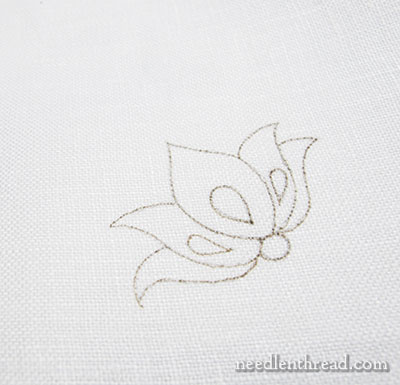
I’m using a very fine permanent pen to trace the design for the non-whitework versions. You can use a micron pen in black or brown or sepia for this part. The Sakura Micron Pens come in a size .20 mm (the cap has 005 on the top of it), and this is ideal for a fine line.
I’m actually using a different pen which is unfortunately discontinued. It’s a permanent writing pen by Martha Stewart. It’s a .5 mm tip archival pen, in a color called “moonstone” – if you have one, it works great. If you don’t have one, I don’t think you’ll be able to find one anymore. They have the 1.2 mm tips in the marker set, but they aren’t the same pens at all.
Another option: spray starch your fabric and use a fine mechanical pencil.
For the whitework version, I spray starched my Shadow Work linen fairly heavily and ironed it again, and I’m tracing the design with a .5 lead mechanical pencil, using a very light hand. The spray starch coats the fabric and will help release the pencil marks when it is washed at the end. You can do the same thing with the non-whitework versions, too. Just make sure that, for your project, you’re using embroidery threads that are colorfast and won’t run when washed.
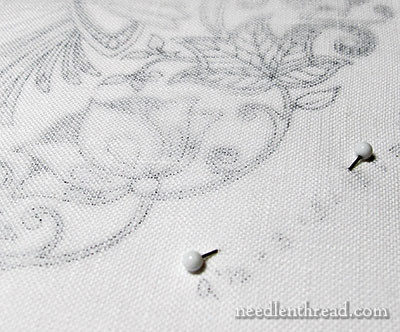
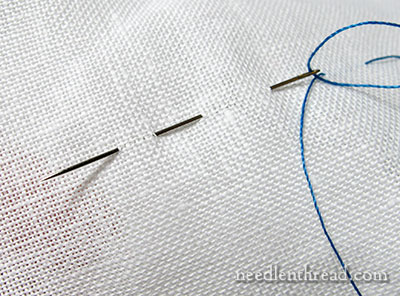
When you have your supplies lined up and your fabric prepared and you’re ready to trace, tape your design firmly to your light box, window, or other surface (some folks use glass topped coffee tables, and put a light underneath the glass…), and then situate your fabric over the pattern, so that it is centered. Then, pin the fabric carefully to the pattern. Pin all around the pattern, pushing the pins into the fabric and paper, but not out again. Two pins facing each other (shown above), spaced equally in eight spots around the design will do it.
It’s very important to pin the fabric to the pattern securely, with the pattern in a fixed place. Because the design is so complex, you may have to break off in the middle of the transfer process, and you don’t want the fabric to shift.
I use a piece of tissue paper to cover the area of the fabric where I’m not tracing, where my arm might rest, and to cover any area that’s already been traced, where my arm might rest.
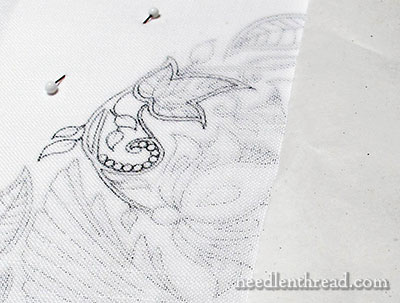
Finally, when tracing the design, only trace the details you definitely need. For example, on the area above (you can see the tissue paper to the right in the photo, and a little traced area to the left), I did not trace the design lines inside the leaves, because I can eyeball that as I stitch.
You don’t have to trace the tiny little dashes and dots inside larger elements, either.
You don’t even have to trace all the double lines on the vines if you don’t want to – it depends on how you plan to interpret those when you stitch them.
Other Design Transfer Options
Because this design is so complex, I find tracing the best option. There are, however, other options. You can find a whole list ofdesign transfer methods here. How you choose to transfer the design is really up to you! Use your own favorite, tried-and-true method if it works best for you.
Just remember to take your time with the transfer of the design! With a design like this, which is relatively large and involved, it’s helpful to do the design transfer when you have few distractions, and if you need to, take a break part way through.
Lots of involved information here, but it always pays off in the long-run to start a project off on the right foot, and if you’re following on this project (or starting a different project altogether!), hopefully, this information will come in handy.
Any questions, comments, suggestions? Have your say below!
For more information on this project, can find all articles relating to the Secret Garden Embroidery Project in this Index, arranged chronologically as the project develops.
Facinating! Thanks for all the details, Mary. That was really interesting.
Hi, Mary!
Thank you for the Secret Garden projects! What a great idea to present three versions! I plan to do SG 101, probably should do SG 201, and can hardly wait to do SG 301. It sounds like you may be working them simultaneously, but I will have to work them consecutively. I better get busy gathering materials.
I so enjoy learning from you. Thank you for exposing your readers to such an interesting variety of information and for your generosity in sharing.
Happy Stitching!
Lauri
Hi, Lauri yes, I’ll be working them simultaneously, though I imagine occasionally, one will take off a little farther than the other, when I’m working a certain technique or area…
Dear Mary
Such a detailed post and full of useful information on fabric and other essentials when starting a project. I agree that Alabaster Angel fabric is the best and Alba Maxima I also love I used Alabaster angel for the Agnes Dei project I did and as you say it is a strong fabric as I have experienced. Your washing instructions I follow all the time now and fabric does feel and work better afterwards. This project is so detailed that it makes want to follow you on it, maybe I will later it looks so interesting and I can’t wait for future posts on the progress. Thanks for sharing this with us.
Regards Anita Simmance
Thanks, Anita! I think it’ll be a fun project (projects), and they’ll always be here for you to follow along later if you want. But even if you don’t follow them, hopefully there will be plenty of tips and techniques along the way that will be helpful to you, too!
Do you really need to wash the fabric if the piece is going to be frame or something like that? I mean if the piece is only to look at it.
Hi, Angelica –
I always pre-wash linen before starting a project, for these reasons:
1. Getting the linen thoroughly wet is the only way to truly remove all traces of folds from storage or shipping, bolting, etc.
2. Rinsing the linen ahead of time is the only way to remove all the manufacturer’s sizing. All linen has some degree of sizing in it to make it easier to handle during the manufacturing process, and getting that out of the project ahead of time makes it easier to stitch, easier to manipulate the fabric, and so forth. Even if you don’t clean the project after stitching, you’ll want the sizing out because over time, sizing can discolor fabric.
3. It takes the initial shrink out of the fabric. So if you end up having to wash the project after stitching it, you don’t have to worry about shrinkage.
So, that’s why I pre-wash….
During the stitching, I take every precaution to ensure I don’t have to clean the piece afterwards, but sometimes, if you end up with dirt or anything on the piece, you do have to wash afterwards. Working on linen and cotton, this is ok, as long as the embroidery thread you use is colorfast. And if you’ve pre-washed the linen or cotton, you don’t have to worry about shrinkage…
Hope that helps!
Mary
Beautifully explained, thank you. I love all the details as to how and why you choose the various methods you implement.
Thanks for the tips on preshrinking linen! Several years ago I ‘appropriated’ the dining room table for my projects (seats six) is a glass top and I place a shaded lamp underneath. Works very nicely.
Yep, I used to do the same thing with my mother’s coffee table. I just laid my light down underneath, facing upwards! Worked great!
G’day there Mary,
Now, that’s a beaut idea, having the different approaches to the design. Thanks for the wonderful info today. Am loving this.
Look after yourself, you seem to be fitting in an amazing amount of wonderful projects with your other commitments as well.
Thanks, Kath! Actually, I’ve been really sick the last two weeks, so I’m taking this weekend completely off, and trying to get over this bug! I’m hoping sleep is finally the best cure….
You truly are amazing Mary. The attention to detail, your energy, and the time you spend are impressive. You obviously LOVE what you do.
SO….you have decided not to do the 10% reduction, but the 100% just as in the book. I’m a little “thick” so wanted to make sure.
thank you.
Yes, that’s right, Patsy – I think the details will be easier to work at the original size. -MC
I am learning so much from this project as well as your site in general. I cannot thank you enough for your generosity. There is a tremendous amount of preparation, for a presentation like this!
Thank you!
I’m glad you find it all instructive, Alyce! Thanks for the encouragement!
I am truly excited to see how your different versions of this pattern turn out. I am also excited that you considering a metal thread version. I was trying to think of how I would do the pattern and I thought that the metal threads would be phenomenal as hummingbirds are so naturally vibrant.
I love whitework embroidery and am thrilled to see how you work that.
I am really looking forward to you sharing your thoughts and hard work on these different versions.
I think the whitework one will be the most challenging for me, Marcia. I find I’m a little nervous about that one. I have some ideas – we’ll just have to see how they pan out!
Everything is clear and precise, as usual!, but I noticed that we need a 16″ square of fabric, which is more than the quarter yard you suggest under Linen Choices. Sorry to be picky …
Sorry not to clarify – with the fabric I recommended from Hedgehog, their quarter yard cuts are 18″ x half the width of the fabric, so it’s the “fat quarter” version of embroidery fabrics. I don’t know if all shops do that, but Hedgehog does. It explains it on the link to their linen page included in the article, so if you read that and check the fabric width for whatever kind you purchase, you’ll know what size you’re getting with a quarter yard. Hope that helps! MC
Hi Mary, I love the ideas you have for this design. As I read down the list of different embroidery versions you are planning I got more and more excited! I am so pleased that there will be a whitework version … oh and the possibility of a metal thread alternative as well! You really are spoiling us now 🙂 Thank you, I will enjoy following your progress with this project.
Hi Mary, Sounds like a lovely project. However under Linen Choices you said 1/4 yard would be enough. Yet the design is 9.5 inches round plus extra fabric. Maybe I read your description incorrectly but that doesn’t make sense to me. Shouldn’t it be closer to 1/2 yard of fabric? Sorry, if I have misunderstood you. Claire in VA
For embroidery projects, with the linen I recommended from Hedgehog, a quarter yard is 18″ x half the width of the fabric. It’s the “fat quarter” equivalent in embroidery fabric…. I don’t know if all shops do that, but I know Hedgehog does. -MC
You are wonderful! I gave up embroidery for many years and recently tried to do it again, but nothing looked as good as it used to when I was young. No wonder! It’s the “ground fabric!” I was always a fan of kits where everything came in one package. However, kits today are not the kits of my youth. No wonder I worked and worked on my stitches without success. Thank you for helping me to solve this frustrating problem. I always learn something helpful when I read your postings!
Hi, Alice – I always contend that your finished project will only be as good as the materials you choose. Average embroidery will always look better on good materials, and superb embroidery done on poor materials will pretty much always look average. I figure if I’m going to put the time and effort and expense into an embroidery project, then I want to work on the best materials I can afford. The most expensive thing that goes into a project, in my mind, is time. If you spend 100 hours on a project and you calculate a minimum wage for it, you’re looking at $800 worth of time – which makes a $20 piece of fabric somewhat inconsequential. Well, that’s just the way I see it! 🙂
I love your articles and ideas. they are so well written!! You mention you are only going to use DMC for SC 101. Are you referring to the DMC floss or the DMC Coton a Broder – #25 that HedgeHog carries. And if it is the Coton a Broder, then will you ONLY use the colors carried by HedgeHog. would it be safe to say if I ordered all they carry, then I would have all the colors you MIGHT use. (I am trying to avoid the shipping charges for SMALL orders.)
Thanks!!!
Barbara
Hi, Barbara – I haven’t settled yet on the exact thread. I’m leaning more towards floche. But whatever the case, even using floche or coton a broder 25, you can always substitute 2 strands of regular floss. I’m still messing with threads, though, and will know better as soon as I finishing messing around. I know some readers want me to use regular DMC floss, so I’m weighing and balancing all options. I’m also working up some samples to show the differences. -MC
Dear Mary,
Thank you for deciding to do one design using multiple techniques – when I made the suggestion, I never imagined you might choose it.
Many tanks once again.
Regards,
Alluson
Hi, Allison – yes, it was a great idea! It’s something I’ve always wanted to do, but I was always held back by the idea that people might get bored with it. So I figured I’m just going to have to work at making it interesting and useful! – MC
Hi Mary,
Much applause for a well-written explanation of getting started.
I read an awful lot of info and your instructions are the best ever.
Exactly the right attention to detail.
Thanks for all your effort 🙂
Regards Phillipa in NZ
Am looking forward to following this project to its conclusion. I learn so much with each project you do. Your work is beautiful. Have never prepped fabric for embroidery as you do, but will in the future. Would you do the same for fabric used in counted cross stitch?
Hi, Linda – I do. Some folks don’t, but I like mine thoroughly rinsed and ironed before I start, no matter what type of project it is. -MC
Mary,
Is there any reason not to prewash your whole piece of fabric when you buy it and before cutting off the piece for your project? With quilting fabrics I usually wash and shrink them right away so they’re ready to use.
If your cut is large – for example, a yard of a 72″ wide fabric, it’s more difficult to hand wash in the sink. I don’t like putting mine through the washer, but that’s just me…. Plus, there’s the whole drying question. Much easier to roll up a small piece in a towel and leave it until just damp and then press it, than to mess with a large cut of fabric. You can do it either way, though, really.
It’s great to see so many specifics! The wash method in particular will be useful to me in the future.
I’m really looking forward to watching all these versions come to life..I have a feeling I’ll be learning a lot.
My book arrived…now to decide on a design. Although I do embroidery, I will follow your beginners group. I will also get the lien you have suggested. I guess we can start at when we are ready and continue to follow along.
Oh DRAT!, You…You…You… are just brilliant! Here I was, going along, thinking, I can just Lurk and Learn, but NO! You have to make it so irresistibly appealing.
*peevish grumble*. Like I don’t have enough on my plate that I should be working on finishing. I know we’re all out here, thinking the same thing. Just how many people are you sucking into this project, Mary? Now I have to go visit Hedgehog and place an order.
*Just teasing you.* This is a really, really great idea!
Oh, come on, Sheila! It’ll be fun!!! 🙂 you know you want to!
Hi Mary, can you tell me if 32 count Belfast linen would be suitable for Secret garden?
Thank you so much for your wonderful site and I am looking forward to following along. I am waiting (impatiently) for the book to arrive!
Best wishes
Jude
Hi, Jude – yes, I think that would work. It depends, really, on the thread “coverage” of the linen. You should be safe with a 32 count, but if you find that it is too hole-y – that the linen doesn’t support the surface stitches well enough – you might consider backing the project with a piece of good white muslin. Just a thought!
Dear Mary
Thank you for your detailed information I have a question . May be your other Australian ladies who follow you can help. Where in Australia can I purchase the fabric you are using as have not come a cross it Alabaster Angel or the Alba Maxima thank you very much.
HI Irena,
I am in Australia too and wondering the same thing. Crewel Gobelin (on line) have Graziano linen – Bisso in white with free shipping but not sure if that would be similar to Legacy Alabaster Angel linen.
Regards
Jude
Yes, I think the Graziano linen would work. I’m not 100% certain on it! because I don’t have anymore in my stash to check it. I used it years ago on another project, though, and if I recall correctly, it would be a good substitute. I haven’t heard of any shops in Australia that import Legacy linen. Another option might be to check Yvette Stanton’s white work shop – Vetty Creations – I know at one point she was carrying some Italian linen that would work well.
You said to put pins in the linen and the paper, but don’t bring them out. Why? I see that with the two pins, there might not be much slippage, but there still can be separation between the paper and the linen; slipping up (apart) is the point I’m trying to make. I’ve had this problem before. I always pin in-and-out to avoid the problem. Since it will take some time to trace the pattern, I may have to remove it from the table before I’m done tracing, and that’s when the problems occur.
Hi, Sharon – that’s why I put two pins facing each other. When the pins are directed back out of the fabric, I always get a ripple I don’t like. But if it works for you the other way better, by all means, do it that way. Whatever works best for you!
I was excited to see that you are doing a whitework project this year. I had a whitework project planned but am holding off to see what stitches and techniques you might use that I could use in my project. I have a question. Since I bring my project to work each day and work on it during my lunch hour (the lighting is great), is it okay to use the small 7-8″ hoops as they are more portable for me. I think the impressions made from the hoop will come out with the final wash. What is your opinion?
It might work as long as you *faithfully* take your fabric out of the hoop at the end of your lunch hour or any other time you are working on it.
If you’re going to do the 101 version, I think the hoop will work fine. I’d make sure it’s a good hoop that you can bind (at least the inside ring) and then maybe cover the work with some fabric (muslin) in the hoop as well, and cut away a stitching hole, This will protect your fabric all around and help keep it clean and free of really creased hoop marks. And it will also help protect your stitches. Make sure you remove the hoop after every stitching session, to avoid permanent marks…
Mary, After the water treatment and pressing with the iron will the fabric remain stiff as a board? Also, should Alba Maxima receive the water bath?
It’s only really stiff while wet. It softens up nicely (with that crisp body typical of linen), once ironed. Yes, I do it with any linen…
Thank you so much for going through all the different steps. I’ll be following all of them, even tho I’m just a beginner.
Wow Mary arnt you a lil angle of stitching. I don’t usually post but couldn’t resist speaking up before I got all caught up in the excitement. Everything you do is so lovely and I can resist being part of it. Seems you out did yourself trying to please everyone and all skill levels. Don’t know how you will top this!!For ponce I think I have all I need! Thank you, my pocket book thanks you, and I am sure my husband would kiss you!
I’m very excited. I’ve never done anything this complex before. I’ve done lots of
crazy quilt embroidery, but never anything on linen. I hope the linen I bought at JoAnn Fabrics is ok. I don’t have the thread count before me now. If not, I’ll buy some good quality cotton. I don’t want to wait for A Hedgehog order. I have gotten some DMC Coton a Broder from them, but don’t have any Floche.
This will be a whole new ball game, and I just hope I can do it.
Now to get my fabric ready.
Hi, Jackie – if you’re going to trace the pattern, check the opacity of the linen. Often linen bought at local fabric shops is slubby, which can really interfere with transferring by tracing. Sometimes, though, you’ll come across decent handkerchief weight linens that’ll work ok….
Thank you so much Mary !
I was reviewing everything about this project that you have so far, and it brought to mind the Marian project, and the ebook put together by you and Cindy Russell. I don’t know if copyrights and such will allow that kind of compilation for this project or not, but wouldn’t it be wonderful if it could come about? I have also noticed that, depending on what you post here on your fabulous website, there can often be a run on certain products and books! I am So Very looking forward to this project, but don’t knock yourself out doing so much work, have fun with it!
Yes, the run on materials could be a problem… I don’t know what the linen supply line is like right now, for example. I should have checked with the importer (Access Commodities), but you can always make substitutions if you have to.
Not sure about the e-book thing. It might be something I look into at the end of it all…..
Dear Mary,
Your posts are always so informative and detailed! I always eagerly check my email after work to read your newsletter. At the weekends I always feel there is something missing… Thanks so much.
About this project, why do you choose to trace your design rather than using the prick and pounce method? I find that with very detail designs works best for me, but does take more time. I can also achieve more accurate lines.
It might just be a matter of personal preference, of course, but would appreciate your expert opinion.
Looking forward for the developments on these projects.
Will probably follow the whitework one and either SG101 or SG201 depending on what I already have in my stash.
Thanks for guiding us in another wonderful project!
Would using silk threads on the Alabaster Angel be acceptable or do you think I should find a silk/satin or different material all together?
I ask because I have brilliant colors of silk from Mulberry Silks and let’s face it-hummingbirds scream for silk!
For me ground fabric choice is the most stressful since stores around me don’t carry high quality linen. If I order online I feel like I’m taking a shot in the dark which can lead to an expensive mistake.
Hi, Wendi – I’ll be using silk on the linen. Silk on linen is a BeeYooTeeFul combination. Can’t wait to see what you do with the mulberry silks. Love them! I’m going to set up a photo group eventually, so folks can share photos as they go along, if they wish…
Dear Mary,
Thank you for your articles and sharing your wealth of embroidery knowledge.
I am curious as to why you chose different linen (shadow work) and a different transfer method (pencil) for the white work sample project.
As an aside, as you are selecting your threads, it may be fun to experiment with different manufacturers. I know most of your readers have expressed an interest in DMC and I love their floche, but I think it would be fun to experiment with other cotton threads. Just a thought!
Once again thank you for your articles. I will be working with you on this project.
Mary, I am hoping you can answer this. I really want to follow this wonderful new project. I LOVE the 3 prong approach for all different levels. Wow, you are on a roll. 🙂
My question is: I want to paint behind my embroidered projects and also incorporate ribbon embroidery into the pieces (sort of a “Di van Niekerk” idea but with my own designs). Will these same fabrics be a good fit for the painting or would there be something more appropriate for that? Thanks for any help you could give me. When you mentioned not using the same thing as clothing linen from the fabric store that made me realize I have alot to learn about just what fabric to use!!! Once again, thank you, thank you for your posts. I look forward to each day’s latest. Learning alot from you.
Hi, Carol – mmmmmm. You can paint on linen, and the alabaster angel linen is a fine enough weave that it won’t look too textured, but if you’re trying to achieve that really smooth surface that you see in some paint & embroidery combos, you might go for a good silk ground, or a very good high count cotton. If you don’t mind the visibility of the weave a little bit, then the alabaster angel would work. It all depends on the look you want….
My book and fabric have been ordered and I am so excited about this project. I plan to do the design in white work. Just wondering about the size and shape (round, square) of the hoop we should use. What do you suggest? Thank you, Mary.
Paula
Hi, Paula – Well, the design is 9.5″ round. To stitch comfortably along the edges inside a hoop, you’ll need a hoop that’s at least an inch bigger all around your project, so you’re looking at a 12″ hoop, if you want the whole project visible in the hoop. I find hoops that size to be a bit large. You can move the hoop around, though – problem is, if you’re doing high relieve white work in any areas, the hoop can affect the stitching. If you do decide to move the hoop around, the make sure you’ve padded the hoop or bound it, to help protect the stitching. I’m going to be working mine on a frame, because a frame gives better tension for an extended period of time, and it doesn’t require you to move the work around, and it is much easier to keep the work clean. I’m planning to use 14″ square frames. ~MC
I can’t wait to get started. I also will eventually do all three but will start with 101. I do like white work though.
Hope you feel better.
sue
I’m excited about this project! I’m not sure im going to do as much as you are. I am doing part of it! There are so many possibilities in this book.
So many ideas, so little time.:-)
Mary, the linen from Jo Ann’s is in a package, and says its made in Belgium.
It’s says 36 which I assume is the count. It looks very fine, and was pricey for a 20 by 26 piece. So I believe it’s good, and not too dense. Did you say that it has to be copied on a non home copier? I want extra copies to play with.
The design won’t fit on a regular home printer / scanner that accommodates 8.5×11 paper. So you’ll probably have to take somewhere. You definitely have to cut it out of the book, unless you can “smash” the binding back far enough, but I couldn’t, so I sliced it out. – MC
Hi Mary,
I thoroughly enjoy your website. Your explanations are excellent and a pleasure to read as well. Thank you for all the time you invest in preparing and presenting them.
I am relatively new to linen so after reading this post I went back and read your post from Sept 12, 2009 about linen and while it answered many questions, it also raised a lot. I was wondering if you would consider putting together some kind of a chart on the various linen options. I was thinking of something like separate sections for cross stitch, surface embroidery, whitework, shadow work, etc, with specific suggestions regarding which linen to use and why. (e.g. surface embroidery, lighter weave & closely woven, Legacy Alabaster Angel; cross stitch, even loose weave, examples? ; etc.)
Also, I have seen many names for linens but I don’t know exactly what they mean, such as the word ‘cashel’. Does that simply mean a specific count? Does it specify how tight the weave is? Is it a brand name?
As you can see, I have a lot to learn. Thank you for considering this suggestion.
Dear Mary,
I hope you have managed a good sleep and feel much, much better! What an ambitious undertaking to do three and maybe a fourth part version of the Secret Garden Project. But it will be a fantastic learning experience for us!
My question is about cutting the fabric to the size required, and then pre-shrinking it. If we start with a 16″ square piece of linen, after the shrinkage process it should be less. Did you measure the shrinkage on yours? I guess some linen types shrink more than others. Overall I imagine the shrinkage amount is only small, but how much can we expect? Perhaps for some linen types we might need to start with a 1/2″ larger piece to take this into account or is this all in the calculations?
I’m with you about time spent and using best quantity materials … and tools. Thank you for the information about sources of good linen in Australia. If any other Aussies can assist further, please let us know.
Mary this is like the first day at school! I’m very excited in anticipation about your Secret Garden projects and the learning that is to follow.
Thank you!
Hi, Louise – Thanks!
if you cut a 16″ square piece, it will definitely accommodate any shrinkage and still give you plenty around the perimeter of the design.
It is sort of like the first day of school – only a little more fun! 🙂
Dear Mary, I love that you’re doing this project! I have the Secret Garden book and I’m in love with the pages that have a fence, a gazebo, a tree with hanging lanterns lit with candles, and even a birdcage. How do I figure out what size fabric I need to do this design? Can’t wait until my fabric comes to do your project! Ann
Well there must be a rush on the Dower alabaster angel. I have called two places and there is a 3 week wait since it is out of stock!
Wow! I’m pinning this post because it has so much useful information. I am very new to embroidering so all your tips and suggestions will come in handy as I learn. Thank you for sharing.
Mary if we use the recommended linen do we need to use a backing fabric
No, not for any of the techniques I’m using for these three. If we tackle a gold work one, that’s a different story!
I received 2 books for Xmas. Secret Garden and Creative Haven’s Art Nouveau Animal Designs. I do love my friends they think I am going to live forever.
Besides that, I admire dive gungho dive into doing one of the SG designs.
I did look a that and I wonder if you saw it the same way as I did?
Looking at the birds, I at first really didn’t like them. They looked rather quite savage.
On further appraisal I thought they were an Aztex or Inca design around their eyes. it dawned on me they have a Celtic look about them.
I did note the Author was either Scots or lived in Scotland. I will have to read the blurb more thoroughly..
They are quite heavy birds but nevertheless I do like the picture with the owls peeping over the leaves.
Well Mary I will look forward to your adventure and I am sure it turn out delightful to the eye as all your other works do.
Thank you for your interesting breakdowns of the workings.
Kind regards as ever.
Martha May
AUSTRALIA
I prepared my Legacy Alabaster Angel exactly the way Mary Suggested.
It did shrink from 17″ to 15.75″
I’m using a thick 14″ quilting hoop clamped to a floor stand. I wrapped the inner hoop with twill. I will see if it works. I didn’t want any of the design to be bent in the hoop. I have a flimsy 12″ hoop but that made the design too close to the artwork. Since it is a round design, I figure a round hoop would be good to hold it. I tried the stabbing technique and it works so far. Before I had been stitching with a loose cloth in a smaller hoop and used the sewing method.
Mary, if you think I’m headed for disaster with this set-up, please set me straight!
Thank you.
The hoop should work for you, Robin. It sounds like you’re set up right. Just keep things taut, and be careful not to pull your fabric wacky when you tighten it up. Should all be fine!
hi. Looking forward to following along with this project 101 just a beginner can you let me know did you go with the 100% image of the picture smaller image ?
Thank you for you knowledge and breakdown of they project. Annette
Hi, Annette – I didn’t reduce the image after all. It’s full size.
Hi Mary!
I wanted to ask if I could use a ground fabric that I bought at Hobby Lobby. It is called M.C.G. Textiles. It is 32 count Belgium linen. the piece that I purchased is 20″ x 27″.
Do you think this is a good ground fabric? If not, I am going to order the fabric that you suggested. I already had this fabric and I thought if it would work, I could do ahead and get started.
Thanks for your help!
Hi, Lynn – well, it depends on the weave of the fabric. If the threads have space between them and he holes are rather noticeable, I think it would not be the best choice for surface embroidery (it would work better for counted work). When the fibers in the ground fabric have a noticeable space between them and the holes are prominent, you end up getting “forced” into certain places for your stitches, which can lead to jagged edges on filling areas and so forth. -MC
Hi Mary,
Thanks so much for all the time you put in here! I can’t tell you what a relief it was to read the description of running out of steam — I thought I was the only one that happened to!!
I absolutely cannot wait to follow this project and will definitely be ordering this book to do this myself. I’m a beginner and I’ve only done a few smaller projects so far, so it’s great to know such a fantastic looking project can also be completed with beginner techniques, thanks so much for that!!
Dear Mary,
Thank you so much for your website–I love it! And I’m learning so much from you.
I would like to do the Secret Garden project as crewel work, using linen twill. I think that will work. What do you advise?
Lois
Hi Mary,
I’ve come to this project a little late though I’ve followed all the details thus far.
I”ve got my copy of the book and have been checking into fabric available here in Australia. Followed the link the Vettys where they stock the following:
Graziano Pronto Ricamo linen. 38 count.
that advise it’s suitable for both cross stitch and surface embroidery but I’ m not sure 🙂
Do you know this linen and do you think it would be suitable please.
Thanks too for your amazing site, your tutorials make everything seem possible !
I’m not familiar with this particular Graziano linen. You don’t want any space between the threads of the weave. Hopefully, someone out there will be better acquainted with it and can tell us how well it would work for surface embroidery using one strand (out of the six) of cotton floss….? I think I’m going to have to invest in some Graziano linen – or at least in some swatches – so I know for sure in the future. You might contact Yvette directly at Vetty Creations to see what she says about the weave of the fabric. You want a close weave that will support satin stitching and long & short stitch, using only one strand of cotton. She’ll know!
Hello,
I am living in France, and would like to buy Alabaster Angel Fabric, you use for the marvellous Secret Garden Embroidery. Is this fabric known under an another name in Europe and where I could buy it. I am a great admirer of yours, sorry for my English.
Thank you in advance for your answer
Huguette Spengler
Hello, Huguette – Thanks for your comment! I’m not sure what it is called in Europe. But I think you could use any high count (40-50 threads per inch) linen, that has a close, full weave. I think the Schwalm linen that Luzine Happel uses – Weddigen linen from Germany – in the higher thread count (I think they make a linen that’s 20 threads per cm) would work well.
Mary, I was wondering if we can dye the linen of choice using Rite dyes. If not can you suggest something?
Hi, Judy! I’ve not used RIT dyes for embroidery fabrics. I think if you are going to do so, you should definitely do a few test runs. There’s nothing worse than colors running during blocking, or cleaning & rinsing if you need to, at the end of the project! The most important thing is to choose a linen that will work as a ground for surface embroidery – it should be a full, smooth weave with a relatively high thread count (no gaps between the woven threads). From that point, if you decide to dye it, do a few test runs with different approaches on small pieces of the same fabric. Most good linen for surface embroidery is pretty pricy, so I wouldn’t personally dye a whole chunk of fabric unless I were absolutely sure it would work out.
Dear Mary,
Thank you for sharing your expertise in embroidery. I wanted to let you know that recently I used the above method for prewashing a large (expensive) linen altar cloth and after I finished the project, the linen still shrank. Everyone should be advised to put the linen into the dryer as a part of the pre-shrink process. A full wash and dry should be given to the linen three full times before using it in a project to avoid shrinkage afterward.
Yes, I would say if your plan is to use the dryer as the normal laundering and drying method for the finished piece, then use the dryer before embroidering, too. Personally, I never use the dryer on altar linens. I roll them in a towel and freeze them, and then, when time allows, I take them out of the freezer, let them sit about 15 minutes, and then begin the ironing process.
Hi Mary, I am just starting and I am doing 101. I am using alabaster angel linen and I did not understand what you meant when you said (Cutting along the thread of the fabric ensures that your fabric is on the grain) A friend of mine said I should try to pull a thread where I mark it at the 16 inch spot, which this is impossible. Mary Please Help!
Thank you.
Sandra
Hi, Sandra – just do your best to cut it straight along the grain of the fabric. You can always cut it a little beyond the 16″ mark and remove threads from the edge until you have a straight edge. You can see what I mean by this, if you read this article: https://needlenthread.wpengine.com/2008/07/dressing-slate-frame-for-embroidery.html The idea is to get a straight edge so that you can align your frame with the grain of the fabric.
Hi Mary, I have one more question do I tape the edges of the linen or frey check I do not have a sewing machine to zig zag the edges?
Thank you,
Sandra
I usually over sew the edge with just a whip stitch, by hand, but you can use fray check just on the very edge if you want, or any method that works best for you. I don’t usually like to use masking tape on a project that’s going to take any length of time. -MC