


Today’s mini tutorial on stem stitch curls and spirals was prompted by some questions that have come in recently via email and in the comments on the various articles on stem stitch.
Some of the questions concerned me enough to reschedule today’s planned article. It seems some of you are really struggling with stem stitch on curls and spirals. On top of that, there’s some erroneous information out there about working curls or spirals with stem stitch.
A couple readers mentioned that they have attended classes in which the instructor taught that the working thread is always on the outside of a circle or curl, no matter what direction you’re stitching in, because that’s only way the circle will look smooth and the stitches will hold in place.
Wellllllll…this isn’t exactly true. I thought we better clear that point up, just in case others suffer under the same impression.
So, in this tutorials, I hope to answer questions on working curls in stem stitch without the stitches looking spiky, and I hope to clarify the relationship between the needle and the working thread when working into a curl.
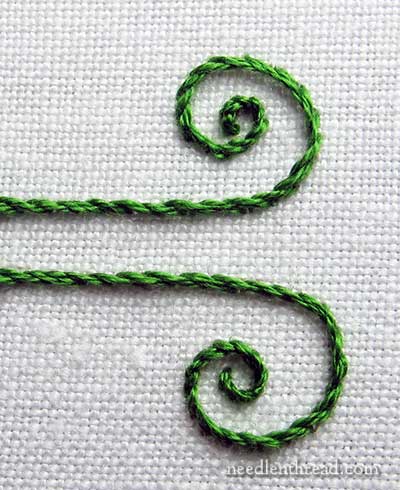
Here are my rather quickly worked spirals that I doodled directly on a scrap of fabric.
When I look at them under the glaring, truthful eye of the camera, I realize they’re not the most beautiful examples of stem stitch in the world. But bear with me, anyway…
Both of those scrolly lines are worked in stem stitch, from left to right. I didn’t turn the hoop at all as I moved forward with my stitching, because I wanted to make sure it was very clear where the working thread ends up in relation to the needle as you go into both the top and the lower curl.
Besides, if you’re working on a frame, you can’t always turn it to follow the movement of your embroidery line.
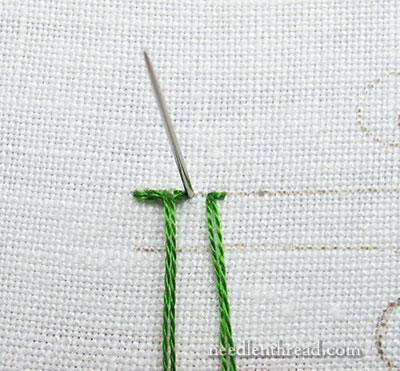
So, here we are, starting the stem stitch line. Notice the working thread is below the needle, because we are working from left to right and we are using s-twisted cotton embroidery floss.
(The whole s-twist, z-twist thing is not relevant at this point, since I’m working with cotton, and all cotton embroidery threads are s-twisted. But you can read about the difference between s-twisted threads and z-twisted threads and see how they affect your embroidery, if you’re curious. Mostly, rayons are always z-twisted, and silks are often z-twisted, but not always. Cottons are always s-twisted.)
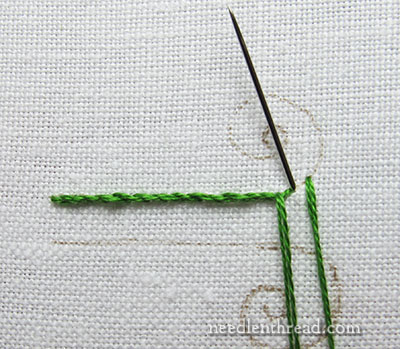
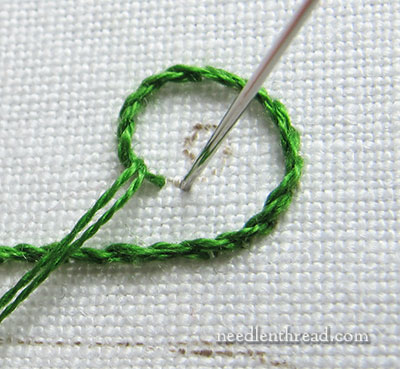
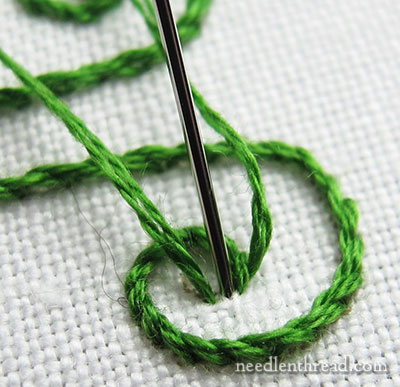
Here we are, traveling along the same line, heading into the upwards curl. Notice the working thread stays in the same place in relation to the needle – it is outside this particular circle, as we work into the circle.

On this upward curl that curls counterclockwise, notice that the the working thread stays to the outside of the curl in relation to the needle, all the way around.
In the photo above, the working thread is above the needle, but that’s because I’m stitching in a different direction at this point. I haven’t changed the relationship between the needle and the working thread at any point in this line and curl. All I’ve changed is the direction in which I’m stitching as I travel around the curl.
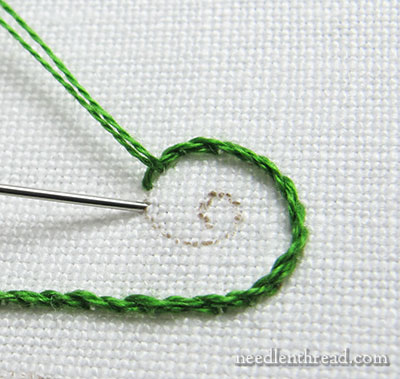
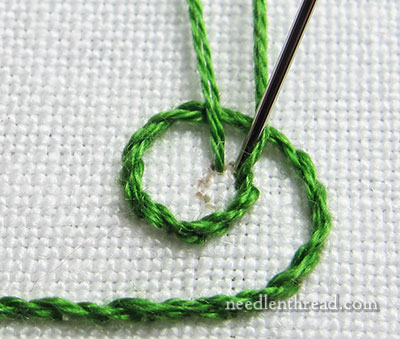
As we work into a tighter curl – as the line starts spiraling in – my stitches are getting smaller.
And as the curl gets progressively tighter, the stitches get progressively smaller.
You don’t want to go from “normal” sized stitches (the stitch length you started with) to tiny stitches in one stitch. Instead, you want to work progressively into the smaller stitches. You know that you’re entering a tight spiral and your stitches will need to be quite small to take the spiral neatly, so start decreasing the size of the stitches as you work into the spiral.
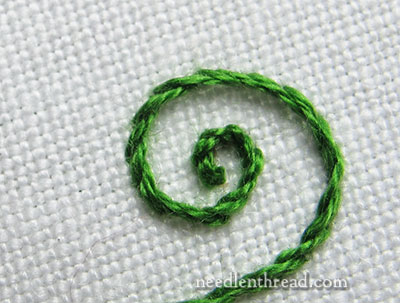
Smaller stitches still! The curl has tightened up so much, that the smaller stitches are necessary in order to keep the integrity of the curl.

At this point, the curl is finished. The last stitch, where the needle goes to the back of the fabric to end off the thread, should be just beyond the end of the previous stitch.
I know a little girl who has a little curl right in the middle of her forehead. When she is good, she is very very good, but when she is bad, she is horrid!
Every time I stitch a curl, that’s what comes to mind. I’m not sure why.
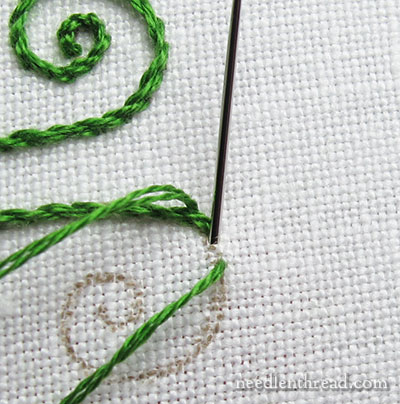
I’m stitching the lower line and curl in the photo above. I started on the far left and the working thread was below my needle with each stem stitch.
And now I’m working into the downward, clockwise curl. Notice that now, the working thread is on the inside of the spiral.
The relationship of the working thread and the needle has not changed.

And it doesn’t really change at all – it’s the direction of stitching that changes. So, as I work into the lower part of this spirally curl, now the working thread is above the needle.
It’s still stem stitch! If you turned the hoop to maintain a left-to-right stitch direction along with the turning of the curl, you would see that the needle is below the working thread.
If you switched right now and put the working thread below the needle, you’d get a slight break in the stitched line, and suddenly, your stitches would blend together into a smoother twist typical of outline stitch and the change would be quite noticeable.
And you can see the decrease in the size of the stitches as I move into the center, tight spiral.
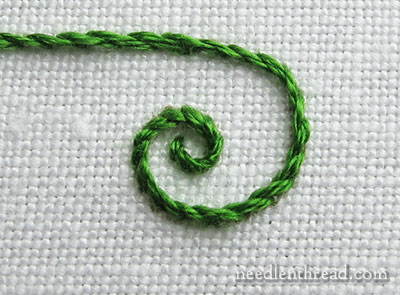
And the second curl is finished.
So, two things to remember when working circles, curls, or spirals with stem stitch:
1. Don’t change the position of the working thread and needle just because you’re going into a curl or spiral. Where the working thread will be in relation to your needle depends upon which direction your design line is traveling in.
2. Work progressively smaller stitches as the spiral gets tighter. In this way, your stem circle will hold and you will avoid the “spikes” that often result from stitches that are too long.
If It’s Easier for You…
While both tips above are essential for working a tight spiral or curve in stem stitch, here’s another tip:
If it’s easier for you to keep the working thread inside the circle or curve to hold your stitches in place, just change the place you start the curl or the circle, so that you’re working thread is in the correct position in relation to the stitch, but still on the inside of the circle or curve.
So, in the example above, if you start on the curly tip, and turn your hoop to give you a left-to-right movement in your stitching, you can work the stem stitch in the normal way, retaining the rope-like effect of the stitch, and keeping the working thread below the needle.
Either way works! The idea is to keep the needle and thread in the correct orientation to achieve the rope-like effect of a true stem stitch.
Stab Stitching vs. Sewing
A final note:
When you are working in a hoop or frame, your stem stitch results will be much more pleasing if you stab the stitches rather than sew them.
Stabbing is taking the needle all the way from the front to the back and pulling the thread through.
Sewing is scooping up some fabric to take the stitch, so that you don’t have to take the needle all the way to the back and you can just work the stitches right from the front of the fabric.
But if your fabric is drum tight in a hoop or frame and you’re “sewing” your stitches, you increase your risk of puckering and distorting the fabric, and your stitches rarely come out as nicely.
Also, stabbing instead of sewing the stitches eliminates the lefty-righty confusion often associated with stem stitch. If you’re stabbing, it doesn’t really matter if you’re left-handed or right-handed. You can work the stitch from left to right, either way.
If you do need to work the stem stitch along a right-to-left line, remember that the working thread must be above the needle, for the stem stitch to come out correctly.
Questions? Comments? Suggestions? Have your say below!
I just absolutely LOVE how detailed your tutorials are! The time and care you take to break down and precisely explain techniques, such as this stem stitch, speaks to your love of embroidery and the desire to promote it as accessible to even the most basic beginner. You make it so easy to follow and I thank you from the bottom of my heart!
Dear Mary
The poem is perfect when stitching curls & spirals and it continues:
One day she went upstairs, while her parents, unawares,
In the kitchen down below were occupied with meals;
And she stood upon her head, on her little truckle bed,
And she then began hurraying with her heels.
Thanks so much for the tutorial on the Stem stitch curls & spirals I always try and sew from left to right as I find that I don’t lose the ropey look of the stitch if I sew from right to left I always end up with a smoother stitch. The tutorial is a great reference and thanks for sharing this with us. I hope you have a great weekend.
Regards Anita Simmance
I LOVE stem stitch, I LOVE spirals, I LOVE swirly, I LOVE lettering, in my embroidery pieces.
I have been SO frustrated with using stem stitch because of the spikes and would begin another stitch going into curving instead of continuing stem….No it did NOT look good, but it seemed better than spikes.
THANK YOU Mary! Perfect, detailed description….blessed are us that learn from you….Seriously!
Mary! You are the best teacher. Thank you! I might add to those who are still confused– you just have to keep doing it, then it will all make sense!
Hello Mary
Your tutorial today is very difficult for me. I’ll have to lead me on a piece of cloth, because only I can not know when I have to put my son above or below relative to the needle. I realize my point still stem from left to right and I constantly turn my hoop … I find that I have many, many things to learn and you are there .. Many thanks
Mary,
Thank you for all the detailed instruction and encouragement!
After your tutorial yesterday, I decided I’ve been doing just fine with my stitches, and I have too relax and have more fun with it.
When I get confused about the direction of the needle and thread in stem stitch I developed a trick for myself. No matter where the row is headed, I think of that direction as UP. And my needle always comes up to the LEFT of the thread as I am lookong up to where I’m headed. It even works upside down. When I’m confused, I look at the last few stitches and see where the thread came out of the line. If its on the Left, then I’m ok and just copy the direction in the next stitch.
This is hard to explain and you do such a fine job. Thanks,
Robin
I think the up idea will be helpful, but I tend to confuse left and right. For some reason east and west are harder to confuse, so I will think of myself as stitching north, and the thread coming up on the west side. Maybe this will help someone else who is directionally challenged – I know there are a lot of us because we are always telling each other “no, I meant the other left”.
Hi, Cindy – if you are stitching towards the “north” on your fabric – that is, from bottom to top – the working thread actually needs to be to the east (or right) of your needle when working with regular cotton floss. I might be misunderstanding your description, but if you are stitching bottom to top of your fabric, and considering the top “north”, the right “east”, the left “west”, and the bottom “south,” then to keep the twist correct on the stem stitch, your thread needs to be “east” of the line of stitching (and the needle). Hope that makes sense! -MC
Thank you, Mary; that is such a clear and easy-to-follow explanation. As always, it inspires a desire to copycat whatever it is you are doing.
Thank you! I always thought I knew how to do the stem stitch, but couldn’t understand why there was the break in the stitches as I went around a curve. Now I know what to do and what NOT to do! Thanks again.
Mrs. Corbet,
Thanks for the very detailed explanation. It clears up many questions!
Sarah 🙂
Mary esta puntada la ha usado en un bordado con canutillo oro entrefino y es muy espectacular y al ver tu explicacion tecnica mas seguridad me da el usar esta puntada mil gracias
Many thanks Mary – I am stitching along with you – not sure my stem stitches will look that good under magnification!! Your previous post answered my question of how big your stitches are – I checked mine and they are also about 1/8 inch (well some of them are)
I have a little ‘ditty’ in my head to help which others may find helpful:
RIGHT to left – RAISE the thread, LEFT to right LOWER the thread, and spiral the same from start to stop.
Looking forward to some leaves next.
I am now obsessed with the stem stitch, have read all your posts, watched the video many times, etc, and I want to get it right. Today’s post is addressing my question, but I just need one further clarification with curves and changes in direction.
If I stem stitch the letter S for example, and I start at the top, moving right to left, thread above the needle (I’m a lefty) — should I just continue that to the end by turning my hoop? (Which is what I’ve been doing.) OR, midway through the S, should I switch to left to right, with thread below needle?
As a beginner, I may be over thinking the stem stitch. Many thanks for your patience and awesome website!
No — sorry, I see that would be the same stitch. What I’m really asking is, on outside curves, should the thread be above the needle, so that the thread lays nicely? How would I do that with an S shape?
Turn your hoop as you stitch. That way there’s no confusion.
Very clear, thanks.
Thank you all the girls, Robin,Cindy for the comment . Yes, direction for stem stich is a real problem…for me. Thank you.
Mary, I just want to thank you again for your fabulous blog. I feel like I am sitting in a class right next to you getting instruction. I am so grateful for these tutorials. I really want to master embroidery and through your blog, I feel like I can! I want you to know how much all of your hard work is appreciated!
Very informative and I like the manner in which you show exactly what you are saying in the photos. Really makes me think about how I do the stem stitch. Thank you.
I think I have confused myself reading all the comments, so I’m asking for a little of the individual attention you so graciously give. You wrote, “Don’t change the position of the working thread and needle just because you’re going into a curl or spiral. Where the working thread will be in relation to your needle depends upon which direction your design line is traveling in.” In both curls pictured, it looks like you are stitching left to right. Do you have to preplan how you will begin–thread up or down–by looking ahead to see if the curl turns clockwise or counterclockwise? Can you turn the hoop in the middle of a line of stitching so that curls can always be turning counterclockwise and the thread on the outside?
Hi, Sandy – Yes, you can turn your hoop as you work into the curls. The only reason I did it here without turning is because many embroiderers work on frames or with their hoops clamped on a stand, and turning is not an option. No, you do not need to start the line differently. My point in the above is to show you that, on the top curl which curls up and counterclockwise, the working thread is to the outside of the spiral. On the lower curl that travels down from the line, clockwise, the working thread ends up on the inside of the coil. The stitch hasn’t changed at all – it begins and ends the line in exactly the same way. When you curl up, your thread ends up on the outside of the spiral. When you curl down, it ends up on the inside. But it’s exactly the same stitch, worked in the same way. The reason I point out the difference in where the thread is, is because some stitchers are under the impression that, when working stem stitch on a circle or curl or spiral, the working thread is “always” on the outside of the spiral and the needle on the inside, but you can see that this isn’t the case. It depends on the direction in which the spiral or curl is coming off the line. ~MC
Thank you very much for your answear for Sandy, I understand now…
Mille Merci à vous deux
Thank you for your detailed explanation in reply to my questions. I’m looking forward to your next lesson.
God bless you! This seemingly simple stitch has made me feel like an idiot for years. I often just resort to back-stitch anytime curvey lines were involved and it was very limiting. I am pretty much a seven-stitch-tea-towel-and-pillow-case-plodder so many of the projects here are way outta my league. However, I still like to do good work and your tutorials are always appreciated! Thanks for taking a step back so I could take a step forward.
Thank you Mary for answering my unasked questions. I have done some Brazilian embroidery but this project is great practice for a beginner.
Hi Mary
The poem doesn’t end well, though:
Her mother heard the noise
and thought it was the boys
a playing at a combat in the attic.
But when she climbed the stair
and found Jemima there
She took her and did whip her most emphatic.
Pretty non PC now, although written by one H. W. Longfellow. From the days when children were to be seen and not heard perhaps. Thanks for sharing your expertise, and a poem from my childhood
Elsa
Hi there: I’ve always gotten confused when working stem stitch where there are two directional changes in a line, e.g. when stitching an S-shape. Do you flip the thread to the other side when working the second curve?
Thanks! Love the information.
Hi, Linda – no, you don’t flip the thread. Don’t change anything as you work the curves, and you’ll find that naturally, because of the change of direction, the working thread will end up on a different side of the needle.
I’ve had Needle n’ Thread bookmarked for a couple of years. I’m a novice crazy quilter and have just reached a point in my stitching where I had to revisit the s and z twist articles. I often use crochet thread to embellish seams and just today it dawned on me why I haven’t been successful in rendering a nice stem stitch. Crochet thread is a z twist. Ah, the ups and downs and twists of embroidery. I sure do appreciate you!
how does this change for left handed people?
Hi, Bunny – if you watch the stem stitch video here on Needle ‘n Thread (you’ll find it here: https://needlenthread.wpengine.com/2006/10/embroidery-stitch-video-tutorial-stem.html), you’ll see the difference in working from left to right with stem stitch (for right handers) and then right to left (which is how a left-handed stitcher would do it). The thread is kept ABOVE the needle when working from right to left, so if you either move your work so that you’re working from right to left as a lefty (always keeping the thread above the needle), then it’s work. If you can’t shift your work around (say, you’re working on a large frame), then just imagine the line you’re working on, as if you were working on it right to left, and then place your working thread accordingly. With lefties, whenever working the stem stitch from right to left, the working thread is above the needle.
If you’re working around a spiral or a curl, again, you just need to situate the direction of your initial stitching from right to left, and then keep the working thread above the needle. As you progress around the curl or the spiral, don’t change the orientation of your thread in relation to the needle, and it will work out!
Your instructions are so good, I can’t thank you enough for helping me to take this journey into embroidery.
lindos seus bordados como adquirir seus livros
One of the many things I watch on YouTube is a particular judge, who should be on the Supreme Court, Stephanie Boyd. At times one of the lawyers that defends clients comes before her and it cracks me up as for some reason he has a perfectly placed curl on HIS forehead. It reminds me of that poem, but I didn’t know the whole thing, only about the curl in the middle of her forehead. I’m not surprised you have it popping in your head.
I have always had problems with a stem stitch and didn’t know about where to keep the thread and needle. My first embroidery project was a pair of pillowcases and I had no instruction on how those stitches should be made. I was also in 8th grade or there abouts. Now I do, or at least I know where to go to get the info on them.