


I’ve had a few questions this past week about stem stitch filling in general, mostly in conjunction with the Secret Garden embroidery project.
So today, I want to show you some close ups of stem stitch filling underway and go over a few tips about how to successfully fill an area with the stem stitch.
The stem stitch is a really versatile stitch, so whether you’re working the Secret Garden project or not, hopefully, you’ll find these tips useful for other surface embroidery projects as well.
First of all, concerning stitch length, your stitch length will vary when working the stem stitch filling, depending on a number of factors.
For those who are worried about being super-duper precise with an exactly consistent stitch length when working the stem stitch and the stem stitch filling, please don’t obsess over stitch length!
Your stitch length may change (or be different from mine) based on several factors:
1. Stitch length varies depending on the thread you’re using. Different threads require different stitch lengths. This is perhaps best explained by referring you back to this comparison of different weights of cotton embroidery threads stitched with stem stitch. Thicker threads will require larger stitches, and finer threads will work better with smaller stitches.
2. Stitch length changes, depending on where you’re stitching. When stitching around a curve, smaller, tighter stem stitches will usually take the curve more smoothly than long stem stitches.
3. With stem stitch filling, sometimes, when working a line of stem stitch in the area to be filled, you might have to alter the length of your stitches here and there, to make them fit next to the previous line of stem stitch or to make them work in the particular area that you’re filling.
The upshot: Chances are, on this piece, which features curvy vines and in which thread choice is individual, every stem stitch is not going to be exactly the same length. Don’t obsess over it. Once the stem is filled up, it will look fine.
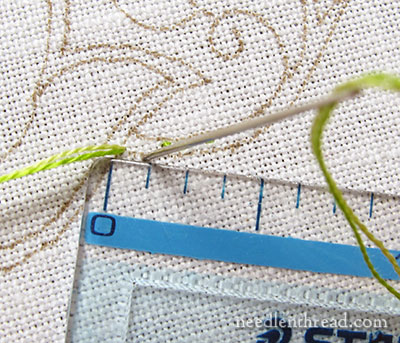
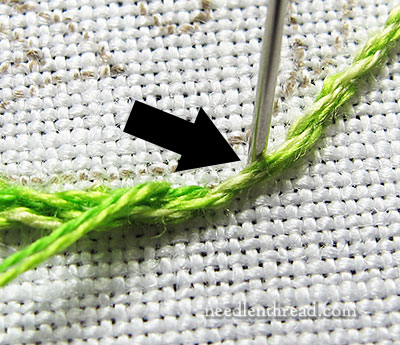
In the photo above, I’m taking my first stitch in a stem stitch line, using two strands of cotton floss in the needle.
You can see that the stitch is less than 1/8″ long, but not as short as 1/16″. My first stitch (and my last) in every line of stem stitch are always a little shorter than the stitches in between. A shorter stitch at the beginning and end keeps the ends of the line a consistent thickness.
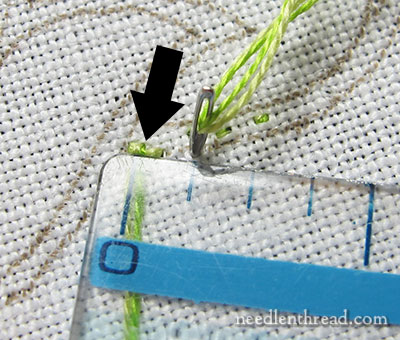
The arrow in the photo above shows where the second stem stitch is beginning in this line of stem stitch. (The working thread is squished behind the ruler.)
The needle is going down into the fabric at about the 1/8″ mark. So, including the overlap of the second stitch with the first stitch, the second stitch ends up being about 1/8″ long, which is slightly longer than the first stitch.
This length will be more or less consistent on straight and gently curved lines, but there will be places where my stem stitches might be a fabric thread longer or shorter, just because I don’t measure every stitch. I try to be consistent, but certainly, there are occasional inconsistencies.
If the line moves into a sharper curve (especially if it moves into a spiral), the stitches will be significantly shorter to take the spiral smoothly.
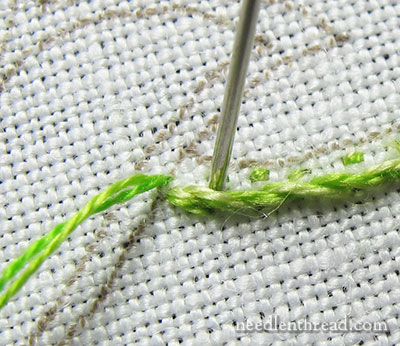
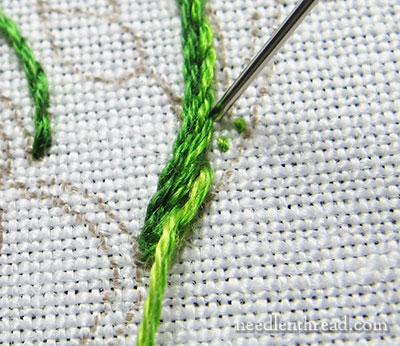
With the first line finished, I changed my thread to the next two shades of green in the needle, and I’m starting the next line of stem stitch filling right next to the first.
You can see that I’ve started on the edge of the vine on the left, and that my first stitch corresponds to the middle of the overlap of the first two stitches on the previous line. This means that my first stitch on this second line is right around or just beyond the end of the first stitch on the first line.
Notice that the needle is right next to the “dip” formed where the second stitch is overlapping (twisting over) the first stitch), and the third is overlapping (underneath) the second stitch.
You might not always be able to end up right in this overlap area. Sometimes, the inner lines of stem stitch will have to be more compact because they’re further to the inside of a curve. Or you might have been slightly inconsistent in your first line of stem stitch, and you’ll find that you can’t accomplish a good length for the stem stitch in a subsequent line, so you have to end the stitch a little farther beyond the dip. That’s all ok – it will work out, once the whole area is filled.
Remember, this is a beginner’s piece. You want to strive to do your best, but you don’t need to make yourself miserable trying to do that, by being too obsessive over the stitch placement and length on the stem stitch filling.
Stem stitch filling is very forgiving, which is why I chose it for the vines!

I’m bringing the needle up for the next stitch (leaving a small loop in the working thread below the needle), just a little more than halfway back, between the beginning and end of the first stitch in this line.
Notice that this second stitch is fairly close to the beginning of the second stitch in the first line, although technically, it’s not quite in the same spot – it’s a little bit forward, just before the spot where the second stitch in the first line is arching out of the overlap.
Notice, too, that the needle is not tucked up right into those first stitches in the first line. Otherwise, you might find yourself going into the same holes as the stitches in the first line, and things would get a little tight in there.
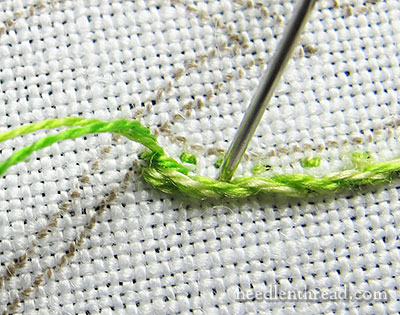
I’m ending this second stitch in the “dip” or overlap area, around the same place where the second stitch in the first line ended, and where the second and third stitches in the first line overlap.
Notice at this point that the second stitch in this second line is quite a bit longer than the first stitch. It doesn’t have to be quite that long – I could have shortened it up and taken it down a little closer to the end of the first stitch – but it “fits” better here, and so the stitch is slightly longer than the other stitches. (And by slightly longer, I mean about a fabric thread longer – not another 1/8″ longer.)
It’s somewhat difficult to see in this spot, but the arrow points to the overlap of the stitches in the previous line. Can you see the darker green next to the lighter green right behind the left of the needle there? That’s where, in the previous line, the beginning of one stitch and the middle of the previous are lying right next to each other on the fabric. It’s not the “dip” between the stitches.
So in this case, this stitch I’m taking here goes just beyond the edge of the overlap, so it isn’t in the “dip” at all.
If I had taken the stitch down into the dip, I must have thought the stitch would have been too short, so I made it a little longer. But even if I had made it shorter, it would still work out ok.
Here’s another spot where I took a really long stitch. It’s kind of an awkward spot, just before where two stems merge, and I needed to get the thread started in this area, but it couldn’t start exactly where the other threads had started at the end of the vine (because I was out of design space there).
So, in this case, I’m practically skipping two stitches in the previous line, to keep this “merging” area smooth and connected. I don’t want it to look like the line breaks off suddenly, but I need the stitch to fit into a rather narrow area, and a longer stitch right there does that better than a shorter one would.
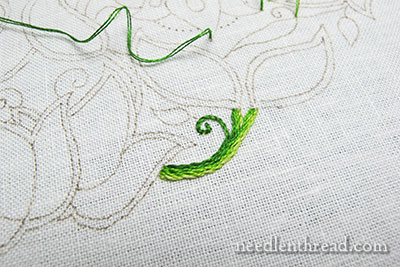
Here’s that vine area finished. It looks a little squat and boxy, because it’s out of context with anything around it and it’s a relatively tiny vine (at the top of the design – I turned the frame upside down to work on that area). Once the leaves around it are worked, it’ll look better!
Stem Stitch Filling Tips, Recapped
1. Don’t worry too much about absolute precision in the length of your stem stitches. Circumstances will cause the stitch length to change now and then.
That being said, try to keep them consistent, or close to consistent, on the straight and very gently curved lines – but you don’t have to obsess over it to the point of measuring your stitches!
2. In your subsequent lines of filling after the first line of stem stitch, there will be times when you have to take longer or shorter stitches, and can’t always begin and end in the same spot relative to the previous line of stem stitch. That’s ok. Chances are, it will work out in the end!
Now, go forth and stitch some stem stitch! And remember that embroidery is supposed to be fun and relaxing. If it’s making you uptight, try to talk yourself into letting go of too much precision.
This doesn’t mean that your work should be sloppy (on the contrary, my hope is that this project will help us all improve our work), but don’t make it more difficult than it is, by being so meticulous that you fail to enjoy it.
Besides, sometimes loosening up a bit can improve the look of your stitches!
So go have fun with it!
If you have any questions, comments, suggestions, tips to share, or whatnot, feel free to leave a comment below.
If you’d like to follow this project from start to finish, you’ll find all articles pertaining to it listed in chronological order on the Secret Garden Embroidery Project Index.
Dear Mary
A great tutorial on stem stitch filling your photos and descriptions on different techniques to use on the stem stitch are clear and concise. I like the stem stitch but I have had difficulties when stitching several lines together and on curves. I can now follow your tips and not get uptight about whether I am using the correct spacing on the stem stitch. Thanks so much for your advice, tips and techniques on the stem stitch.
Regards Anita Simmance
Hi Mary,
Thank you so much for this tutorial and break down. It has helped a ton!!
But one question. If you were to use stem stitch next to long and short, what would you do first? I would want the stem stitch to be more prominent as it is the main focus but then I will use long and short filling to be in the background almost.
I can see exactly what you’re picturing, Naomi – a really flat and smooth long and short stitch area next to a rather textured, thick stem stitch area. But long and short stitch is not always perfectly flat against the fabric. An outline stitch over which the long and short stitch is worked would lift it off the fabric a bit.
Also, keep in mind that you’re seeing these photos magnified, so the stem stitch looks heavy and ropey in the photos. In the whole scheme of the piece, it’s not quite that heavy looking.
One Last Question. When using stem stitch in all one color the shading, do you start and finish each line? or go back and forth to fill the line? What would be the best way to make it look the best?
Sorry thats three questions…I hope thats ok.
Hi, Naomi – if you’re not shading – if you’re filling with all the same color – you can stitch a return line. Just remember that, if you’re stitching from right to left on the return, the working thread goes above the needle. – MC
Dearest Mary
How can I express my joy at this project. I have not yet started, what fills me with joy is the vast detail you are going into about each and every aspect of planning and stitching this project. I began emberoidering as a teenager at school. I am English and have also undertaken the City and Guilds, however no tuition I have ever had has taken the trouble to provide so much fine detail. I am of course aware that some of what you are explaining comes as second nature and naturally in what we do when we plan and execute a project, but following this and reading and re-reading your posts (which I am printing and filling for my future reference) makes me think differently. I absolutely love what you are doing is showing is so much detail the execution of stem stitch – a stitch I have never had great results with – but now know I have the depth of knowledge to improve and think through curves etc.
Thank you Mary – you are amazing.
Gosh, thanks, Sue! I’m glad you’re enjoying it and finding the tips useful! -MC
Thank you for this learning experience. The magnification and instruction is so very helpful. I can hardly wait to begin embroidering, although it won’t be something as special as “The Secret Garden.”
I LOVE to use stem stitch, but have so many problems going into curves…..I’m a beginner, so sincerely appreciate the detailed information you’re giving concerning stem stitch.
Going into curves ALWAYS ends up looking sloppy for me, so thinking I need to use even shorter stitches than the short I have been using. Also maybe I should be using the stab method like you.
Hi, Patsy – If you’re working in a hoop or on a frame, the stab method is definitely the way to go.
As you take a curve, shorten your stitches – even up to half as short, or shorter, sometimes! It depends on what your thread will allow and how tight your curve is.
If you’re working on a frame or hoop and can’t turn the work to keep the left-to-right direction going, still, keep your needle in the right place in relation to your working thread. If you’re working left-to-right, and your curl goes UP from the line and turns counterclockwise, the working thread is on the outside of the curl. If you’re working left-to-right, and the curl goes DOWN from the line and curls clockwise around, the working thread is on the inside of the curl. But if you’re working right to left, and the curl goes up and clockwise around, the thread is on the inside of the curl. If you go down and counterclockwise, it’s on the outside of the curl (all compared to the needle).
Hmmmm. I wonder if this is something I should address in photos?
There are stitchers who say that, no matter what direction you’re traveling in, you always want the needle on the inside of the curl and the thread to the outside of the needle, so you might change the orientation of the thread to the needle before entering the curl, but if you do this, even though it seems to “hold” the shape of the curl in place, in fact, you can loose the look of the stem stitch completely and end up with either a twisted line that is smooth (without the ropey distinction of stem stitch) or a line that is what I call “hairy” – or spiky.
Of course, you can always manipulate your stitch direction by changing the orientation of your hoop or frame.
Maybe this is too much detail. If I have a chance, I’ll work it out in photos to explain it better. I think that the point you bring up is actually the most bothersome aspect of stem stitch for many stitchers, so it’s worth addressing.
Thank-you, thank-you Mary for your response to Patsy’s questions and especially the explicit directions as to where the loop goes depending on the right/left direction and clockwise or counter-clockwise direction of the curl. I am brand-new to embroidery and haven’t found the answer to that question anywhere; am stitching copperplate cursive letters on a baby quilt. Thank-you!!
Hi, Diane! Oh, good – I’m glad the tip was helpful. Copperplate is a beautiful lettering, and I bet it will look stunning on the quilt! Good luck with it!
Dear Mary,
Yet again you have prepared a fine tutorial, and what a nice tutorial this is! I appreciate the time, effort, detail, and equipment needed to prepare it. I become so ridiculously excited when I read your tutorials, for inevitably I end up thinking, “I CAN do this.” Thank you for being the gifted teacher you are. Thank you for the generosity of your spirit.
Mary, I am hoping to one day follow through with the Secret Garden project and turn it into a throw pillow. How does that work with the linen? Would I need to back it with muslin while stitching?
No, not if you’re using the medium weight linen I’m using. You’d have a pillow form behind it – you wouldn’t make the pillow out of the linen and directly stuff it. You’d make the pillow “cover” and then put a pillow form inside.
Wow, what a wonderful explanation! The best part is that you said to relax and have fun! I was beginning to stress about the stitches and now I see that I was doing fine after all. Mary, thank you for your generosity and detailed explanations. This IS fun!
Mary: How many strands of floss do you use for your stem stitch? Also, do you ever teach at retreats or do classes?
In the this project, I’m using two strands for this part.
Yes, I do, and will do more in the future, but right now, I’m swamped. When I do have any upcoming classes open to the public, I’ll announce them on the website.
Hi Mary,
Thanks for going over the stem stitch that review was just what I needed. Your blog is always so encouraging just when I need it.
thanks, Janie
Mary, on the vines in the SG, I was wondering where you were going to put the dark lines. I see that you are keeping the dark at the bottom throughout. So the light source is coming from above or the top of the design. Is this pretty much the way you are seeing it? Thank you for all the great tips. I can’t wait to see everyone’s design when we finish.
If you look at the photos that show the completed areas (check the project index for other posts with photos) you’ll see the dark is at the lower design line.
Thanks for the brush up tutorial! I have used this filling with a variegated thread and careful placement and choice of the color section to make ‘bark’ for a tree. To increase the textured effect I also reversed the direction of some rows of stitches as well. It’s a fairly quick and solid filling stitch.
Mary, thank you for showing the ruler in one of your photos. I had been aiming at about 1/32 of an inch, and even tighter on the curves! The ruler in that shot showed me that it is ok to relax, a LOT. That it turn will make the stitching faster, a nice added benefit.
Wow – how did you manage a 1/32″ stitch with two strands of floss?? Another advantage of loosening up the length will be that it’ll be less likely to pucker. If your stitches are too tight and small, your fabric could definitely end up puckering.
Mary, I was using the strongest reading glasses that I could find, along with a strong clamp on magnifier. Helping out, I am using an Evertite frame to keep the fabric drum head tight.
Mary, this is actually about the Bisley filing cabinets. I think you have advocated them before? If so, they’re on sale at http://www.containerstore.com. Great drawer inserts for us stitchers! Donna
Yes – love them! I was waiting for the sale to order one more. As soon as I saw the sale was on, I ordered. So now I’ll have six altogether, which serve as the base of my work table (I also order the plinths to elevate them). The sale is a good one – saves $70 / cabinet.
Thank you Mary for having raised the delicate issue of the meaning of stem stitch. I am one of those people who stop turning their framework for embroidery “in the right direction” and it is sometimes a real headache. This is also why the fixed floor stand is not for me … Thanks again to take us by the hand.
Hola Mary,
My question is regarding fabric. What are the next best fabric choices to linen. I’m a beginner and would like to join you in the Secret Garden project. But would like to save the good linen for when I have a few other embroidery projects under my belt.
Thank you.
Marta
Well, you could use a cotton, but keep in mind that cotton is not as forgiving as linen. With dense stitching, it’s more likely to pucker. If you do use cotton, it should be a high thread count, heavier cotton. Check a local quilt shop for a good quality cotton muslin in white. – MC
As a person who can obsess over stitch length being perfect – and, of course, they aren’t – this is very helpful information. Thank you.
I’m really trying to take in all the great detail on stem stitching, it’s really good for me. I’ve already made some mistakes, and I bet I’m not the only one . I’m doing my very best as a beginner . Part of my mistakes are in the tracing part. Not all if my lines are just as they should be. This project is the most detailed and difficult that I’ve ever traced. Already , I’ve had some lines too close or too far, and just do whatever I can to make it right. I just have to make sure each side of the design is balanced. And I am having fun. Thanks for great instruction.
Thanks for this post. It is so much more relaxing to have “permission” not to obsess about stitch lenght!
My book just came today. I am very excited but have some catching up to do…
Thank you, thank you, you answered questions I was posing to my self last night. I am practicing stem stitch on a project that is only done in stem stitch. I am truly enjoying this site while learning and becoming excited about embroidery again.
Your posts are always a delight. The comment sections are sometimes my favorite part of your posts. Like today, it tickled me to see how many were glad you said to have fun. I could almost see relief pulsing out of the computer. While I’m sure I will never take one of your classes, I can imagine what a fun and profitable time would be had by everyone.
Mary, I’m currently working on a project, and have used your site for much inspiration as well as help. However, I have found one thing still nagging me: when using a certain stitch as a fill, all in the same color, how do you guarantee they all flow in the same direction? I finished a part of chain stitch that I worked ‘regular’ and ‘reverse’, but I’m having a hard time finding a tutorial on how to move back up to the beginning of the section without carrying thread back up and over. With my current piece, working inwards in a spiral-type fashion is not an option. Do you have any suggestions on how to accomplish this?
Thank you,
Mary C.
Hi, Mary – The only way you can do that – if spiraling is not an option and you don’t want your adjacent chain stitch lines moving in opposite directions – is to end the thread and start it again at the beginning, or, if the space is “relatively” short, to turn the work over and pass the thread under the stitches on the back until you’re back to the starting point again. There’s no way to “reverse” chain stitch in a way that the stitch is actually reversed looking. ~MC
Im sorry, I didnt mean chain stitch. I got distracted and missed a sentence. I was going for stem stitch, but i think changing the placement of the thread (above vs. below the needle) solves it. Thanks again!
What a gem, a pearl of a girl. I was just sitting looking at a piece of work and thinking what I could fill it with. Your email flashed up as if it read my mind. For a moment there I thought it was for a little eBook.(which I would have bought especially in this instance) Nevertheless, I did get and idea and have done a little sample and it works a treat. Well done and a big thanks Mary. Your time and efforts are certainly not wasted on me. Much thanks and appreciation.
I’m using stem stitch for a narrow iris leaves (with some slight “bulges”). I wonder if it’s better to outline the leaf and then fill, or to build rows sequentially? The one I outlined and filled looks better to me–I worked from the outside in.
Hi Mary, I am a complete newbie but have been following your blog for a couple of years and finally picked up my courage and needle and thread.
My first attempt has been at filling a design of a simple circle with a cross in it. All in stem stitch, using your videos. My problem is that for one, it is on a piece of clothing and using a hoop has been difficult in getting it “taut” enough (fabric is linen) and secondly it seems that I wasn’t keeping the thread tension tight enough (or at all really). The design looks ‘fine’ from afar but if the fabric is played with, some part of the threads scoop up in height..
I was wondering if you had any advice on tension? And how to tighten the fabric on the hoop without ‘distorting’ some area of the material. I tried my best to have it taut but the middle of my fabric with the cross just became flabby no matter how tight the outer area was. The design border was pre-stitched – I just needed to do the filling. I also removed my hoop everyday so that it would not keep an indent. I started the circle from the outside and slowly filled toward the interior, and toward the cross. Should have I started from the middle, filling it toward the outside instead?
Thank you for any guidance 🙂
Hi, Pi – If the circle is solidly filled, then I would start from the inside and work out. That’s just me, but it seems to make more sense that way to me.
Tension is hard to explain from a distance. When you hoop up your fabric, before you push the outer ring on, you want it tightened so that you have to give it a good push to get it on. You should be hooping up on a table or hard flat surface. Put the inner ring down first, center your fabric over it, and then push the outer ring, which should be pre-tightened so that it goes on snuggly. This will give you some good tension right off the bat. Then, work your way around the hoop, pulling the fabric evenly, and further tightening the screw.
The larger your hoop, the more difficult it is to maintain tension in the center. My maximum hoop size when I stitch is an 8″ hoop. I prefer a 6″.
For stitching tensioning, the idea is that the stitch lies nicely on the surface and doesn’t pull hard in the holes it makes. You might see a slight pull, but you don’t want to see a distorted hole where the thread goes into the fabric.
I hope that helps a little bit! Sometimes, it’s just a matter of practice and getting the feel for things!
Don’t give up!!
Dear Mary,
Thank you so very much for your help.
I can see that my first mistake started on how to put on the hoop as I held the fabric free-hand, so to speak.. Not on a hard surface to start with.
With my thread tension, at times, I was trying to compensate too hard as I could see the distorted holes you speak about.. Perhaps some of my stitches length were too long and when scrunching the fabric, that’s when it could lift up(?)..
My usual lengths were about 0.5cm, at times less and much less, but at the beginning, some of them were about .8 to 1cm. The circle is quite large about 15cm or 6 inches. I think my hoop is around 8 inches. And I agree! That may be my limit as well
I was doing the sewing method but had to switch to the stabbing when reaching in certain areas of the middle. And learning to do both thanks to your videos!
I really enjoy embroidery, it is calming and such a joy to see a design come to life. I don’t think though I would have tried it without your wonderful website, your enthusiasm and the beauty of your creations. So I really appreciated your help and input and now I can correct my ‘newbies’ mistakes!
The stab method works better when working in a taut hoop. The sewing method tends to distort the fabric if you’re working in a hoop. Just another little tip! 🙂
Oooh I see..! That explains a lot.
Thank you very much Mary for mentioning this.
I guess, my next question is a bit of a tangent/follow-through (perhaps for being such a novice???) Is it best to always use a hoop or a frame? I was wondering about free-hand embroidery (cons & pros) of the various techniques. Is free-hand just when you don’t have a hoop…?
Re-reading my question made me realize that it may not be actually a quick answer at all!! It emanated from childhood memories with my auntie & grandma (back in France) who had showed me how to do some very very simple little flower embroidery as a kid but it was free-hand (never saw a hoop) on knitted filled lavender bags we had made over the summer. They were amazing knitters..
When people talk about “free style” embroidery, they mean surface embroidery that doesn’t require counting or a grid – just regular “embroidery” like the stuff I do most of the time here on Needle ‘n Thread. When people say “in hand” talking about needlework, they mean holding the fabric or canvas in hand, rather than having it on a hoop or a frame.
When you’re doing hand embroidery, it usually always benefits from a hoop or frame. There are certain types of hand embroidery that don’t use a hoop or frame – like traditional Madeira embroidery – and there are those who prefer not to use a hoop or frame and they always work in hand. And then there are some types of fabric and some situations where a hoop or frame is just not necessary. But for the most part, hand embroidery will generally come out better if you work with a hoop or a frame. And then of course, there are some types of hand embroidery that can’t be done without a hoop or frame – like goldwork, for example.
Oooooh!!! Many thanks for all of this explanation!! ‘In-hand’ then is what I meant!
I’m sure you may have had a nice little chuckle about it, and if so, good 😀 at least my comment and question gave you a laugh. English is a second language for me, and even after well over 20 years living abroad, I still make funny mistakes such as this one. I guess here though it is also mixed with my beginner’s learning curve of the jargon 😉
Best wishes!
If I am filling an area with rows of stem stitch (same colour) when I get to the end of the first row rather than end the thread and start from the beginning again can I turn the work upside down and then fill the next row with outline stitch? Then turn the work right side up and use stem stitch. Will this give the same effect when you look at the work right side up? Thank you for your advice. Julia.
Kia ora Mary! Thanks so much for your expansive list of helpful tutorials. I find myself coming back time and time again.
I did wonder when I look at your tutorials, in particular when you refer to techniques, stitches or your projects, if you could include images? For beginners, like me, I wouldn’t know which one you are referring to! Also, I love your video tutorials, wonder if you could do more of these. I find them so much easier to learn from. But, I am aware that everything takes time but just thought I would put my 2 cents in, in the chance that you have time and would want to do that. 😛
Thank you!
Lyly