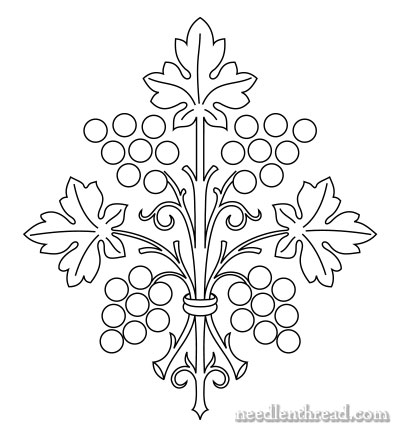
I love grapes! I love embroidered grapes! If I were the type to decorate by theme, I believe my kitchen and dining room would sport a kind of winey, grapey, Italian theme.
But since I’m not super-themey when it comes to decorating, I just enjoy grapes in all kinds of other ways, from embroidered…to frozen…to crushed and fermented.
If you like grapes and have a reason to embroider a bunch of them, this particular stylized bunch would work quite well. It has Possibilities.

Initially, I drew up this embroidery pattern (inspired by a piece of ecclesiastical embroidery) for a lesson in tambour embroidery. It’s perfectly suited to tambour embroidery, and would be a good exercise in shading, filling, and working in circles.
But the more I thought about it, the more I realized it would also work well on table linens, in whitework. The grapes cry for plump, rounded, satin stitch dots. Or maybe openwork eyelets? The leaves would be a good place to add texture, while the stems could remain smooth and flat, worked in long & short or stem stitch.
And then, of course, there are the ecclesiastical possibilities. Silk shading and satin stitch, surrounded by thin lines of gold, would look great on the leaves. The stems could be couched gold. Embroidered the same way, the design could be put to secular or non-religious use, too – a nice embroidered gift for the wine aficionado, for example.
And there’s always the simple approach, too – the cotton bar towel worked in simple stitches with cotton floss.
And we can’t rule out the design’s potential in other crafts – paper crafts, painting, and the like. The painted top of a recipe box? A carved wood plaque? A mosaic trivet or outdoor table inlay – I’m thinking mosaic bubble glass tiles for those grapes.
Those are some of the things that pop into my head when I see this particular design, anyway. What about you? Any other ideas for it? Feel free to share some inspiration below!
Printable Stylized Grapes Embroidery Pattern
Here’s the PDF download for easy printing. The design prints at about 5″ tall, but you can enlarge or reduce it to suit your needs.
Free Hand Embroidery Pattern: Stylized Bunch of Grapes
Hope you enjoy it!
If you’re hankering for something to stitch, do check out the many other free hand embroidery patterns available here on Needle ‘n Thread.
Looking for inspiration & information on hand embroidery?
There are all kinds of reasons to sign up for the Needle ‘n Thread daily newsletter! Check them out and sign up today!


Thank-you, Mary! I might just attempt this in whitework…I lone the satin-stitch grapes!
Dear Mary,
thank you for the stylised bunch of grapes. I have promised to make a burse & veil in purple for Advent and Lent for my local church. This design I brilliant, I may just have to tweak it a little. Leaves in needlelace, grapes in Goldwork, stems in stem or satin stitch with a gold edge, thank you so very much.
On my To-Do list and when complete I will send you a photograph.
Love your website.
Kind regards, Carol.
Since I’m on a needle turn applique kick, I think I will enlarge it and applique it 4 times (in a circle) to make a small quilt or table topper….. maybe ! 😉
Hi Mary,
I’ve been looking around the site for as much info on satin stitching I can find and I’m still having a problem. When I satin stitch circles I always end up with points on either end. Do you have any advice?
Hi, CM: You definitely need to at least outline the circles with split stitch first. This not only lifts the edge, but it also provides the visual “filler” for the round shape. Then, when you satin stitch, start in the middle of the dot and work towards one edge, but, surprisingly, don’t stitch to the edge. If you look at this tutorial here for satin stitched dots: https://needlenthread.wpengine.com/2011/03/satin-stitched-dot-tutorial.html you’ll find a diagram towards the end that shows you the general layout of the satin stitches. Notice how the side stitches don’t go all the way to the dot edge’s ‘edge’ – they just cover enough of the split stitch outline to kind of curve over it. The outline will make the shape round. The last stitch on either side looks like it would make the shape flat on the sides, but it’s the outline that allows that last stitch to kind of hug the roundness of the dot. Visually, it will look round. If you keep trying to cover to the very edge of the circle, you’ll end up with something more eye-shaped than round. ~MC
Dear Mary
Another lovely embroidery pattern. I’m actually in the process of tambour bead embroidery, I’m making an evening bag, beading on silk organza and then appliquéing it on to red silk fabric, I really got the hang of tambour work and this pattern would look lovely in tambour embroidery. Thanks for the pattern and sharing it with us.
Regards Anita Simmance
Marie,
Thank you for this pattern (I love this style) and thank you for the lesson how to make dot correctly.
Florence
hi