


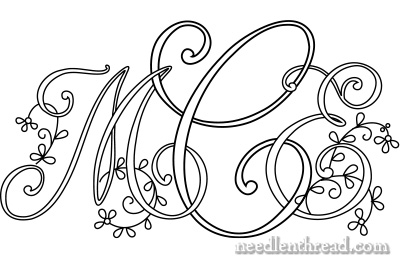
The other day, I posted the first three letters of the Delicate Spray monogram alphabet that I’m adding to the hand embroidery patterns here on Needle ‘n Thread.
One of the aspects that I really like about these scrolly-scripty type letters is that they are easy to combine into true monograms – groups of letters – rather than just using them as decorative initials.
Today, let’s look at some ways that individual decorative letters can be combined into groups of letters to form a monogram.
If you’re not an artist – if drawing is just not your thing – that’s ok! You can still create a two or three-initial monograms for hand embroidery out of pre-existing decorative alphabets.
All you’ll need is tracing paper, a pencil and eraser, and the monograms you want to use, printed in the size you want them to be.
The Arrangement of Letters
Traditionally, if a three-letter monogram is meant to represent an individual, the center letter is the initial of the surname (the inherited or last name), the letter on the left is the initial of the first name, and the letter on the right is the initial of the middle name.
If the monogram represents a married couple, traditionally, the central letter is the initial of the husband’s surname, the letter on the left is the initial of the wife’s first name, and the letter on the right is the initial of the husband’s first name.
There are lots of variations to these rules these days, but that’s the simplified, traditional approach to three-letter monograms.
Size of Letters
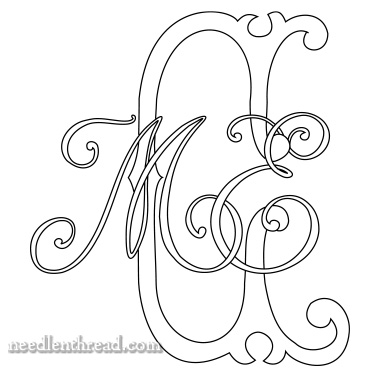
Often, the central letter in a three-letter monogram (like the C in the monogram above) is a little more dominant than the flanking letters. If you want a more dominant central letter, you’ll need to print that letter larger. It might be significantly larger, or it might just be slightly larger.
The two flanking letters would normally be the same size as each other.
Then, it’s just a matter of tracing the elements you want to include in the monogram design, making sure that the letters are laid out in an arrangement that is pleasing, well-proportioned, and not too cluttered. Start with just the letter forms, making adjustments in your tracing until you are satisfied with the layout.
If you want the letters to intertwine somewhat, follow a logical over-under sequence wherever they overlap.
Once you’re satisfied with the letter layout, then you can add decoration by tracing elements that were on the original decorative letters (like the sprays of flowers in the monogram above), making adjustments as you go until the arrangement is pleasing.
Though the arrangement of the monogram above gives you an idea of the overall three-letter combination, it could still use some work. Back at the drawing table, I’d probably widen up the C a little bit and rearrange the sprays of flowers on the flanking letters.
Embroidering the Monogram
When embroidering the whole group of initials, I’d define the C by stitching it differently from the flanking letters. If, for example, I were to embroider the flanking letters in a smooth satin stitch, I’d perhaps work something more textured on the C.
Or, I might do just the opposite. The C might end up raised and padded, while the flanking letters are worked in something a lighter and more subtle. For example, the flanking letters might just be outlined, while the C is completely filled.
In any case, the central letter in the monogram normally dominates the design, so the embroidery stitches should be chosen to ensure that the design balances around the central letter.
Other Combinations
You can combine other styles of letters into one monogram, too.
For example, you might take the central initial from the more upright Fan Flowers alphabet, eliminating the fans and other decoration, and then use the script style lettering found in the Delicate Spray alphabet for the flanking letters.
As you combine letters, keep in mind your approach to the embroidery.
If you take a look at the monogram directly above, notice how the M and the E are superimposed on the C. This would make it difficult – and probably a little awkward looking – to work the C in a padded stitch. The overlapping M and E would cause too much disruption over the padding.
Instead, on a design like this, you might consider working the C in subtle line stitches and maybe with a light textured filling like seed stitch, and then working the M and the E in a smoother, padded stitch, like satin stitch.
In any case, the point: for those wishing to create more intricate, multi-letter monograms or ciphers for embroidery, you can do so fairly easily by tracing individual letters from pre-existing decorative alphabets and combining the letters in unique ways, to create truly personal monograms.
Favorite Monograms – PDF Collection
Looking for monograms to embroider? You’ll find 16 complete decorative alphabets all in one place in Favorite Monograms, a downloadable PDF collection of 16 monogram alphabets perfect for hand embroidery and other crafts.
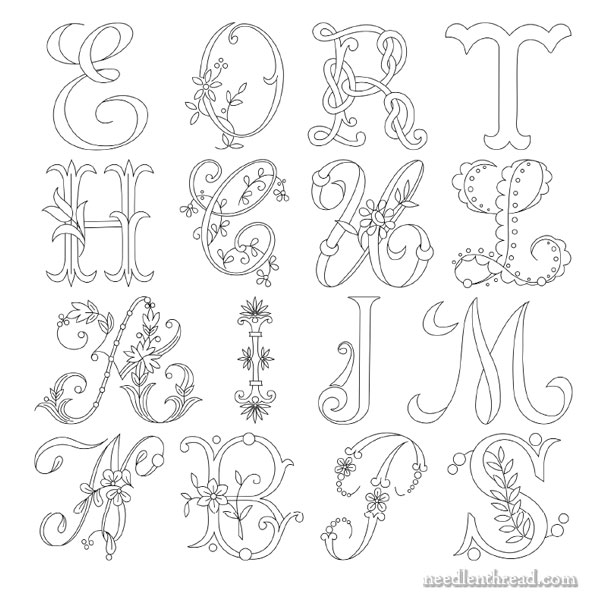
In the photo above, you can see samples of each alphabet available in Favorite Monograms.
Each letter in each alphabet in Favorite Monograms has been carefully traced into a clean line drawing that can be easily enlarged or reduced on a home printer or a photocopier.
The 16-alphabet collection is delivered as via a download link to your inbox shortly after purchase, so that you can begin creating right away! Priced at less than $1.00 per complete alphabet, monogram lovers can’t go wrong with this collection!
Favorite Monograms is available in my shop, here.
awesome, cool, unique
AWESOME, I LOVE IT, VERY INSPIRATIONAL
Marie,
So too much beautiful, I love. For my project (secret!) within needlnthread – I also want my photo-, I took heavy metis. My thread is the # 12, not divisible white and color, is that I can use as a lettering and I would also ask you the No. of the needle 8?.And thank you again for the clarifications to create one’s own lettering
I read the citing articles, thank you Marie, it’s really fantastic.
Yikes! In the monogram I designed for my Sister, I put her Husband’s first Initial on the left. I will have to fix it. Incredible article packed with inspiration! Thank you Mrs. Corbet.
Dear Mary
What a lovely idea to incorporate more then one monogram. I like the idea of putting the initials together for a wedding or a special occasion. Mixing the designs of the monograms is also an interesting concept and using different sized monograms which would dictate the stitches used is also a great idea. The juices are flowing for combination monograms there are so many ways of designing and integrating them, it’s endless. Thanks for showing us this concept and for sharing your ideas on different designs and styles.
Regards Anita Simmance
You might also consider using the lower case letter and enlarging it if you want to keep the same script but the upper letters do not look right combined.
Or, do the opposite if embroidering a whole name instead of just initials. I embroidered a name using block letter and used all capital letter but made the first letter larger.
Thanks for the lesson! I’ve been very interested in monograms lately, and this article really gets the creative juices flowing in my brain. Monogramming definitely will be one of my projects once life stops being so busy. Thanks for the alphabets!
I don’t use tracing paper I do mine on the computer. I’ll try to explain but this may be a tome! Before I do this I download different fonts that are either made for Monogramming or work well with it. (I’ll have to write that out later maybe but there are tutorials on it out there.)
I use Microsoft power point. I delete the offered text boxes that automatically pop up.
– I put the center letter into a text box and make it the size that I want.
– Next I add the second letter to a separate text box. I can then slide it where I want to place it in relation to the first letter. When you are working with inserts in a power point “presentation” you are given a choice to “arrange” under the heading “drawing”. Use this to decide what gets which layer.
-add the third letter and manipulate it in the same manner.
– Finally pick a size, print and transfer it onto my cloth.
Hope this helps someone!
Hi Mary, I am sending this message via comments box because I don’t have your email address; I now have no internet connection at home therefore I am unable to learn hand embroidery from your video tutorials. Do sell CDs of these video. If you do how can I perchase it?
Hi, and thanks for the question! I don’t have the videos available on DVD at this time. I may in the future, if there is enough interest to offset the expense of producing them on DVD, but right now, I’m not sure that it is feasible. -MC