


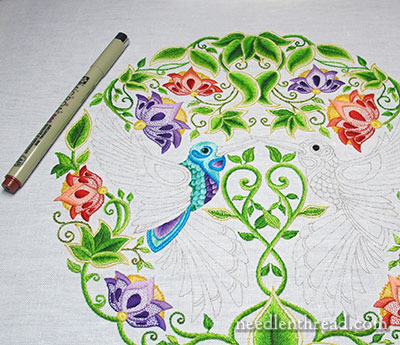
The last time we looked at the Secret Garden embroidery project, I had finished (for the time being) with the hummingbird’s upper body.
The Next Step: Tackle the the Top of the Tail!
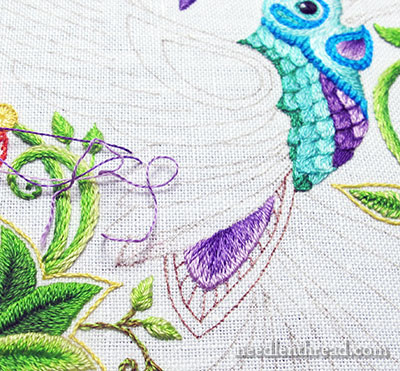
I began with the little short tail area protruding from under the wing, and embroidered the center open section in long & short stitch in three shades of purple.
Using a micron pen, I portioned off the center section of this area into small, relatively-evenly spaced blocks that radiate outwards around the long & short stitch.
In the original drawing, there are circles inside this middle area of the tail. I liked the idea of some sort of design variation in there, but not circles. The space is really too small to satin stitch nice circles, and I didn’t want to use knots here.
So instead, I used satin stitch to fill the small block areas, using satin stitch in a pale blue and a pale bluish green (these are colors that are used in the long & short stitch on the bird’s head).
There’s not much contrast between the two colors; I wanted just a subtle difference – nothing that looked distinctly striped.
Once I finished the satin stitched area in the center, I worked a chain stitch in the medium bright blue, just inside the remaining little area on the tail.
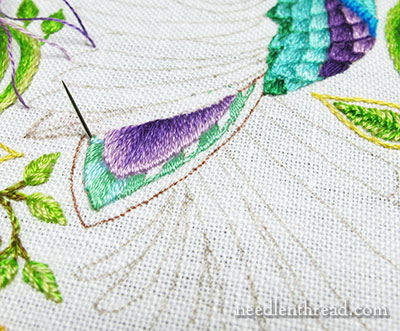
You’re probably thinking that it looks weird, and it does! The purple long & short stitch seems to be sitting higher than the satin stitch, which is heavier than the chain stitch, and the chain stitch doesn’t fill that whole outer level.
But stay with me here…
With the chain stitch foundation in place, I then used the darker brilliant blue and worked a buttonhole stitch directly over the chain stitch, leaving space about the length of a chain stitch between each buttonhole stitch.
The outer twisted edge of the buttonhole stitch is just on the design line.
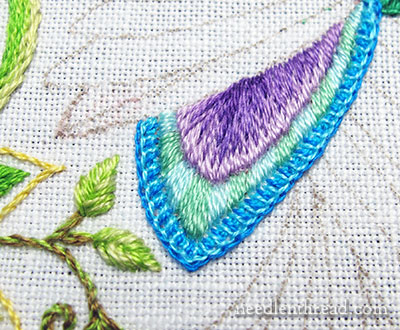
And then I took the lighter shade of the bright blue, and worked another layer of buttonhole stitch over the chain stitch, just inside the first layer of buttonhole stitch, so that the light stitches fall between the dark buttonhole stitches.
The light buttonhole stitches don’t completely cover the chain stitch, but almost. If there were no chain stitch in the background, you’d see little glints of white fabric.
Not quite finished yet…

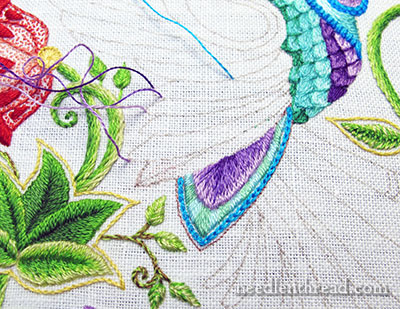
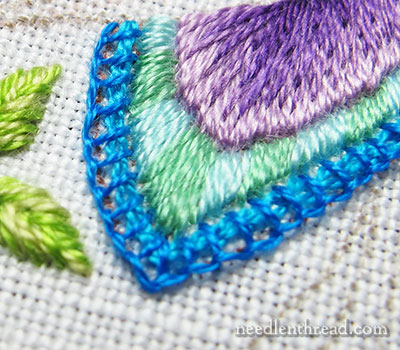
To further define the edges of each color section, I used the bright blue and outlined both sides of the center striped section using stem stitch. Basically, I stem stitched “in the ditch” where each color section merges.
And now let’s look at it from farther away:
I’m not 100% certain I’ll leave the stem stitch in that particular color of blue – I might switch that out a little later to something with a little more contrast, or whip stitch around the stem stitch with something to add some contrast or depth there.
For now, though, I’ll leave it.
The micron pen and the embroidery scissors in the photos above are to give you a sense of perspective on the size of the embroidery.
So, that’s where I am at the moment. My mind is presently turning towards the wings. I’m looking forward to testing some ideas there!
If you’d like to follow along with the Secret Garden Hummingbirds project, you can find all the articles relating to this project arranged in chronological order in the Secret Garden Project Index.
It’s looking good and I like how the blues and purples tie into the head portion. With all the layers of stitches in that band around the rump, I hope you don’t have to rip out any of it. Wowsers!
A question just came to mind: with all the angles of the satin stitches and such in this bird, will it be difficult to repeat them on the other bird? Will you flip the bird upside down? Or perhaps with your experience you can stitch at any angle with no trouble. I know quilters that can do that. I cannot.
Hi, Irene – if I have problems getting the right angle, I sketch in guidelines on the fabric. Since they will be covered, it’s no big deal to draw them in!
Good Morning, Mrs. Corbet. AMAZING, AMAZING, AMAZING! In my imagination I would have never incorporated the same colors of the flowers into the birds, but the further you go along in this project, the more in awe I become! Your stitches are so glorious! He looks so beautiful! I think this might be the most beautiful piece I’ve seen posted here! I say that as a person who adores your Mission Rose! Be very proud of your amazing gifts.
This really looks like a coloring book page done in thread! Very bright!
Simply stunning, Mary! As I was reading along, I was getting more and more intrigued with each added section! When I got to the long shot, it took my breath away! I love the way you have such an eye for colour and your stitching is superb.
Thank you for leading us along this mysterious path 🙂
Looking FANTASTIC, Mary!
I love the way you place colors and stitching to interpret your designs, and this is no exception. It is very playful and gay, and brightens my day with each posting!
I look forward to your posts every day to see what you have done, learned, and found. You are part of my “stitch therapy’, even when I am too busy, overwhelmed, or bummed to stitch.
Thank you, Thank you, Thank you!
Dear Mary
Wow Mary all those stitches to cover one small area I love all the combination stitches, I am so impressed you are truly an artist, it looks absolutely lovely and I love how all the colours and contrasting stitches blend so beautifully together and blend in with the overall design, lovely. I must try to use different stitches and thread combinations but I don’t feel confident enough. It’s beautiful. Thanks for the update on the project and for the different angled photos.
Regards Anita Simmance
I join you in the lack of confidence, anita, but these step-by-step postings certainly show that it is do-able!
I really love the buttonhole/chain outline, that is really superb, and a great addition to the smooth satin and L&S. I have to admit I preferred it before the bright blue stem went in, and I didn’t see the slightly terraced look between the L&S and the satin as a problem at all. I love a bit of texture and dimension. I find this all completely fascinating, mainly because I like to see the process. and because your design leanings are not necessarily the same as mine would be, I get a lovely horizon widening experience reading the blog.
I envy your ability to stitch so beautifully in such a small space. I love your color combinations, and the stitches you chose. Such beautiful work, Mary.
I don’t comment on your blog often, but I wanted to let you know that your blog is by far my favorite among all topics. So if you think you’re not reaching me (and others probably) because I don’t comment, well, you have absolutely reached me. I look forward to what you’re up to, your play on words, excellent photographs, fabulous content. THANK YOU!!!
Aw, shucks, thanks, Harper!
It looks so lovely. You’ve inspired me to go back and try again – I put mine aside because I got frustrated that it wasn’t looking good enough, but I really want to have a try at that gorgeous layering technique. Thanks for being such an inspiration.
I love it! The double stitched buttonhole over the chain stitch is brilliant. The mix of colors are looking wonderful.
Mary, I am in awe! When I delved into this embroidery journey, little did I know what went into the development of a project…such a labour of love, and such mastery in the execution. I am so glad I found you – for your teaching expertise, and for the attention to detail that you model for us all. Thank you.
Hi Mary
I like the chain and blanket stitch. I solved this issue in a slightly different way for another project I was working on. ie I did double blanket stitch (or blanket stitch coming top down and bottom um. It was also good in that it allowed me to do two colours of the “pipe” lines
Gorgeous! Thanks for reminding us of just how small the piece is. It’s easy for a spectator like me to wonder about a detail here and there instead of considering the impact of the whole.
Thank you for leaving the pen and the scissors in the photo – I had thought the project was quite a bit larger than it actually is. Even more impressed about your ability to get so much detail in such a small area.
ooooo! looking great!
I am a beginner at this and to be honest I am excited yet scared to start this project. I do think I am pushing myself but it will definitely be a learning curve for me. The tutorials are amazing so thank you for that!
I love the colours you have chosen, it is a bright and beautiful piece of work.
I just hope I can create something decent. Right now I am hunting for all the accessories I will need. The linen fabric you have chosen I cannot seem to find in the UK so I will go with something else. Looking forward to this as it will be something different from my usual work (painting). Thank you for posting this, I cannot wait to see the finished project xX