


I mean that literally. I’m winging it on the Secret Garden embroidery project right now – just testing some approaches on the wings, trying this and that, and changing my mind and starting over.
It’s not necessarily the best approach in the world, if you’re trying to be an efficient embroiderer!
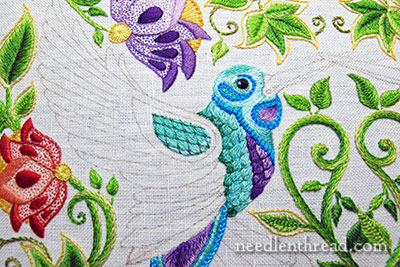
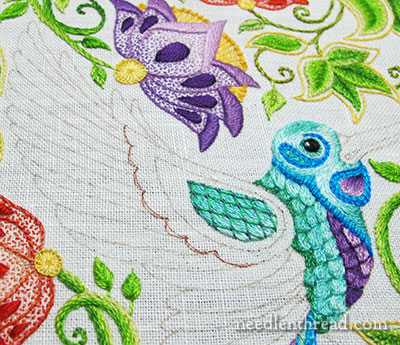
That little center part on the wing there has been stitched three times – in chain stitch, in a series of open buttonhole stitch configurations, and finally, as you see it above.
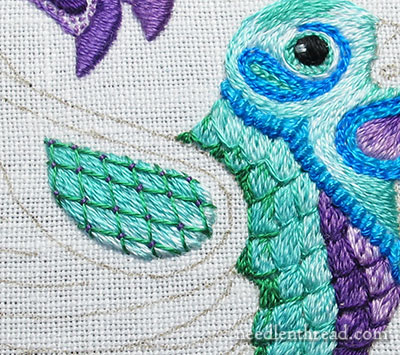
This is long & short stitch, starting at the tip (the upper left tip) in a darker blue-green, and working towards the front of the wing (the round part) in lighter shades.
Then, using the emerald green, I worked a lattice over the top of the long & short stitch filling and couched the lattice with a bright purple.
I liked it much better than the two previous approaches, which I regrettably did not photograph.
Once I realized I had completely missed the opportunity to take photos of some really lousy embroidery interpretations, I made a better effort to keep the camera close at hand! After all, half the fun is seeing the mistakes, too, right? And it’s always good, I think, to discuss why we think something doesn’t work and why we make changes.
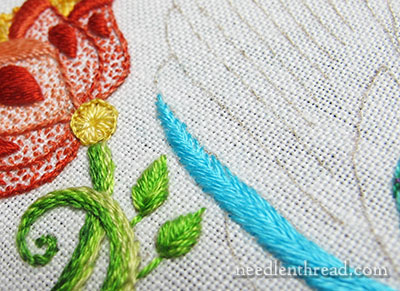
After I finished that little inside section on the wing, I moved on to dabble with a feather.
And I really liked this feather! It’s embroidered with fishbone stitch, which works fantastically for feathers!
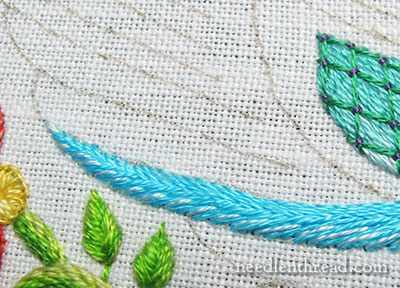
After working the fishbone stitch in the bright blue, I tipped out one side of the feather with some really pale blue (the same pale blue used on the hummingbird’s head – it almost looks white here).
I liked it “ok” – but it didn’t work out quite as I pictured it.

What I really didn’t like was the way the feather worked into the main part of the wing. In fact, I started thinking that maybe there should be a more defined break between the feathers and the front of the wing.
So I decided to sketch in some scallops, to break up the wing a bit.
I’m not sure if I like the scallops or not. I’ve stitched them once so far, but the attempt was dreadful – and I’ll show it to you next time, along with the fix.
I haven’t finished the fix yet – I’m not sure I even like the fix. So I might have to show you the first attempt, the fix, and the fix of the fix. Sometimes, I wonder about myself…
Now, by the way, is a Really Good Time to reiterate my absolute love of good linen for hand embroidery. No other fabric would be as resilient, when it comes to all the frogging (ripping out) I’ve been doing. The linen still looks great and performs great. Cotton would have succumbed by now, as would silk or synthetics.
Hip hip hooray for linen! Three cheers for that Fabulous Flaxen Fabric!
I’ll have a better update for you, with a little more embroidery on that fabric next time we visit the project. But I did want you to know that I am working on it! It’s just that, lately, more stitches are coming out than staying in!
Questions, comments, suggestions? Feel free to leave them below!
If you’d like to follow along with the Secret Garden Hummingbirds project, you can find all the articles relating to this project arranged in chronological order in the Secret Garden Project Index.
OMG! You are such a perfectionist – what a huge amount of patience you have. I am so impressed. I thought the piece you have just unpicked was absolutely lovely – so what do I know ! It’s all looking beautiful
I liked the feather, too, Helen! It will show up again! I just didn’t like the way it connected to the main part of the wing, and I had a different idea about color placement….
I love the way you work Mary and the fact that you are willing to share the entire journey with your fans. I know that when you have made all your final decisions the result will be fabulous. I am holding off on my birds until then in eager anticipation. I did like the feather stitch though, thought it looked pretty but I do see your point of it not joining in very well. Can’t wait for your next feather post. Thanks.
Hi Mary,
I like your fishbone stitch idea but I also agree that stitching around the center shape would be of benefit prior to stitching all the feathers. Not sure you need the outline stitch though and why not put it in at the end if you think you need it or you could simply add a thin split stitch line in an appropriate colour after the wings are complete.
Hi Mary!
I was just going to ask about the state of your fabric when you mentioned it’s ‘good linen’.
I suppose you don’t even try reusing the threads you decide to frog, right?
I always have to hold myself from trying to reuse old threads and fabrics… the final result is just not worthy it!
No, I never re-use thread I’ve pulled out, normally because I snip the stitches and pull the threads out with tweezers. Anything leftover of any length is usually not worth re-using, because it doesn’t look fresh by then!
Thanks for sharing your frogging Mary – one of my favourite stitches!! I have done the heads and chests of both birds and am ready to start the feathers (a photo of some progress on the flicker site.) Well not ready at all really, I want the feathers to look ‘open’ and ‘feathery’ so there is a lot of thought and not much action, now adding fishbone stitch to my options. 🙂
Looking forward to seeing what you do next.
Why don’t you stitch possible sttiches on a doodle cloth? That way you could avoid ripping so much and also have a record of what worked and what did not.
Hi, Alice Rae – Well, this IS my doodle cloth, to an extent. I’m feeling my way through the design for the first time, working out what I like and don’t like. If I set up a doodle cloth with parts of the design on it, I would be stitching it just as many times. This way, when I get to the point where something works, I leave it. I don’t have to switch pieces and stitch it again. Another point: I think a doodle cloth is good when you don’t know how to work a stitch, or you don’t know what a stitch looks like when it’s worked. But in my case here, that’s not really a question for me. What I want to see is the technique in context with everything around it. That’s where I discover my likes and dislikes. So the best way to do that is on the real project, where everything is in context.
Mrs. Corbet,
I bet the orts jar is happy with all the thread you’re adding to it 🙂
It’s packed full, that’s for sure!
It looks beautiful so far! Your stitching and blending of the colors are great!
I haven’t started mine yet, think I am waiting for you to complete your beautiful piece ! You inspire me to keep learning!
hey you are way too hard on yourself. I love the way it looks! i would give anything to have 1/100th of your talent!
Grateful fan of Needle and Thread!!!
Lyn
Good morning, Mrs. Corbet. I think you should know that my 4yr old nephew is now a fan! At least for today. I opened my mail and he just LOVES the Hummer. I said, “Aunt… wants to learn how to do that.” and he said, “ME TOO!” Of course, he is 4 and that’s subject to change by dinner but I thought you’d like to know. 🙂
I ADORE the wing patch and I FLIPPED OUT seeing the Fish Bone Stitch, please put it back! I understand the need for more definition 1at the joint area but I already loath the scallops. I can’t wait to see what comes next! Brava
I for one am so glad to see your problems as well as the fixes! You do such fabulous work …its nice to see that sometimes you decide to change it up after a false start- only because I typically assume that you SOooo know what you’re doing that it never happens to you too!!
The lattice over its long and short stitch looks really good. Accentuating the scallops is also a good idea. I’m looking forward to seeing what you do with the long feathers.
Dear Mrs. Corbet,
Love the scallops, loved the feather too – but I trust your judgment and I know it is going to look even better!
Cheers!
Dear Mary,
I loved the stitching you took out but I also agree, you have so much patience. The fishbone stitch seems perfect for it, but I can’t wait to see what you do with it and how you handle it. Love what you have done so far with everything but the throat of the bird. Guess I spend to much time in the yard bird watching. To me it just looks out of shape or too abstract. Keep up the wonderful instruction and thanks for the inspiration. Have a blessed day.
Wanda
Hi Mary, Some of these stitches are new to me even though I have been stitching in some form, for years. Can you please show how to actually do the lattice stitch? Is it just one long strand done at regular intervals and then couched down? Please would like tips on doing it and having it look even. Thank you Mary, and hope you are doing well.
In Christ,
Gail J.
Hi, Gail – this tutorial should help: https://needlenthread.wpengine.com/2013/01/stitch-fun-doodling-with-lattice-stitches.html You’ll find more tutorials for different types of lattice fillings under the Stitch Fun series, here: https://needlenthread.wpengine.com/2012/05/stitch-play-index.html And if you really want to get into playing with all kinds of lattice fillings, I have this lattice sampler guide available, here: http://shop.needlenthread.com/product/lattice-jumble-sampler-guide
Hope that helps!
Hi Mary,
I absolutely agree with you about linen. I’ve just completed my first piece of crewel work (inspired by you) which involved a lot of reverse stitching!
Love where you are going with the wing.
The scallop on wing is perfect. It gives definition to the wing and mirrors the breast area of the bird. Comparing the last too pictures the wing was screaming out for the scallop! Good Job! And I got ‘the fix of the fix!’ HAHA self deprecating humor love it!
Hi Mary, I loved the way you did those feathers on the wings and then was aghast when I see you unpicked it, I can see your point BUT couldn’t you have outlined the original with a slightly darker thread?
Hi, Flora – it wasn’t really the edge of it that bothered me – it was the way I worked it into the main part of the front of the wing (around the back of that lattice area). I’ll be using the same approach for many of the feathers, but not working into the other part of the wing area.
Mary, can I please ask – what type of linen is your favourite for embroidering on ? What you are working the Secret Garden on looks lovely.
Many Thanks
Beth
Hi, Beth – Any of the Legacy linens (the Dower quality) are wonderful. I especially like Alba Maxima and Alabaster Angel for all purpose embroidery linen. For very fine work, the shadow work linen and linen cambric are both excellent. You can find them at Hedgehog Handworks. They are rather expensive by the yard, but for most embroidery projects, a quarter yard will do (she cuts them as stitcher’s quarters or fat quarters, so you end up with a good sized piece for 1/4 yard). -MC
Nearly choked on my coffee, when I saw that lovely fishbone gone! But hey, you know best and I look forward to the next chapter.
I ma just wondering whether leaving a tiny blank space between each feather outline (as in Japanese embroidery) and maybe slightly changing the angle of the stitch would sharpen the definition you are after.
Hoppy frogging!
Dear Mary
I was visiting a friend yesterday so I missed this. I really like the centre wing with the lattice stitch over the L&S stitch really pretty, I also liked the fishbone stitch on the wing, I’m re-discovering the fishbone stitch on my current monogram project I really like it, it’s so pretty and versatile. It’s good to test out different stitches and techniques and I know you will fix the fix of the fix of the fix ha, ha! and I so agree with you about using good linen it’s turf stuff. Thanks for sharing your journey of the project with us and for teaching that changes in stitch technique is allowed and sometimes necessary.
Regards Anita Simmance
Oh dear spelt tough wrong where am I this morning, not awake yet anyway I’m sure you knew what I meant.
Anita Simmance
The Fishbone Stitch worked well in the tail feather. I liked the effect.
The other stitch that might have an interesting effect is the Fly stitch worked closely. I think I might have waited to frog what you did until I tried something else a feather or two away so that removing the first idea would not be a problem. I can see why the addition of the pale blue was not pleasing. The stark contrast was to much. One shade lighter or even darker may have provided the effect you were after.
Actually, I like the very light tips and I’ll be exploring that further, along with darker tips on some feathers (and probably no tips on others!). The closed fly stitch is definitely in the plans for some of the feathers!
Mary,
You are my best source of inspiration! I’m working on a crazy quilt for my granddaughter. The theme of the current square is fans. I came to your website looking for ideas and this post was just the ticket. I think a feather fan would look marvelous.
Thank you for all the amazing tutorials and projects.
I’m loving this! I feel I’m sitting next to a good friend who’s stitching and talking to herself (and me) as she goes. Didn’t realise I could comment until you suggested it. Just wanted to thank you for sharing. It’s story-telling – for embroiderers. And it’s fascinating! Waiting for the next instalment!
Anne
Thanks, Anne! I’m so glad you’re enjoying it! You know, I DO talk to myself when I embroider – probably more often than I should admit!! 🙂
Mary, it was worth every bit of reverse stitching. The darker colour on the edge is perfect and I wish that I had only half of your fortitude. Great job!