


Several weeks ago, I reviewed this hand embroidery hoop stand – a hoop on a stick – and it prompted quite a few emails and comments from readers.
Most readers were chiming in to report great things about their sit-on hoop stands. Many readers hadn’t heard of them before, or didn’t know they could be found in the US.
And several readers wrote in with a very legitimate question, which I want to address today.
Condensed, the questions posed boiled down to this: “I would love to have a way to embroider with both hands free, but I just can’t afford to purchase a stand right now. Do you have any suggestions for a less-expensive alternative?”
I thought I’d open the question of economic alternatives for embroidery stands up to all of you, too, because I think 20,000 collective heads are better than one!
Understanding the dilemma, I’d like to offer some good ways to manage two-handed stitching without breaking the bank – I’m pretty sure many of you out there can help provide some excellent ideas.
Using Clamps for Embroidery Hoops & Frames
The difficulty is that most hobby-stitchers embroider in an easy chair or on a sofa. This poses a problem, because you don’t really have anything to support a frame or a hoop if you’re sitting on a couch.
If you’re sitting at a table, you can make use of a clamp that you can find at your local hardware store or online.
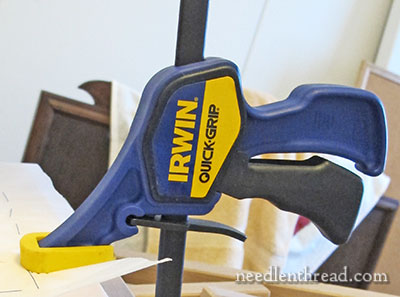
I use these particular Irwin clamps (that’s an Amazon link…) in my work room quite often. They have a soft, wide foot, they come in different sizes, and you can manage them with just one hand. The mini clamp would hold a hoop or stretcher bars pretty easily. If you’re using a large frame, you might need two clamps, or you might need the larger clamps.
With a hoop, you can position the clamp over the tightening hardware, because that’s where you have the most grippable space on the edge of the hoop. I’d suggest a piece of scrap fabric between the clamp and hoop, just to protect your embroidery fabric.
The advantages of a clamp:
1. If you just need one clamp, it’ll cost you around $10 – $11 for the mini clamp, and you’ll be able to stitch with both hands free.
2. It’s easy to tighten and to release (with one hand).
The disadvantages of a clamp:
1. You have to unclamp every time you need to reach the back of your work.
2. The positioning of the work is not flexible.
3. If you’re clamping a hoop, a larger hoop is necessary if you want to have any stitching room. (A small 4-inch hoop doesn’t clamp well and leave enough room to stitch.) So it may require you to invest in another hoop.
The Table Edge is Free!
If you’re embroidering a large project that’s set up on a frame and you don’t have a stand to hold it on, the table edge is free!
Sit up to a table, rest the lower part of the frame on you (your lap, your stomach – wherever is most comfortable and offers the best stitching position) and the upper part of the frame on the edge of the table. Voilá! Two hands free!
Saving for the Right Equipment
One thing you might consider is budgeting and saving until you can afford to purchase the right equipment.
I can’t stress enough that it’s a waste to buy inferior products that will not withstand the test of time, that will not do in the long run what you want them to do. Better to save for the good stuff that will last, than to spend half the amount on something that’s going to fall apart after a few uses!
Years ago, I wrote this article on budgets and hobbies, because I used to receive a lot questions about affording the supplies I use when I embroider. The gist of the article still holds true today – read it and see what you think!
Your Suggestions?
Please pitch in with your suggestions on how to manage two-handed stitching without breaking the bank for a floor stand or a lap stand! I’ve only offered two solutions, but I’m guessing that many of us have rigged up our hoops and frames different ways, in order to have two hands free.
Join in below with your suggestions and ideas! What’s worked for you? What have you seen other people do, that works? Your advice is always appreciated!
I’ve also seen a tip long ago about suspending the hoop from ribbon or fabric strips around your neck. This might work better for larger hoops? I wonder how much the ribbons/fabric might get in the way.
And I totally agree about saving up for good equipment. If I added up how much I spent on cheap hoops and frames (even on clearance, hmmm probably a reason why they were on clearance!), I could probably have a Very Nice Indeed hoop/frame/stand setup.
I’ve used wide (1″) ribbons for stitching while commuting on the train, but generally with stretcher bars rather than hoops. Stability was decent and the ribbons didn’t get in my way. The only issue I ran into was wearing a black raincoat: the black ran onto the fabric, so another time I would protect the fabric edge better.
I have done something similar, but with scroll bars, not a hoop. I took a cord and tied it to a stretchy hair band like you use for a ponytail. I put one on each end. Then I twist the bands around the top knobs on the scroll bars, loop the cord over my head to the back of my neck, rest the bottom on my chest and ta-da! Hands free stitching. I did the first time when I flew from California to Boston so I could stitch on the plane and it worked great. I still use it frequently.
I usually stitch sitting on my bed (in my tiny college bedroom) and I use a largish hoop – 6 or 7 inches. I find, if I bend my knees up I can balance the hoop on my two knees and have both hands free for short periods. It’s not comfortable for a long time but for brief french knots or the like it works great!
1. If you have an expanding table, open it just enough so your frame fits over the gap in the table.
2. If you have dining chairs with ladder backs, use two chairs back to back spaced so that your frame rests between the two chairs. This is only really suitable for larger frames.
3. Sand bags. I have seen this but don’t have one of my own. A long, thin bag filled with sand. Place the edge of your frame on the table edge, place the sand bag on the edge of the frame. The sand is sufficiently heavy to hold the frame in place leaving both hands free for stitching.
I use heavy books works like the sandbags
Thank you very much for your idea about the ladder backed chairs – what a great “lateral” thought. I’m going to try that for some goldwork I’m working at the moment.
I’ve seen relatively inexpensive floor and lap stands at places like Michaels. If you have a 40% off coupon, they are pretty affordable. I haven’t used any of them myself, but they look like they would be perfectly serviceable, at least for the short term. They might not have a lifetime guarantee like some of the more expensive stands, but I’m sure you can get years of use out of them.
I’d also recommend checking yard sales, flea markets, eBay and Craigslist. You never know what bargains you can find. If you belong to a guild that has a stash sale, that’s another good place to pick up things like stands that someone might not want any longer.
I usually sit in a rocking chair when I work which makes stands of all kinds inconvenient. Nonetheless I really wanted to try a stand. I waited until I had a 40% off coupon at our local hobby store and bought a relatively nice one and spent only $20. I put a 1/2 inch dowel rod in the clamp making a long (36″) horizontal movable bar that I use like you suggested to use a table edge. Its adjustable joints allow me to arch it over my lap while its spread feet don’t interfere with the rocker. I can put it anywhere – move it as I need it – don’t have to unclamp it every time I want to move the work – it supports everything from frames to hoops – I works with everything from a delicate 10″ hoop to a hefty 22″ quilting frame. And, when I want to get up or its not in use, its easily moved aside.
I always stitch at my kitchen table….the light is good and my back prefers a straight chair.
So….yes, that clamp works just fine and is cost effective. And, when the situation is suitable, you can avoid turning the work over to end thread by using an away waste knot. Also, the clamp is lightweight and very portable for classes, travelling, etc.
Second plan. Put a daily search in on Ebay for a “Grip-It” stand, avoid similar looking alternatives, they aren’t as well designed. I’ve used them for many years; sold ka-jillions of them in my former shop. Recently grabbed one on Ebay, new in the box, for about $30. Just to have a spare.
Ginger
I use a table edge, a knee or even balancing between chest and knee if the frame is big enough.
=)
Mary, I covered a house brick with wadding and fabric and use this as a weight on the frame at the edge of the table. The advantage of this is that it is easy to move around and it can be used with either slate or ring frames.
How timely!! I am in the process of re-organizing my sewing room and have been looking for something with a smaller foot print. My beautiful, perfect height, 5 ft harvest table may have to make way for a smaller set up. Sit-upons do not work for me because I find myself curving my neck and spine too much. ( am also an equestrian, posture and core control is vital!!)After a few years of doing work in a recliner I found that a straight back chair is better for my back and neck. I want the hoop to be at the proper height and angle for shoulders and elbows. I have the System4 stand (along with many others) and it is head and shoulders my favorite stand. But the base can take up quite a bit of (tripping over) floor space. I am waiting for the System 4 “lap stand” to arrive (today?). I am also trying to find the best suited magnifier/lamp combination. I have a small, old end table that may need to do double duty for a while. In the back of my mind I am designing the perfect needlework set-up that can be folded away. hey, they did it for sewing machines years ago, why not needleworking stations!!
I use the table edge all the time, but I find it works best for me with the Q-snaps, which I use in Brazillian embroidery. It doesn’t work as well for a circular frame, so I resorted to buying a Clover embroidery lap stand wich is pretty economical. It is basically a big hoop and a little hoop with some supports bewteen them. It has really helped me work on things like pillow cases because it holds the fabric layers apart and I can work with both hands. Someday I will have my husband make me some saw horse type legs to rest a frame on, like they use at the Royal School of Needlework. I got some photos from someone who went there and that looks like a good option for when I start working on my wedding sampler–maybe next year? At least it can be easily put away and the frame can be turned whenever you need to.
Dear Mary
I don’t have any suggestions on economic alternatives but I agree with you that budgeting is a great way of affording our needlework luxury, because that way you don’t get into debt (as you wrote in your article on budgets and hobbies). It takes time to save and the item you thought you needed might not seem so appealing and therefore with the money you have saved you can spend on other equally needed embroidery items. I don’t have many needlework accessories but I have 2 stands the system 4 which I use for hoops and the necessaries floor stand they were expensive but as I use them all the time I feel they were worth the expense. Thanks for sharing your advice on using alternative stands with us and your tips and advice on how to obtain the more expense ones.
Regards Anita Simmance
Hi Mary!
Frame weights: although I usually use a sit-upon that converts to a floor stand, I often travel to teach. I can sometimes fit the sit-upon into my luggage, but other times I utilize a Frame Weight. Many stitchers use a brick covered in needlework, or a small ‘stuffed’ toy that has lead weights inside. Either will hold one side or rim of a hoop on a table edge for two-handed stitching. There are lovely patterns available for stitching brick covers.
My frame weight is Ottellina the Otter with fishing weights inside. She was from an EGA Greater Pacific Region Seminar in 2008, where everything ‘otter’ was part of the fun.
I often use something weighted to hold a frame balanced over the edge of a table. It works where a clamp will not (sometimes the surface is too thick or doesn’t have enough lip). I have “bean bags” and also have decorated old cotton ladies’ gloves stuffed with lead shot or sand to use. Both are lined with plastic and I believe the shot had been washed before we got it (group project).
I use the “string frame” often. I first learned about it on the Internet (RCTN, a usenet group) as Helen Mardis’s string frame. I use ribbon. I’ve used it tacked to the side of stretcher bars and looped over the ends of scroll frames, but haven’t tried it with a hoop. To me it seems kind of dependent on having that flat side to balance against your body. I’ve had mild problems with it intereferring with my stitching, but I get used to it pretty quickly. What I like about it is that I can get up if I need to and just let the frame hang from my neck.
I’ve also balanced frames between two tables or tv trays to stitch. This is how we worked in the Japanese Embroidery classes I’ve taken.
I purchased an old aluminum hoop holder at a antiques shop years ago. It clamped to a table. Sadly, it only held one size of hoop and I never found one that fit. I haven’t found inexpensive options that work with a hoop.
One day I’m going to get a hoop stand.
I travel and so I have found myself using lots of impromptu things:
1. Weight placed on edge of frame or hoop to stabilize on a table edge. This can be a brick, bag of coins, bean bag.
2. Two ladderback chairs with my frame resting between the rungs at the preferred height.
3. Two boxes or crates of the same height – place on each side of me so I can rest the frame/hoop on them.
4. I’ve used the clamps you mentioned too – beware of these with glass tabletops. I’ve broken a couple.
5. Made my own trestles to use with slate frames. These with clamps will work with hoops too.
Kimberly
In the days when one of my expensive stands broke and I was saving up to replace it, I used a simple standing towel rail placed in front of me. The upper edge of my rolling frame or hoop could rest on whichever of the bars was at the right height, while my legs and feet had plenty of room to poke through the space under the bars, so I was able to bring the stand right up to the chair if need be for smaller frames or hoops.
If you’re a member of EGA, ANG, or any embroidery guild/group, check out the “stash sale” for used equipment. Used doesn’t necessarily mean bad or non-working. Our local guilds have annual sales, and they frequently include equipment and materials donated by members who can no longer stitch or from the estates of members who have died. Last year I had my choice of 4 or 5 floor stands at that were priced at only $10! I’ve only used it once so far and it worked well enough – haven’t needed it since – but at that price, I’ve got my money’s worth already.
Mary in MN
Dear Mary, over the years I have used everything EXCEPT a System 4. Until fairly recently, I had never heard of such an animal and I can’t remember if it was your column or visiting Lacis in Berkeley.
Many years ago I bought a very nice, expensive, hardwood embroidery floor stand with several different sizes of frames, the kind you sew your piece to and then you are restricted by the size of the frame and the sidepieces. Hard to get to the back and you must lace in your embroidery in order to get it tight enough. This is a very good stand except for getting to the back and you also have to have a good chair arrangement as you can’t get it close enough to an over-stuffed easy chair, which my 70-year-old posterior prefers.
Then I got into other gadgets including one with a clamp on the side which doesn’t hold well and another with scroll frames, no access to the back and, again, you have to lace to the sidepieces to get it tight enough. So I often revert to the tried and true hand-held hoop which I can do from my over-stuffed EC. It is also portable to my stitchery groups and classes.
I am saving for a System 4. Thanks for the discussions on frames and stands, Mary, it’s been a great help. Best, Charlotte
After I read the other post about the hoop on a stick, I did some investigating. Amazon sells the Elbesse seat frame – the same one sold by the Sophie Long Embroidery Shop in England but with 3 hoops. The one that I ordered is being shipped from England. It was $39.99 with free shipping. I won’t receive it until early December, so I can’t comment on the quality, but Amazon UK rates these hoops very highly.
You can find find clamps that you showed in your article in your local hardware store. I started out using the screw type “C” clamps. A frame weight can also be use for larger embridery pieces.
Frame weights are another option; resting on the corners of a frame on a table, they will hold the frame at 90 degrees and leave plenty of room for your underneath hand. I’ve seen two cheap options: a pouch filled with pennies (when we were making frame weights as seminar favors, we found these cheaper than BB shot, fishing weights, or pie weights), or bricks wrapped with fabric pinned on so that the brick dust doesn’t get on the work.
I have found great deals on used equipment on eBay (watch the shipping) and Craigslist
I use a pattern weight to weigh down one side. its heavy enough that it holds my hoop while allowing me to easily rotate or flip to the backside when needed.
The type I use are pictured here: They were around $20 for a pair.
http://www.sewingdepot.net/images/Pattern%20Weights.jpg
I smiled when I saw your article today with the clamps. I use the clamps and covered the ends with the rubber grips used for crochet hooks…. I have to admit that I agree with the downside being that you have to unclamp to get to the back but they are great for traveling and I use my “trusty” Lowery stand when stitching at home.
I use clamps like yours but with longer “legs” on either side of a rectangular wood fram, which then straddle my lap when I am in an easy chair. In fact I introduced my husband the woodworker to these clever clamps – they used to disappear until he developed a huge set of his own! hh
I totally agree with saving up for real, good quality equipment.
I almost always embroider in the recliner or the rocking chair in our family room.
I still have a small cold today. Yesterday I had to go unexpectedly to the dentist and have a baby tooth pulled! The extraction went as well as an extraction can go. It wasn’t painful at all. My gum is still a little sore if I smile or open my mouth wide, though.
Sarah
I would strongly suggest zeroing in on the desired good product — and then check eBay! Also check your thrift shops and the like. When needleworkers move on, their families often don’t know what to do with their things. Or people lose interest. This fine equipment ends up with a low price, unappreciated until we discover it. Make sure where the item is coming from and that it’s not a cheap copy. Personally, I get “vibes” studying eBay listings. I also sell on eBay. I love the sellers who offer lots of pictures and plenty of description, i.e., “my mom used this and I’m not sure what it is” . . . . and not to leave the embroidery topic altogether, I recently looked to eBay for Weeks’ Dye Works threads. I was astonished at range of prices for the same brand new threads — several well under the “going rate” at embroidery websites and quite a few demanding almost double! Conclusion: it really pays to be beady-eyed and hang onto our dreams of good equipment and materials.
I’ve been using a embroidery frame that I got at Michaels, and I put it against the table en the bottom piece of the frame is resting on my lap. I feel very relaxed with this. There is also no stress on my back
I wish I had some good ideas. sitting on a couch or ‘easy’ chair is difficult — that i why I mostly use small hoops (6″) that I move around on the project. I understand why that isn’t always possible. If it is a large frame item, then i am required to sit at a table where I can use the squeezie-clamp that you showed in your blog. Either that, or straddling it between two tables (or trestles). Hoping someone has some good ideas!
In days gone by before we were even aware of floor stands or sit-upon hoops, we made bean bags and filled them with b-b’s. That was nice and heavy for draping across the edge of a frame onto the tabletop. If you’re at home and don’t have a bean bag one of the large cans of veggies works quite well, too. The advantage of this method over a clamp is that they are easily moveable when you need to get to the back of your work. You’d be surprised how much tugging and pulling of a needle these things will withstand – or you could use two of them.
My dad attempted to rig me a stand by using 2 old camera tripods with pieces of sturdy wood (3/4″ thick? 2 inches wide and about 4 inches tall) screwed onto them (some sort of bolt that gets locked into the wood that the screw on the top of the tripod will turn into) and clamp the frame to the wood.
Problem was he got me awful clamps that required 2 hands to use and it was difficult to move around since tripods take up a lot of leg room if you have 2 of them next to each other. Another problem was if you wanted to get to the back, you had to manipulate 2 swivel/rotate heads instead of 1.
For a hoop (and 1 tripod) it *might* have worked, but I use frames not hooops.
Dear Mary
One item that I use when I am sitting at a table is a bean bag. The bag can be placed on one side or corner of the piece to steady it enough to use both hands while stitching.
These are easy to make to the size you need.
Sharon
I purchased 4″ clamps at Harbor Freight for $1.99 each. The minis pictured above are $14.99 at Walmart. Mine are exactly the same but without the colors. Work perfectly and identically.
More than 25 years ago I got a Grippit all wood floor stand. Scored a new base for it at a guild meeting sale last year. Almost all the members of my ANG chapter have switched to the metal Lowry frame, but not me. It’s no longer made but should last me the rest of my life.
I did try the K’s metal floor stand several years ago and sold it to a chapter member. It was heavy and cumbersome to me.
I bought an inexpensive couch table (like this one: http://www.seenontvproducts.net/tablemate/)and cut a hole in it. I can rest just about any kind of embroidery frame on the table top, and because the frames rest freely, it is very easy to turn them over or rotate them. The table cost about 10 euros, and I love it (though I must admit that my husband, disapproving of my handiwork, replaced the plastic table top with a nice wooden one).
For odd-shaped projects I also make my own ultra-cheap frames: cut a piece of soft board to a suitable size, cut a hole in the required shape, and glue squared pattern paper to it. Fabric is pinned to the board with very short pins (with the squared pattern paper as a handy guide), which are then covered with a strip of fabric. I find that this works really well and saves fabric for very small designs, or long and narrow ones.
I purchased one sit-on stand several years ago (sorry, I don’t remember the brand) and returned it immediately — very awkward. About a year ago I bought one of the Jennoop double-hoops that seemed like a good idea: two hoops connected by three perpendicular ribs. I do not recommend it; It’s so lightweight that I frequently need to use two hands anyway. That might be overcome by using sandbags on the bottom frame, but then they’d have to be moved every time you needed to access the back. It also (unlike some similar-looking Morgan individual plastic hoops I’ve seen in catalogs that have grooves or ridges to hold the fabric tightly) is smooth, and when I went to a Hancock store for twill tape to wrap it, they had no cotton, only polyester, which is no better than no tape!
Mostly I use scroll frames or sometimes Q-snaps, and I did get a table/lap stand to use with them, which is fairly convenient for smaller frames. Just now, I’m working on a piece with 28″ rods, and the one clamp on the side of the frame is not up to the challenge. I’m almost always in a Stressless reclining chair that has a separate footstool. With this large frame, I perch my feet on the footstool and balance the frame between by lower chest and lower thighs. leaving me room to use one hand underneath and no need to unclamp anything to get at the back when necessary.
I also have a floor stand that my dad made for me fifty-some years ago. It has a frame that the piece has to be laced into, but it also swivels to make reaching the back easy enough. It was wonderful when I did a large stumpwork piece a few years ago.
I enjoyed reading all the others’ comments and will be checking out some of the brands recommended. I would only express concern about using cans of veggies for weights. Unlike a bag filled with pennies or shot, it could do real damage if it fell off onto your foot! A brick, of course, could too, but I would think that a brick would be more stable and also probably heavier.
While I’m here, may I ask a question? One thing I really like about the Q-snaps is that you can release the stress on the fabric with a couple twists and reverse that to stitch again. The primary drawback to them, in my opinion, is that it’s awfully hard to get the clamps off to remove the work (or to reposition, which I’ve done only when setting up, as I don’t think I’d want to leave the clamps over stitched areas). So here’s the question: Does anyone have any suggestions to get the clamps off more easily?
Thanks to Mary for this wonderful forum, and to all of you who are so willing to share your experience and insights!
I made a cute little frame weight out of a little stuffed toy “Garfield”. I opened a small area in one seam, removed some of the stuffing, and using a funnel, poured “be bees” into the center, stuffed back in some of the stuffing, and closed the seam. Very inexpensive. The copper “be bees” can be purchased at most sporting goods stores and are very clean. This way you can customize your frame weight to suit the weight that is best for you. And you can choose your favorite character. I like “Garfield” the cat, because he looks grumpy, and sometimes I feel that way too, especially when my thread keeps knotting on the back.
Alice
Use the table edge and a bean bag ro stabilise with a larger hoop – my bean bag is a 4lb bag of red lentils covered in some scrap cotton fabric to help it grip. As I am tall and sit in a dining chair, my hoop is not directly on the table but rests on a family size biscuit tin.
Thanks Mary for all you interesting articles
Beth
This is so timely, Mary. I have only recently picked up embroidery again after many years of not touching it & have been rather coveting the hoop stand you mentioned as well as the millenium frame system. However, given the expense, I’m hesitant to spend the money if I end up taking a long hiatus from embroidering again.
So this served as a good reminder that the right equipment is worth waiting for & in that time, I can asses to see if my current rekindled interest will stick around.
Because my legs swell I need to keep my feet up. I work in my recliner most of the time. I found I can bend my knees and balance the hoop between knees and stomach. This may sound funny but it works!
How about building your own stand? Wouldn’t it be a great project for a woodworking loved one to give to you as a gift? I found this free pattern with specs that was developed by a needleworkers husband. http://www.van-vliet.org/dempseywoodworking/needlepointstand.shtml
Dear Mary, I look forward to your email every day, and learn so much from them. Thank you. I’m primarily a machine embroiderer, having completed both Certificate and Diploma levels of my City & Guilds. I thought you’d like this photo, taken back in 1895, of a method of suspending a very large piece of fabric (the front of a chasuble) while the completed embroidery was being applied… with the “help” of my cat! Well, you couldn’t expect a stationery knee tone ignored, could you!!
Darn! I can’t work out how to attach the photo. I am sitting in a chair, with the weight of the fabric suspended over the back of a chair positioned in front of me, and the large hoop resting against the chair in front. It was very comfortable, until our cat decided to help me….
Definitely a way of having a hands-free hoop – just not a knee-free one!
Rats, I spent all my budget on a bunch of used embroidery books. I do get books through inter-library loan, and I did that with the “Arts and Crafts Embroidery” book that you reviewed Mary, but I often need them to-hand for reference.
I still choke at buying fancy stands and expensive linen. I used to buy specialty gizmos for quilting and I found I went back to basic tools. I rest a bed pillow on my lap when I embroider and it holds the hoop up and allows me to manouvre for French knots or other manipulations with a needle.
I have a quilting frame for basting quilts, much like embroidery frames used in the 18th century. One could buy fir lengths to do that and lace the work into a frame on fabric strips. Total cost about $30.
I don’t consider $200-$200 for a frame something I would choose to budget for, because I wouldn’t use it enough, I only do occasional pieces of embroidery. For the same reason, the cost of linen for embroidery is not something I feel is a practical investment, not for the few things I work up.
You probably all do this already, but just a reminder to keep your eyes open at yard sales or rummage sales. I’ve wanted a sit-on hoop for some time but couldn’t justify the cost. I found a very sturdy table hoop at a church rummage sale (it sits on the table and you can stitch with both hands)for $3. It works really well, but the hoop has to be sturdy, and you have to be willing to sit at a table.
They still make round hoops that have a tilting mechanism and it clamps on edge of a table. Clover use to make one,,,,was not expensive.
I normally hold my work. When I do embroidery demonstrations at a local county fair I use a floor stand.
I don’t think the particular one I use is made anymore, but I know I have seen others in crafts stores. If either my husband (yes, he does needlework too) or I bought the stand it had to be fairly cheap, as we are. The one I use holds the hoop or frame between 2 pieces of wood using two screws with wing nuts to tighten them together. It can hold a variety of sizes up to a large quilting hoop. It is light weight.
I am guessing that if we spent $25 for it, it was a lot or we would not have bought it.
Husband reminded me when I mentioned this topic of the Morgan Hoops.
These are hoops, where one purchases 2 hoops and they are linked together with plastic bars. One can stitch using either hoop and the work stands on the other hoop. The inside area is easy to access through the supports. The hoops come in different sizes and one can reuse the support bars from one setup to another or even use one of the hoops in one’s hand if one wishes. The hoops have a raised line around the outside of the inner hoop and a cut around the inside of the outer hoop, locking one’s work into position.
I have nothing to do with this company, just have seen them at shows.
The first one I have may be silly sounding but use one or two soup cans as weights as you balance the hoop or frame on a table. The second suggestion is to make a weight by using an 1/8 of a yard of upholstery fabric to make a pillow 6×8 inches and fill it with pie weights. This will be flexible enough to conform to the shape or edge of your hoop or frame as you balance it against the edge of a table. Sand could be used as well or emery if it is available. It then becomes a convenient place to park needles as you work.
PS: even less expensive is the suggestion made by one of your corresponders to fill an old glove with sand which is even better than making something. It would be best to choose an old white cotton glove so that you don’t have to worry about color runs.
I use an ‘over bed/chair table’ on wheels and clamps. I find that I then can roll the table to wherever I sit and I can also adjust the height of the table. The table surface is then very hand to put all your yarns and what nots on; including the most needed cuppa!
The clamps can be used with whatever size of embroidery frame.
I live in Australia and I bought mine from a pharmacy that also sells mobility equipment. It was just over $100. There are also dearer ones but they were too big and more suited to beds.
Cheers
Hendrika
When I started Japanese Embroidery, I learned that their large frames are laid flat between two specialized stands. These stands are pricey and, having made a significant investment in the frame and materials, I asked my teacher if there were an inexpensive alternative I could use at home. She suggested tv tray stands, which run around $8 at Target. I bought 2 and found them just the right thing for my Japanese Embroidery, as well as larger needlepoint pieces.
I have the Irwin clamps in my toolbox and use them occasionally to clamp pieces down. However, with 2 tv tables/stands, the needlework is flat and balanced and really doesn’t need to be clamped down. It’s very easy to flip it over to tie off ends and check my stitching – actually easier than a stand because I don’t have to unclamp or loosen anything first. There is plenty of room on both sides for my needlework supplies. And, the tv stands fold up for easy storage. They are also versatile enough to be used as small tables on occasion.
For full disclosure, I have a System 4 stand and several wooden table stands, lap stands, and sit-upon stands. To be honest, when I am working on larger needlework pieces, I prefer the tv stands now that I have discovered them.
hello mary,
i bet i have 50-75 hoops on the wall. from old wooden to plastic. i found these ones made of hard rubber/plastic that looks like wood and they connect to another hoop with 3 stick looking connectors. sew u have one that sits on lap and one to put material in.one is 2 sizes bigger. at my sewing group 2 days ago i had 3 people ask where i got it. i bought 1 at joanns and the other at tuesday morning. i look everywhere on it and couldnt find a name or anything. i love it. i use them to embrioder and quilting. i also saved and bought one for my needlepoint and it has a base that sits n my lap. i like it as well. i am definitely with u when saying go ahead a buy the better ones. they will last and u get what u pay for.
Hello Mary – I have used string or ribbon tied to a rectangular frame, around my neck and adjusted to the right angle for comfort. The bottom of the frame balances across my lap. It is less than perfect, but I find it a reasonable solution when travelling. Hope this helps
Many needlepointers mount their canvas on stretcher bars. Those who work at a table often use a frame weight instead of clamps. A frame weight is anything that is large enough to go across 2 adjacent sides of the frame & heavy enough to stabilize the frame.
Some examples of frame weights include small stuffed animals stuffed with BBs, drapery weights, nuts, or other hardware. A small rectangular bag stuffed with a roll or 2 of coins also works.
The important thing is that the frame weight sits on the frame and not on the fabric or canvas which would otherwise get “saggy” and defeat the purpose of stitching on stretcher bars or a frame.
I belong to a livejournal stitching community where-in one of the members is cross-stitching ‘Napolean Crossing the Rhine’. It’s a fairly large piece, and at one point, her father rigged a ‘stand’ from the ceiling, so she could reach around to the back as needed.
I really like the idea of a ‘stand’ that hangs from the ceiling. If you or your significant other is at all handy, it would be easy and fairly cheap to make one that will even pull out of the way when you are done, and would have the advantage of being extremely flexible as to position.
You’d need one (or more, depending on hanging position) of those plant-hanger screws – the ones with the eyelet, not just a hook – rope, a pulley sized to the rope, and either a clothes-hanger or a thick-gauge wire bent into a triangle of appropriate size. I’d also recommend one of those flag-pole rope hooks to get on the wall. Screw one of the hooks above where you normally sit into the ceiling, and as many as necessary to keep the rope tidy against the ceiling to the wall. Put the pulley on the hook above your stitching seat. Thread the rope through the eyelets with plenty of room to ‘tie up’ the end by your preferred place to stitch. Thread the rope over the pulley, and tie it to hangar or wire. Add some kind of weight to the hangar so there’s constant tension in the rope. Tie the excess off on the flag-pole hook on the wall. That’s the basic piece – with it already weighted, it’s easy to raise and lower the hangar to the appropriate height for stitching.
The next part would be clamps of some sort that clamp around the hangar and onto your piece. To finish off the ‘stand’, and keep everything in place, you need another weight, one that would rest on the floor and not move easily. A brick or stuffed toy filled with sand or bee-bees or pennies. Tie a second rope from the frame you’re stitching on to the floor weight, adjusting as necessary to get it to sit where you want, and out of the way.
This ‘stand’ would be fairly flexible in terms of placement, but would probably work best on scroll hoops. Q-snaps or circle hoops would probably require another clamp.
But supplies should be something like $15- $20USD for this, depending on the clamps used. And it would be easy to lower, use, and put it away.
Just a thought.
-Monika
When I started using the frame we used objects like bean bags to hold the frame steady at a table edge. You can find these in a toy store or yard sales and then fill them with heavier filler if what you find is not sufficient.
I purchased my first lap stand at JoAnn’s. I bought the scroll set one month with the 40% off coupon. The next month I got the stand part with the next 40% coupon. The month after that I got a larger scroll set and finally an extra package of knobs. It took a few months but persistence paid off! Two sizes of scrolls, the stand and the knobs at 40% off.
Hi Mary and All!
I have health issues and spend most of my time in bed, (though not sleeping). I know I would get more needlework done if I had the Lowery Work Stand — but it’s expensive. Does anyone know if they ever go on sale in the United States?
Thanks,
Sabrina in Port Townsend, WA
I bought my stand from a friend. She had taken the measurements from one she saw in a catalog and she and her husband made them to sell. It is a very nice one, shown in this shot on my flickr photostream
You just need basic woodworking skills and it is made with large dowels and a piece of wood. I think drilling was the major process in putting it together. She stapled ticking to the dowels for me to use to attach my stitching. They drilled holes to make it adjustable and gave me extra dowels so I can easily change it to fit each project. It is something anyone really could do.
I’m primarily a needlepointer, and use a frame weight. I’ve never seen a covered brick used, as some of your readers described.
I’ve made several, out of Beanie Babies – they’re very inexpensive now that the fad is over, and have been kept pristine, as collectibles. Open a seam, remove some of the stuffing, and replace with BBs or fishing weights. Wash the BBs first, or put them in a small ziplock bag, as they have oil that might leach out with time.
A friend made a very pretty rectangular frame weight which doubles as a pincushion. She stitched a design on linen & filled it with emery sand sewn into a muslin inner ‘bag’.
Mary, I’ve sent you 2 private messages and gotten no response, so I am thinking somehow they aren’t going thru? I have one of those inexpensive craft store floor stands that I’ve “re-done” to fit my needs and have taken photos of it. I would be happy to send you the photos (they aren’t wonderful, but I think you could get the idea anyway). I was going to try to post them on the share portion of your site, but it says I’m “inactive” and won’t let me post and to “contact a board member”. I’m assuming you are that member, but that was one of the pm’s I sent and never heard back.
Hi, Carol! Thanks for your comment! You can email photos to me, at mary(at)needlenthread(dot)com, if you like! I’ll look forward to seeing them!
I purchased a System 4 unit from ThreadNeedle Street on the west coast of USA. They have the best price as they sell alot of them. It’s still not cheap…but I’ll tell you, I LOVE my floor stand and I can flip it around to work on the back and front. It was WELL worth the money.
I’m looking for some information on a frame weight. When would they be used? My instructor has put it on the supplies list but I’ve never used one.