Last week, we began Part 1 of this mini series on how to embroider and finish a Christmas ornament using materials, threads, and embellishments from your own stash.
Today, we’ll look at Part 2, which is essentially finishing the front of the ornament (even though, when I took the photos, I hadn’t finished the front of the ornament yet!). No excuse except (cue up the music): “It’s that time of year…”
(Is anyone else trying to figure out how we arrived at 8 days before Christmas, without warning?)
But see, that’s the nice thing about this project. It’s relaxing. It’s fun. It’s easy. And it should produce a nice finished ornament to either give as a gift or add to your own tree. Above all, this should be a no-stress project. And that’s exactly how I’m approaching it.

In the last several days, I’ve added a couple tutorials here on Needle ‘n Thread for the techniques I’ve used on this ornament, specifically a tutorial on how to use DMC Memory Thread and a tutorial on how to ruche a ribbon.
The reason I wrote these tutorials separately is because you can use those techniques for other surface embroidery projects, and I didn’t want to limit them to “Christmas Ornaments” – even though that’s what I’m making.
The idea with this type of ornament, though – what I would call “free style” embroidery – is that you can do whatever you want to do with the embroidery on it. You don’t have to do what I do! You can pick your own stitches, your own supplies, your own techniques to piddle about with.
The Stitch Fun series here on Needle ‘n Thread would be a great place to find fun stitches that you can put to use on your own ornament.

So, the front of my ornament is almost finished, but I have some correcting to do, and I have to finish some beading.
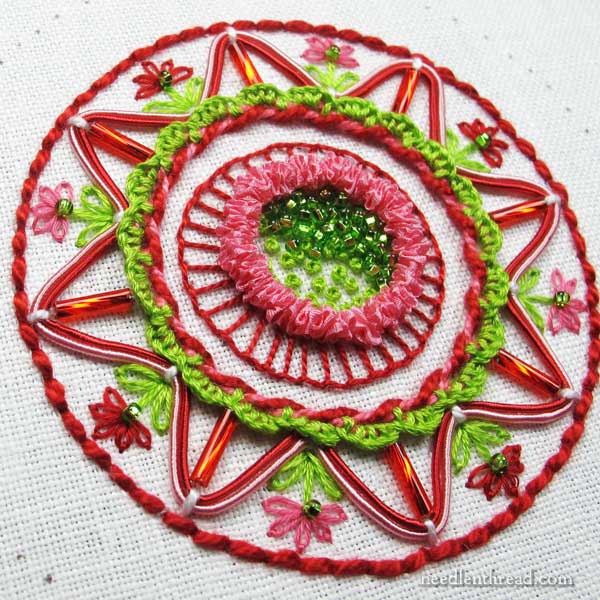
This is what I did on my ornament, from the outside in, so far, picking up from where we left off in Part 1:
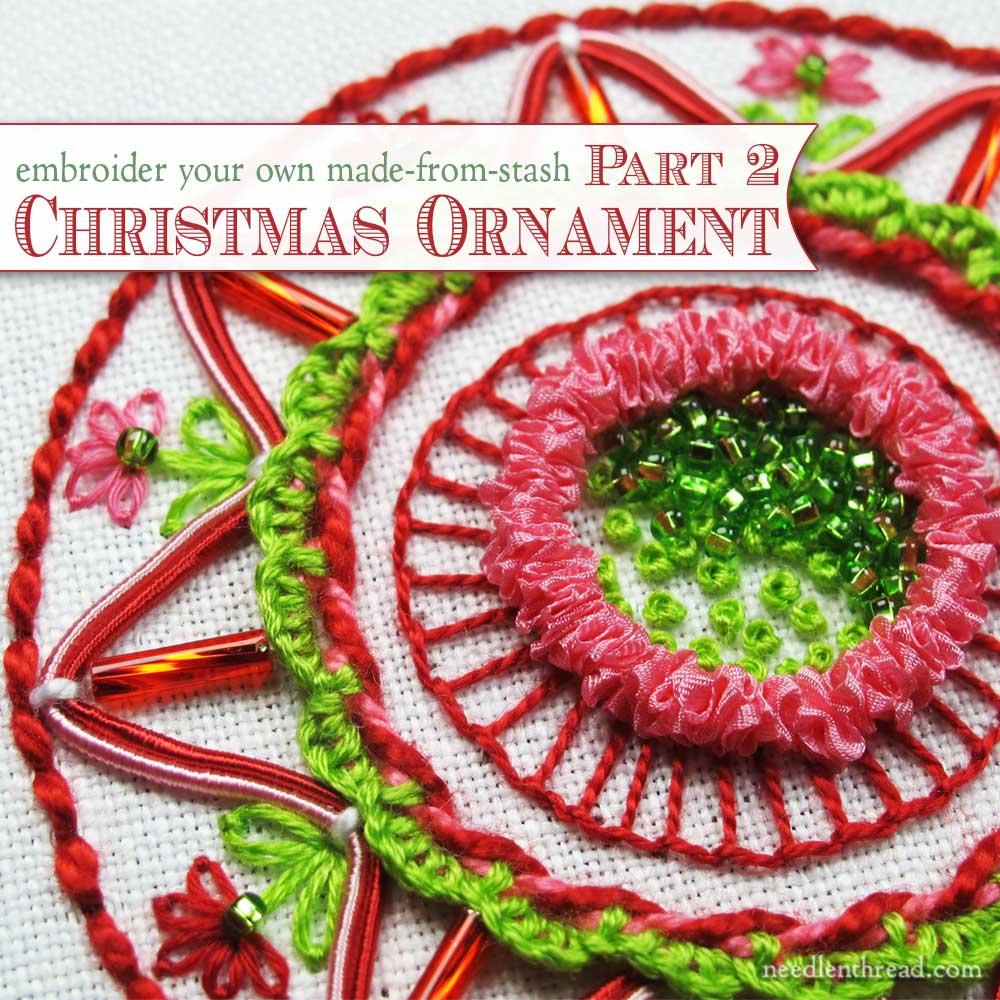
Between the backstitched outer line and the buttonholed cable chain stitch, I couched DMC Memory Thread in waves. I used two pieces of Memory Thread in pink and red and couched them with #5 white perle cotton.
Between the waves of the Memory Thread, in the outer spaces, I worked some flowers. Using three strands of DMC floss in bright green, I worked a straight stitch for the stem and two daisy stitches for the leaves. The flowers, which alternate red and pink around the circle, are worked in daisy stitch, using DMC cotton floche. I placed a little green seed bead in the center of each flower.

On the inside of the waves, I added long, red, twisted bugle beads.
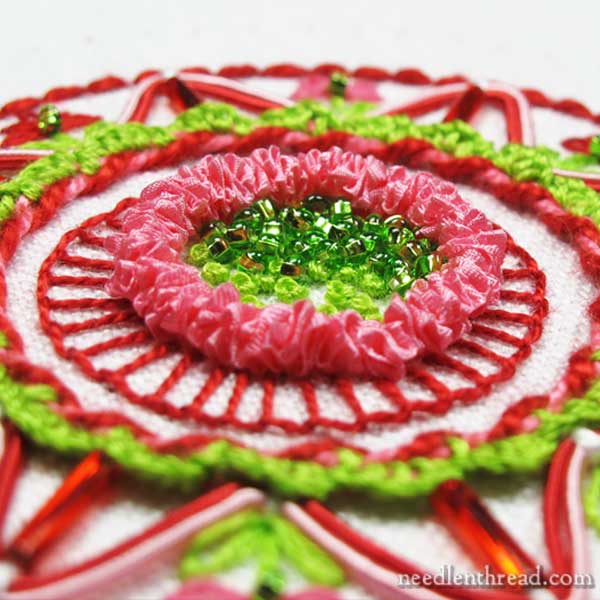
Around the inner ring, I added a ruched ribbon outline in pink.
Around the ruched ribbon outline, I worked a buttonhole stitch ring in red – but it’s coming out. I have another idea for there, and the buttonhole ring came out a little lopsided.
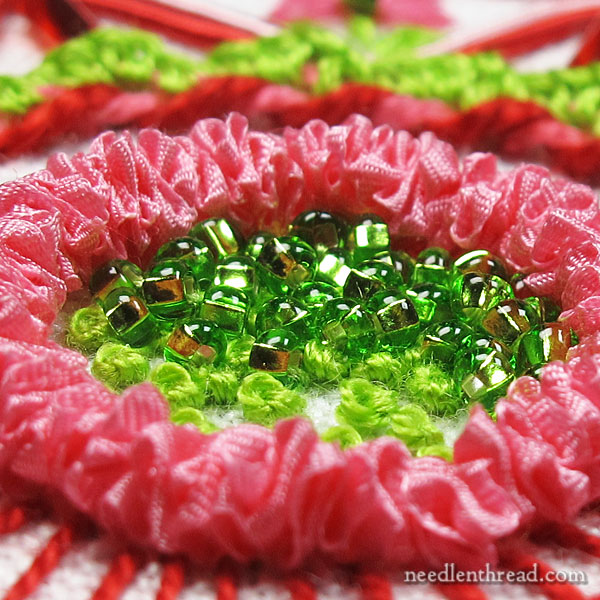
On the inside of the ruched ribbon ring, I worked some scattered French knots in green (with three strands of floss) as a foundation, and over those and between them, I’m working little tiny green seed beads.

Why the French knots? Well, I didn’t want my seed beads to sit inside the circle at the same level. I want to pile them in, kind of like gravel, some higher and some lower then the others.
To do that, I worked the French knots first, so that I can work beads on top of them and in between them. This gives the beaded area a kind of gravely, sparkly, random, really textured appearance, without stitching beads on top of beads.
The beads are not quite finished.
So, to finish the front of the ornament, I need to re-work the buttonhole around the ruched ribbon, and I need to finish the seed beads.
Once the front of the ornament is finished, I’ll transfer the design again (I covered how I transferred the design here) and I’ll start the back of the ornament.
While I’ve been working on the front of the ornament, my mind was constantly working on ideas for the back of the ornament, which will be the same color scheme, but with other techniques and stitching approaches.
Then, we’ll put the two sides together, add a cord, and finish the edge. We’ll cover all of that in parts 3 and 4, and yes – before Christmas!
Over to You…
Do you have any questions or need any clarifications? You’re welcome to leave a comment below!
Needle ‘n Thread, Daily!
Did you know there are seven terrific reasons to sign up for the Needle ‘n Thread daily newsletter? Check them out and sign up today!


This is going to be sooo pretty. And I am so glad that I am not the only one to change my mind and take things out for something I think will be better. I am looking forward to seeing the finished one. Thank you for all the great information.
Hi Mary, love your work as usual and love that your such a normal needle worker . I think they start the countdown to Christmas far too early, the number is so large that we feel like we have ages and then before you know it it has snuck up and kicked you in the bum leaving you with unfinished projects that you were sure you had plenty of time to finish!
How is the Hungarian table runner by the way?
I Had to chuckle, Roma, because I originally included a comment about the Hungarian runner in this article – but I deleted it, because I didn’t think it was relevant. And it included my favorite cuss word, which is riffemrackemfrickemfrackem. That should tell you something! 8 days? Will I finish it? Hmmmmmmm…..we shall see!
Hi Mary,
Well I just finished the ruched part and had a sigh of relief that I’d caught up.
Silly me 🙂 I’m feeling a little overwhelmed with all the work you’ve done. Your peice is very beautiful.
I’m doing the heart shape and I don’t think I can fit any little flowers in the top part as it’s quite skinny and not as well spaced as the circle one looks with the zig zag thing… sorry very new to embroidery.
but I love the little flowers… I’ll try to find somewhere else to put them on the heart. It’s all very exciting and I’m enjoying being part of the project.
Just love your daily blog. can’t wait to try this. I just purchased the book crewel intentions and plan to make several of the projects into pillows. Can you advise what type of linen i should use. would legacy be a good choice and if so what one? there are so many choices! I will use mainly cotton dmc threads. if i used crewel would the same linen work too. I just finished a kit by elsa williams the queen’s garden with 100% wool crewel and 100% linen fabric. It was fun to work with and the finished piece is beautiful, but I do not know what to buy to get the same type of fabric. any suggestions would be greatly appreicated. thanks again mary sue C
Alba Maxima by Legacy is a good all-around linen for pretty much anything. You can find it at Hedgehog Handworks online. A fat quarter will give you a good sized piece to play with!
Thank you Mary! this has given me so much inspiration. I will be making ornaments for my family for next year. They already have their gifts for this year, Christmas quilted place mats.
I enjoy reading your emails every day!
Dear Mary
I know what you mean about 8 days before Christmas where does time go and so much to do. I love the beading and french knots on the Christmas ornament very pretty. The bugle beads between the DMC Memory thread look like candles very effective and the daisy flowers look lovely as well. Very nice piece it will look lovely on a Christmas tree or a hanging decoration. Thanks for these tutorials on the Christmas ornament I can’t wait to see the finished fob. I hope you manage to finish the Hungarian runner for Christmas!
Regards Anita Simmance
Wspaniały haft:)
Looks lovely. Might have a go for next year.
(Is anyone else trying to figure out how we arrived at 8 days before Christmas, without warning?)
Doubtless your unfinished redwork table runner is responsible. :-)(How’s that coming?)
OR
Santa does not want to have to pay the California Inventory Tax, so he speeds things up so he can get rid of most of his stock… (snicker)
Ah, you answered my questions about the beads. Why French knots and beads? To give that lovely piled effect rather than neatly organized beads in a row. And were you going to leave it this way with beads in a pile at the bottom (?) of the center circle? Nope, you’ll be adding more. But I like the idea of beads in a pile in the bottom of a bowl of stitching. It would have to be hung a certain way to maintain that look but I like the thought.
Good morning Mary ~ One of the first I do when I get up is read your newsletter…it is so much more inspiring than reading the local news paper. I was glad to see you used a little Flouche. Thank you for introducing me to Flouche, it has become my favorite thread for stitching my Tea Towels
Sharon
Love those bright colors!
Wow Mary! Awesome ornament. I love it, will definitely put it on my ever-growing to-do list.
Mary, Your creativity is just amazing to see. I’m also wondering where time went this month, trying to get things ready for Christmas as well as the end of the year. I have a quilt to make for my grandson out of the scraps from this year’s quilt projects. Then it will be time to travel and help the kids move into their new home. Thanks for this great idea and in case I get too busy to write later, have a very Merry Christmas and Happy New Year! Debbie
love the ornament & was starting on one myself but it won’t be done for this year which is why I am commenting.
I broke my arm. I can still use my non dominant hand & am trying to figure out if there are one handed ways to sew….I expect I am not alone in this & thought you might be able to help.
I have been sewing & crafting most of my life & the thought of having to give it up for several months is driving me crazy.
Hi, Kaz – So sorry to hear about your arm! This is where an embroidery stand or even a “hoop on a stick” – like this one: https://needlenthread.wpengine.com/2014/10/sit-on-embroidery-hoop-stand.html – comes in handy. If you have something else holding your work, you can embroider with the working hand! Hope the recovery is swift and complete! ~MC
Mary,Thank you so very much!! I am returning to embroidery after a decade or so absence. I have learned so much from you in the last month. I appreciate your generosity!
Thanks, Ray! 🙂
The ornament is so pretty. Thanks for all your shares and help. Know that it is appreciated.
Thanks, Theresa!
Mary,
I always save your emails for last…like dessert! Just ordered your Lavender & Honey pattern and I am adding this Christmas ornament to my list of things I want to stitch for next year. Thank you so much for all the tutorials and helps you give. I especially like the thread comparisons as I’m trying to decided on a few fibers to buy while in the US (live in China) for the holiday. The fiber comparisons have been enormously helpful. Thanks!
Hi, Carolyn! Thanks for your note! You know, I have the thread comparison posts from years ago on my list to re-vamp with new photography in the coming weeks, so I’m glad to hear that they are still helpful! Happy Christmas!
The thread comparisons are very helpful. I have them bookmarked in an organised fashion to help make decisions.
Thank you for everything you do for embroidery. And a Merry Christmas and Happy New Year to you and yours.
Helen
…and a sprinkle of your favourite Xmas spice just before exhibiting this little gem.
Hi Mary,
I’ve done a “quick version” or this lovely ornie to send to my niece this Christmas. I’m sending a couple ornaments in a pretty tin for her to store them. The plan is to add an ornament each year so that when she grows up and has her own Christmas tree who’ll have a “stash” of special ornaments to get started. In the meantime they can go on the family’s tree each year.
I’ll email a photo of it to you that you can share if you’d like.
Sharlotte
Well, your ornament is just gorgeous and I’m really delighted to have found your site because it’s teaching me ALOT. Thanks for all your great information and simple to understand instructions and your humor, well that’s just icing on the cake. Happy holidays!
Lovely and your instuctions it is fantastic…always
Congratulations
Happy festivities