


I know. It’s Monday morning. And that says it all, doesn’t it?
To help you get through the start of the week, here’s an awesome piece of inspiration – a beautiful pearl, gemstone, and goldwork embroidered icon frame, featuring an interesting and effective approach to high relief embroidery.
Several years ago, Larissa Borodich shared this pearl embroidered frame with us, surrounding an intricate cross stitch featuring an angel. Since then, she’s been exploring bead embroidery, including high relief embroidery.
Here’s Larissa’s latest masterpiece!
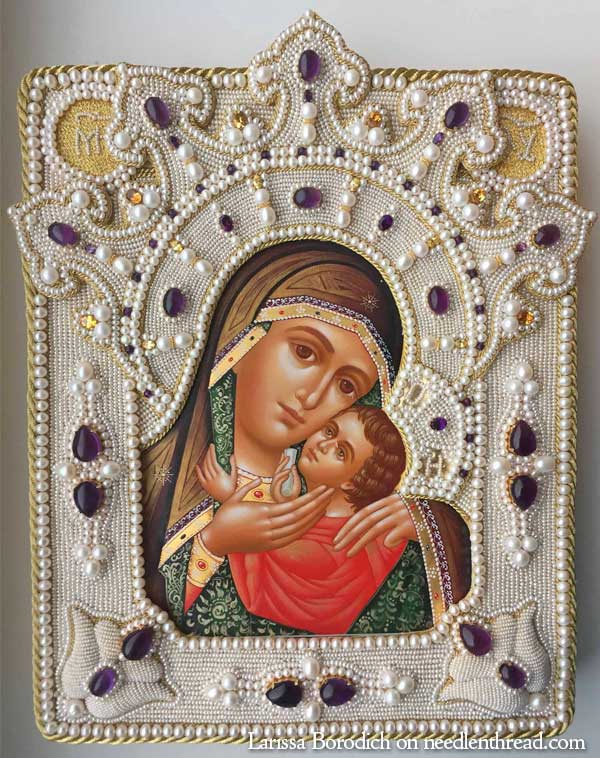
Here’s the icon frame completely embroidered with pearls and goldwork threads, and accented with cabochons.
The two flowers in the lower corners are padded and raised, and then embroidered over with pearls. We’ll look at those closer below, along with the padding technique Larissa used.
First, though, some close-ups of the rest of the piece!
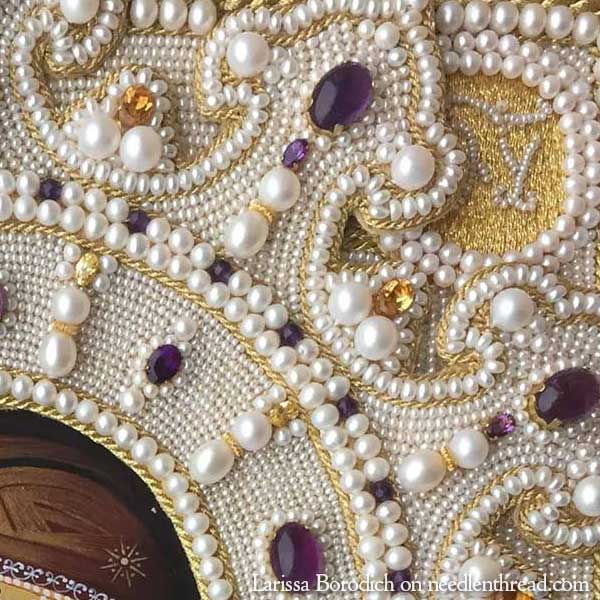
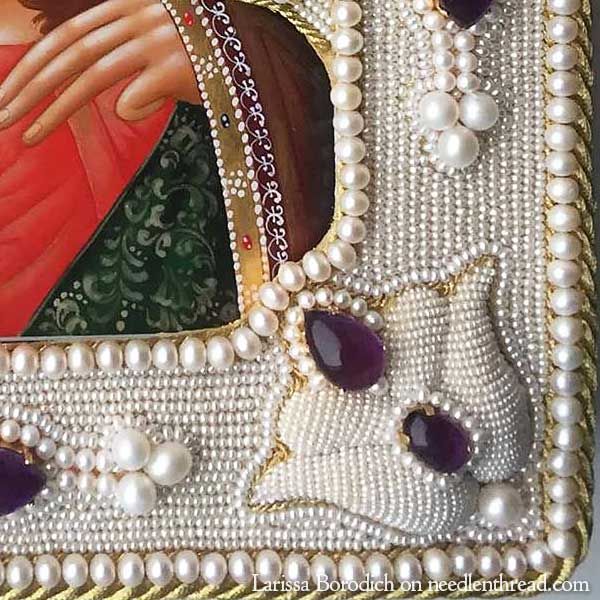
This is the top right corner. Don’t forget to click on the photo for a larger image!
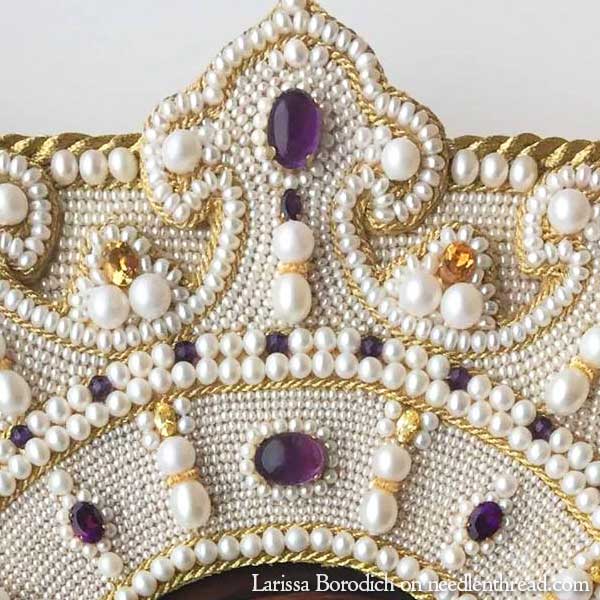
This is the top center of the frame, the tip of the crown-like halo around the Virgin’s head.
I love the combination of the gold and the pearls, and the choice of gemstones for the accents! It’s very striking.
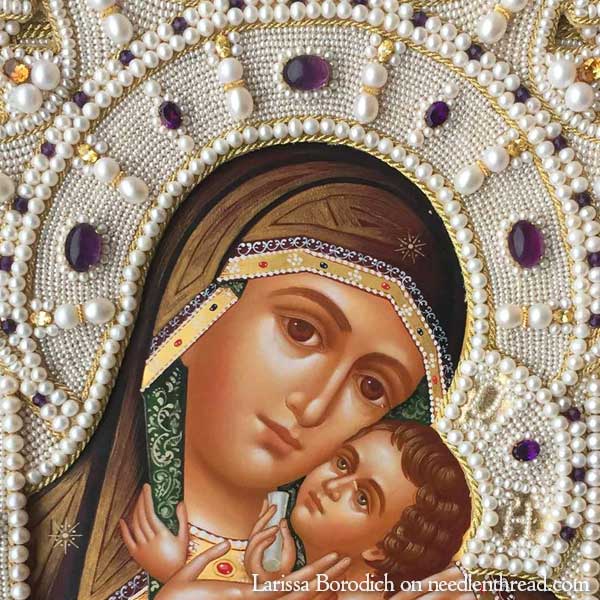
And here we have the two halos cut around the icon itself.
It’s a beautiful icon, too! The detail in the painting is exquisite and quite delicate. The faces retain the structural elements of an icon, but are considerably softer.
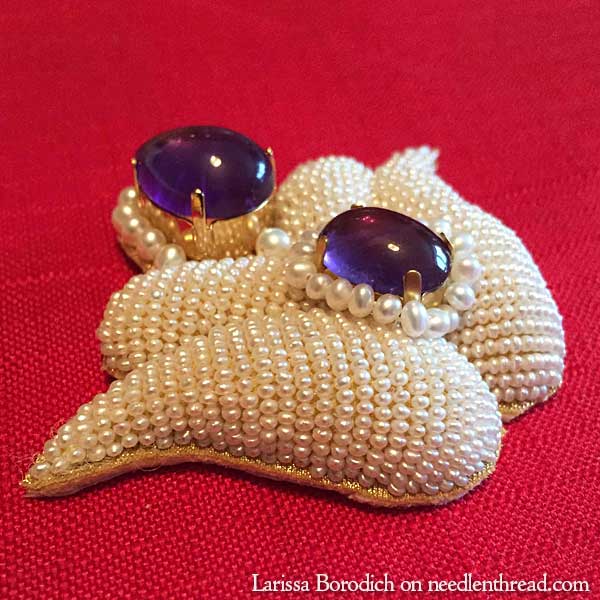
Here’s the padded tulip-like flower in the lower right corner of the frame. The tulip sits about 1/3″ – 1/2″ higher than the surrounding main section of the frame.
The tulips were embroidered separately over a foundation filled from the back with polyfil, cut out, finished, and then applied to the frame.
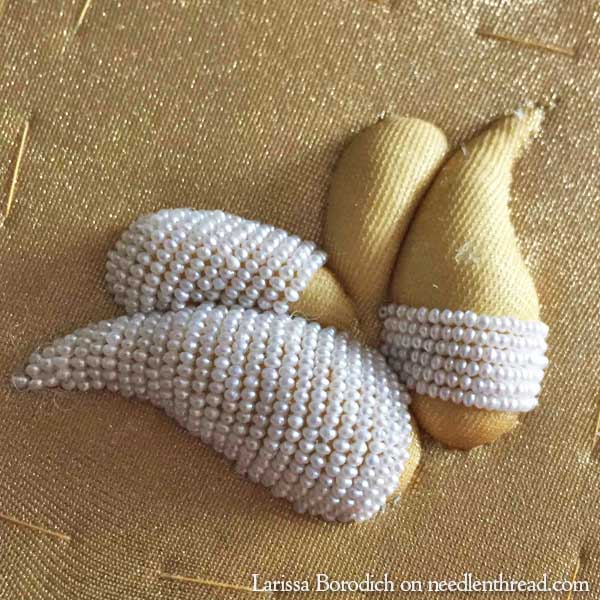
Here is a photo of the tulip in progress.
With the embroidery finished, the tulip is cut out and the edges turned under.
You can see in the photo above how full and raised the whole tulip actually is.

This high relief embroidery is something I’ve wanted to try for a long time.
When I deconstructed this piece of goldwork – and especially the Lamb in the center – my whole purpose was to examine how the embroiderer achieved the high relief. The method was slightly different (layers of felt padding were built up, then covered with linen), but the outcome is essentially the same.
Larissa’s approach – stuffing the foundation from the back – can be seen in books on goldwork, so it is not too unusual, but it’s nice to see it worked so precisely with pearl embroidery.
Highly sculptured embroidery – especially pieces of sculptured goldwork embroidery – have been around for centuries upon centuries, with many different approaches used to build up foundations. The Spanish and the Belgians were masters of this art form, which they applied to ecclesiastical embroidery on vestments.
This particular technique – stuffing the shape from the back – is also very much like trapunto, which has been around for centuries. I think it’s very effective to use it this way!
Thanks, Larissa, for sharing the photos of your latest piece.
So, there’s your Monday morning inspiration! Have you ever worked any high relief embroidery? If so, what method did you use to achieve the padded height you were after? Do you have any questions about the techniques used here? Feel free to chime in below!
On a piece called “Drifting Snow” I used layers of white orts from Silk and Ivory thread, then white felt. It worked nicely.
Meg
Are there any books teaching this pearl embroidery technique?
This is extraordinary and exquisite needlework. I cannot imagine the cost of doing such a piece!
I’d love to see how the slip is applied to the piece. Since the base of the slip is a bit rounded in the photo, it seems there must be some technique required to enable the piece to remain flat and undistorted as the slip is stitched on.
Dear Mary and Larissa,
Thank you so much for sharing this technical info! We had to do high raised padding at the RSN for our advanced goldwork. The raising was achieved by using carpet felt in several layers and basting it down thoroughly on the ground fabric. Not a fun job for your fingers. I think Larissa’s method is brilliant. Once I find the time: I will try it out!
Best wishes, Jessica
P.S. I’ve written about my visit to the textile collection of the Bavarian National Museum on my blog this morning.
Simply amazing.
That is simply breathtaking. I particularly like how the shape of it follows and frames the icon – that had to be a bit of tricky work in the beginning to get it just right. I would like to know more about how the cabochons are attached as I don’t see any framing stitches like you would with shisha.
I took a class at Quilt Festival in Houston one year that was raised bead embroidery. The teacher had us lay a straight line of beads first and then the beads that would actually be the leaves when finished. It was easy to do and quite lovely when finished. It was a technique used by the native Americans in upper New York for their whimsies which they sold to tourist.
I really enjoy using beads on my projects but my results are not always as neat as hers. Random beads here and there are easy enough. But to stitch row after row of beads/pearls and keep them so straight takes patience. Hers are beautifully even, no wobbles. 🙂
I do hope you will mention how the gems are attached in another article.
i always enjoy your blog new and informative. just placed my first order with nordic needle for anchor cotton. great service very quick and i just loved the email confirmation showing all the colors i needed. i cannot wait to start this project from crewel twists book. the project calls for seven different colors of anchor marlitt and i am having trouble finding a source. any suggestions or can i use something else. not sure what the difference is between the cotton and marlitt having never seen it in person. thanks again
Dear Mary
A lovely piece of beading which must have taken a long time to complete. I really like the pearl filled tulips a lot of work has gone into this a really lovely piece. Thanks Larissa for sharing this piece with us and for the technical advice. Thanks Mary for sharing the photos and the advice on how to raise an element of embroidery.
Regards Anita Simmance
Oooooohh! This is spectacular! I thought the angel and frame was gorgeous, this one goes to yet another category of awesomeness. Well done Larissa!
Beautiful. I love doing beaded embroidery but will never reach the level of this piece. I found a face, obviously from a broken china piece, at a flea market and have embroidered around it for a necklace for myself. The face is lavender so My beads and pearls are in lavenders, purples and turquoise. I’m ready to back the piece now and do the edge, Feb/march work when the snow is too bad to go out. :O)
WOW! that is a totally amazing piece of work!!
Aloha Mary,
That is inspirational. Any way you could entice her to do a guest post about this ? Standing all the edging pearls on end – how is that done ?
Looking forward to seeing the finished bird and flower embroidery.
Regards,
ji
Amazing! And quite beautiful! But how were the pearls attached. And how did she keep her rows so perfectly aligned.
Thank you for sharing this! I also have used layers of felt for dimensional effect and may try this, next time.
I looked at the articles for the Agnus Dei piece you deconstructed (wonderful information!) and would like to know if you have continued with taking the book apart.
Rosalie
How absolutely gorgeous. I have some padded work in stump work, but this is absolutely fantastic.
Thank you Mary for such a wonderful blog today! I am very honored to be here with my work. I read the comments and want to thank all the ladies for kind words. Saw some questions and am taking the liberty to answer shortly. The technique to attach the pearls or beads is called couching. It is a very old and known technique. You really have to align the first row and just add up. I used couching all over the piece. Everything was couched on. The flower is attached to the main piece by glue. And also by stitches, like qpplique and then I couched on the cord around the contours to hide this area where the flower ends and the main fabric starts. The back of the flower is flat enough to be glued on. And the flower itself is quite sturdy and hard so you can use some force and press it to the base fabric while the glue is taking on. The stones are in sew-on settings. I bought them separately, and just looked for the right size of the setting to fit the stones, or looked for the right size stones to fit the settings, whatever was available. But there are a lot of sew-on rhinestones already in settings on the market. If they are stones with flat backs you can also glue then on, but in this case you have to be sure that you put them in the right places the first time, with sew-ons you can take them off and sew on back if you need to make changes in the design. Glued stones will come off too, but with much damage to the fabric I am afraid.
Oh good. You’ve answered all the questions. Thank you so much for coming by to do that for us.
I think I understand the pearls: you thread a bunch on a thread, then couch them down on the fabric. That makes perfect sense now. I’ve always attached beads one by one. I much prefer your way of doing things.
And looking at the photos up close, I see the gem settings now and see the possibilities of attaching them.
This is truly amazing work. Thank you for sharing the techniques and inspiring us to try new things.
What an absolutely stunning piece of work! Using a trapunto slip was an ingenious idea. The crown looks like a slip to me, as well. Thank you both for sharing this great work.
A stunning piece and a true inspiration.
Possible answers to three above questions:
Pearls ‘standing on end’ look like side-pierced pearls. They are strung so that the ovals stand upright.
The backing doesn’t show on the puffed edges of the stump work tip because she uses gold braid around them once they are stitched down.
The cabs are held down with prong settings in gold and possibly the ‘g’ word as security, which is often the case with shallow prongs and high-shouldered stones.
Her craftsmanship is outstanding!
Hi Mary,
Oh my this is amazing stuff! I place my vote with Jacquelin. Maybe we could get her to do a guest post. I am sure there are others who would love to stitch along and try this technique.
Barbara L.
Beautiful work!
Thankyou Mary for the beautiful “inspiration” for my Monday morning. The frame is so beautiful and it’s so interesting to see it in close up with your explanation about how some parts were achieved. Cheers, Virginia
Oh, wow! Thank you Mary, and thank you Larissa! It’s a joy to see work this lovely.
Incredibly beautiful work!!
I was surprised to see that Larissa had used iron on stabilizer and polyester filling.
With the amount of work involved in this piece,
would these products cause a problem long term? Particularly the glue in the stabilizer.
Sandy NSW Australia
Okay, I know I am going to catch a lot of flack but… If I hadn’t seen all the work Larissa had gone to and had seen this on sale at just about any store, I would have thought “Boy, they sure used a lot of hot glue to make this.” Maybe its the three and half days of taking care of someone with the flu who will freely admit she is a bad patient and I am getting a little punchy. By the way, I love pearls – real ones.
They’re freshwater pearls. I’d at lease examine it before jumping to a glue conclusion – though there is glue used in it, to construct the pieces. Another thought – this is a type of art typically Russian, and we don’t see it often here. So not being used to it, it may not appeal to you. Still, yes, the hot glue comment might be a bit harsh…! Hope your charge is recovered from the flu!
This is absolutely amazing!! Its so perfectly done.
Im blown away by the beauty and intricate work and time put into this piece. Extremely well done!!
Wow. I love this piece with the pearls. And the icon is wonderful. I want to learn how to do this too. So wonderful. Thanks for sharing.
What a gorgeous piece of work. I would love to do something like this for my daughter-in-law, who is expecting her first child and who loves the Holy Mother. Is there a source for the icons on fabric? Thank you for any help!
Dear Janice! I’d like to send you a source for the icons(and many many other different patterns) on fabric for beading.
http://zolotayanora.com/catalog/ikony
This site is Russian, but you would be able to order directly from them, they will ship worldwide. Please,enjoy. Thank you, Best Regards, Lara.
I’d like to know how she attached all the pearls, not only around the jewel features but all over and in that density. Can you share that with us, Mary? Thanks.
Thank you Mary and Larissa for showing this work. I have long been fascinated with Ikons and it is no end of frustration that there is an exhibition of them at a gallery only (!) about 6 hours from here, by car, and I can’t get there. So I am very happy to have the opportunity to see Larissa’s amazing and beautiful frame.
For the comment about finding an icon image on fabric, I think you would be better off printing your own. You can easily buy printer-ready fabric these days and there are probably squillions of copyright-free images on Google.
About what size were the smaller pearls that were used?
Im a dress maker of wood sculpture saints I tried that kind of embroidery but I don’t know how to put & what to put inside in the gold work can you help me. Thank you and I tried to look a book for gold work here in the Philippines but there’s no book like you said.
Me encanta todo los trabajos!!!!!!!!!No me alcanzará la vida para aprender todo estas maravillas!…Muchos éxitos!!!!Realmente lo merece! Muchas felicidades para el 2017!….Maria Isabel
The Icon of Mary in Jeweled frame takes my breath away! Thank you. It’s truly inspirationAL
que coisa mais linda,eu quero muito aprender,poderiam me mandar o tutorial dessa tecnica? obrigada