


It seems quite a few of us have taken to adding beads to our embroidery lately, incorporating some of the recent Stitch Fun! tutorials here and there in current projects.
I know this is the case – and that I’m not the only fiddling with beads now – because I’m receiving lots of emails with questions about adding beads to this stitch or that stitch, or about how to get this stitch to work right with beads, or about what size bead to use with that thread for this stitch, and other similar bead-related questions. I love these kinds of questions, and thanks for sending them in!
But I can rarely answer them all via email, in detail, so I’ve been keeping a list. If I can work out a tutorial that will answer your question and make it available for everyone here on the website, I will.
One particular question that’s come into the inbox repeatedly is how to make a daisy-stitch-like loop that looks like normal petals or leaves when working it with beads. Since the stitch is a pretty popular one in general, I thought I’d answer that question right here.
There are a couple ways that you can work chain stitch and detached chain stitch with beads and get a decent result. Today, I’m going to show you the simplest approach to making a daisy stitch loops with beads.
I know what you’re thinking. That’s not a daisy stitch.
And you’re right, it’s not!
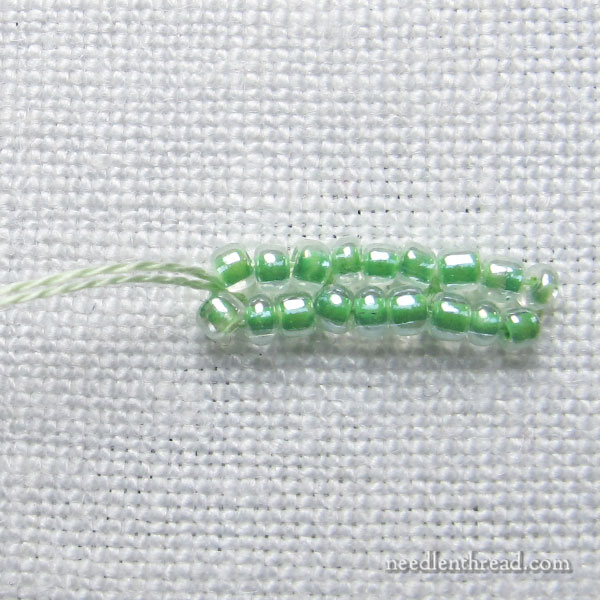
To demonstrate the difficulty of a chain stitch with beads, I stitched up a little line of three chain stitches for you, using the normal approach to chain stitch, only I threaded beads onto the thread before making each chain stitch.
Do you see what happened? I ended up with the beads separating onto each side of the stitch, and pulling into almost parallel lines. The whole look of the loop and the chain is completely gone.
We know by looking at this example that you can’t always approach every stitch you want to add beads to, the same way you’d approach it if you were just stitching it normally with thread. You might have to make some adjustments in the way you work the stitch, to get it to behave the way you want it to.
So let’s look at the daisy stitch, which, in this case, is not quite a daisy stitch.
If the purpose of making a beaded daisy stitch is to create a petal shape (which is usually the case) with a beaded loop instead of a loop made from thread, then we may have to go about the stitch a slightly different way.
See what happens when I thread beads onto a needle and approach the stitch like I would a normal daisy stitch?
At this point, the stitch hasn’t been anchored, but if I did anchor it with the thread, the same thing would happen here that happened with the chain stitch above. I’d end up with two relatively straight lines of beads on each side of the stitch, and they would look a bit wonky, because there’s an uneven number of beads on the thread.
Here’s the simplest way to achieve a decent, anchored loop that looks like a petal:

First, start with an uneven number of beads on your thread. Your thread should be able to pass through your beads twice, so make sure the beads are large enough in relation to your thread.
In this case, I’m using 11/0 round seed beads with a double strand of regular cotton floss.
Take the needle and thread to the back of the fabric next to your starting point, to form the loop with the beads.
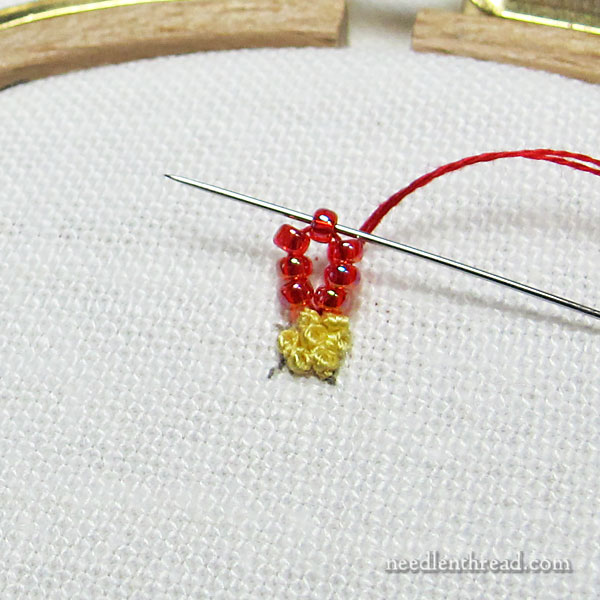
Then, bring your needle and thread up from the back of the fabric behind the middle bead at the end of the loop and pass the needle through the middle bead, as shown above.
You should have an equal number of beads on each side of that middle bead, if you began with an uneven number of beads on your thread.
(You don’t have to be this specific, necessarily. If you’re using really tiny seed beads, then whether or not there’s an even number of beads on each side of that center bead probably won’t matter. With larger seed beads like the ones I’m using here, it makes a difference.)
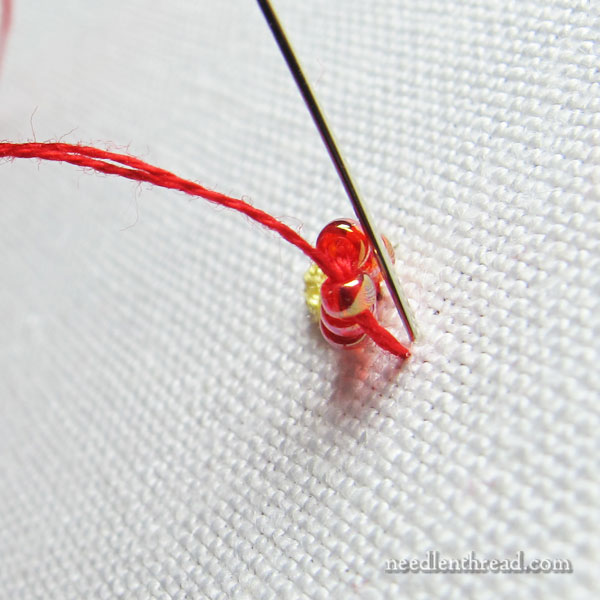
Take the needle and thread to the back of the fabric on the other side of the bead you just passed through. You’ll have a little space between the beginning of that thread and where you’re going down, about the space of the bead’s width.
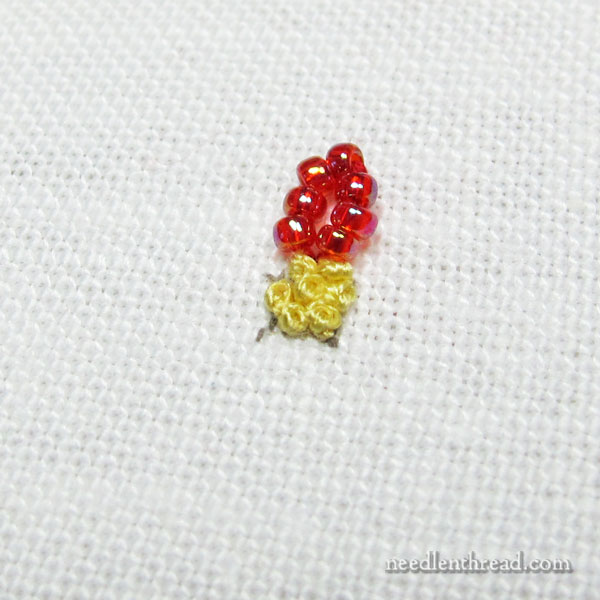
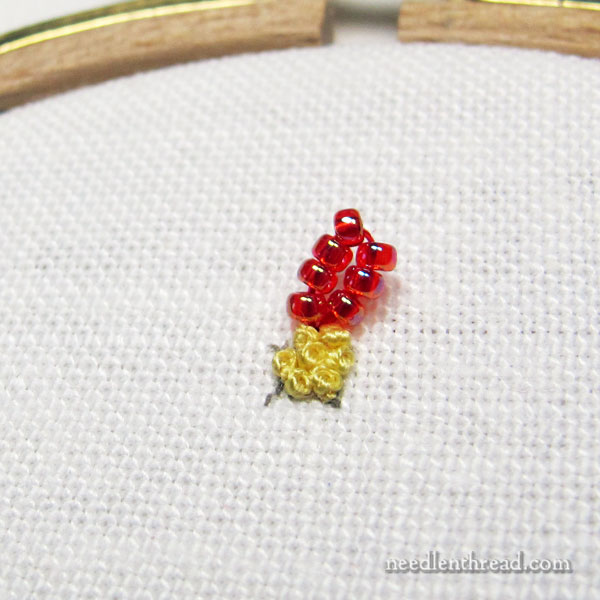
When you pull the thread through, you should end up with a situated loop of beads on your fabric.
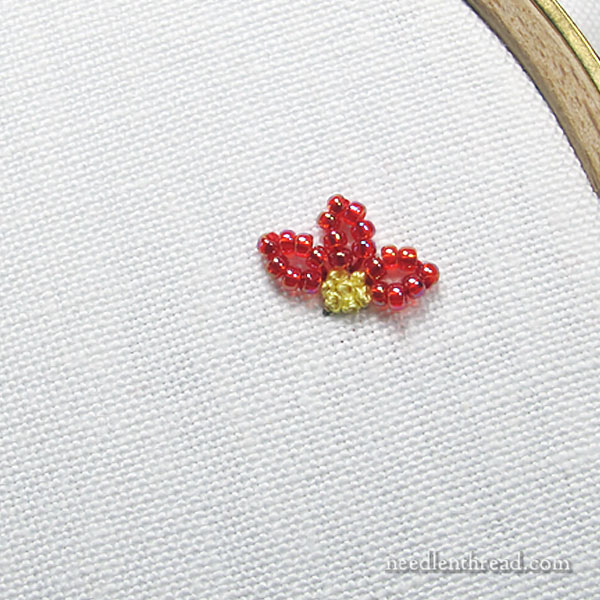
The loops work up pretty quickly this way, and as long as you’re not stringing a whole lot of beads onto the thread to make Really Big Loops, they are stable. They’ll keep their shape and serve well for petals and leaves.
There are other ways you can tackle this type of stitch, but this is the simplest, most direct way to form a petal-shaped loop out of beads.
You’re always welcome to leave any questions (or comments or suggestions) below in the comments section, or if you have a question about a particular stitch you’re having difficulty with and would like to see worked out in a tutorial, you can drop me a line and I’ll add it to the list!
Looking for more?
You can find this and other tutorials for embroidery with beads listed in the Embroidery with Beads Index here on Needle ‘n Thread. You can also find a whole slew of fun embroidery stitches to play with in the Stitch Fun! Index, and over 75 embroidery stitch videos available for your perusal, too.
Dear Mary
What a great way to create a flower using beads as the petals and french knots for the centre this is lovely. I never thought to use beads and create petals as above, beads are so versatile there are so many ways to use them I love experimenting with them. I learn something new everyday with you and this is another technique that I will certainly incorporate into my embroidery in the future, this would look lovely on my lace journal as an appliqué or bling to enhance the design of my journal. Thank you so much for sharing your tips and techniques on the daisy stitch petals and beads this is very useful for future designs.
Regards Anita Simmance
SO clever!!! Love this idea and can’t wait to give it a try. Thanks for another great solution.
I am new to embroidery so this might be hard to follow because I do not know all of the technical terms for this. If I were to use the lazy daisy stitch but I wanted a larger petal with beads, would it be strange to try to keep the shape by anchoring in more than one place?
Hi, Myranda – that’s right. If you want to make a big loop, just work it like a long line of beads around in a loop and anchor the line. You can anchor the line with just thread, by couching over the working thread in between the breads. You might anchor the center bead as shown above, to establish the shape and then couch the loop further from there.
Mary, I just want to say thank you for this tutorial. I have not actually began to use beads in a project yet, but seeing what they look like and how to do it, is motivating me to finish up the cross stitch project I am working on and get started with some Christmas projects. I have seen hand embroidery used in creating Christmas cards on card stock. Would you go about the stitch in the same way on a paper project? Thank you again for sharing your information and knowledge, it has helped me broaden my stitches in every way! Have a wonderful creative day!
Absolutely amazing! These are wonderful and could do so much to a simple blouse. I was thinking of making a simple linen blouse this week. Adding some of these would put it over the top. They look quite secure so I think they would be able to handle the gentle cycle. I love your beaded stitches for clothing. Thank you Mary!
clever!!
Mary, you are so helpful. Thankyou 🙂
Hi,
Thankyou so much…i like your designs very much..i used to do embroidery alot when i was small but now i forget some of the stitches. Thanks to you, it got brushed up after seeing all the videos. I have one question i want to embroider a bedsheet by using your great techniques and designs, which type of fabric should i use?
Mary, this is exactly what I was looking for. It worked perfectly. Thanks, I am happily beading over some detached chain stitch leaves I embroidered right now.
I have always just couched between each bead to make a petal come out the right shape. I never thought to anchor through the center bead. That seems so much easier. Thanks for the tip!
Hi
I am busy with a crazy quilt project and I use quite a lot of beads! What is the best thread to use when beading? Some books tell you to use floss others ”invisible” thread. When I use beads on an embroidery project I usually use ”invisible” thread, but it also depends on how small the beads are. I love working with bugle beads – especially on my crazy quilt projects. The centre of some of my flowers/daisies often get done in tiny seed beads.
Thank you for a WONDERFUL website!!
Hi, Rhona – well, opinions differ on that question, I think. When it comes to embroidery that’s enhanced with beads, I just use floss, because the beads are generally part of the embroidery that I’m doing – part of a stitch, usually. I haven’t had any problems using floss.