Good Morning and a Happy Tuesday all around!
I’ve been making pretty good progress on Late Harvest recently, and I’ve concluded that one of the things I like best about this project is that every bit that I do is a learning experience.
Many of the lessons I’ve absorbed from this project are negative lessons – what not to do, the next time I’m in similar situations. Negative lessons are sometimes the best lessons, because they stick with us longer.
The negative lessons I’m experiencing here have nothing to do with the instructions or the kit itself – instead, they have to do with decisions or mistakes that I’ve made while working my way through the project.
Today, I want to show you one of my favorite elements of Late Harvest so far, and I’ll share with you some negative lessons, so that, if you’re ever in a similar stitching situation, you can avoid making the mistakes I’ve made.
Here’s the leaf:
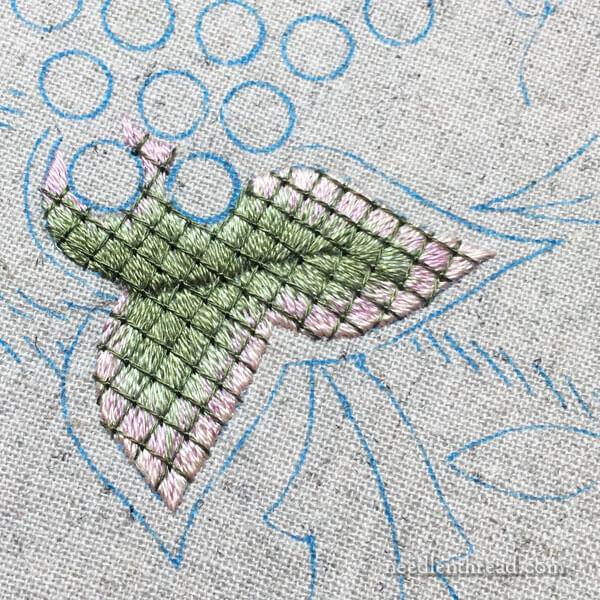
This is a rather large leaf on Late Harvest – the largest one on the project – and it’s worked in long & short stitch shading in pinks and greens which is then stitched over with a lattice grid.
You can find tips on working a lattice grid over a solidly stitched background here.
I love the technique! I never would have thought of working lattice stitching over this type of long & short stitch leaf, simply because it would not occur to me to cover up that much long & short stitch with anything else! Long & short stitch is a gorgeous technique on its own, and normally, I’d be loathe to cover it up with anything else. But it really works on this, when the whole leaf is finished. You’ll see what I mean!
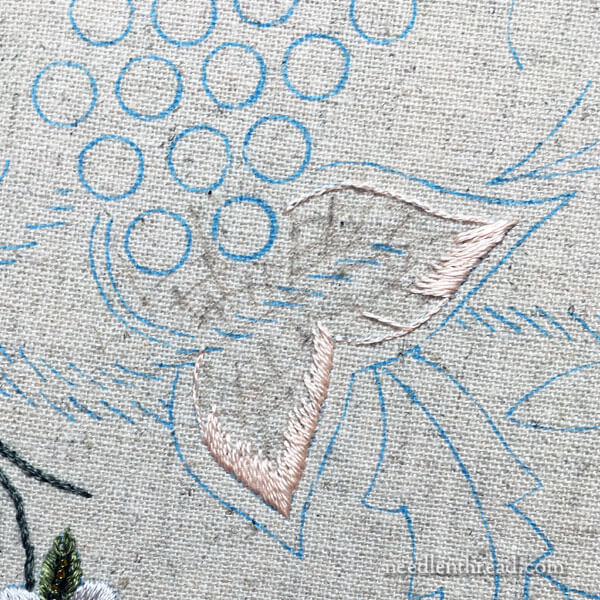
So I started the long & short stitch out with my normal approach, using a split stitch outline and starting with the outer edge and moving inwards to the center vein.
In her instructions, Hazel starts at the inner vein on the lear and works outwards (which is fine! it works!) but I’m so used to starting on the outside of an element and working inwards, that I’ve decided just to stick with my own approach on all the long & short stitch on this project.
Before I started stitching, I mapped out some directional lines and color layers on the inside of the leaf, using a fine tipped art pen. That’s what all the mess is on the inside of the leaf in the photo above.
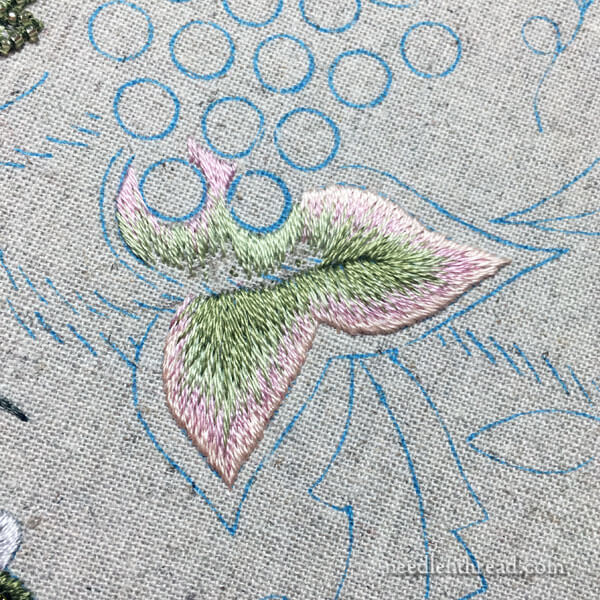
And away I went, long & short stitching all over the leaf.
Now, you might notice that the leaf is overlapped by the round grape elements in the top of the photo up there.
This is where I made two decisions that were wrong, retrospectively.
1. In the instructions, the grapes are worked first.
Sticking with my typical approach of working background elements first, though, I decided to do the leaf first. This, I discovered a little later, will undoubtedly end up being a mistake. The grapes are rather fiddly, and you’ll see that once the edge is on this leaf, I will have created some stitching obstacles to working the grapes.
2. I added some long & short stitch between the two overlapping grapes, thinking that there would be some visible background there.
In fact, this is totally unnecessary and will only get in the way later.
The moral of the story: think about the background elements carefully. What are they made of? What stitching techniques are involved? Will stitching the foreground elements (in this case, the grapes) become problematic if the background elements are already in place?
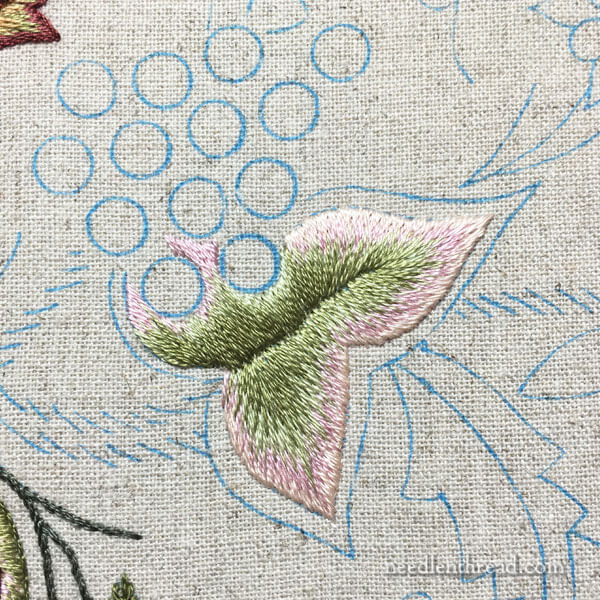
Here’s the finished long & short stitch on the leaf. The vein in the center looks a bit wobbly. No worries – that’s going to be covered up with a heavily beaded line, so I didn’t really sweat a perfect line for the vein.
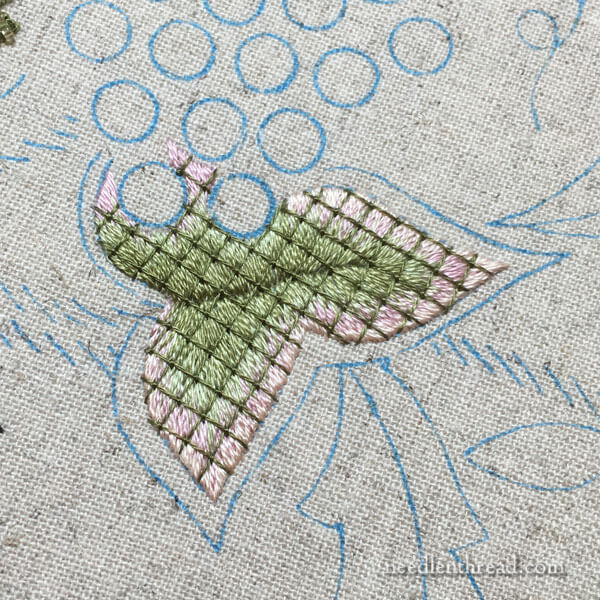
And here’s the lattice worked over the long & short stitch.
At this point, I’ll admit, I was a little disappointed. I Really Liked the long & short stitch on the leaf (not to mention, it took ten forevers to get it done!), and I felt like I had just put it behind bars, where it could no longer be seen to its full advantage.
But this is The Thing: you can never get the full sense of an embroidered design element, until the whole thing is finished. Seeing it in parts just doesn’t show the whole picture. Best to wait before making any definitive decisions on likes and dislikes!
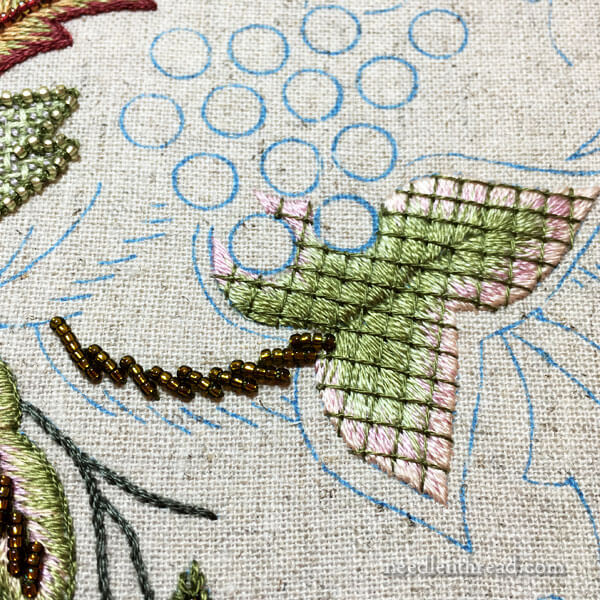
With the leaf finished, I started on the beady stem, and all went well enough up to this point in the photo above.
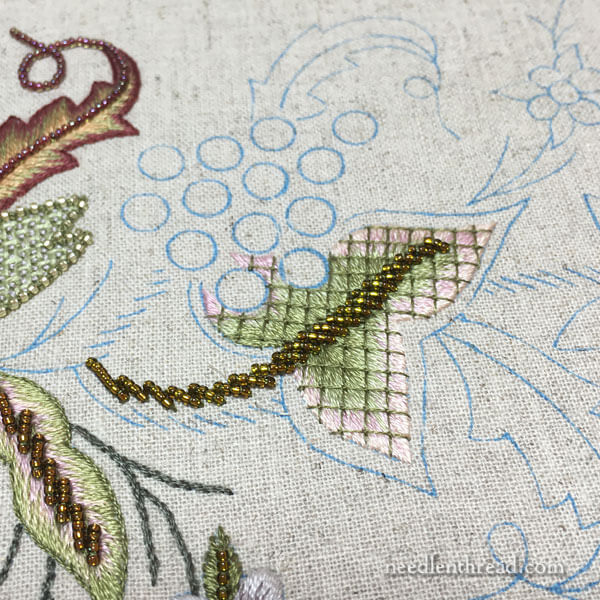
And then I somehow lost my slant, and the vein became thicker than I wanted and went sort of weird on me.
When I finished it to this point, I contemplated picking it out and starting it over.
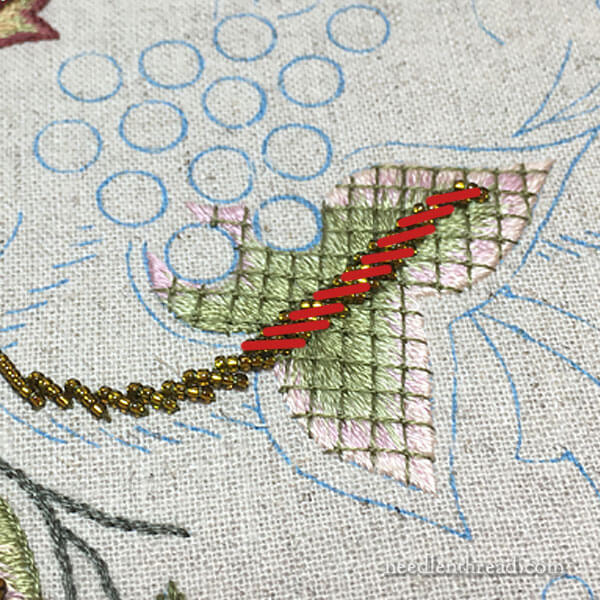
The red lines above indicate a more reasonable slant on the bead lines on the vein. And even then, with the slant somewhat corrected, the lines are still a bit close and heavy.
The inner vein could have been much lighter and a little more airy, if I had slanted the bead lines a bit more and had spaced them out a little bit.
Alas, I didn’t.
To remove, or not to remove? That is the question!
I opted not to remove – at least, not just yet. Picking out those little bead lines that were worked over some pretty dense long & short stitch (and lattice stitching) could end up making a real mess. I decided to go forward and see the finished leaf first.
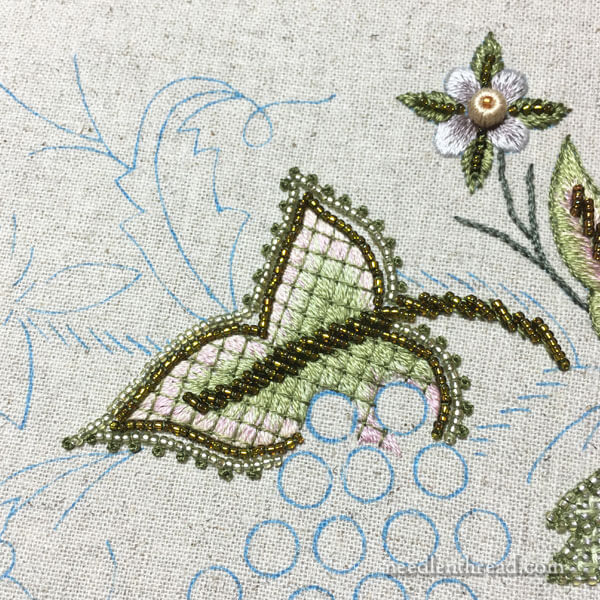
And so, onwards to finish the leaf!
The edges are two lines of beads, the dark line worked right against the long & short stitch edge, and the lighter one worked slightly outside the dark edge. Outside the light line of beads, evenly spaced French knots finish the edge into something really pretty.
The whole leaf edge is not complete at this point – the incomplete line on the upper left in the photo above is awaiting the long & short stitch leaf that extends from the edge of this leaf. I’ll work the French knots on that line on top of the other leaf.
I love this leaf now that it’s finished. I think it was an inspired design combination on Hazel’s part.
And sure, the center vein is still somewhat heavy and odd, but it isn’t that noticeable in the scheme of the whole leaf, and it doesn’t bother me enough to want to pick it out.
There are a couple problem spots that will definitely come into play when the grapes are underway. No doubt about it! But we’ll cover that later, when the grapes are all finished and we’ll chat about how they could have been avoided.
In the meantime, though, I really enjoyed working this leaf. I love the way the lattice over the long and short stitch looks, and I love the combination of elements on the outline.
So, that’s my project update so far. I hope whatever you’re stitching on is moving along for you, too, and that you’re enjoying it as much as I’m enjoying Late Harvest!
Have a Totally Terrific Tuesday!
More on Long & Short Stitch
If you’d like to learn a little bit about long & short stitch shading, or polish up the technique, you can find a whole series of lessons on long & short stitch shading right here on Needle ‘n Thread.


Hi Mary,
I have a question on the beaded leaf vein. Did the directions call for you to stitch the long and short stitch first? Could you have put the beaded leaf vein in first and then done the long and short stitch? I ask because there seem to be blue lines for the beaded vein and by doing the long and short stitch first you cover them up. Thanks,
Barbara
Hi, Barbara – with the lattice work running all the way across the leaf, it would be a little more bothersome to work the vein first and end up with an evenly spaced and couched lattice over the whole leaf. So on this particular lead, the instructions call for doing the vein after the lattice. I think the vein could be eyeballed better than I did, that’s for sure,
I have done the same thing with patterns or kits before. “Oh, the instructions say do this part first, but it makes so much more sense to do THIS part instead.” Most of the time I took a second look and reviewed everything again and went with the instructions. On those times I didn’t — I ran into problems. Nothing insurmountable, but it would have been so much easier to follow the instructions.
Still, your work is so beautiful you pulled this off. What a fascinating project this is, and I am so glad you are sharing it with us, Mary.
Good morning Mary, I also have started on one of Hazel’s projects, Pertinacity.
I was wondering what thread you were using and size? Also, will you be keeping a journal of this project like you have done with your other projects? Might I had your work is beautiful! On the other side of the coin, I was thrilled that you told us about Hazel’s Needle Weaving techniques for hand embroidery book!!! Sometimes you just need better visual instructions. I would next like to do Late Harvest and follow what you have done. Enjoy your projects!
Lynn Schofield
Hi, Lynn – the instructions call for one strand of DMC cotton for most of the elements, so that’s what I’m using. I don’t really keep a journal on kits, just on my own projects. Any changes or anything I’ve made on this while going along – and those are mostly just changes in stitching order and occasional techniques – I’ve blogged about, so that pretty much acts as my journal. It’s a run project – you should do it!
Just wanted to say how much I enjoy your posts. There is so much inspiration and information in them. Thank you so much.
Wow. Just, wow. It’s gorgeous!
My words exactly!
Hi, Miss Corbet!
I recently started a new Big Embroidery Project (finally…). The only embroidery I’ve done since my carousel horse has been either pretty small (like embroidered cards) or not very detailed. I decided it was high time I started another more complex project! So what design did I choose? I’m stitching Johanna Basford’s Mushroom Castle from her book ‘Enchanted Forest’:
https://s-media-cache-ak0.pinimg.com/564x/46/95/26/46952630baf2120125df972a57e203b3.jpg
(That’s a link to a picture of the colouring page. It’s not mine… I just found it through Google Images)
A bit of an undertaking for me! But what’s life without a challenge now and then, right? 🙂
So far the only stitching I’ve done on it is a little bit on one of the tree trunks because I have some other things on my plate, but something is better than nothing! Besides day-to-day school work I have music that must be practised, books for school that need to be read, writing assignments that need to be finished… or started… and I just began a new sewing project, too, because, you know, I needed one more thing to do! lol.
‘Late Harvest’ is coming along very nicely. I think the lattice worked over the long-and-short stitch is a neat touch. What are the beads made out of that you’re using for the project?
Sarah A.
Oh, gosh, that’s going to be stunning! Crossing my fingers that you’ll share photos of your progress.
Wow, Sarah! That looks like it will be a fun project! It should keep you busy on the embroidery front for a while!
Liz N.:
You just might see pictures of the finished piece (I’m not so sure about progress pictures) if the wonderful Ms. Corbet would like me to send her pictures of it when it is done….. 🙂
Ms. Corbet:
I think it will be fun. It has the potential of being a learning experience as I don’t know how I’m going to fill certain elements of the design with my current knowledge. It’ll definitely be a while before it’s done! I only hope I don’t get too tired of the colour green in the process…..
Dear Mary
Late today been to an afternoon leaving party. Anyway I really love this leaf, like you I would never have thought to cover the leaf in lattice worked over the long and short leaf but it works. It’s hard to break habits and try new techniques, but the leaf and lattice work and the outline beads with the french knots look beautiful. When I’ve done lattice work it’s really hard to line it up accurately and more often then not I have to keep starting from scratch to obtain the right way. Thanks for the retrospective tips on this leaf and for sharing your tips with us.
Regards Anita Simmance
Love this project! Need to order some background fabric. Thank you for inspiring me!
You always have such interesting things to share. Your leaf is beautiful and has inspired me to get busy on another longstanding project. I want some embroidered pillows, now that my house has been painted and cleaned. Although, admittedly today, I am making utility curtains for my bathroom and then returning to more exciting stitching and sewing. That longstanding quilt will eventually get done, as will the pillows and other UFO’s on the pile. Happy Stitching to everyone!!
I am really enjoying watching you go through this project! Thanks, Mary.
You are certainly right about waiting until the design is finished before decided whether to redo it. Once the two beaded edges are in the center vein looks pretty good. It may be a tiny bit better if you picked it out and restitched it with the more severe slant, but would it really be worth it? I think not. I love the color combination, it really looks lovely.
If my long-and-short stitch were as perfect as yours I wouldn’t want to cover it up! But the result with the added lattice and the bead border is gorgeous – magnificently opulent and encrusted. Thank you so much for sharing your progress and processes.
Thanks Mary,
I never even thought about the lattice work. But it makes perfect sense now why the beaded vein was done last.
Barbara
Mary, I am beginning to think you are deliberately doing things ‘wrong’ in this project in order to teach us know-nothings (and I freely admit I could be one) what not to do, lol. Is that right or have I got it all wrong again?