


Have you noticed that there’s an increasing trend in the embroidery world to find different ways to finish needlework, besides framing it?
This is completely understandable, given the fact that any one house only has so much wall space, and anyone’s circle of friends and family’s houses only have so much wall space!
Still, despite our reasonable desire to find multiple ways to display needlework, framing is still the most popular approach to finishing a project for display. Professional framing, though, can be mighty expensive! So, in many cases, I do my own framing.
I’ve written about how to frame up pieces of embroidery before, using a lacing technique for mounting the finished work on board before putting it the frame. You can read about that here.
Today, I’m going to walk you through a recent framing job, this time employing pins.
If you’ve pondered framing your own embroidery but haven’t taken the leap, come along while I frame up a favorite piece of needlework, and you’ll see how easy it is!

Just like with any project, there are some preliminaries to framing a piece of needlework. You’ll need to prepare the needlework (I block and damp stretch mine) and you’ll need to gather supplies and tools.
To frame this piece of needlework – it’s this Sense of Hearing miniature tapestry from MicroStitchery – I had to purchase a few things:
1. A frame – 12″ square simple black frame
2. A mat – double mat cut to fit the embroidery & the frame
3. Foam core board – acid-free
When it comes to the glass in the frame, you can also decide if you want to have a custom piece of museum glass cut for your fame. Sometimes I do that. Sometimes I don’t. I didn’t on this piece.
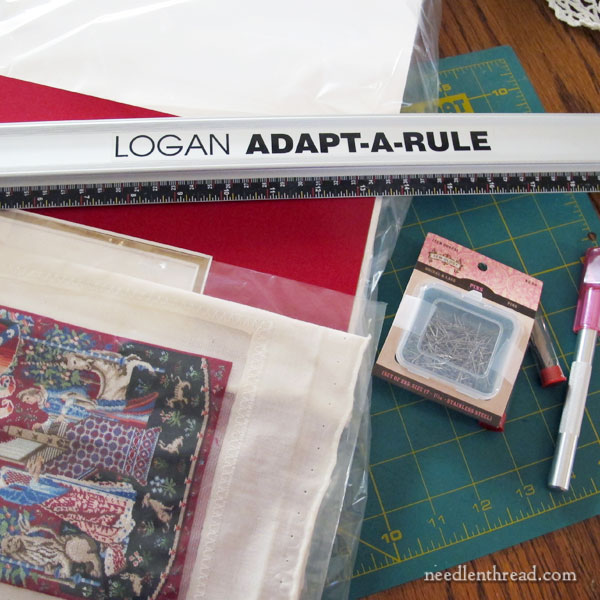
I already had on hand the other supplies used to do the job:
1. A craft / utility knife to cut the foam core board
2. Stainless steel pins (also called lace pins)
3. A precise ruler
4. Framer’s tape (acid neutral)
5. A cutting mat
Try to Buy Supplies on Sale
Everything I had to buy to do the job myself, I purchased on sale.
I used a 50% coupon on the frame during one shopping excursion, so I got it for about $12.
The foam core board was on sale when art supplies were on sale, and the piece was much larger than I needed. It cost about $4.
The mat was the expensive part. I had it special cut. I did that during a custom framing sale, so it ran about $20 instead of $40. It’s a linen finish on the red, and on the gold, a metallic leaf finish.
Since I had everything else I needed, the framing job cost me about $36.
Don’t Rush!
Don’t be like me and leave your faming job to the last minute! I was a little rushed with this particular job, since I was giving the piece as a gift that very day.
Make sure you have a few hours set aside for the job, just in case you need to make a lot of adjustments as you go, and if you intend to take photos of the finished piece (I highly recommend doing so if you’re giving it away), try to work at a time of day when the lighting is conducive to good photos. I didn’t. My photos here pretty much stink, and I never got a good photo of the finished framed piece.
On the bright side, I gave the piece to my niece, who lives a whopping three blocks away, so I’ll get a good photo at some point just for my own archives.
Note: my finished embroidery piece (including all the excess fabric) was too small to mount onto one single piece of foam core board that fit behind the mat and filled the whole frame. Because of this, I had to mount my embroidery on a small piece of foam core board and make sure I had enough excess board to fill around it and it keep the mounted embroidery tightly in place behind the mat.
If your finished embroidery and its excess fabric will fit over the whole piece of foam core board that fits perfectly inside your frame, you don’t have to cut your foam board like this. You can just skip ahead to the mounting part!
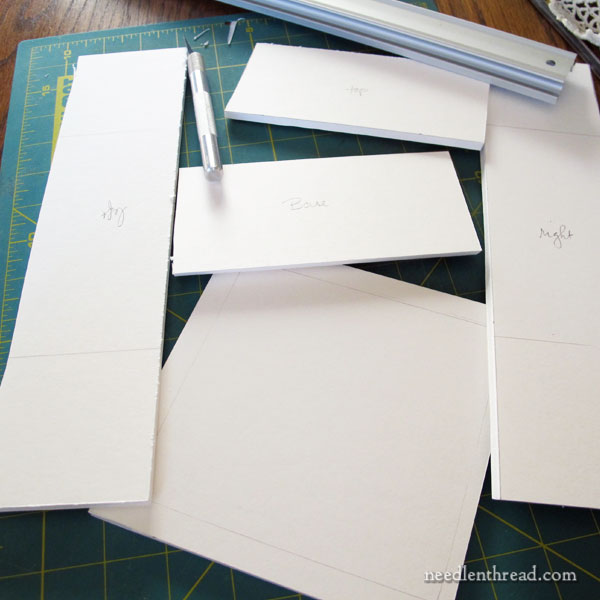
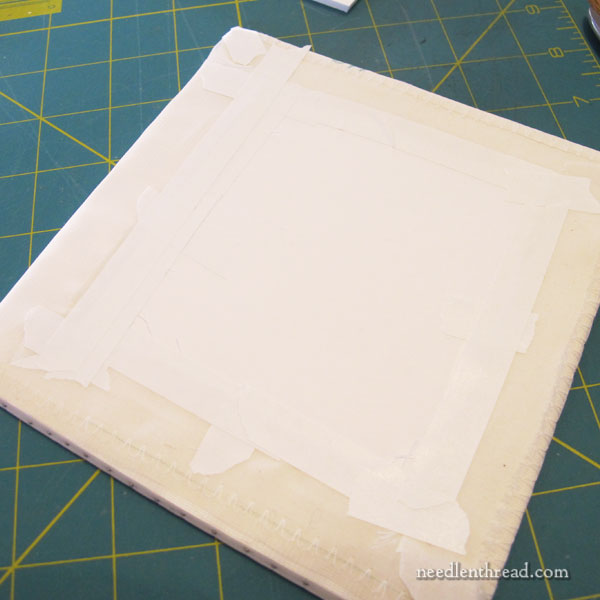
Start by cutting a large piece of foam core board to fit inside the frame.
Then, measure the placement of mat on that piece of foam core board. Place the mat on top of the cut foam core board (it should fit right on top of it) and Very Carefully, using a light pencil, just trace the mat opening. Don’t get pencil residue on the cut edges of your mat!
Then, measure beyond the mat opening about 1/2″ or so (your fabric has to fit over this piece, so don’t make it too big, if you don’t have a lot of excess fabric around your embroidery) and mark a line around the opening drawn on the board.
Using the ruler as a guide, cut the foam core board into pieces, keeping the center area intact as one piece. You’ll end up with extra pieces of foam core board that will fit exactly inside the back of your frame, to keep the embroidery tightly positioned where you need it. I marked these (base, top, right, left) to make it easier to assemble everything at the end.

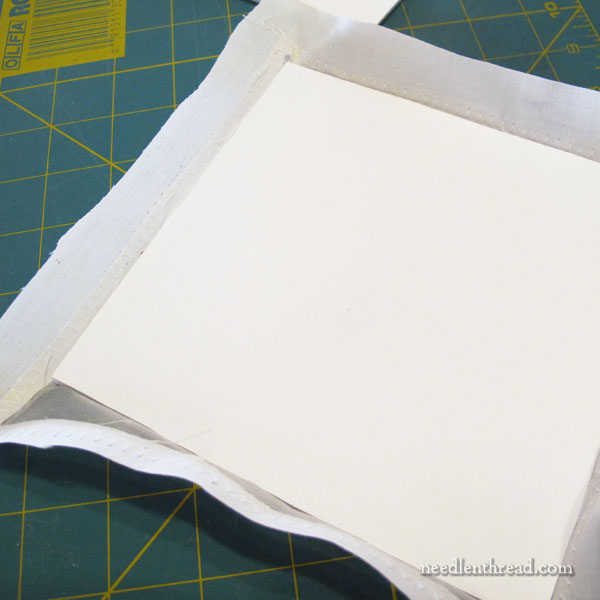
Now it’s just a matter of mounting the needlework onto the foam core board, using stainless steel pins.
(Note: it’s important to use stainless steel pins because they are not prone to rust. Don’t use regular sewing pins!)
Starting in the center of one side of the needlework, insert a pin into the edge of the foam core board so that it goes into the board straight. You don’t want it to pierce out the back of the board or – worse yet! – the front where the needlework is.
Pin this side of the embroidery, from the center outwards to the edge, making sure you’re keeping the embroidery edge square with the edge of the foam core board. Go slowly, pin carefully, make adjustments as you go. Don’t be shy about taking a pin out if you’re not pleased with the placement of the embroidery on the board. You want the piece to line up nice and straight and square!
Place a pin about once every quarter of an inch.
If you need help pushing the pin into the board (they go in very easily, but your fingers might hurt from pushing that many tiny pin heads), using something nearby that’s flat and easy to hold. I used the flat end of a small container that holds my craft knife blades to push the pins in.
Continue pinning, from the center out, right across the edge of the foam core board, and then go back to the center and work out to the opposite edge.
With one side finished, move to the opposite side and repeat the process, starting from the center and working out to one edge, and going back to the center and working out to the other edge.
Pin the last two sides the same way.
When you’re pinning, pull your embroidery somewhat taut, so that it fits snugly over the foam core board, but don’t pull the needlework really tightly, because you don’t want to warp it. But you do want it to fit nice and snugly over the board.
The needlework won’t look perfect on the board until all four sides are pinned.
Once all four sides are pinned, examine the needlework closely to make sure it’s on straight and looks good. Make sure there are no warbles in the surface of the embroidery or in the design, where the work might be pulled too tightly or left too loose. Make any adjustments you need to, by removing pins and re-pinning.
Remember: Take Your Time!
When the embroidery is on the board to your satisfaction, turn the piece embroidery-side down, and cut off any excess fabric, leaving about an inch all around.
At this point, though I didn’t show it, I also trim the corners off, within about 1/4″ of the board’s corners.
Using framer’s tape, tape the excess fabric down to the back of the board, all the way around.
And yes, I forgot to take a photo of the front of the piece, on the board but out of the frame. Sorry!
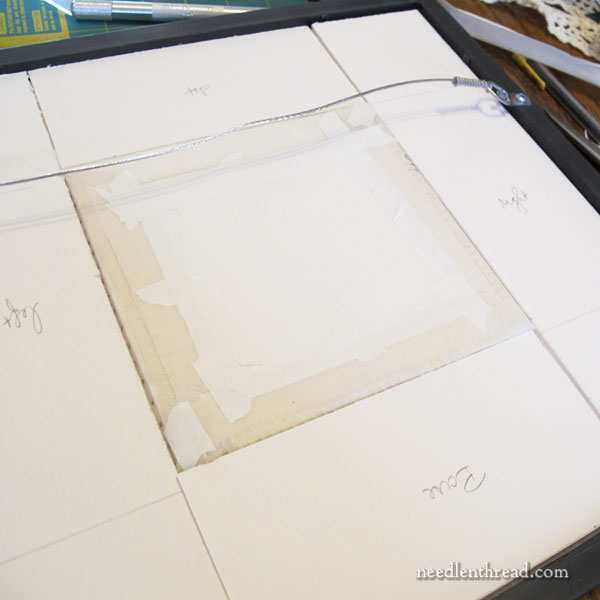
Situate the embroidered piece in place behind the mat opening.
At this point, I like to tape the piece in place on the back of the mat, once I have it right where I want it. Once the embroidery is exactly where I want it, I run a couple long pieces of framer’s tape across the piece, rightly down the edges of the piece, and across the back of the mat, and secure the embroidery in place so that it doesn’t shift while finishing the framing.
Turn the frame face down (if you need to, wash the glass first!), put the glass in the frame, put the mat (with the embroidery taped to it) on top of the glass, and then configure your extra pieces of foam core board around the embroidery piece, behind the mat. It should all fit together like a nice comfy jigsaw puzzle.
Finally, place the backing of the frame over the insides, and either nail it in place or bend down the little bendy tabs on the back (this part depends on the type of frame you purchased).

And there it is, ready to go!
That’s the best photo I got of the finished frame piece, thanks to really bad lighting that day. Still, you get the idea.
Unfortunately, you can see how the very base of the design is slightly cut off, because the mat opening was not large enough. This was my fault – I didn’t take the embroidery with me when I had the mat cut. I just took the dimensions. Learn a lesson from my mistakes – always take the embroidery with you when you are having a mat custom cut! The folks who cut the mat will be much more precise when they measure.
I hope this little tutorial comes in handy the next time you’re contemplating doing your own frame job. It really is simple – it look me much longer to write this tutorial than it did to do the framing!
As always, Mary, and excellent tutorial. I’ve learned so much. Thank you.
Very NICE Mary!!!!
Next tutorial idea? How to measure the matboards please? I keep mentally going around and around on this! How much matboard outer size, inner size, and margin between the two edges? Thank you VERY much!! Linda in NC
Hi, Linda – I think the standard margin with double mats is 1/4″, but that can always be adjusted if you’re going for a different look. The outer size of a mat is going to be whatever fits into your frame. The inner window is going to be the size of the finished embroidery piece. How much mat you want showing, or how little, depends on the project and what you want it to look like in the frame – this is where talking to a professional framer comes in handy.
Very nice job, Mary!
For those who choose to have their work professionally framed, a bit of advice from a former professional picture framer: PLEASE do not trim the fabric on your piece to the finished size you want in the frame. Framers need to block the piece before framing it, which means they need that extra fabric to do the job properly. Trust me: any certified professional picture framer knows how to do this. (I can’t tell you how many time people brought in beautiful needlework for framing, but had trimmed the fabric, and there wasn’t enough fabric left to block for framing that the customer wanted. True, framers can always work around it, but it’s so much better to give your work the treatment it deserves!)
Long ago, I framed an embroidery piece myself, and I didn’t know what I was doing. I was just looking at it the other day and thinking I ought to get it re-done competently. Maybe I’ll be doing this soon!!
I have been having problems finding stainless steel pins lately, can you suggest a source?
I found mine at somewhere like JoAnn’s or Hobby Lobby. I can’t remember which. In any case, a sewing store with a decent selection of notions, and they were in with the pins on the notions wall. They are called “lace pins” and if you look at the description on the packaging, it will note stainless steel.
I’m a bit of a nut when it comes to needles and, to a slightly lesser degree, pins. Because I love needle lace as well as a couple forms of embroidery, I patronize needlework shops (on-line) and lacemaking shops (also on-line). One of the lacemaking shops is VanSciver Bobbin Lace at http://www.vansciverbobbinlace.com. On her website you’ll find some very nice specialty pins used in bobbin lace, but which will work for other things as well. This page: http://www.vansciverbobbinlace.com/Pins.html lists the pins she sells, shows a Pin Sample Card, and a short write-up about “How to Select A Pin.”
I’ve seen some on amazon, but they were all over 1 inch long and, at that length, I wouldn’t trust myself not to go into the side of the foamboard a little crooked and wind up poking out the front or back. I read a similar tutorial for cross stitch framing last year on feltmagnet and the author (a pro-framer that’s done a lot of cross stitch framing) recommended 1/2″-3/4″ Sequin (also known as Lills) pins. I picked up a box of Dritz 1/2″ nickel-plated ones up for $3.50 at Joann’s last week. If you have one nearby, this might be a good substitute for you. Or try any craft stores like Joann’s that emphasizes sewing/quilting. They might have Lace or Sequin pins.
Oh my goodness what a wonderful post. Thank you Mary. I have a number of finished pieces that I simply haven’t been able to afford to have professionally framed. Your tutorial has taken the fear out of that work – I can do this!
Thank you Mary, for the comprehensive tutorial! A tip I would like to offer is to look for frames at your local thrift store! I have found some very nice frames for as little as a dollar, and certainly fits into anyone’s budget!
Great idea, Erin!
Mary,
Thank you for such a timely article. We were just speaking about framing and how some of the techniques have changed. I have heard that lacing isn’t recommended as much as it used to be because it puts too much tension on the fabric and the threads. I have always laced my pieces but I sew a piece of very lightweight twill type binding to all the edges and I lace through that fabric not the embroidery fabric. It is an extra step and if I am not careful can add extra bulk but then I do not have to worry about distorting or damaging my embroidery.
I thoroughly enjoy reading your newsletter and refer to your website often. Keep up the good work. Happy New Year from one survivor to another.
Marion Jones
Hi, Marion – Yes, I used to lace mine, too, but the problem I found was that, over time – especially when there are environmental changes involved (like increased / decreased humidity and the like), the lacing thread can become slack, causing the fabric in the frame to relax a bit. With the pins, I haven’t had that problem. The professional framer I used to go to put me onto the stainless steel pins and was very good about explaining his methods. Unfortunately, he retired and I haven’t found a framer I’m satisfied with since then, so now I do most of mine myself. It saves quite a bit of $$, especially if you can find a good frame that’s already made, as opposed to a custom-made frame. Depending on the piece, I sometimes will also have museum glass cut for it, but I didn’t do that with this piece.
Hi Mary, This was a very helpful post! I was wondering if you have any tips when choosing frames so they are deep enough to accommodate the foam board and fabric, etc. I don’t think photo frames would work. Do craft stores carry other kinds of ready made frames that are deep enough? Thanks!
That’s right – you’ll need to check the depth of the inside of the frame, to make sure it can accommodate the thicker foam core board. Photo frames, for example, wouldn’t normally work. This particular frame that I used already had a cream colored, thick mat in it (which I took out and saved for another use).
Something I didn’t see when I was reading this article: Consideration of the depth of the ‘shelf’ in the frame. A lot of picture frames have a pretty shallow depth, because they are only meant to hold a thin piece of photo paper, and *maybe* a matte board. This adds up to maybe an 1/8 of an inch stack height, where-as foam-core board, 2 layers of fabric, 1 layer of embroidery (especially if it’s beaded or has elements that stand ‘proud’ of the fabric’) and extra matte boards can easily get to a stack height of 1/2 inch or more.
Nothing is more painful than executing a framing job only to find the work stands ‘proud’ of the back of the frame. It interferes with hanging the picture correctly and all kinds of things. (And also, it’s just about gauraunteed to hit your local engineer’s hot buttons…)
I also frame my own pieces (sometimes), and I often buy frames from Wal-Mart or Target. The trick is to check how deep the frame shelf is. For smaller pieces, especially, I’ll often lace around an acid-free matte board cut to 1/8 smaller than the frame opening, and skip the decorative matting you added above. It’s a simpler process overall, and most of the smaller frames you see will have the shelf depth to handle it. Still, the pieces I’ve framed this way can result in a very tight fit, and those bendy tabs can be a pain to work with! (Thanks goodness I’m stubborn, hah!)
Some pieces deserve the Full Monty, so to speak, and I’ve given a couple pieces away with a check so the recipient can find a local framer and have them do the piece justice. But I stitch a lot of smaller pieces, too, and they’re often fun in pretty simple frame treatments.
-Monika in Mobile
Good point, Monika! I always check the depth of a pre-made frame first. You’re right – photo frames are not really made for this kind of work!
Just a though. I’ve had a few frames that were perfect except for depth of rebbit. I put a ¼ to ½” square dowel on the back in a square. Once you cover the back with a craft paper dust cover, it worked fine.
I could maybe find a picture if you would like.
Do you always use glass? I have had a few pieces framed without it. I was told by a framer that cloth cannot “breathe”under glass. Even with spacers dampness, due to temperature change, will cause fabrics to deteriorate. Especially if hung on an outside facing wall or in an area where moisture can build up. Yes, the piece will get dusty, but the trade off is mold won’t be a factor on destroying your work.
.
Thanks for the great tutorial, Mary. I have three finished projects waiting to be framed.
I’ve been putting them off because I didn’t quite know how to do it. Next stop: the craft store winter sales!
Thank you for another tip that I know I’ll be using soon…framing is so expensive. And it’s nice to hear someone else admit to waiting to long to complete a piece and finish it. My personal “best” was framing at about 4:00 am on the morning of my mother’s 90th birthday. It actually looks pretty good; the important thing is that she loves it.
Mary,
Thank-you for you tutorial on framing embroidery. When I finish my crewel project, this will help me. You always have good ideas.
Happy stitching,
Louann P
Great tutorial, Mary. On FB somebody posted in Spanish. I’ll translate for you if you like.
Hi Mary!
I love this piece and the colours are gorgeous. With regards to the mats you had cut, were they acid free as well?
They’re labeled as acid neutral. Many frame shops have a decent selection of acid free or acid neutral matting, mounting board, and so forth. If you have trouble finding it locally, you can order it online and take it to a framer to have it cut.
One of these days, I’m going to learn to cut my own matting, too. I just need space!!
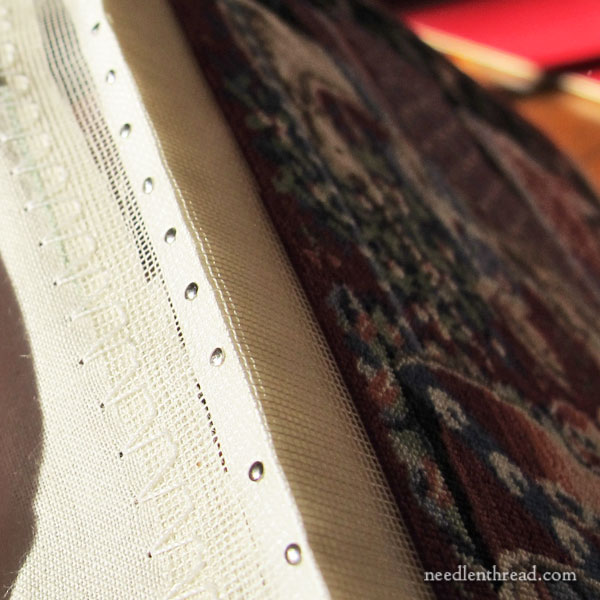
Thank you for the tips. I am curious about the ?basting stitching I see on the close-up photo with all the pins in place on the foam core. It is outside the pins and looks to be folded to the back side in the end. Is it something that should be done before tackling the framing?
Thanks again!
Mary Kay from Montana
Hi, Mary Kay – the stitches you see there are the zig zag stitching I used to sew the silk gauze onto muslin, to extend the size of the overall piece, so I could put it on my embroidery frame to stitch it. It also gives more room for framing, if your ground fabric for the embroidery isn’t large enough. I’ll be writing about this process later this week (on Friday) with a new project I’m setting up.
This is a great tutorial…I would be interested in how you mounted that silk gauze (I think?) to the background fabric. Maybe you had a past article on it and I missed it….. I have a piece I want to frame that is hemstitched, and I’m racking my brains trying to figure out how to stretch the backing fabric and attach the hemstitched piece to get it to lay flat. Congratulations on finishing this beautiful piece!
And, I just saw your response to another comment that you are going to cover that process later! So ignore me! 😉
Hi, Heather – Yes, I’ll cover that with a different piece I’m working on now, most likely on Friday! 🙂
Mary- Great post, as always! I had never thought of stainless-steel pins, but I am going to try this technique on several projects soon.
As you mentioned that having the mats cut was the most expensive part of the process, might I suggest that you consider buying a mat cutter for some of your projects? There are many different varieties of cutters, but I have had the most success with a push-style bevel mat cutter. I purchased one at an art store about 15 years ago and I haven’t had a mat professionally cut since! Of course, you will have to purchase full or half-size sheets of acid-free mat board at an art store. For this, do not go to a craft store like Michaels or Jo-Ann Fabrics, but a store that sources professional artists, architects, graphic designers, etc. While you are there, pick up a few extra packs of blades for the cutter, too. You really go through blades and for my cutter they are really hard to source. You will also need a large cutting surface like a self-healing quilter’s cutting mat and a large, metal straight-edge.
To use the cutter, you simply need to figure out how large you want the opening to be and mark the area on the back of the mat. There is a line marked on the cutter that you line up with the lines you have drawn on the mat. The big thing to remember with these cutters is that you place the cutter inside the opening, stopping where the lines intersect. You turn the mat and follow the line again. Each cutter is different and so you will have to learn how to get the perfect corner with your individual cutter, but it doesn’t take long to figure out. After a few practice cuts, you will stand back in amazement at how easy it is!
Now, if you have design questions or if you do not know about the color of the mat or the width of the opening and certainly if it is a very special or vintage piece, then by all means go to a professional framer. But, if you want to try to save a few bucks on some basic mats, try one of these cutters… I know you will like it!
Thanks, Elisabeth! I’ve been wanting to look into a mat cutter. I’ll put it on my list for this year!
Thanks Mary. I’ve been framing my own things for some time now, but this fabric/stitching thing is a whole new “ballgame” and I’m sort of “learning as I go”. This is a wonderful tutorial, and I love the idea of the pins. Think it would work so much better than what I am doing now. My only “complaint” is that you don’t show how you cut the fabric at the corners. 🙁 I could sure use advice there… (hint, hint for Friday?) 😉 Crossing my fingers you can show us.
Carol in VERY windy Arkansas (nearly, literally, blew my chihuahuas away this morning!)
Great tips Mary and also good comments. Very helpful!
Perfect timing Mary! I’m about to embark on framing something and this is the way I think I’ll go. Simply can’t afford the exorbitant charges at the framers!
It looks lovely, Mary!
Hi. I found it interesting how you deal with the foam-board. My husband did a course on framing and did one of my cross-stitches while learning. Instead of cutting the whole foam-board up and putting it back in as a jigsaw later, he was shown to cut out the middle square, so there was only two parts. Then putting the embroidery in like we do when we stretch fabric in a hoop frame. I’m not sure which way would be easier, his or yours. Thanks for sharing your knowledge and experiences with embroidery, I always look forward to what you do next. Very inspirational.
What great timing, I just found some petit point pieces in the thrift shop that have been finished but not framed. I was wondering how to frame the 5″x 7″ pieces. Great tutorial, Thanks.
What great timing, I just found some petit point pieces in the thrift shop that have been finished but not framed. I was wondering how to frame the 5″x 7″ pieces. Another great tutorial thanks Mary.
I am having a chslling finding 3/8 foam core boards. Do you have a source you can recommend?
It’s just the standard foam core board that you would find at a framer’s shop. Perhaps it is measured in mm instead of inches – and it might not be exactly 3/8″ – that was an estimate…
Just framed my first piece thanks to your tutorial, your instructions are so precise, as always. Thank you for saving me so much $$$ that i can now soend on canvases!
Hello Ms. Corbet! I’ve been a follower of your blog for many years and have always loved how precise your instructions are! I have yet to actually finish a piece, but I’m at the point at which I’m trying to figure out how to preserve my work. Framing definitely seems like the best option, and my budget basically demands that I do it myself. To that end, I would like to know the length of the pins that you use here. I’ve found 1/2″ sequin/lills pins from Dritz at Joann Fabrics, which seems to be the shortest length available. Would these work? Do you have a specific brand of pin that you use for this work?
I used stainless steel lace pins, and they were probably 1″ – 1.25″ … BUT … since then, I’ve gone back to lacing entirely. I use the pins to position the fabric, and then I lace, and then I remove the pins. Then, I give the piece the lightest spritz of water (using a micro sprayer) in order to pull the fabric taut over the board a final time and to remove any small creases or dents (especially from fingernails) that might be barely visible in the fabric. You can find this whole method explained in the following articles:
https://needlenthread.wpengine.com/2019/08/reframing-embroidery-disassembly-preparation.html
https://needlenthread.wpengine.com/2019/08/reframing-embroidery-from-botched-to-better.html