


So much for a weekend finish! Today, I was supposed to share a whole pair of mittens with you, but the embroidery on the second wool mitten is lagging behind a bit!
Still, I can show you the first mitten with the embroidery finished, for what it’s worth. Last time we visited the project, I was almost there, but not quite.
So this is a finished wool felted mitten, embroidered, with a few things I’ve learned along the way – just in case it’s a project you’d be interested in undertaking, too!
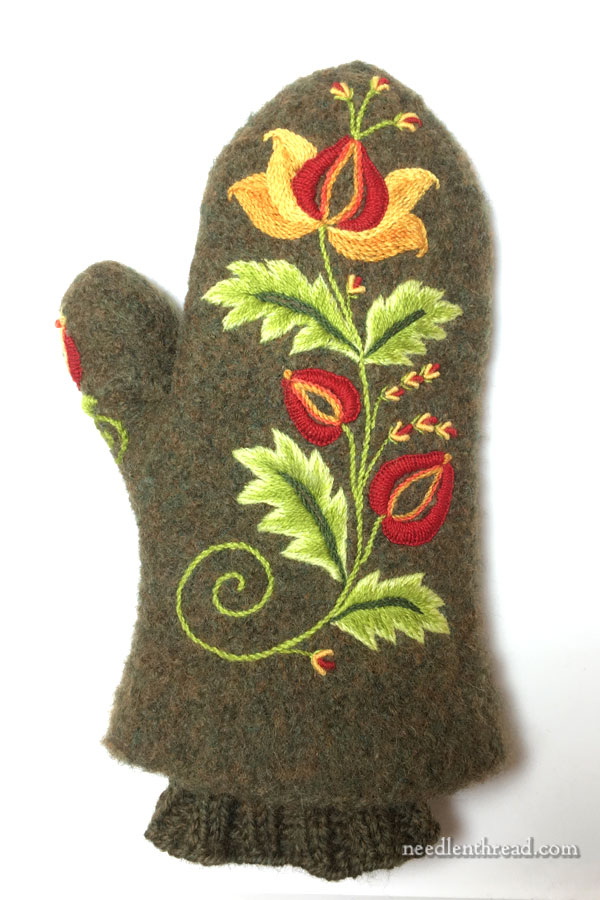
This is what the full finished mitten looks like, with the embroidery complete and the knitted cuff inserted inside the felted wool mitten. The knitted cuff really makes the things super-warm and cozy, very weather-resistant. But you definitely can’t tack the cuff into place before you embroider the mittens, or you’d never be able to get inside them to stitch!
When I initially drew up the design for the embroidery (you can see the original plan in this article), I had also intended a little embroidery around the felted cuff on the mitten.
As it worked out, there wasn’t really room for it, so I’ve skipped it. In the future, though (yes, I plan to try another pair!), the cuff will be a little longer, and when I design the embroidery for the second pair, I plan to focus on the cuff area, too.
Here are some things I’ve learned along the way:
1. My original approach to transferring the design (discussed here) wasn’t bad but it wasn’t great. It was a little time-consuming, but more to the point, working with the tissue paper wasn’t super-accurate, because the paper had a tendency to tear. I remedied that with the second mitten, using a different product.
2. Starting and ending threads is easy! You can start your threads with a knot – the knot just sinks into the felted wool. Ending threads is easy, too. Taking the last stitch with the thread I was using, I’d manipulate my needle away from the area and up into the felted wool, where I’d rock it back and forth in different directions to catch inside the felted wool, and then bring the needle and thread to the front of the mitten (anywhere), pulling on the thread to create some tension, and then snip the thread close to the wool felt. The thread disappears inside the wool felt.
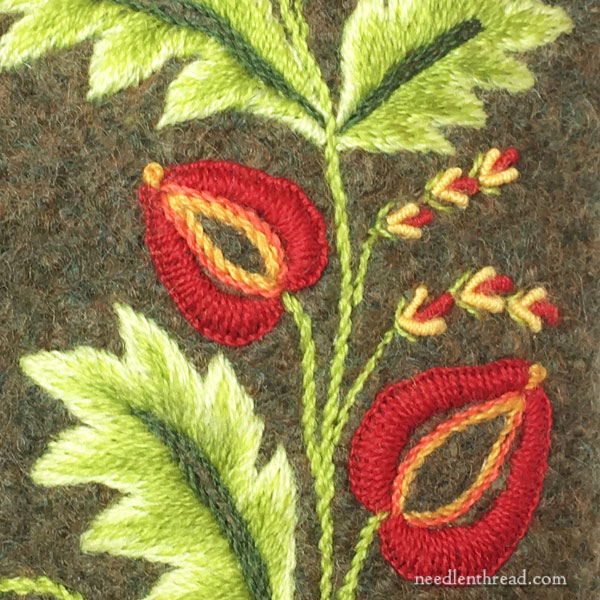
3. You have to “scoop” your stitches (using the “sewing method” rather than the “stab method” of stitching) whenever you’re working deep into the mitten. Along the cuff area, you can stab the stitches, because it’s easy to reach the needle, but towards the top of the mitten, you have scoop. You can read about sewing vs stabbing stitches here, if you’re unsure of what I’m talking about.
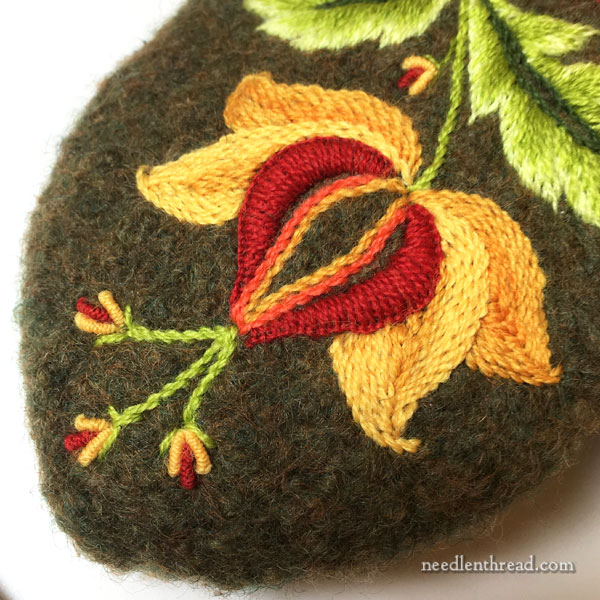
4. Bullion knots (if you’re already comfortable with them) are incredibly easy and low-frustration stitches, making them perfect for accents.
5. French knots – not so easy!
6. Long & short stitch (soft shading) is a little trickier to scoop. You really have to mind your tension on the stitches. It’s better, in fact, for them to be too tight than for them to be too loose. The looser the stitch, the messier it looks when scooping in the next row of shade on the long and short stitch.
And that’s my adventure so far with my embroidered wool felted mittens! (Or as my niece would say, middens.)
Once I finish the second mitten, I’ll share some more tips and I’ll share the pattern that I used for this particular pair.
If you’re looking for the knitting pattern for these mittens, you’ll find a source for it at the end of this article.
If you have any questions, comments, suggestions, inspirations, or whatnot, feel free to chat in the comments below! Anything that comes up, I’ll either answer below, or I’ll elaborate on when I share the pattern and the finished pair with you.
Hope you’re week’s off to a great start!
I enjoy reading all of your posts, Mary, and wanted to say how lovely this mitten is. The colours work so well together and the stitching is beautiful.
The mitten(s) are a tour de force – congratulations. I shall take my iPad and show our village craft group on Thursday. I live in a very small village near Cambridge in UK. Recently as a group we visited the Fitzwilliam Museum (Cambridge University) in Cambridge to see their exhibition of samplers. We were shown around by the Honorary Keeper of Textiles, Carol Humphreys. She really made them come alive – lots of research into the people who made them and the idea that they are record of ‘ordinary’ women. Her book is called Sampled Lives. I really look forward to your emails and have learnt so much.
With best wishes.
Tricia Lewis
Morning Tricia ~ I wonder if Carol Humphreys is related to Sara Humphreys? She has some wonderful tutorials on You-Tube so relaxing to watch working different stitches while sitting in front of a large window overlooking a garden.
Just beautiful I would be afraid to wear outside because I would loose one. Need a mitten leash.
Thank you Donna for the reminder. It’s frowned on these days as a danger but in our family through many generations, mittens and gloves were always attached by a long I-cord which is then threaded through the sleeves of the coat. We never lost mittens that way and I remember in primary school coats hanging in the cloak room with “hands” hanging out of the sleeves, scarves and hats hanging on each child’s hook. Then there was the crate of 1/2 pint milk bottles over by the door and as the milk was not homogenized all the cream floating on top.
Sweet—you’ll be making snowballs in no time!
Wow, Mary! What a great job! When you put on the thread pattern, I didn’t know how you were going to get all the detail in, but you pulled it off – with style! I can’t wait to see how you put the pattern on the second mitten…
Beautiful mitten!
It is possible (and easy) to make the mitten flat, felt it, then seam it after doing the embroidery — wouldn’t that make the embroidery much easier? Of course there would then be the seam to deal with, but if you had thread that matched the wool it would partly disappear into the felt, or could be hidden under a line of blanket stitches or something else decorative.
Susan
Hi, Susan – I think you could! But you know, I’m not a knitter (yet). I really love this mitten pattern, though, and the kind of “roundness” of it. I think that effect would be lost with seems. But again, I’m not really sure, as I haven’t tried it!
Maybe you could put a blanket stitch trim on the cuff. (-;
I thought about that, Connie – I am still thinking about it, actually! I’m thinking about it in a kind of reversed scalloped design, solidly filled (so, more buttonhole than blanket), and between each scallop, a little bullion bud to match the others. However, that could be overkill! 🙂
I. love. It. Mary, it’s a beauty in every way. I’m about to embark on a small project of embroidery on wool felt (a lapel pin) and a friend suggested drawing the pattern on Solvy to be soaked off at the end. Might that work with your mitten?
How did you transfer the design on the second mitten?
Hi, Julie – I did it a similar way but with a different type of material, called Swedish pattern paper or tracing paper. They carry it at Wool Thread. It’s not without its problems – which I’ll cover next time – but it works a whole lot better than the regular tissue / pattern paper I used before.
The mitten is super-cool! It would be great to wear on this snowy day in Minnesota! Will you have trouble making the second one mirror-match the first or don’t we worry about that?
When you do another pair why not knit a stripe or two at the end of the cuff matching one or two coloureds of the embroidery?
These mittens are beautiful Mary and DO look so cozy. I love the colors and stitches you’ve chosen. Just maybe you could talk your sister into a matching hat or scarf, not necessarily felted in the case of the scarf, (I can’t tell how heavy they are from the picture) with the same colors in the same style added to them. What pretty accessories to wear to church.
What did you use in place of tissue paper?
Hi, Susan – I used what’s called Swedish tracing paper or pattern paper. They carry it at Wool Thread. It’s much easier to see through, as it doesn’t tear the same way. But it still has its disadvantages, which I’ll talk about next time. Still, it was a lot easier to use and the transfer was more precise.
Love the mitten. You have inspired me.
If I were doing this I’d find the “darning egg??” that we used when darning holes in socks/stockings back in the old days, to support the stitching without catching the back side.
Hi, Cheryll – thanks for the suggestion! It doesn’t really need a darning egg, I don’t think. The wool felt is so thick that, normally, when scooping the stitches, you don’t even pierce through to the back of the side you’re working on. But, if the felt were not as thick, I would definitely drop a darning egg or something similar in there. It would be a good way to go!
Will you finish the pair in time to wear this winter? Or do you plan to display it?
Hi, Laura – I hope to wear them! But yesterday, it was 60 degrees here, so whether or not the weather will cooperate is another question. Of course, right now, it’s snowing. So it just might cooperate!
Please take a photograph for us!
Wouldn’t it have been easier to do embroidery on felted wool first, then cut out and sew mittens?
Hi, Denise – yes, it would definitely be easier. On the other hand, though, I like the mitten pattern without seams. What I’d like to experiment with is whether or not the seams would felt into each other without ending up with a noticeable seam. I may very well explore that!
I just looked back at earlier post on this project. I didn’t realize you started with a felted pair of knitted mittens. I thought you used ‘fulled’ wool fabric, in which case embroidery first would have worked. But you’re right, there would be seams if fulled fabric were used, so they might be a bit uncomfortable. I’m not a knitter, but maybe could find a large man’s wool mittens and felt those.
It’s really gorgeous, Mary. The rest of the mitten is so magnificent that the cuff area does seem in want of definition to me, perhaps just a stem stitch line with some of those cute little bullion flower buds coming off it, or two stem stitch lines with the buds in between at regular intervals, or even just several lines in green, red and yellow…
Oooh, that sounds like a good idea! I may explore that!
I have used this method of transfer only once so far, for a book cover with black fabric. Tissue paper was a disaster from the beginning so I gave up on that pretty quickly. I’m not very crafty (embroidery is my only exception) but I do love to cook so I had plenty of baking paper on hand. I found that held up really well, and when it was time to pull it off, I misted it with water and that made it soft enough to pull out with tweezers, yet it didn’t disintegrate – it came off almost in strings. I wouldn’t hesitate to use the baking paper again
Hi, Bracha – thanks for the information! Do you mean parchment paper for baking? I think on this particular project, parchment might be too stiff, as you have to fold the felt a bit while you scoop the stitches.
Truly charming, Mary. I am going to hunt for a thrift shop sweater to felt and cut and sew for a pair…I am knitting impaired and though I am blessed with three sisters, nary a one is a knitter. But these are irresistably delightful, and as the old saw states, “There is more than one way to skin a cat.” (Please know…only an adage; I would never do that! I love kitties!) Thanks for this inspiring share!
Linda
I absolutely love your Mitten(s). I’m a mitten wearer and have recently received a compliment by a young woman saying how warm they are compared to gloves. Your felted wool, with added cuffs, will be the toastiest. The embroidery is so lovely and I”m so jealous. Enjoy them and treat them kindly. The funny part of woolen mittens is that my mother would make so many mittens for three of us throughout the winter and they became felted by the rough treatment and then being wet and dried so often..Now we make them felted on purpose.
That is one beautiful mitten!! Can you do it again! In reverse! Nice job, Mary.
Dear Mary
Such a beautiful design on the mitten once the other one is completed they really will stand out and the colours really combine well together, as well as being decorative they look really warm to wear. I’m sure the second mitten will be equally as good and will look really lovely please take a picture with you wearing them can’t wait to see them worn. Good luck with the transfer and stitching on the second mitten.
Regards Anita Simmance
Your mitten is such a charm, Mary, that you inspired me right away to knit and embroider them myself, you see! I’m usually a hot person who very rarely wears mittens, but I have two chilly daughters, and I know they will be delighted when they get them for a birthday present.
Could you please show the cuff itself and whether and how it is attached somewhere inside the mitten?
And here’s another source of patterns for knitted and felted mittens: DROPS Design – https://www.garnstudio.com/pattern.php?id=3447&cid=17, a fantastic Norwegian website with thousands of knitting and crotcheting patterns and thorough instructions (I’d say foolproof – for fools like me^^), wool, accessories etc. It goes in 17 languages, and when you have a problem, you can always pose a question in your own language – they will answer immediately and competently. I’m not affiliated with them, just a very content user who would highly recommend them.
Angela from the Ore Mountains
Oh, by the way – most patterns on this website are for free!
Absolutely gorgeous! I never even thought of felting mittens. That might be because I have lived in the South my entire life. I could probably count on my fingers (maybe those of only one hand) he pairs of mittens/gloves that I have owned.
The embroidered wool mitten is beautiful! So are all the other things you’ve r stitching.
Thanks, Kay! I’m almost finished with the second one – just two little spots on the thumb! 🙂
Hi Mary, I’ve really enjoyed this post when it first came about. They must have been a delight to wear when the cold winter made its way to you last year. I hope to have a go at them before the year ends. Thanks for the lovely photos that always accompany your articles. They are just so lovely, and thanks to your guidance and down-to-earth attitude/guidance always inspiring and never daunting! And that’s a really big plus. You make things sounds like all of us can do it, so many thanksfor that 🙂