


Good morning and Happy Friday all around!
Today, I’m going to share with you a little Stitch Fun! tutorial for a decorative composite band, worked on a foundation of wheatear stitch.
This band can be used for lines, gentle curves and the like. I’ve used it on letters (in Stitch Sampler Alphabet) and I’ve used it for decorative borders or just little pretty accent sprigs. It’s an easy and fun combination!
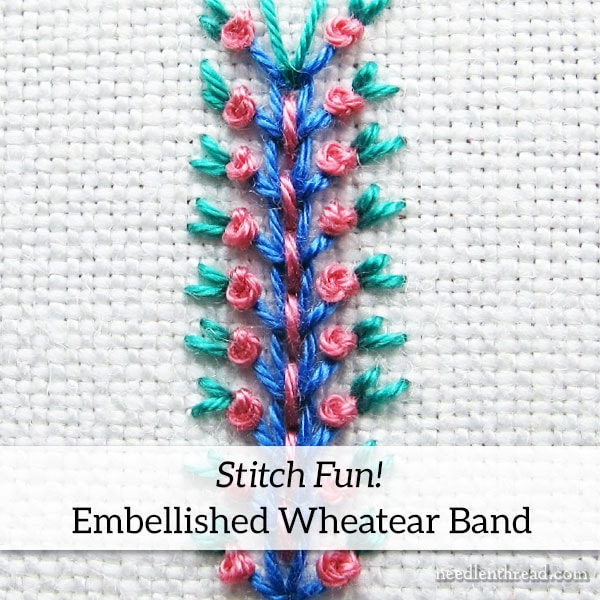
So, the foundation for this decorative band is the wheatear stitch, which is a chain stitch variation with little off-shooting arms that create the look of a wheatear. Hence, the name of the stitch.
If you’re unfamiliar with the wheatear stitch, you’ll find a video tutorial for wheatear stitch right here. It’s pretty simple and a good stitch to add to your repertoire.
In this tutorial, I’m using coton a broder #25 for the thread with a #7 crewel needle, and I’m working on linen fabric. You can use practically any type of embroidery thread for this. If you’re playing with regular stranded cotton (DMC floss), use two or three strands from the six. This will work well in finer perle cottons as well, like #8 or #12. For this particular interpretations, three colors work well.
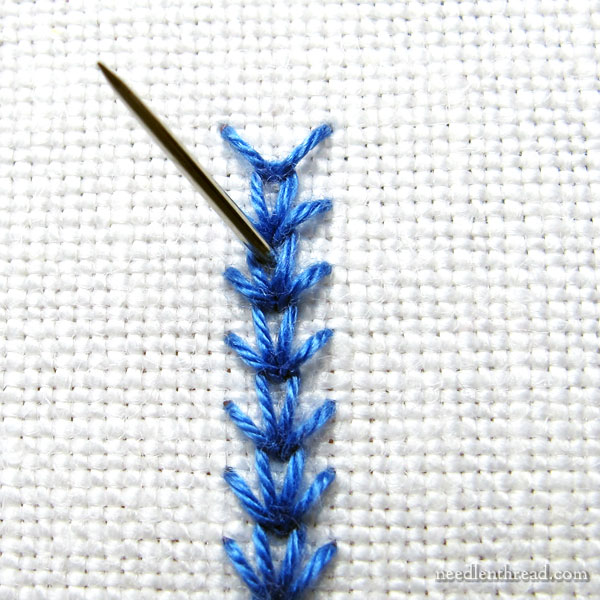
To get things going, stitch up a line of wheatear stitch in a color of your choice.
Then, change your thread to another color, and backstitch down the middle of the chain stitches. To do this, bring your needle and new thread to the front of the fabric in the middle of the second chain stitch down the line.
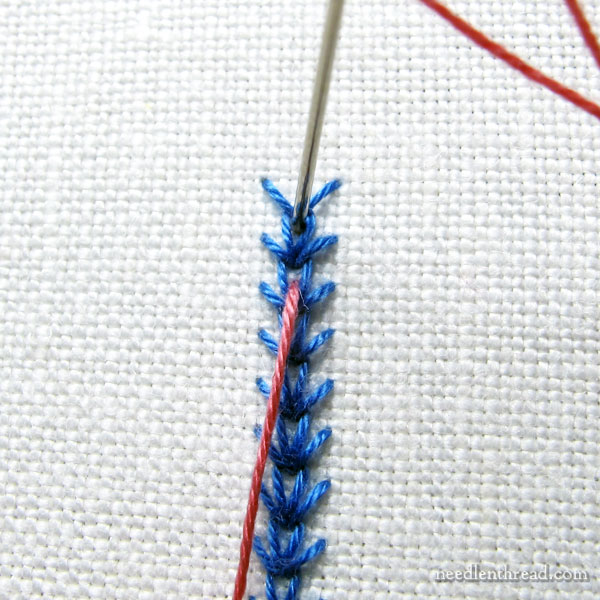
Take the needle to the back of the fabric inside the first chain stitch above.
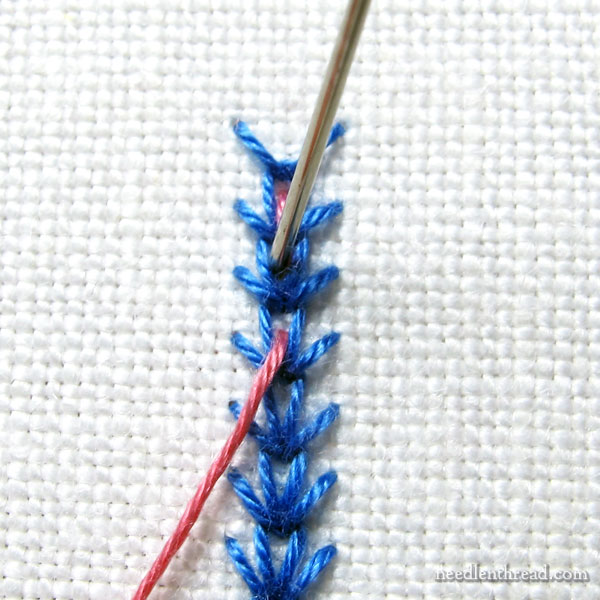
Come to the front again in the third chain stitch down the line, and then take the needle to the back inside the second chain stitch, right where you first emerged to start backstitching.
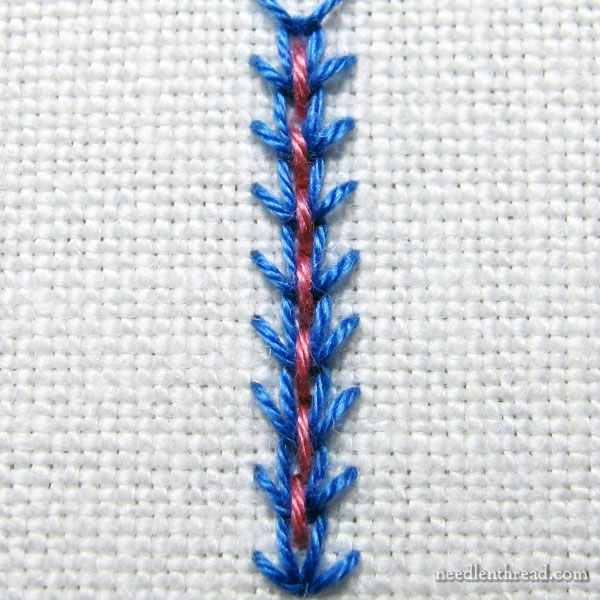
Continue backstitching down the center of the chain stitches until you’ve backstitched the whole line. Simple!
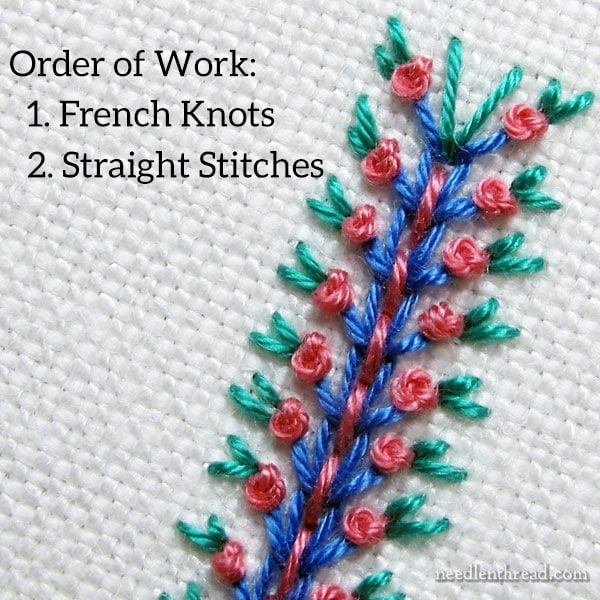
Now it’s just a matter of a little further embellishment!
Using the same color you backstitched with, work tiny French knots at the tip of each wheatear “arm.”
Then, using your third color, work tiny straight stitches fanning out from the French knots. You can work two or three straight stitches at the tip of each French knot, depending on what you think looks best.
As you can see, it’s a very simple but effective way to create a really pretty composite decorative band!
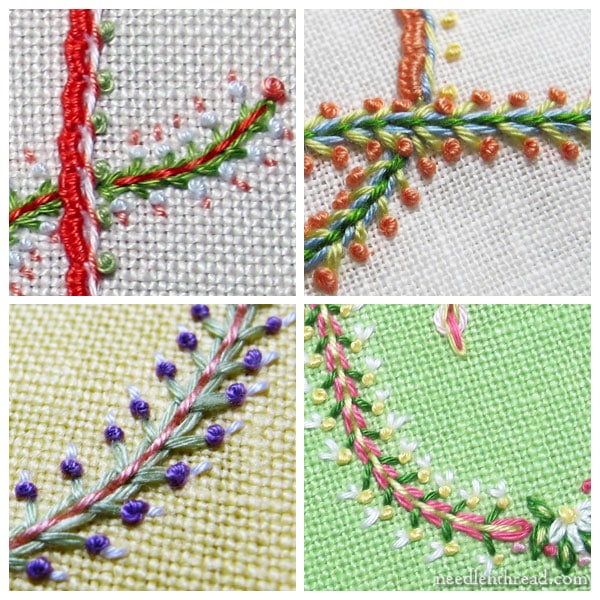
Here are some samples of this embellished wheatear banned, used on lettering in Stitch Sampler Alphabet, my e-book for decorative lettering made up of over 65 stitches and stitch combinations.
There are all kinds of ways you can vary the look of the band, besides just changing colors. If you play around with it a bit, you’ll find yourself exploring all kinds of different combinations. But be careful – that kind of exploration can be addicting!
So maybe this weekend, if you’re in the mood to play with stitches, you’ll come up with your own favorite combination? If you do, feel free to tell us about it!
I hope you have fun with it!
In Other News…
I’m back home, much earlier than originally planned! It’s great to be back in Kansas! I had a terrific little break. I met my six sisters on the east coast and we spent several days together, often just hanging out in a lovely spot overlooking the ocean. The fascination of staring at the ocean, listening to its song and watching its fluctuating moods, is a vacation in itself.
So, why home early? As it worked out, there was too much pressure to get back to work. I suppose this is what happens when you’re self employed and there’s no one to pick up the slack when you need to take a break.
More specifically, I rushed home because, immediately before I left, I signed a lease on a new studio space. A small space within walking distance of my house came open two days before I was scheduled to leave. I’ve been looking for a space for a while, knowing that Needle ‘n Thread would not survive as a business unless I could grow it in a new direction or two. Even though it’s not my “dream space,” with the lack of affordable small spots around here, I figured I better jump on it, so I signed in blood. And now it’s a sink or swim thing. I decided I better get home and start swimming!
I’m very excited about things I have planned, which will take shape over the coming months. I’ll definitely show you the space as the work areas come together, and I’ll keep you in the loop as my plans develop.
Hope you have a terrific weekend with your needle and thread!
A delightful combo stitch, Mary; stitch fun, indeed! Congratulations on the new studio space. Moving forward such a good thing…if I may be so presumptuous to speak for the community: it is always a relief to hear assurances of ways you find to keep going. You are our teacher, our materials and books resource, frequently our witty entertainer, our community glue and our faithful needle and thread buddy. We love you and are grateful for all you do and sacrifice for your self-employment.
Blessings always,
Linda
Congratulations Mary on this expansion! All the best of luck X
Grow,grow, grow Mary! Good luck in your new studio and new adventure! Hope you will post pics once you are settled in !
Definitely will! Keep in my mind, it isn’t what I’d call my “dream space,” but it’s a good start!!
Many congratulations on your new studio space! I hope it is exactly the jumping off place you need to go on to achieve what your heart desires with Needle ‘n Thread.
Just beautiful stitch, Mary…love the embellishment and looks like I could do it! And big congratulations on your new studio space! Can’t wait to see what else you’re up to! Have a great day, L
As you are a mentor to many of us, we are here to support and encourage you as you grow your passion and business. I look forward to finding out more about what exciting things you have planned.
Congratulations on the new space Mary! I’m so excited and happy for you that you were able to make this work. Looking forward to seeing the space, as well as the expansion of your business. Congrats again!
That IS a “fun” combination of stitches! Thank you!
And Congratulations (and good Luck) with the new space. Always exciting! I am sure we ALL look forward to what will come out of there!! Thank you for all the enthusiasm and inspiration you share with the world!
Very, very best of luck with the new studio and planned expansion, Mary. Looking forward to hearing all about it!
Good luck with your new venture. I look forward to seeing what you have in store for us x
Thanks, Heather! I’m pretty excited! 🙂
Congratulations, Mary! The very best of wishes for this big step outwards.
Thanks, Elaine! Busy weekend of getting some stuff situated in the new space. Office furniture is first on the list! It’s the whole “situating thing” that I’m not good at – I’m trying to be very careful in creating a logical work flow area. We’ll see how it pans out….!
Good luck with your new space and with bringing Needle n Thread to a higher level!!! You must have had a very nice time with your sisters….wow!!! 6 of them? I’d always dreamt about having sisters…many of them!! Lucky you!!
Hi, Simona – Thanks! Yes, I am very fortunate when it comes to having so many sisters! And the best part is that we all get along very well – we’re a pretty close family, even through we’re scattered about the country.
What a beautiful set of stitches! Thank you for sharing. In October I am supposed to become a grandma for the very first time and after being a mom to two boys, I finally will get my girl! As soon as I saw that design I instantly thought of those cute little headbands that baby girls wear. I’ve never made one, but would anyone like to share some instructions for me such as how big to make it, what width and length of elastic, and how do you deal with both Aida cloth as well as a backing, or can this be made on regular fabrics? Thanks for any help. Due to arthritis my hands aren’t up for many hand work projects these days.
I probably wouldn’t use Aida cloth, personally. It’s so stiff, and the holes regulate where you can stitch. A soft cotton might work better for a baby headband? You might find tutorials for them by googling “baby headband tutorial” or something similar.
No puedo esperar a que sea por la mañana para probar esta maravillosa puntada!!!
Muchas gracias por todo!
Un abrazo grande!
Oh Linda,
I second and third every word you said. So excited for you Mary, growth in a small business is often a knees knocking experience. Remember to breathe at the scary times and count to at least 50 before you make decisions. Hoping and praying for your continued success.
Brenda 🙂