


I’ve been playing with the braid stitch – also known as the cable plait stitch – lately. I plan to use it on an upcoming project. It’s a great stitch!
While I was playing with it, I pondered its capacity for bead incorporation. I discovered that it does have great capacity for bead incorporation, but that there are some pros and cons to the obvious ways of adding beads to this particular stitch.
So today, I’m going to show you my first experiment with adding beads to the braid stitch, in a method I’m calling (very originally) version 1.0. Later on, we’ll look at a couple variations that produce a more stable result.
Braid stitch is an embroidery stitch that produces a series of interlocking braided loops. It’s a lovely stitch for wider, textured lines. It works well on gentle curves. And you can vary the look of the stitch considerably by working it closer together, farther apart, wider, narrower, and so forth.
If you’re not familiar with the braid stitch, you can watch my video tutorial for the braid stitch here. It’s a lovely stitch to have in your repertoire!
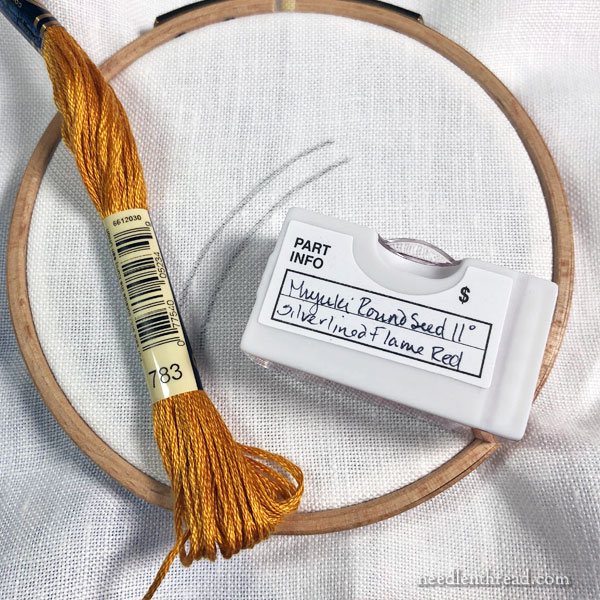
For today’s Stitch Fun experiment, I’m using linen ground fabric (specifically, Alba Maxima linen from Access Commodities – check your local needlework shop for it), stranded DMC cotton floss, and Miyuki 11/0 round seed beads. I used a crewel (or embroidery) needle around a size 8. The needle size depends somewhat on the needle manufacturer.
If you’re playing around with beads and embroidery stitches, I suggest testing the size of the needle by threading it with the floss you want to use and then trying to fit the beads on it. If they don’t easily slide over the threaded eye, you’ll need a smaller needle.
A Distinction
Before we go any further, I want to mention a distinction that I’ve made before between bead embroidery and embroidery with beads. I know it sounds like a question of semantics, but there is a distinction in types of embroidery here, so this is how I distinguish between two different approaches that involve beads.
Bead embroidery is embellishing ground fabric with beads, so that the beads play the prominent role in the decoration of the fabric. “Japanese bead embroidery” would fall under this heading. Generally, most of the fabric is covered with beads, and embroidery stitches (if any are visible) are secondary.
Embroidery with beads, featuring beaded embroidery stitches, is different. The embroidery stitches play the dominant decorative role in the decoration of the cloth, with beads added to either the stitches or the ground fabric as accents.
This tutorial falls in the latter category.
To get the line going, I started out with a regular braid stitch, no bead involved.
Upon the completion of the first stitch, I threaded one bead onto the embroidery thread.
I didn’t pull the bead towards the stitch, because I am not incorporating it until the second half of the stitch.
So I need to start the stitch and then push the bead down to work it in.

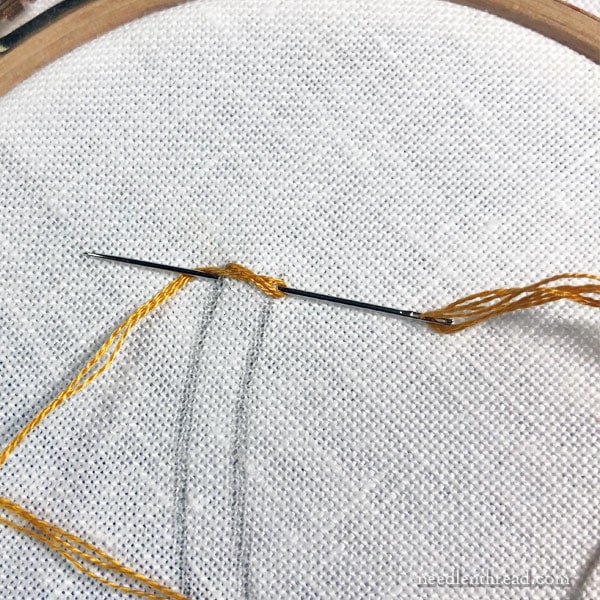
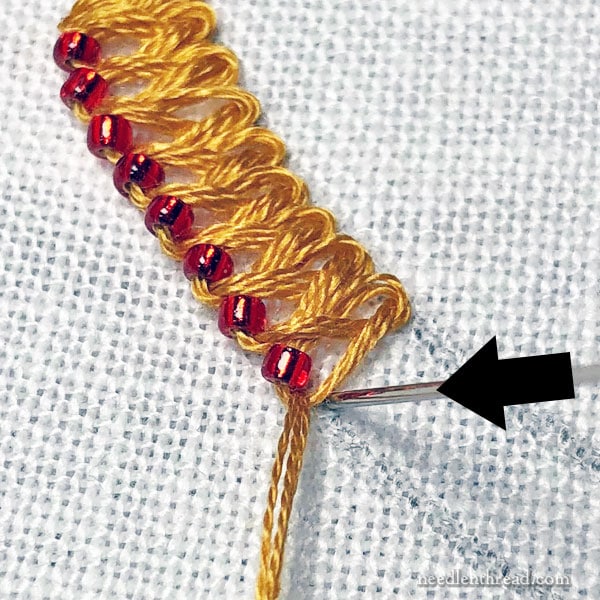
Here’s the first half of the stitch underway, with the twist around the needle. The needle is entering the fabric on the right line and it will emerge for the second half of the stitch on the left line.
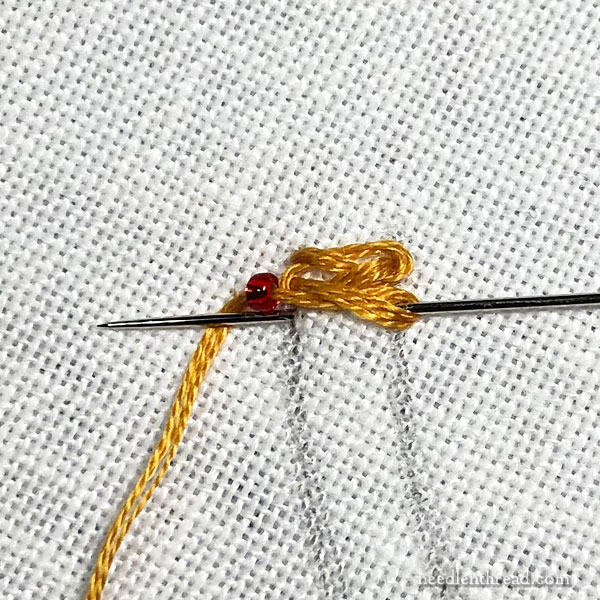
The easiest way to work this stitch is to scoop the fabric, rather than stab it, and to bring the needle out on the left, with the working thread under the needle, as shown above.
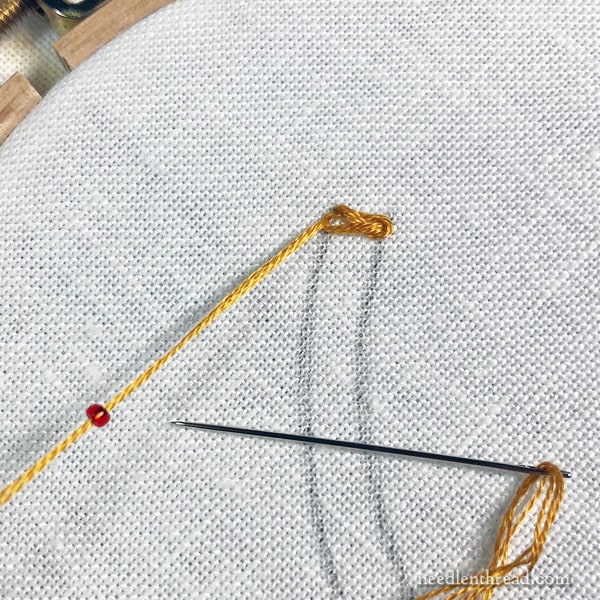
At this point, you want to situate the bead so that it is above the needle.
I found it easiest to push the bead down towards the stitch and then scoop up the fabric, emerging on the left with the thread under the needle and the bead above the needle.
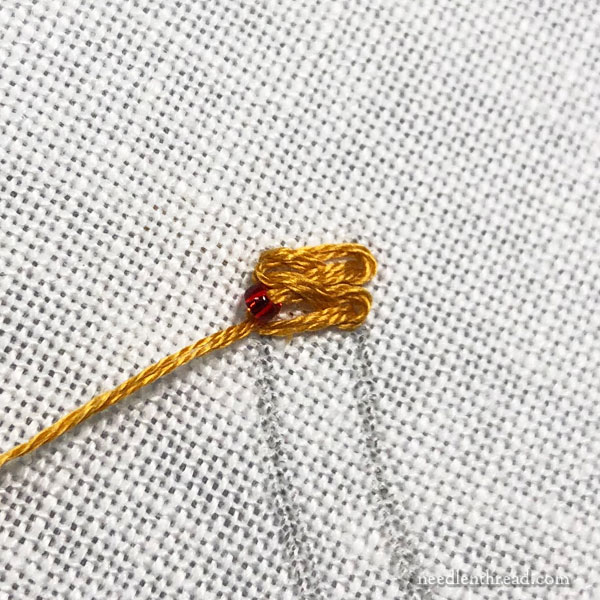
Pull the working thread through, and there’s your first beaded braid stitch!
Right after you pull the thread through, string another bead onto the working thread, but leave it out of the way to work the first half of the next stitch.
Continue on down your design line, repeating the steps above.
Eventually, you will run out of thread, because braid stitches of any kind are thread hogs.
Let me show you how to end one thread in the middle of a line and start a new thread.
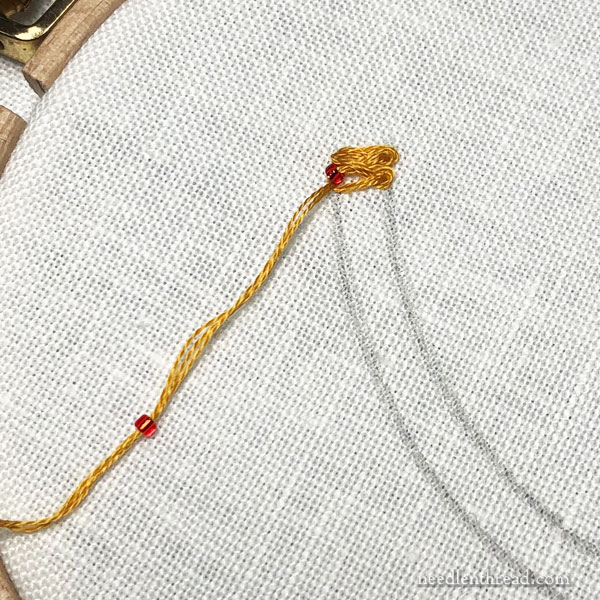
When it’s time to end one thread and start another, after you’ve pulled the working thread through with the bead situated on the stitch, you’ll take your needle to the back of the fabric just over the loop you’ve just formed.
Pull through so that this little stitch will anchor that loop. Then end off the thread on the back by running it under the backs of the stitches or by stitching a few tiny tacking stitches between the design lines and snipping the thread. These tacking stitches will then be covered up by more braid stitches.
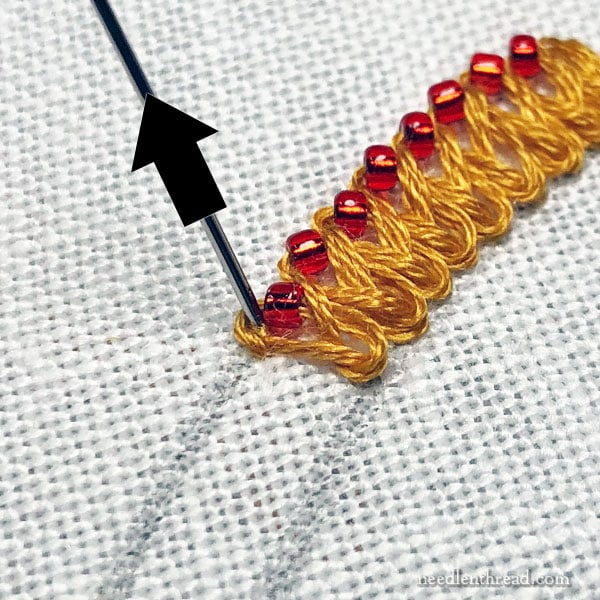
Thread your new thread into the needle and bring the needle and thread to the front of the fabric, right inside the last loop that you just tacked down.
From this point, continue on down the line in the same method, by immediately stringing one bead onto the thread, working the first half of the stitch, moving the bead closer, and then working the second half of the stitch.
When you come to the end of the line, tack the final loop down the same way, with a little tacking stitch right over the loop.
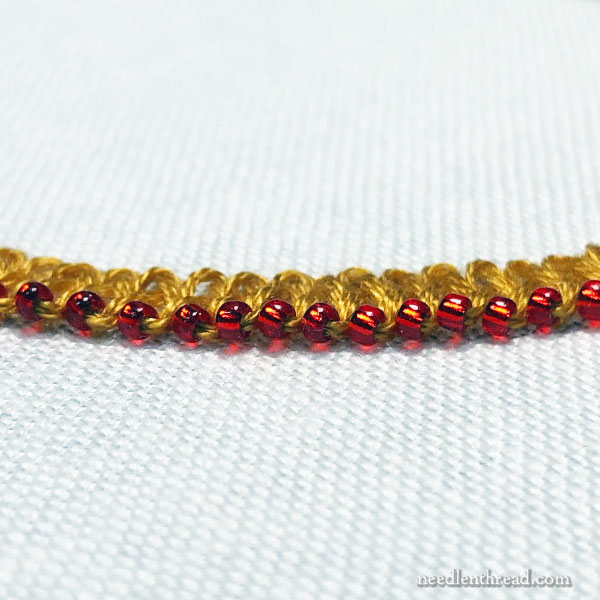
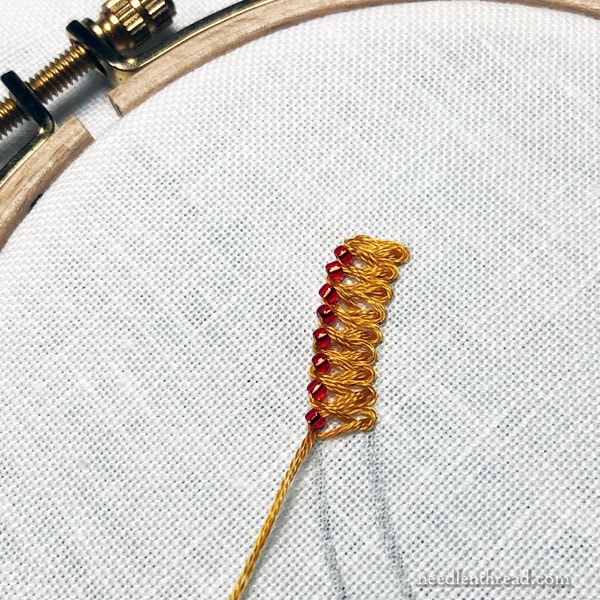
This method of beading the braid stitch creates an attractive beaded edge along one side of the braid stitch line.
The edge is not super stable, though. It’s effective for embroidery that won’t be handled much, but if you’re in the middle of working a project and you use this particular method, as you move your fabric or run a hand over it accidentally or anything like that, the beads will most likely shift a bit and require some straightening.
Stabilize the Line
If you want, you can stabilize the line by going back through each bead and sewing it down with an individual slanted stitch.
Unlike some bead stitches, you can’t run the thread through all the beads as a group, because this would change their orientation and point them in a different direction.
To stabilize the line, you must actually stitch a small slanted straight stitch through each bead.
I didn’t stabilize this line, but if I were finished with it, I would have.
I have further methods to explore to get the effect that I want, so I’ll be sharing those explorations with you in another tutorial.
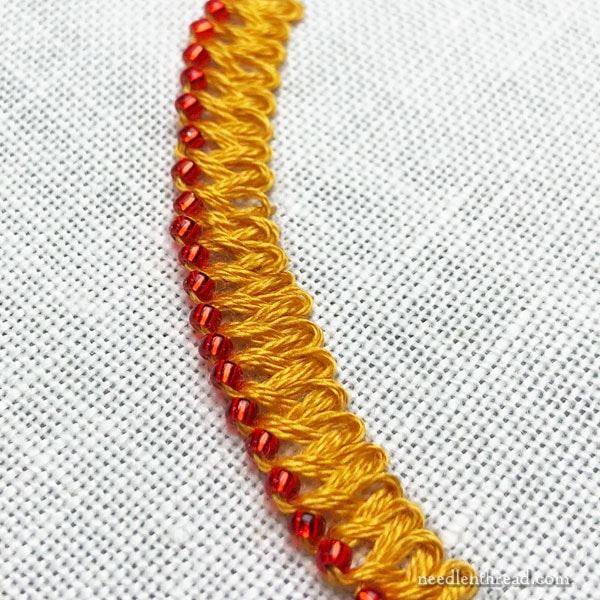
Overall, this is a neat method for adding a beaded edge to the braid stitch.
On the pro side, it’s a quick way to attach the beads as an integral part of the stitch so that they are situated at a specific angle that goes with the flow of the stitch.
But on the con side, if left as is, the beaded edge is unstable and it can be easily disarranged. You can fix this by returning up the line of beads with the working thread, working a small straight stitch through each bead to stabilize it.
Looking for More?
If you’re looking for more Stitch Fun, you’ll find a whole series of tutorials exploring stitches, composite stitches, and stitch combinations here. If you’re looking specifically for adding beads to embroidery stitches, you’ll find a list of tutorials for stitches with beads here.
You’ll find over 70 how-to videos for hand embroidery stitches here on Needle ‘n Thread.
Some Good Instructional Books
If you’re new to exploring embroidery stitches, I highly recommend getting a stitch dictionary or two to have on hand for reference!
At the top of my Amazon recommendations page, you’ll find several of my favorite stitch dictionaries. You can’t go wrong with any of them!
You’ll also find two excellent books for adding beads to embroidery stitches and for creating beaded motifs in your embroidery projects. I’ve written about those books here, if you want to see them up close. They’re lots of fun!
This article contains an affiliate link to my Amazon recommendations page, where I keep a list of embroidery-related things I recommend – mostly embroidery books, but also some other items that can be had on Amazon, including affordable lighting options, tools, and the like. When you go to Amazon through my link and make a purchase, Needle ‘n Thread receives a small commission without any extra cost to you. Every little bit counts! Thank you!
I love beads, they give such a nice extra sparkle! Haven’t quite got to grips with the various braided stitches though… possibly at least in part because I’m a stabber rather than a scooper.
As for this particular beaded stitch, I don’t want to be a party pooper 🙂 but if you have to stabilize them with individual stitches anyway, couldn’t you just as easily sew them all on after completing the braid? It would not look exactly the same, but as long as you keep the angle right it shouldn’t be too different, should it? Or am I, by this question, showing my unfitness to be anywhere near a bead…
Mary…
I enjoy doing crazy quilt blocks…and this stitch will work wonderfully on a seam! I really like the look of the beads with the stitch! My crazy quilt blocks are usually sewn into a wall hanging. However, I think I would still add the little stitch to be sure that the beads stay in their place! Thanks for this great idea…
Regards,
Bonnie
That’s wonderful. I agree that going back with an extra stitch through each bead would help the beads stay in position. I just wondered if you used a single strand of thread or use all 3 (?) that you used for the stitches. I love to add beads but pushing 6 strands through would be pretty difficult. At most I use 2 strands, going through once, then coming back up and straddling the bead to stabilize it.
Dear Mary
What a lovely idea for a stitch fun series I love Alba Maxima linen my all time favourite and I love beads and embroidery and a great idea to add beads to the braid stitch and so pretty. Are you using two strands of DMC thread for the braid stitch. I really like the stitch fun series you creative ability to think up such lovely and unusual ideas for embroidery always inspire me. Thanks for sharing the version 1.0 bead and braid stitch with us and for the links to the stitch fun series.
Regards Anita Simmance
That’s lovely, Mary! I haven’t played much with beads, but this just might inspire me.
I won’t, however, be doing it on the cable plait stitch. I just can’t seem to get it right. Following your video religiously, I used it as the stem of a vine and it looked beautiful – until I got a few inches down. By then, the beginning looked awful. There’s nothing to hold the second loop in place (right where you put the beads) and it would go all cockeyed. I was using a montmellick thread on a pillowcase. I tried more tension and less tension, but neither seemed to make a difference.
If anybody has a suggestion, I’d be most grateful.
What a lovely idea! I immediately thought of how cool that would look on a round neckline (no collar) and perhaps the hemline of short sleeves or sleeveless tops/dresses. Especially if it was a summer dress or top where wearing jewelry is just one more thing to make you hotter in the middle of summer. Or for winter formal wear, especially using silver or gold threads and decorating the neckline.
Thank you for this, Mary! How fun!
This is a very pretty stitch.
How about using perle cotton instead of floss? Any thoughts?
Mary, that is a delicious combination. Thank you for sharing.
I love that bead storage box. I have a bazillion of them and am happy to say, they are helping me to actually use the beads up because I can SEE them and can organize them in many ways quickly and easily. I guess I got the idea from you. Can’t remember. My stash was so disorganized – in various bags and tubes before switching – that I didn’t even bother to try to ID the beads like you have. I’m not worried – my goal is to just use them and I’m not bothering to replace any so I don’t need the notes. Believe me I have plenty of all kinds.
All I want to know is where I can buy embroidery cottom, which is not DMC or Anchor, because I need a special gray colour to finish my Danish Clara Weaver embroidery with. The firm was closed a very long time ago.
I am looking forward to trying this technique soon. I have saved this web-site so I can be sure to get back to it soon. Thanks for the tips.
Slick treatment for a neckline or pocket.