


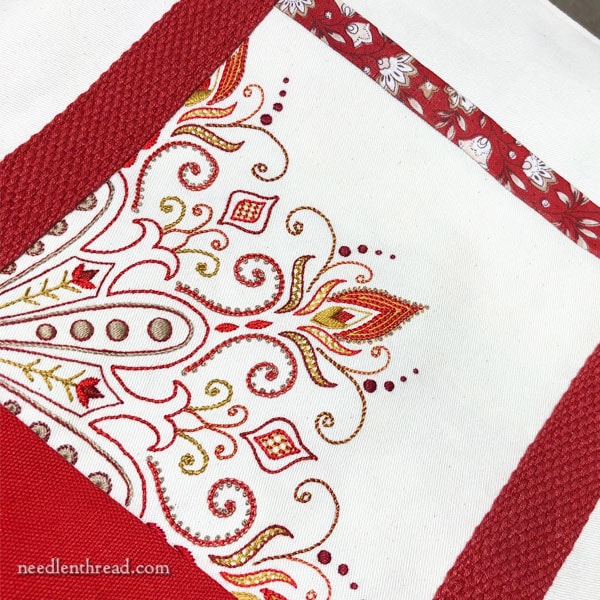
Last week, I showed you a resurrected embroidery project – one of those projects I had high hopes for, but never got around to finishing. It’s this embroidered kaleidoscope design broken down to fit on a pocket for a tote bag.
With my sister – who’s much more adept at sewing than I am – in town, it was a good time to tackle the tote.
Her approach was to let me do the tackling while she advised when needed. This worked out well, because I learned a lot.
There were a couple mishaps along the way.
Right off the bat, after cutting everything out and preparing it to sew, I discovered that the pattern I used (which was a free pattern from Craftsy before it merged into Blueprint and hence, is no longer available) wasn’t everything I wanted.
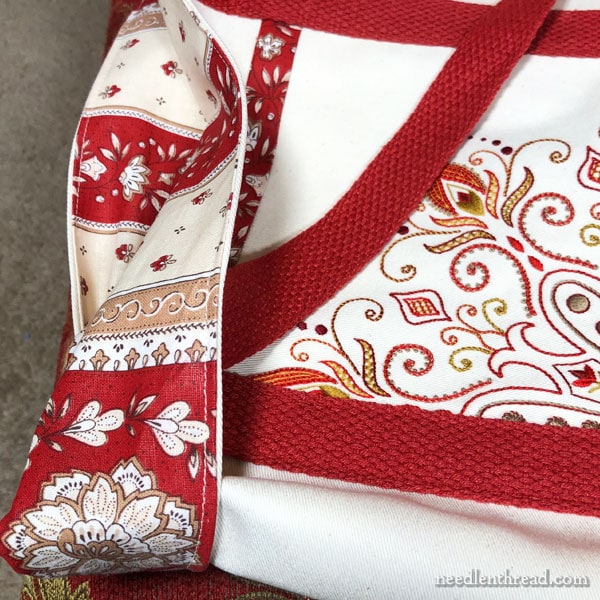
The straps on the original pattern were too narrow and too thick. Once constructed according to directions, they ended up being a quadruple layer of heavy fabric a scant 3/4″ wide – uncomfortable to hold, skimpy in width up the side of the pockets, and visible in bulkiness under the layer of fabric at the base of the tote.
Susie advised substituting cotton webbing, which makes a nice, comfortable handle for a tote. Unfortunately, the weather outside was frightful that day – not a good day for driving, with snow and ice and accidents all over the highways – so I had to put off a trip to town for webbing.
My sister left the next morning and I ended up flying solo on the rest of the tote, but accompanied by lots of good advice.
The whole thing came together easily enough, although the lining does not sit as well on the inside as I would like.
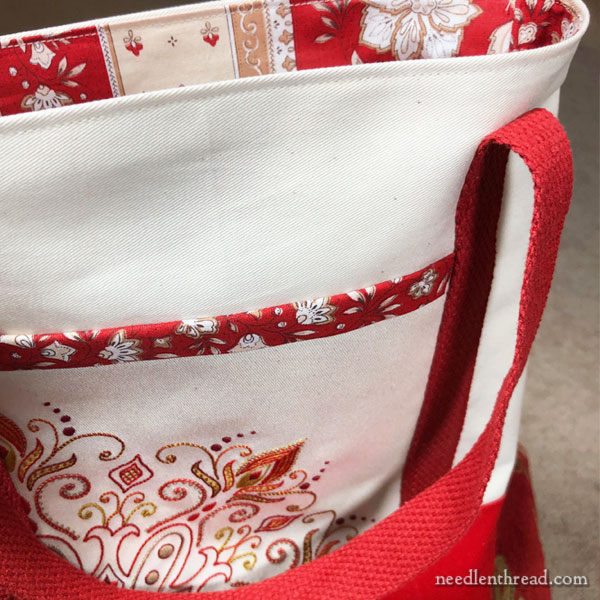
I was super pleased, though, with the lining fabric, as far as color and design go. I love this stuff! I found it through French Connections, where they offer a wide variety of this style of fabric from Provence, France.
I found the lining fabric very easy to sew and to keep straight.
Following the instructions, though, I cut the lining fabric too large and didn’t realize it until after the whole bag was constructed. Next time, I’ll take a different approach, cutting and trimming the lining after the outside is constructed to make sure I get a good fit.
It’s hard to get a photo of the inside of a bag and the outside of a bag at the same time!
Here’s a better idea of the lining fabric, at the expense of crumpling the tote.
Hey – it’s just a tote! It irons!
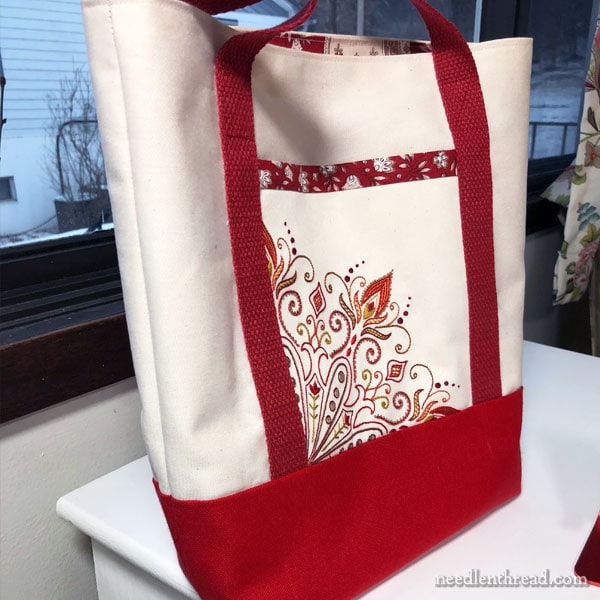
The combination of twill (the lighter, natural fabric) and duck (the red base) make the outer shell of the tote stiff enough to stand up fairly well without being a rigid bag. There’s no interfacing in this thing, so it really is just a simple bag.
My point is not to focus on the construction of a tote, though – you can find plenty of free patterns online for tote bags with instructions on how to make them.
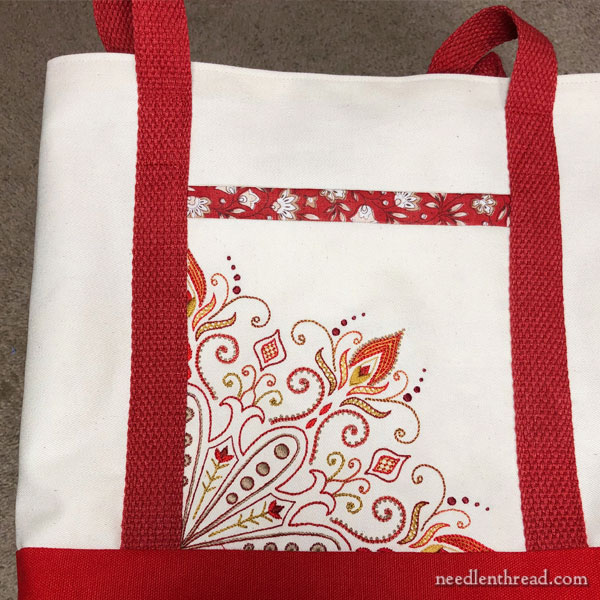
Instead, I just wanted to share a finishing idea for small pieces of embroidery – especially if you like tote bags. I like using totes for project bags or for carrying miscellaneous books and items when traveling.
A decorative outside pocket on a tote bag is a great way to use a small piece of embroidery. It makes any standard tote uniquely your own!
The dreadful thing is that, when I went shopping for that cotton webbing, I found another combination of fabric that would make a lovely tote. And I had so much fun constructing this one that I’m fated, it seems, to make another. I already have a new embroidery pattern in mind for it.
But I must move on to other things first. I’ll keep you posted!
Happy Monday!
Beautiful tote bag……the lining was perfectly chosen for the embroidery you did on the pocket. I love it and know you will enjoy any others you make. Susie will be happy to see this tote.
Thanks, Barbara! 🙂
Love it, Mary! The red accents make your embroidery stand out really well. But I’m curious. Why did you cover up the edges of your beautiful stitches? When I look at it, I want to pull your embroidery up and to the right to see every stitch. Was your embroidery fabric a little too small for the pattern?
I didn’t cover the stitches – that’s the edge of the design. The whole design is split in quarters, so the seams go right up to the edge of the design. There’s no more stitching to the pattern there. If you look back at the original design in the previous links, you’ll see that the embroidery ends right at those edges. Hope that helps!
Well, now I know! It is lovely and probably nobody but me would be so weird.
Also, thanks for the French fabric link. They have several that I really like, and I’ve got it down to two to make new seat cushions for the dining room. Ooh la la!
Mary,
The tote looks great! Your embroidered piece looks perfect on the pocket. I love it!
For quite some time I have thought about making a tote for the farmers market incorporating a simple redwork embroidery piece, however I’m not the best machine sewer. I always have trouble sewing a straight line. If I used something like the lining of your tote, perhaps I would be more successful. The design “bands” might help me stay somewhat straight.
Hi, Mary – Well, I had a sewing machine phobia before this project, and then I discovered (after listening to my sister say it a million times) “it isn’t rocket science.” It was much easier than I thought it would be, and it all just kind of came together. I had some difficulties with the boxed bottom of the tote, due to the heavy seams (and sewing too far into one of the seams so it wouldn’t lie flat), but it all worked out. Just try it! At least then you’ll know if it’s something you like doing or not. 🙂
Why not purchase a few already-made totes to which you could attach your embroidery on? A hot iron and fusible interfacing has many advantages!
One of the sewing hacks on YouTube shows fitting a wide rubber band over the arm of the sewing machine. This helps guide the fabric in a straight line.
If you really really have trouble sewing straight, lay a line of painters or masking tape down the seam line on the fabric, or on the bed of your machine, and follow that. Sometimes I do the tape on the machine so I have a longer guide to line up the edge of the fabric up with. It helps avoid my tendency to want to watch the needle, which can make for wobbly seam lines.
Mary Z, about sewing straight lines, the suggestions above are really good ones. You don’t want to be looking at the needle while you are sewing, you want to be looking at the edge of your fabric if you are trying to keep your seam allowances even. Happy sewing!
Dear Mary
I absolutely love your tote bag you have done a really good job of making the bag. I like the colour red you have chosen it really matches the design on the bag and it’s always useful to have a pocket and the lining it’s lovely. You have obviously got the hang of sewing and I can see will be an expert soon. Thanks so much for showing the finished project tote bag and for sharing it with us, well done. I hope you have a great week.
Regards Anita Simmance
Thanks, Anita!! I’m glad you like it!
Your tote bag is absolutely splendid! Your care with every choice has produced a beauty. Have fun using it.
I LOVE your new tote bag! Wouldn’t you like to open a business and sell them – I would buy one. ;D Or, better still, take a course in sewing tote bags. What I mean is: I envy you your sisters. All of them, but in this case especially Susie. 🙂 As I was much younger, I sewed even bluejeans, but a good sewing machine is half the battle, and a good advisor, when you get stuck, the other half.
But back to your tote bag – it all fits so perfectly together – the fabrics, the webbing, and first and foremost your beautiful embroidery. I’m really enchanted.
Congrats for mastering another exciting ability!
Angela from the Ore Mountains
Mary,
Your tote turned out lovely! What a nice way to show off your embroidery.
I have made several totes and I always add a decorative outside pocket as well as inside pockets to the lining–one inside pocket is the full size of the side of tote, on the other side I add the same size pocket but divide into 3 pockets (for scissors, pad of paper, other small items) by stitching two seams at the 1/3 width and 2/3 width.
Mary’s bag is terrific–and prompts me to mention that making fancy pockets is a great use for the samples that I’d guess many of us have accumulated when learning new techniques. Also, I’ve received various kits as gifts or exchanges for SMALL embroideries–which I’ve made but then what?
I hate to leave all this stuff just sitting there unused–so have turned them into bags, bags and more bags. The small samples or kits are a great size for pockets, and a great focal point on the outside of a bag. You can bind them off and apply them directly to the bag, or insert them into the binding and stitch down, as Mary has done. Best of all, you’ve found a use, as last, for all those how-t0 technique samples. And your bag will attract lots of compliments!
Mary, I sew a lot and love being able to incorporate my embroidery and my sewing. Your bag turned out great. As always, your color selection is spot on.
I always make my bag lining 1/4 inch smaller than my bag. It really helps with the nesting of the lining in a tote.
Thanks for the fabric link. I’ve made market bags and something really fun called Japanese Knot Bags recently. My husband decided he wants a new cooking apron! I’m going with embroidered pockets. Cotton webbing makes great ties on aprons, as does twill tape. Since my husband is French, I’m going to purchase some of their great fabric and make a bit of piping for the pockets.
Terrific finish. Aren’t sisters great!
Did you sew the pocket on after you sewed the tote?
No, sewing the pocket on was the first step, really, in constructing the tote.
What a beautiful end result, and what lovely fabrics!
I’m sure you’re way too modest about your sewing skills; the bag looks very well finished, and I can’t wait to see your next one 🙂
Mary I love this tote! It looks very well put together and coordinated. The embroidery is very pretty! I agree with your sister about machine sewing- it takes getting used to – but is no indicator of artistic talent or vision.
Can’t wait to see the “next one”!
This is absolutely exquisite! I truly love what you have done. Beautiful. I love the red and white….although if I made it I would have to make a very dark color because mine would be dirty in a day. But we all deserve to have something as lovely as this! You did an excellent job on constructing the bag…and I do love the lining fabric as well. Bravo!
Mary,
Your tote bag is absolutely beautiful!!
I have not been spending time on embroidery or sewing much at all lately — but you have inspired me to reorganize and get back to stitching!!
Thank you!
cb
That’s exquisite! And (speaking as a sewist now), I see that the red fabric at the base on the sides matches perfectly. Why am I not surprised?
I love the tote! its beautiful, such a crisp finish! It’s lovely!
Funny, I just finished making my first lined tote today!! But it had interfacing on both the fabrics I used…lots of learning with it. I love your tote…the fabric for the lining is beautiful and your needle work is amazing!
Lovely. It turned out really well.
I made a tote bag from a remnant of fabric I had. It has no pocket unfortunately. Do you think it is too late to add one which would have to be in different fabric…plain perhaps? Your tote looks very attractive and functional! They are great for carting all sorts in! Thank you in advance for any advice, happy stitching! Michele
Hi, Michele – I suppose if you don’t mind sewing through the lining, you could add a pocket? Might be worth it, if a pocket will enhance your pleasure in using the bag!
Absolutely lovely! What a great job. The only problem is that it’s almost too pretty to use.
Nicely done! I like how you positioned the design in the corner out, looks great!
Thanks, Carol!
What a beautiful bag! I should use some of my embroidery instead of let it sit in the drawers. Thanks for giving us a good idea! I’m still teaching sewing lessons and have tons of bags that need something to make them sparkle instead of look like just another shopping bag! Now I know how to add to them, but I will end up having to embroider the pocket after the construction. Not a fun way to play with the needle, but a few French knots and a leaf will do for now!
Very nice bag!
🙂 Thanks, Sophie!
Beautiful!
Marilyn
I love your tote, it’s gorgeous! Well done and Woo-Hoo on overcoming your sewing phobia. Sister is right – sewing is not rocket science. IMHO, it’s better the lining is a bit too large, than too small and pulling the bag out of shape when you put things in it. Don’t wait too long to buy the fabric for the next bag, or it will be gone.
LOL! I went to get the webbing for the straps, and that’s when I bought the fabric for the next bag. It just jumped out at me. Oh bother. This could become a problem!
It’s fabulous all around—beautiful job!
Thanks, Madeline! 🙂
This is beautiful, Mary and now of course I want to make one!
Hi Mary
Your tote is GORGEOUS! I love how the fabric matches the embroidery. You did a great job. If you don’t mind a little tip, for the next one just cut the lining fabric 1/2 inch shorter than the outer and it should fit inside perfectly.
I want to sincerely thank you for your blog! Not many people give so much of themselves in free content to teach their skills and you should know it’s GREATLY appreciated. I’m a beginner to embroidery and just finished the Coloris colidoscope. I love it! I’m diving into monograms next using the patterns in your Favorite Monograms Collection e-book. So much to learn!
Thank you!!
Absolutely beautiful! Love how the embroidery and fabric match so well.
Oh wow! If I can make little heart smileys I’d cover the page! Like you, I’m rubbish at machine sewing. The last time I did any kind of machine work was on an old Singer with a spindle foot. Yes, that long ago. But I’ve also recently taken up sewing again and am pretty pleased with my efforts so far (outdoor cushions WITH zips!). You inspire me in new ways to put hand to machine and try something else.
Thank you for a wonderful site and such interesting blogs. Enjoy spring springing its way over there; we are about to go into autumn and winter, although ours aren’t as hectic as yours.
Kris
This is inspiring. Now I want to make a tote with beautiful stitches on an outside pocket! Thank you!
I think it turned out marvelous! Love the colors, and fabrics. Good job.