


Tool #1 in embroidery, in my mind, is the needle. Without a needle, embroidery would be rather difficult, wouldn’t it?
Next up, Tool #2, is a good hoop or frame.
I know, I know! Scissor lovers out there might argue with me! A nice sharp pair of scissors is certainly necessary, but we can actually get away with a pair of kids’ scissors or household craft scissors if we had to.
But a good hoop or a good frame, used correctly, can make a huge difference in the finished results of a project.
Today, I’d like to pay tribute the The Embroidery Hoop by recapping some previous helpful articles on the subject, with tips so that you can make the most of your embroidery hoop.
If you’re knew to Needle ‘n Thread, you may not have seen these articles from the archives; if you’ve been hanging out with me for a while, a good refresher is always helpful!
First thing first: what makes a good hoop? Or rather, what makes a hoop good?
When it boils down to it, there’s only one question that determines what makes a hoop good: does it do its job? That is, does it hold your fabric taut for stitching?
We can go further, and ask if it does its job without damaging the fabric, without requiring constant adjustment, and so forth. But really, in determining whether or not your hoop is good, you really just have to answer whether or not it does its job at the level you want it to do its job.
If the answer’s yes, then bingo! you’ve got a good hoop!
For further information, though, on what to look for in a good hoop, here’s an article that I wrote way back in 2009 about what makes a good embroidery hoop. The content is still relevant today.
Hoops vs Frames
Hoops and frames are different pieces of equipment. Basically, I use a hoop on short term projects that I like to tote with me, or on projects that I consider “casual” embroidery projects, or on more formal projects that fit within the entire frame of the hoop and that won’t last long.
If I have a project that is going to take a while to work, I usually opt for a frame.
There are lots of different types of frames, but we’re not going to go into them all here. Today, we’re just talking about hoops. If you want to delve more deeply into the topic of the hoop vs the frame, check out this in-depth article.
Keeping it Taut
A good hoop keeps your fabric taut. But one trick to help your hoop do this consistently is to bind the inner ring of the hoop with cotton twill tape.
You can find a tutorial for binding the inner ring of the hoop here, and an even more in-depth one here for how I bound the inner ring on my square-round hoop.
Binding the inner ring also helps protect your stitching fabric!
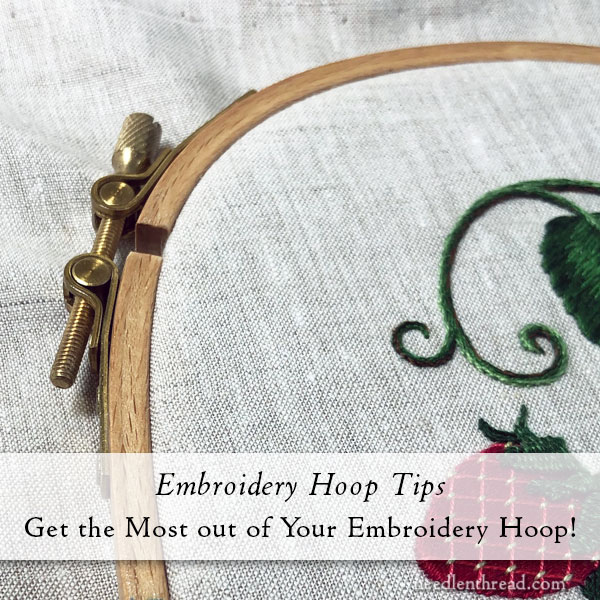
When you tighten the hardware on your fabric, it helps to use a screw driver for the final tightening.
HOWEVER!!! (I don’t often use all caps, so when I do, I mean it!) Don’t OVER-TIGHTEN the screw with the screw driver. If you’ve got a good hoop with good, solid, brass hardware, you don’t need to tighten that screw until the hardware starts to bend. If you do, you’re going to strip the screw and ruin the hardware. Use the screw driver just to save your fingers when you add the final tightening to the screw. But don’t mangle the hardware in the process!
Protect your Fabric
When you work in a hoop – especially if your hoop is hand-held – you might want to protect your embroidery ground fabric. After all, there’s nothing worse than discovering a discolored, grimy hoop ring when you remove your project from the fabric.
There are three things I do to help protect my fabric when I’m working in a hoop, depending on the project:
1. I always bind the inner rings of my hoop (discussed above).
2. I usually remove my work from the hoop after each stitching session, or at least loosen it. This helps the fibers relax and it goes a long way to avoiding a permanent hoop ring. Now, on flour sack towels or other casual projects, especially if I’m stitching a little on them every day, or several times throughout the day, I might not loosen the hoop. When I know I’m going to be away from the project for a while, I loosen it.
3. On fine embroidery projects, I will often layer a piece of scrap cloth over my ground fabric and mount both in the hoop at once, and then cut away the design area inside the hoop, so that my hands are not coming in contact with the ground fabric, but rather with the scrap fabric, when I hold my hoop.
Some folks like to use plastic cling wrap in the same way – hoop up your ground fabric with a layer of cling wrap, and then cut away the design area inside the ring of the hoop, so that you’re holding onto the hoop and the cling wrap rather than you’re ground fabric.
I prefer scrap fabric for this approach, because I can reuse it. Plus, I’m the type of person who only engages in fights that are worthwhile – and fighting with cling wrap is not worth my sanity! It drives me mad.
Use the Right Hoop for your Fabric
Another tip that is easy to forget, especially when we become attached to a particular hoop. Use the right hoop for the fabric! Good wooden embroidery hoops come in various thicknesses. The heavier your fabric, the thicker your hoop.
For example, if you’re working on a heavy duty linen twill, doing some crewel work, you’ll benefit more from a hoop that’s 5/8″ thick or 7/8″ thick (depending on the project’s size), rather than from a hoop that’s 1/4″ thick. You’ll get more support from the hoop and it will hold your fabric better.
Favorite Hoops
My favorite hoops these days are still the Hardwicke Manor hoops that are available through Access Commodities. You can find them at fine embroidery shops and your local needlework shops that carry goods from Access Commodities.
You can also find them online through specialty needlework shops, like Needle in a Haystack, which carries the whole line.
Hope these hoop tips come in handy for you!
You can explore many more articles on embroidery tools under the tag “needlework tools” right here on Needle ‘n Thread.
Hello Mary
I love this little article. I find good hoops hard to come by. I do have some really old sturdy hoops. There is a brand in UK called Elbasee they make amazing hoops in variety of sizes and thicknesses. I haven’t tried their frames yet. They also do clamp, seat and floor stands. I do have their seat on stand and I know that the stand can also be used for their clamp which I haven’t tested yet.
Boy. That was more typing that intended. I was wondering whether Elbasee products are available in US as a pen pal of mine enquired about it recently.
They are available over here, coming from the UK mostly. I find the quality of the Hardwicke Manor hoops a bit better, personally.
I often use a q-snap type frame. To keep the fabric from slipping, I super-glued twill tape to the frame. It has been on there for several years and has worked great.
Thank you Mary. I am learning a lot from your very detailed posts.
Hello Mary
Do you use hoops of different sizes? For example hoops 10 cm in diameter or larger?
There are people who say that smaller hoops are better for embroidering than the big ones (18cm in diameter).
What is your opinion?
Hugs from Rio de Janeiro , Brazil
Angela Garcia
Hi, Angela – Yes, I use different sized hoops, depending on the project I’m working on. I don’t generally like to go beyond an 8″ hoop if I am holding the hoop in my hand, because it’s too difficult to stretch my fingers half-way across the diameter of a larger hoop, when I need some extra fingers on the back of the work or the front of the work. I find larger hoops a bit too unwieldy to hold, but if I’m using a stand that can hold them, then I don’t mind using a larger hoop. The largest hoop I have is 12″, but I rarely use it.
Dear Mary
Good to be back been away and been busy with other things to do with my hip replacement, nothing serious, more exercises. Anyway back to hoops, I find it difficult to tighten the fabric taut with hoops but I think I was using the wrong size hoops for the fabric. I wasn’t aware that the thickness of the fabric and hoop make a difference to the tautness, great advice. Hardwicke Manor are the best but very expensive I have to save my pennies to buy more. Thank you for sharing with us the tips and techniques on using hoops.
Can I finish my cross stitch hoop with a piece of round muslin on the back after I trim and stitch together my aida cloth? What is the best way to do it? Should I hem it first so it will fit?
I suppose a hemmed version would look better on the back for finishing. But I’m having a hard time picturing what you are planning to do. I’m not sure what you mean by trim and stitch together my aida cloth. Do you mean stitching across the back of the hoop to hold the cloth in place better? If so, yes, I’d definitely cover that up with something, whether it be muslin with the edges turned, or something like wool felt, which also creates a neater looking back without having to turn edges under.
Hi, I’m new to embroidery and have just completed a piece in a hoop for a gift which I’d like to frame within a hoop to finish. The problem is that the hoop that came with the kit is plastic. I don’t like the quality and would rather the end piece be framed within a wooden hoop. My question is how easy would it be to remove the plastic hoop and successfully put the finished piece into a wooden hoop as its frame instead? I’m worried about lining it up and getting the taughtness correct. Don’t want to ruin it as it took so long to make! Thanks for any advice for this newbie!