


Good morning and welcome to the last installment of Dragonfly #1 in this series of tutorials on how to embroider a dragonfly!
If you’re just joining us, you will find all the articles relating to this tutorial – plus several other tutorials, including how to embroider wheat, strawberries, daisies, and grapes – in this project index. Lots and tips and techniques in there, so why not have a browse?
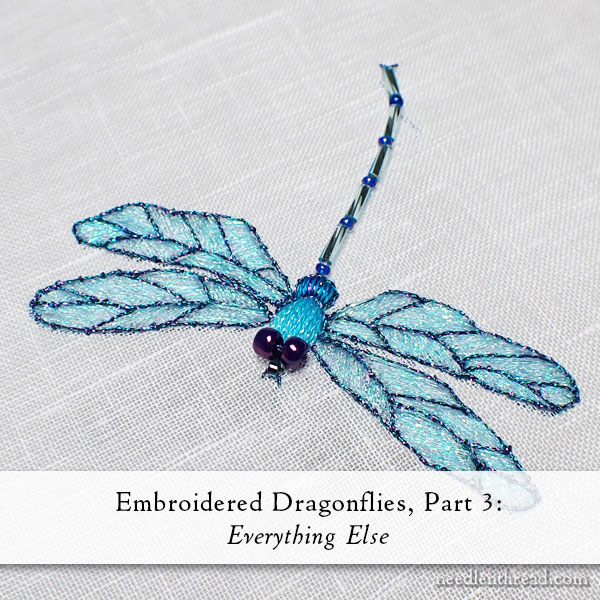
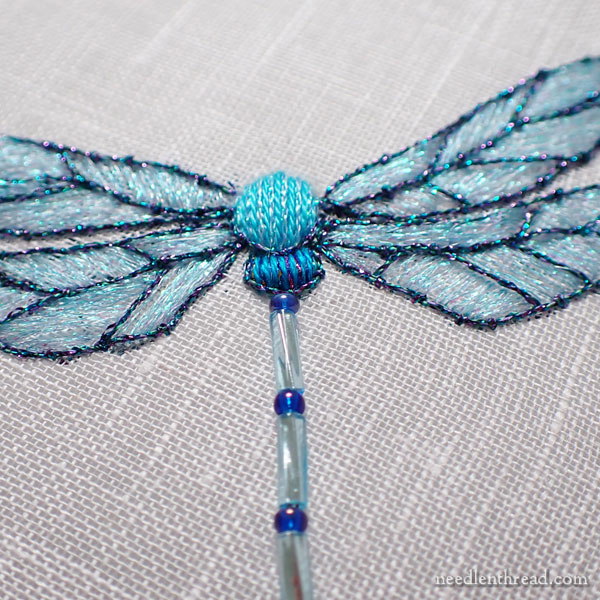
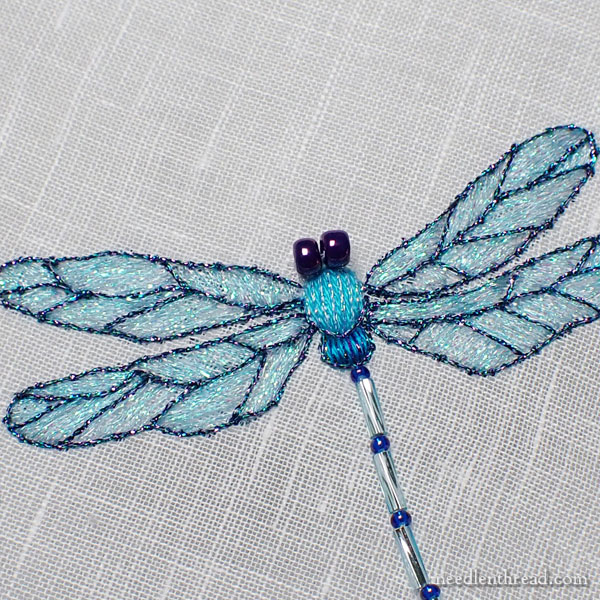
We’ve already embroidered the thorax and the wings on our dragonfly. Today, we’re going to embroider everything else: tail, eyes, and little bits to enliven the bug.
As usual, Needle ‘n Thread members on Patreon will receive the latest tutorials of the series in a handy-dandy PDF format for easy printing. I’m rolling the last tutorials into one download, and it will be available soon.
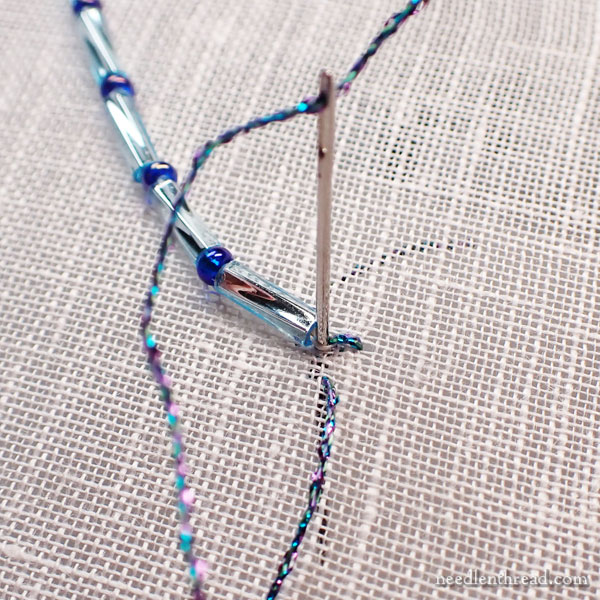
Before we launch into the tail, we’ll take a look at the fly stitch outline on the parts of the thorax, which were mentioned in the last installment but I’ve had a couple questions about them.
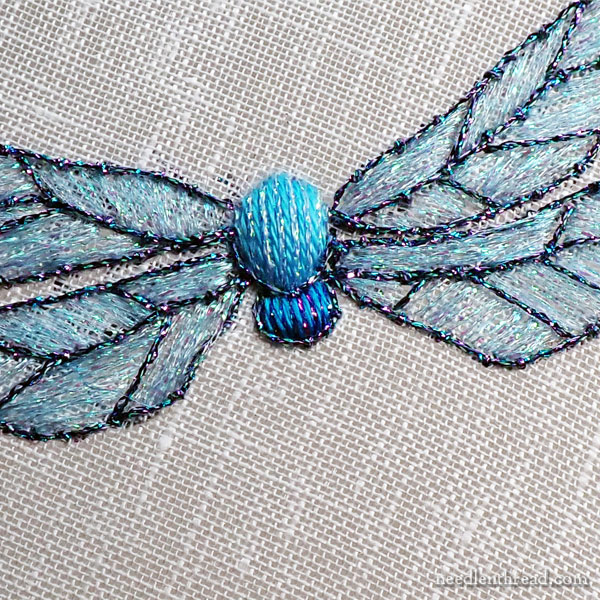
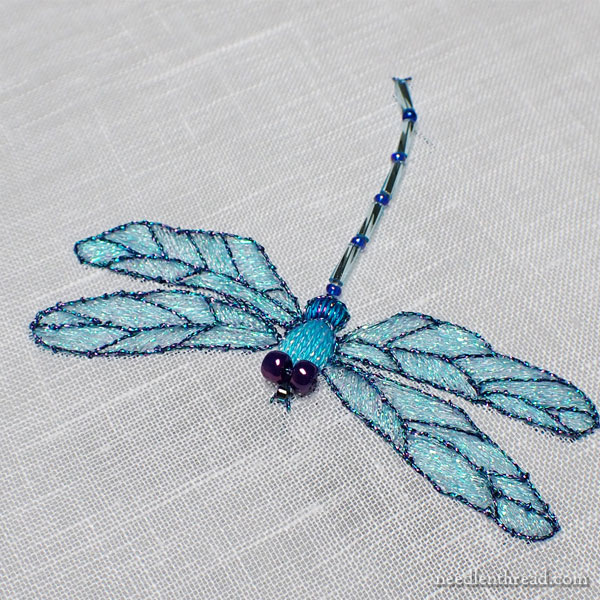
Here’s a close-up. You can see that the larger section of the body has a metallic thread around half of it, and the lower section is also surrounded by the same dark metallic braid used on the wings.
Those are fly stitches, but the sides are couched as well, to hold the stitch into the rounded shape.
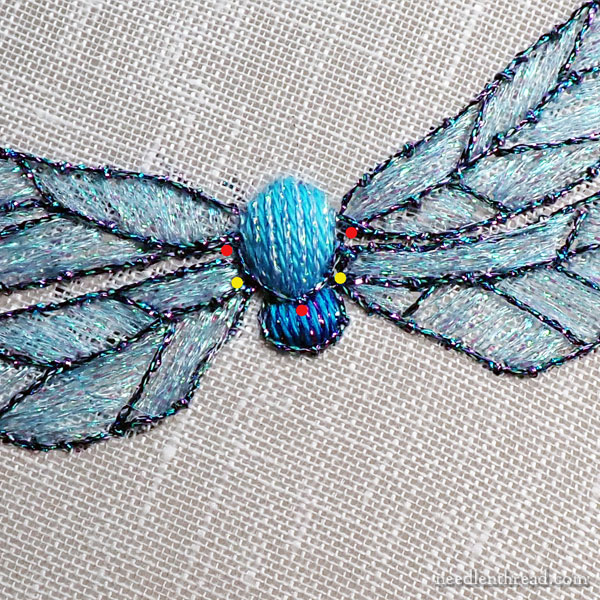
To explain further, see the red dots in the photo above? The fly stitch starts at the dot on the left, bringing the thread to the front. Take the thread to the back at the dot on the right side of the section, and then, before pulling all the way through, come up at the base of the padded section, where the red dot is at the lower center, and catch the fly stitch and couch it down.
Then, work an extra couching stitch over the sides of the fly stitch, where the yellow dots are.
Do the same on the smaller section of the thorax.
For the tail (which is technically the segmented abdomen of a dragonfly, not a tail!), we used bugle beads, and specifically, twisted 6mm x 2mm bugle beads. I don’t know what brand they are – they came in a tube. That’s all I know! If you have a bead stash and you have 6mm bugle beads, you’re in good shape! If you have 4mm beads, just use one or two more to cover the length of the tail.
We also used 11/0 Czech glass seed beads in a color called Sapphire Iris.
We used 6 lb Fireline (fishing line) to attach the beads, but you can use a coordinating color of floss if you don’t have any Fireline.
Begin with a seed bead at the base of the thorax, and then alternate bugle / seed / bugle so that you’ve threaded up four beads total. Take the thread to the back at the end of the four beads.
Then return to the top of your four-bead line and, using the same thread, work a small couching stitch between each bead and over the thread.
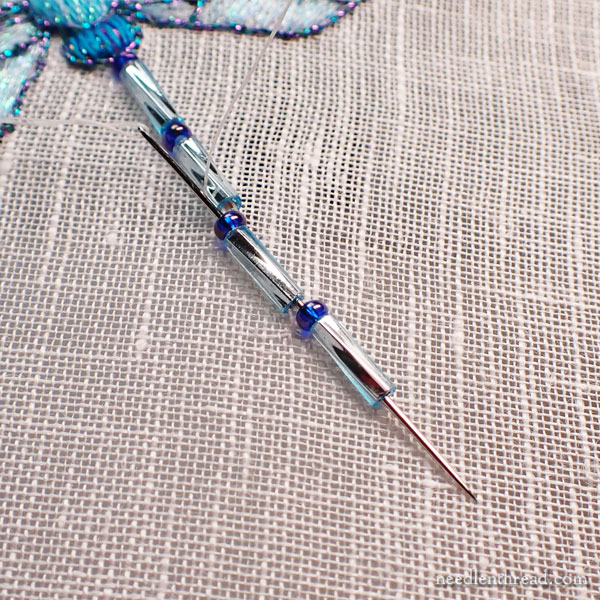
Come up directly after the last bugle bead in that four bead line, and thread on four more beads in the same sequence.
Take your needle and thread to the back of the fabric after the last bugle bead of the second set of four, and then bring them to the front right where you started that section of four again, couching over the thread between each of those beads.
This couching between the beads really helps to hold the beads exactly where you want them.
Finally, work one more seed bead and one more bugle bead at the end of the line.
This last pair of beads is set at a jaunty angle, just to give the dragonfly a little life.
Couch over the thread between the two beads again, and you’ve finished the beads on the tail. Simple!
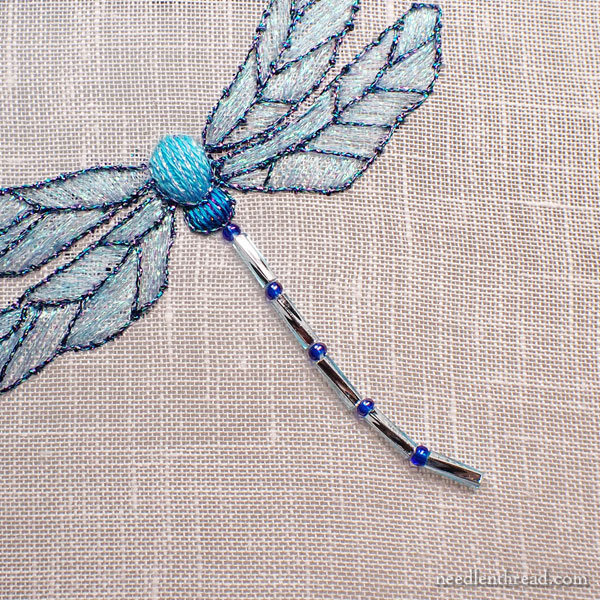
At the top of the tail and the base of the thorax, where the Fireline comes to the front to start the tail’s bead line, we had a little gap of white, because the Fireline is white.
It wasn’t a Hugely Visible Gap, but still – the tail looked disconnected.

Easy remedy: work a small straight stitch (like a couching stitch) right over the gap, using the heavier metallic braid that outlines the thorax.
Use the same braid to work a small inverted “V” (working tiny straight stitches) at the base of the abdomen (“tail”), right after the last bugle bead, for the little abdominal appendages.
Don’t carry the braid across the back from the top of the tail to the base for these two tiny stitches. It’s better to end the braid and start it again at the base of the tail. Otherwise, the braid will show up behind the beads through the fabric.
Of course, if you’re not using this almost-sheer Glass Linen and you can’t see through your fabric, then I suppose you could carry the braid, running it under a stitch or two on the back so that you don’t have a long stretch of braid that could loosen or catch on things.
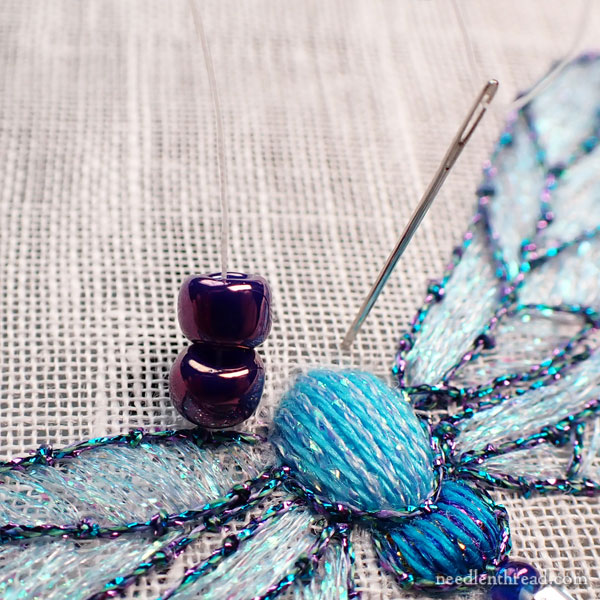
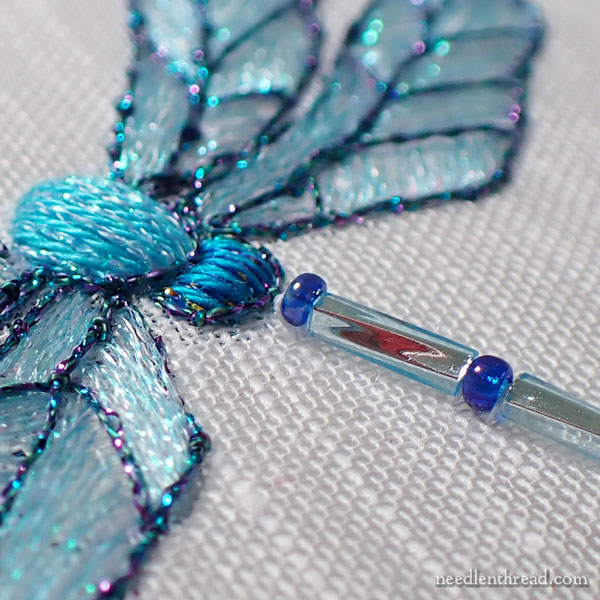
Now it’s time to add the head, which is comprised of two eyes (6/0 round seed beads) and a jaw (11/0 delica bead or Mill Hill Magnifica, with a little metallic braid).
Use Fireline or a coordinating thread color to attach the two seed beads in place at the top center of the thorax. Pass through the beads several times, to secure them, and then couch over the thread between them, to secure the beads further and to pull them into line a bit.
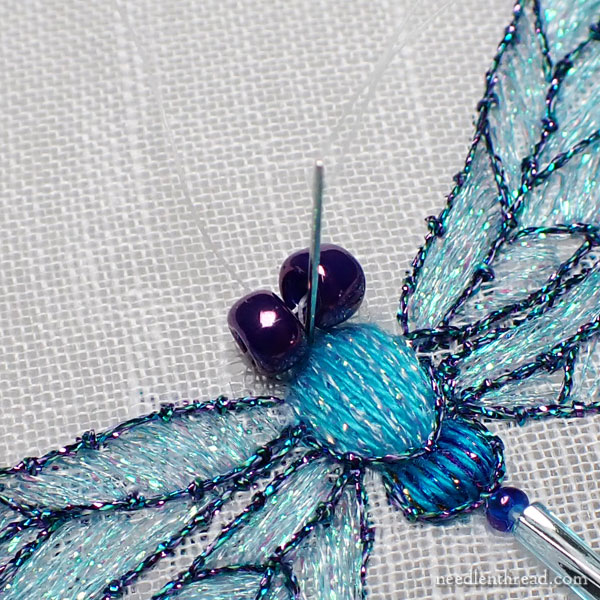
We’re going to couch one more time between the eyes with the metallic, which will help pull them a little farther into line.
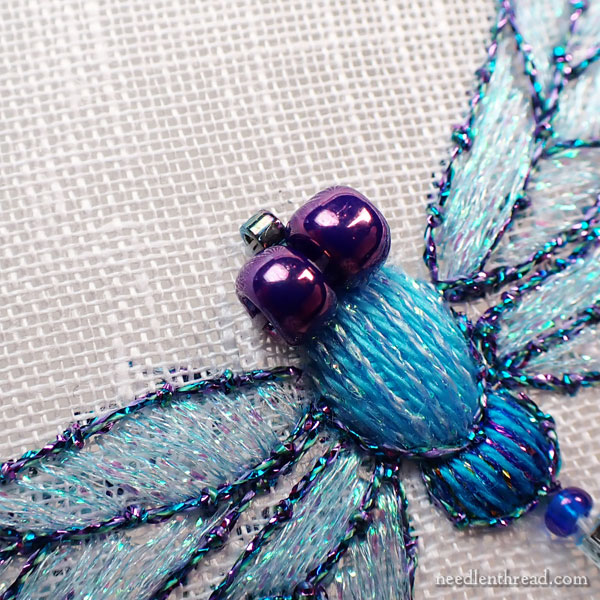
Sew the delica bead in place, centering it in front of the eyes. A seed bead will work, but the shape of the delica bead – which is a tiny tube – works great for this.
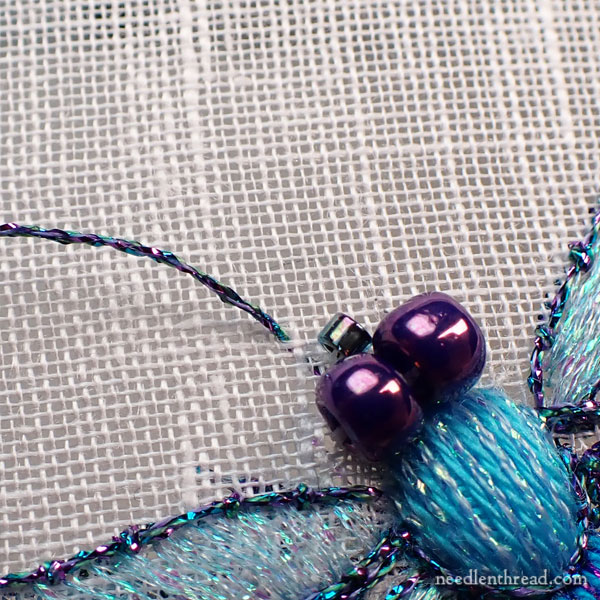
Thread up your metallic braid, secure it on the back where it can’t be seen, and bring it to the front of the fabric just in front and off to the side of the small delica bead.
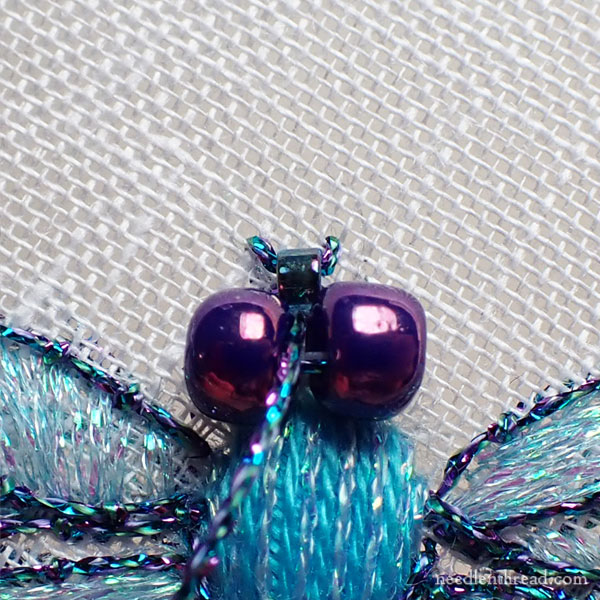
Pass through the bead and out the other side, so that the stitch creates these little “barbs” on the sides of the jaw.
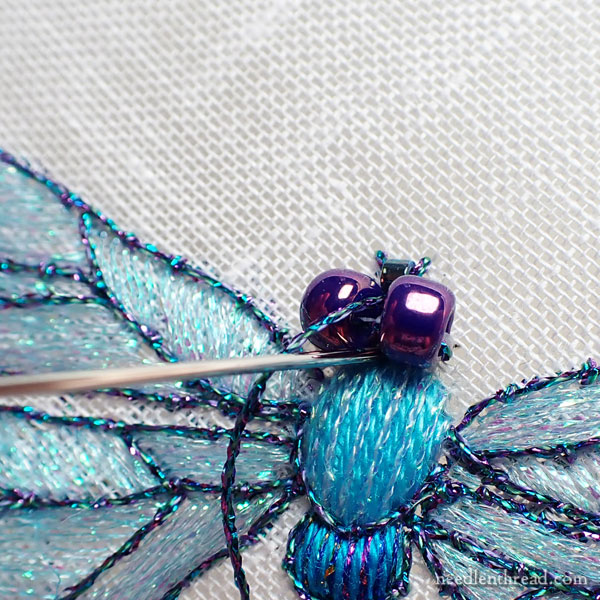
Use the metallic to couch over the thread between the eye beads one more time.
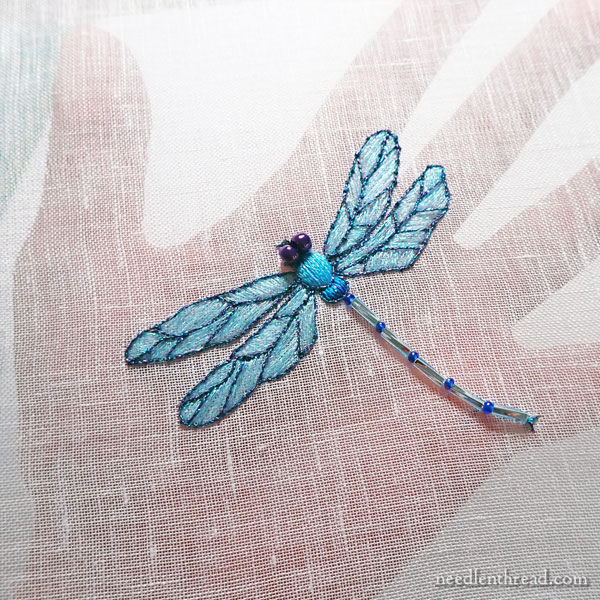
And that, my friends, is the finished dragonfly!
We’re going to do one more version, this time with a simple background behind it, and we’ll be using a different color scheme. So stay tuned for a new design and some further instruction!
You’ll find all the articles for the dragonfly so far in the How to Embroider (Blank) index here.
Members over on my Patreon page will be receiving all of the tutorials as a handy PDF download as soon as I can post them. I’m putting the finish in one download, but I realized there were some sequencing problems in my photos, so I’m going to fix that before publishing the printable.
Coming Up
I’m working on next year’s series of tutorial projects. They’re really fun so far. We’ll be making some embroidered finished things that are both useful and beautiful. I’ve coined an appropriate name for the series – I’m excited about it!
Good news, too, is that Anna Banana is back with me, as the northern climes didn’t work out for her. Yay! We’ll be approaching Needle ‘n Thread a little differently together, and that will be exciting, too. I’ll tell you about it as next year unfolds.
I know it’s weird that I’m talking about next year. But as we approach Thanksgiving (and then the Stitcher’s Christmas series of give-aways), things wind down pretty quickly.
Lots coming up! Stay tuned!
PS – Today I’m having a little corrective procedure on one of my eyes. I plan to be around Friday, but if not, blame it on the eye. Hopefully, this is the last eye problem and things will only improve from here. I’ll keep you posted!
I love this little guy! Using the glass linen helps so much to give the ethereal, “flitting” effect! As this is the first year I’m making a number of “little” pieces like this to give as gifts, I’m struggling to think of things to do with all the finished projects. How do YOU plan to mount or “finish” this dragonfly that shows off the translucence of the glass linen?
I’ve been following your dragonfly closely. They are so wonderful and yours captures all their iridescent sparkle. Loved your work with the beads. Most often I just add beads as singles to add sparkle and texture. I loved how you couched the thread between the row of beads. For some reason I never thought about that and one thing that bothers me a lot is wobbly beads. 🙂 Now I know how to tame them.
This is beautiful! I can’t wait to give it a try. Thank you for sharing with us such an inspiring and ethereal project. I know there are many of us who love dragonflies. Also thank you for your detailed instructions. I am sure they will come in handy when actually working on this wonderful project.
Gigi
Just wonderful! I’m not going to embroider it but just admire your work.
Gorgeous! I usually see dragonfly wings done with translucent iridescent fabric. I like the option of using sparkly threads instead of having to search out fabric and most likely have to buy far more than I’d ever use.
I didn’t read the full post before I commented… Bummer that up north didn’t work out for Anna, but I am looking forward to what the 2 of you get up to in needlework. Good luck on the eye correction, it certainly would be wonderful to have the last thing fixed.
Dear Mary
I’m so glad for you that Anna is back helping you I’m sure that is a great relief. Welcome home Anna. The dragonfly is beautiful and I love the way you have used the beads they on the eyes and tail lovely, as you know I love bead work and this project is really beaded and lovely. I do hope the corrective eye procedure works out for you and you can put the whole catarrh eye problem behind you it must have been so difficult for you. Thank you for sharing the dragonfly project with us and for the photos above. Looking forward to next years projects.
Finally caught up with all the posts been rather busy lately with various things and been away going away on Thursday but back on Sunday so catch up on Monday.
Regards Anita Simmance