


Today, I’m going to chat with you about a Massive Embroidery Project that I’m not actually doing.
Well, I’m doing part of it. The least-fun part! I’m doing all the set-up and helping with some pointers to get it going.
I don’t consider it “my” project, since I’m not actually doing the embroidery. *Sigh*
It’s actually a good thing, because this project is Huge.
By huge, let me explain!
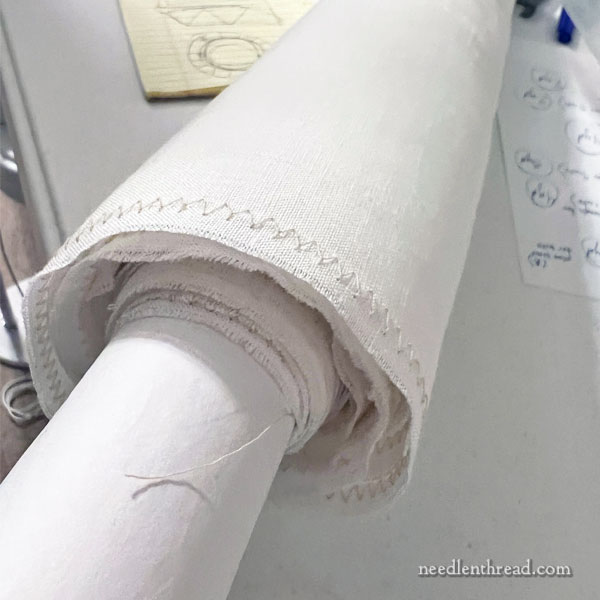
In the photo above, that’s a piece of linen approximately 17″ high and …. 21 feet long. Twenty. One. Feet. Long. That’s a long piece of linen.
The project is three altar cloths for a large church. (So, three pieces of linen, each 17″ x 21′.)
What is wanted for the cloths is a front decorative piece of cutwork in white linen that will extend the whole length of the altar plus its height on both sides. The linen is cut a little longer than necessary, to make sure there’s no shortage at the time of finishing.
The linen I’m using is the “Caster Sugar” linen in my white linen sample packs. It’s a beautiful linen, fine enough to be beautiful but crisp enough for cutwork. It is not quite medium weight. I think it’s lovely linen for decorative (or “fair”) altar linens.
To prepare the linen, I first cut it along the thread, in the width and length required. Then, I sewed around the edges with a simple zig-zag stitch on my sewing machine to neaten the edges a bit and reduce the fraying that can happen when a project is in the works for a long period of time. (You can read about neatening the edge of linen or fabric for embroidery projects here.)
Rinsing & Shrinking
To rinse the linen and shrink it completely, I used a big white plastic tub reserved for this purpose, and a hot-cold rinsing process.
I kept the linen folded up in a piece about 17″ wide and maybe two feet long. I didn’t wring or twist the linen at all during this hand-rinsing and shrinking process.
First, I soaked the linen in very hot water (too hot to hold your hand in it for long) until the whole linen was saturated with the hot water and warm all the way through. This requires a bit of lifting up and down and swashing in the water, but without messing up the linen.
I left it sitting in the hot water for a while. Then, I dumped off the hot water and rinsed the linen thoroughly in cold water (which, this time of year, is Very Cold), until there was no warmth in the linen at all. I made sure to open up the layers of linen and really get the cold water in there. You can put your hand between the various layers to feel if there is any warmth left in them – you really want the cold water to permeate everywhere. I let it soak a bit in the cold. At this point, the whole piece of linen goes very stiff!
Then, I dumped off all the cold and repeated this hot-cold process the same way, two more times. I left the linen in each hot rinse anywhere from 20 minutes to an hour, mostly until the water was tepid. Then, I dumped the water and ran very cold water over the linen again until it didn’t feel warm anywhere, filled the tub with cold water, submerged the linen in it, and let it soak.
After doing this three times, I boiled several kettles of water. I dumped the last cold rinse off and poured boiling water over the linen. I used some spatulas reserved just for this purpose to lift the linen layers and move the water through, and then to push the linen under the surface of the water and hold it there. I let it sit until it was room temperature (which takes a while!), then rinsed it in cold, and then laid the linen out in about a 17″ wide x 4-foot long folded stack, on a table covered with soft white towels.
I covered the linen with more soft white towels and pressed all over them with my hands, to help remove excess water from the linen. Then, I smoothed out the folded linen stack as neatly and wrinkle-free as possible, on a clean, hard table top, and let it dry to just-barely-damp.
Then, I ironed it all.
I did this with all three pieces of linen, all the same size.
The fabric is ready. The shrink is out of it. It feels marvelous and looks marvelous and is so smooth and pretty!
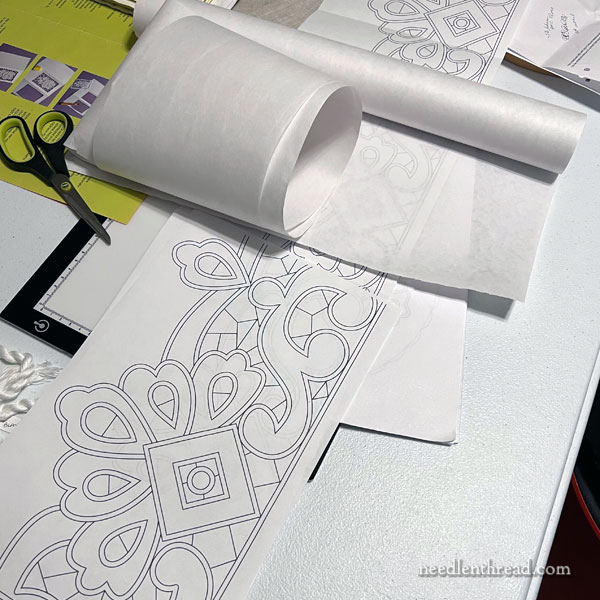
The design for the cutwork is from one of Joanna Jakuszewska’s Haft booklets. I wrote about Joanna’s cutwork kits recently, here. If cutwork is something you want to try, you should definitely check out her kits – they’re a great and affordable way to delve into the wonders of cutwork!
To apparently help fit the scale of the church, they wanted the design for the cutwork edge scaled up, enlarged about 150% from the original. Admittedly, I’ve got some reservations about this approach, but when you’re working for someone else, ultimately, it’s what they want that counts. So I expressed my reservations, and then went ahead to accomplish what they want.
My reservations are mostly dealing with upscaling a cutwork design. Your spaces of cutwork increase in size, but without more support. The bars get longer, and there’s a lot more open space between bigger areas of linen. So here and there, in the design, I added some more support bars where I thought they would be necessary, but where they would still flow with the design in a sensible way.
The other reservation is about the width of the embroidered edges of linen. The outlines of the embroidered elements are much wider, once a design like this is scaled up. I think the embroidery will definitely require more padding, to get good definition in the design. And this all affects, as well, the choices of thread weight and so forth.
So there’s a bit of work and fiddling to get the design to work at this scale.
There will be a total of at least 17 repetitions of the design, too, to create the whole cutwork edge. The transfer process requires some serious consideration. I’m still working on that! I’m testing different reasonable methods.
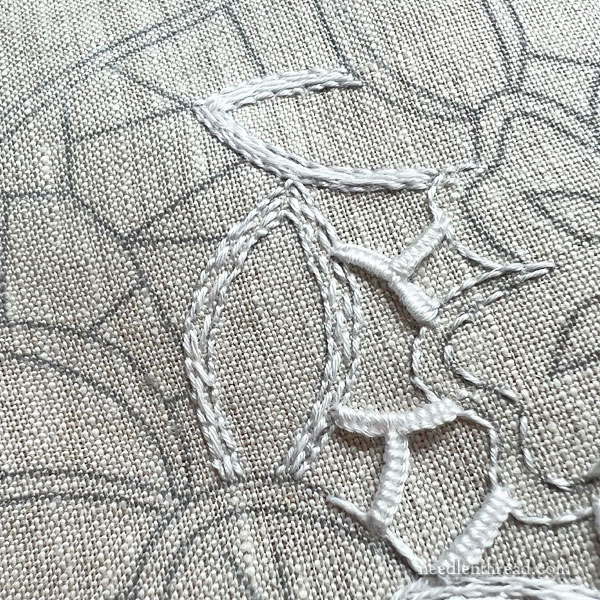
As far as the actual embroidery goes, regular cutwork thread works wonderfully on any of Joanna’s regular sized designs. This is a practice piece I set up, to demonstrate the methods and sequence of work. I’m using a design out of one of the Haft booklets. I transferred it onto natural colored linen so that it’s easier to see the techniques in progress.
I’m just using #25 cutwork thread (coton a broder #25).
I haven’t done any of the buttonhole stitching – just some outlining, padding, and the bars.
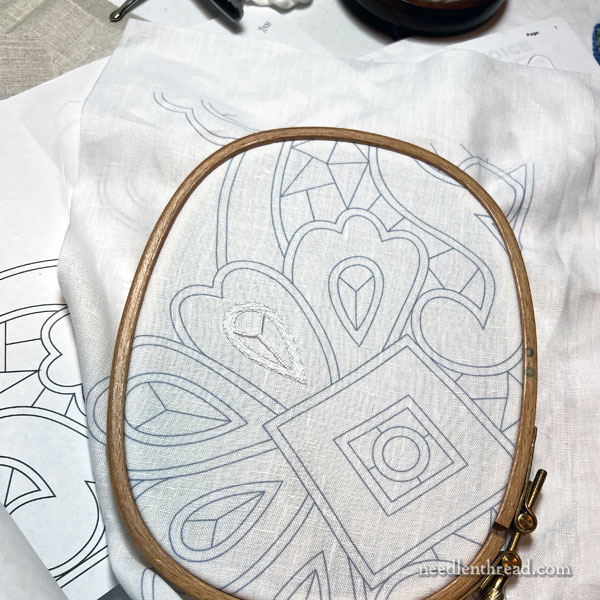
This is a test section of the enlarged design, set up on a scrap piece of the same white linen that will be used. I was testing sequences and techniques on the larger scale, using the same thread. I’m not sure about it. I think it will work, but I have a few more things I want to try.
Then, of course, there’s the whole washing process. If we transfer via an iron-on process, I want to make sure that the ink will not discolor the linen or the threads at all. With whitework, especially on this scale, it would be foolish to risk it without testing, testing, and more testing. With the time, materials, effort, and expense going into something like this, you can’t really risk an end product that doesn’t wash well!
So that’s a huge project going on in the studio at the moment. Once the testing is finished, the transfer is done, and the linen is set up on frames, I’ll hand these off to a few other people for the actual embroidery. And then I probably won’t see it again for at least a year.
I’ll let you know about any discoveries I make and things I learn as I finish up my part of this project!
I like this type of work, but it makes me a little nervous when it is at this scale, and for someone else. It’s one thing if I screw up my own stuff. It’s a completely different story when I mess up on someone else’s!
Heh heh.
Coming Up
On Friday, we will delve again into the Bee-Jeweled Pincushion project that started here with the design. I’ll clarify a few things about what you can expect. Don’t worry! I will give you all the information you need as the project progresses, just as I do with any tutorial series here on the website!
The kits sold out pretty fast (in under 4 minutes), but I am scurrying to prepare more – just waiting for more supplies to arrive! If you want to be on the advanced notice list for the kits so that you receive an email when they’re available again, just drop me a line!
Will be interested in following this progress, Mary. I love doing cutwork. Easy stitches, doesn’t require a lot of brain power. Your process for readying the linen sounds very time consuming, but I bet it’s just lovely to stitch on once it’s done. Me, I’d be likely to just start stitching on it without any of that prep work. I’m a bit lazy like that…
Oh Mary, only you would be brave enough and dedicated enough to tackle this enormous project. Love cutwork … so dreamy and elegant. Looking forward to how it goes. Blessings!!!
How will you transfer the design on the altar cloth?
I’m working on that question now. 🙂
Very interesting. I just received 2 Richelieu cutwpork projects from the vendor you wrote about on January 5.
The linen is lovely, quite heavy so I will have to decide on thread. Wonderful to see the huge project you are preparing. Thanks for bringing this source of projects for us this technique to our attention.
Hi, I like cutwork embroidery and would like to try it. Do you know of a source for coton a broder thread in the US? I also do Schwalm embroidery and have bought thread in Germany while taking lessons there. I’d like to find a US source for the thread.
Needle in a Haystack, this link will take you to their cutwork thread page. If you’re looking for a wider range of colors, Lacis (www.lacis.com) is a good source.
I’m wanting one of the”Snipets” Pincushion kits.
Could you put me on the available notice list please? Thank you so much for a project that really got me excited to do!
Hi, Roberta – Can you drop me a line via email, please? The advanced notice list is an email list, so I need an email to reply to. Thanks heaps!
I cannot wait to watch this project! Hope the embroiderer will share progress pics and the Final!
We’ll see – I don’t know if I’ll have access to it again once I finish my part of the work.
Wow – what an endeavor! Since you aren’t doing the embroidery, who has the magic fingers? And will you share with us a few pictures of the finished Massive Embroidery Project when it is completed?
We’ll see! Once I finish with this part, I don’t really know if I’ll ever have access to it again. Things move on, you know. It’s being embroidered by volunteers. I’ll go over the techniques with them in a class, and then my part should be finished. I think.
Oh wow, you are so clever. Thank you for the very interesting and detailed read. It is a world I know very little about. I would quake in my boots at the sight of all that linen in my hands. I read and imagine, and look forward to the next post on this. In the meantime I can attempt the pincushion – thank you. I have also purchased your Floral Corners E-Book. Bi for now, Sandra
This will be fabulous, but very tedious work. I hope your stitching partners have lots of patience. I’ve done very little cut work, but would enjoy a small practice piece. Altar linens are a very exciting project, but these are huge.
Mary, this is fascinating. Church linens — especially the very large ones — almost always make me stare and wonder how handwork like that is accomplished. I never really contemplated the “back office” production involved, and am just now realizing what a huge project it is. I hope you’ll be posting photos of the transfer process and the setup for the frames! Thanks so much for sharing it —
What a huge project! It will be a magnificent piece of embroidery when it’s finished, but I do understand your reservations about enlarging the cutwork design. I look forward to hearing more about it and seeing it in place on the altar one day.
I can’t imagine a project like this. I’ve used your process to prepare linen twice and the pieces were small. I can’t imagine doing it with something that large. Good luck. I hope they reconsider and go with your advice.
Holy Christmas, Mary! What a project. This cutwork drop will be sewn along one long side of a fair linen — or is the altar’s depth so narrow that the 17” will cover the altar top and then drop in front? (If this is an altar placed against the wall – priest facing away from the congregation – that could make sense.)
As someone who has laundered & ironed fair linens: have they really thought this through? How will it be washed when the inevitable wine stain happens? What if the cutwork shrinks in the washing: how to ensure that the ironing doesn’t pull the bars loose over time?
Won’t the cutwork border simply drape more-or-less invisibly on each side? I bet you’ve already raised all these points with the commissioner (and its Altar Guild). They don’t want a) to do just *one* of these to see if it really works like they hope; or b) consider making this drop a superfrontal that a plain fair linen would cover?
I’m curious how this will get mounted on a frame for the embroidery: surely a scroll frame? (Trying to imagine a 21’ slate frame…). Really interesting, challenging project — and I’m glad _you_ aren’t contracted to do all 63 feet of cutwork!
Oh, sorry, I used “fair linen” to mean decorative, rather than topmost. There are three linens on the altar. There will be a linen over the top of this linen, which fits only the depth of the mensa and does not hang over the front. The cutwork linens will stay in place for long stretches of time, while the topmost linen is removed more frequently for laundering when necessary.
Yes, the cutwork edge will be sewn onto the front edge of the linen. It hangs much better. Also, it makes it easier to salvage if the main linen needs replacing for whatever reason.
The person in charge of the project has made altar linens this way – not just with cutwork, but with different types lace. Her role is the construction part.
A slate frame scrolls. The top bars are called “rollers” because you can roll the fabric on them and only expose what you’re working on. To work on trestles, it may require working with the design oriented perpendicular to the stitcher. Or you can rest the slats on a stand, too, depending on the type of stand.
This. Is. Exciting !
This sounds like a once-in-a-lifetime project, I’m so glad we can be part of it from a safe distance !
Yes, I would definitely call it once in a lifetime, too. Although there are three, so I suppose it’s thrice in a lifetime. :-/
Looks like you have your hands full. I would definitely consider this “your” project with all the engineering that you’re doing.
Wow, what a project! Thanks for pointing out that there’s more than size to consider when enlarging a pattern even though some of them might not apply to all types of needlework. I suppose the same concerns exist when reducing a pattern, except in reverse with things becoming too crowded and threads too large.
Will the zig zag be removed for finishing? I prefer the 3-step zig zag (if your machine has it) for the linen edges. It seems to do a bit better job at controlling any fraying on the fabric. However, regular zig zag is much easier to remove.
It’s room for the finishing – the zig-zag part won’t be included in any of the finishing. The excess will be cut away. I normally like to use overcast, but I don’t overcast foot for this machine. And I didn’t even think of the triple zig-zag. I’ll keep it in mind for the future, though! Thanks!
This was such great information that I read the article three times! I, too, am preparing for a large-scale linen project and was very interested in the linen prep. I have always just soaked my linen in a tub of very hot tap water until it cools, rinse in cold water and then repeat the process a few times ending with a thorough final soak in very cold water. My question for you is, after the first three hot water soaks/cold water rinses, why do you then switch to a 4th soak in boiling water? Is very hot tap water not enough heat? Is this purely about shrinking the linen or does the boiling water help to remove starch/sizing?
As for the design, I appreciate that you shared your concerns about the Richelieu with your readers. When I read about the customer’s request to enlarge the design, I became very nervous about the stability of the work over time. Even with your careful addition of extra reinforcement bars, I really worry that the design will start sagging after a few washings and well, gravity. I really hope that the client listens to your expert advice!
Shrinking happens because of the hot/cold sequence, and I have always found that the hotter the water, the more thorough the shrink. It is super duper important that all the shrink is absolutely removed from this linen. So I always end with boiling water.
Hi Mary! I wonder … would this hot/cold/press/iron method work similarly with linen twill? I have a large (roughly 96″ square) coverlet design on linen twill I received from an anonymous stash and I’ve been pondering various methods of dealing with washing the fabric, either before or after it is stitched (I’ll be doing it in crewel using Appleton threads.) The twill itself is a bit soiled in places (it is likely at least several decades old!) and I would dearly like to wash it prior to stitching, but am a bit worried that the design will disappear or at least fade beyond reasonable sight. I have traced the entire design onto velum and mapped it to a diagram so I can re-create if necessary. I could stitch it first and then wash it which would take that fear away, but I’m still not sure how best to clean the fabric. Any suggestions you might have would be greatly appreciated!
Unless you know how the design was transferred,I would not wash it first. If it was screen printed, it would probably be fine but if not, washing could be problematic.
Wow, what a project. Watching with fascination. Thanks for explaining how to prepare the cloth.