


I introduced you a few weeks ago to the set-up work I’m doing on some Really Big embroidery projects (that I’m not embroidering).
Yep. It’s true. I get to do the fun part! You know, figuring out how to set up these relatively huge projects so that the transferring of the designs can be done in a reasonable amount of time, in a way that will produce a precise, clean transfer.
And then doing the transferring. And then framing up the projects so that they’re ready to stitch. And then perhaps a little coaching on how to stitch them. Maybe some troubleshooting on the difficult areas.
That’s my part of these projects. And it really is the relatively short part of the process. Those who are doing the actual embroidery will be living with these projects for at least a year.

In the introduction to this project, we talked about preparing the linen.
After the fact, the final dimensions for the linen came in, and the embroidered part will only take up about 17.6 feet of the linen (not the whole 21-foot piece). So that’s a big old bonus!
The final dimension of the embroidery, then, are around 8 inches high by just around 17.5 feet wide (around 211 inches).
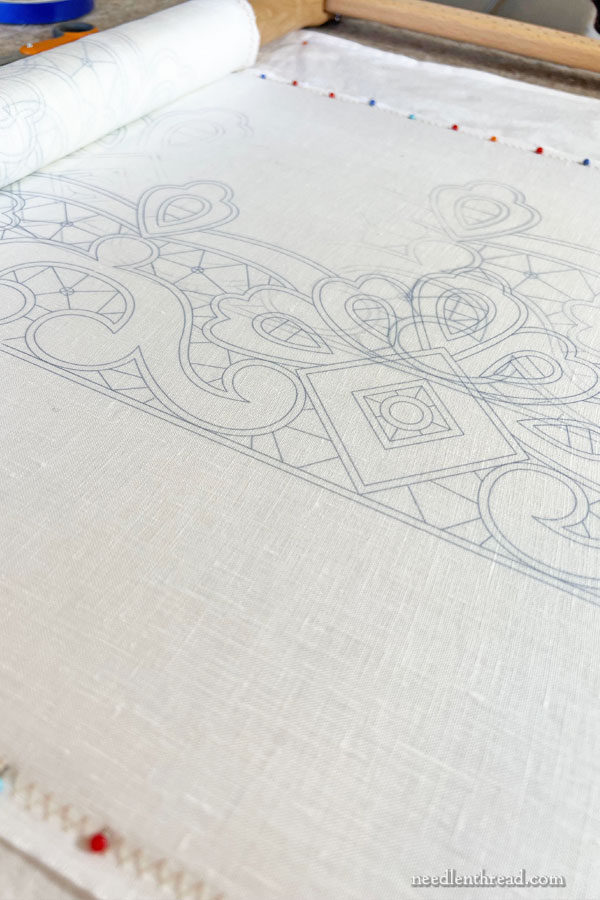
The embroidery technique will be cutwork, using a satin stitch edge over a bundle of threads for padding, in a method called overcast stitching or trailing, depending on how you look at it. There will be wrapped bars in the cutwork areas. We talked about the techniques already, here. I’m still messing around with techniques and troubleshooting, so I’ll fill you on final decisions for the stitching a bit later.
The Transfer Question
So, how do you transfer in a precise, clean, neat, and hopefully “relatively” quick way a repeat embroidery design across a 17.6-foot long piece of linen?
There are many ways to transfer embroidery designs to fabric – ancient ways, like prick and pounce; more modern ways, like iron-on transfers, direct printing, screen printing; there’s tracing; carbon tracing; tissue paper and tacking stitches… and more!
But the fact is, transferring in pretty much any method except a heat transfer or direct printing (the latter being very expensive for custom printing on custom fabric, so pretty much infeasible) would take a very long time.
And while a “long time” can be a somewhat relative term, when you’re talking about 17.5 feet of fabric, I think we can agree that it would take a long time in the most literal sense.
So, heat transfer it is. This requires custom printing the transfers with special ink. It can’t be done with just any ink.
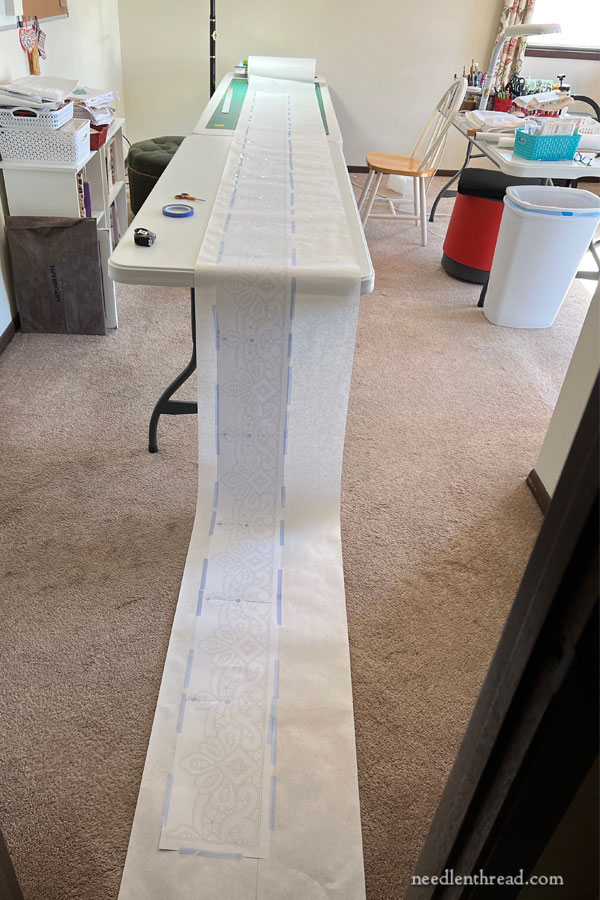
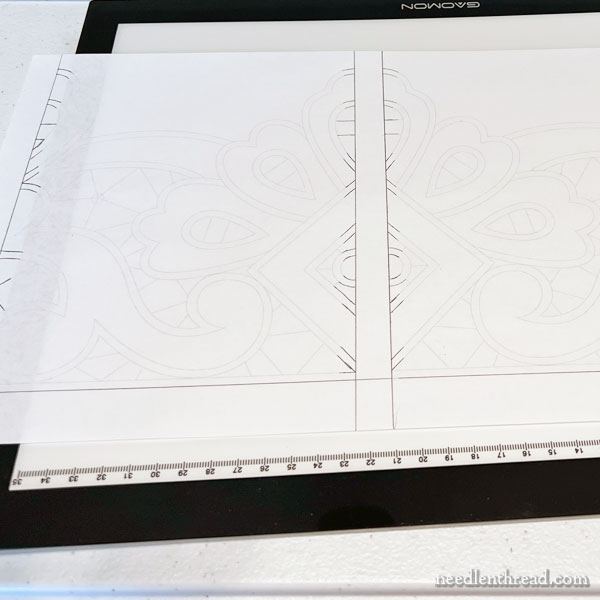
At first, I thought we might be able to set up the entire length of the design and transfer the whole thing without working in small segments. Using a roll of paper, I fixed the design repeats very carefully to an 18-foot long piece of paper, using heat resistant tape.
I made sure all the joins between each repeat were lined up perfectly. (That’s what’s going on in the photo above.)
Then, I pinned the linen on top of this very long design layout.
But alas!
When working with large embroidery designs, it seems to be important – no matter how you’re transferring the design – that the fabric is under some tension when the design is transferred. Among other reasons for this, tension helps keep the fabric straight on the grain, without shifting. And this is definitely important!
Working with the whole design set up, we had no way to tension the whole fabric. We tried pins, but that didn’t work well.
The rolled paper with the design on it, and the fabric, just kept rippling and buckling, making it unlikely that we could transfer the design without some shifting and whatnot going on.

At this point, it became evident that we would have to work in small sections of the design. Although this would definitely take longer, the outcome would be much more certain, and the process would be much less nerve racking!
And it wouldn’t take nearly as long as, say, tracing or pricking and pouncing. So that’s a good thing!
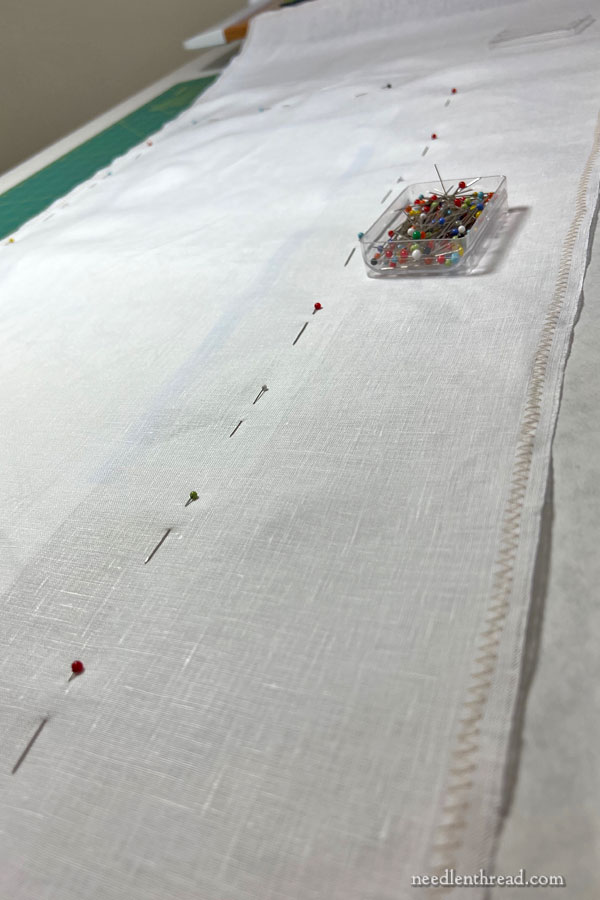
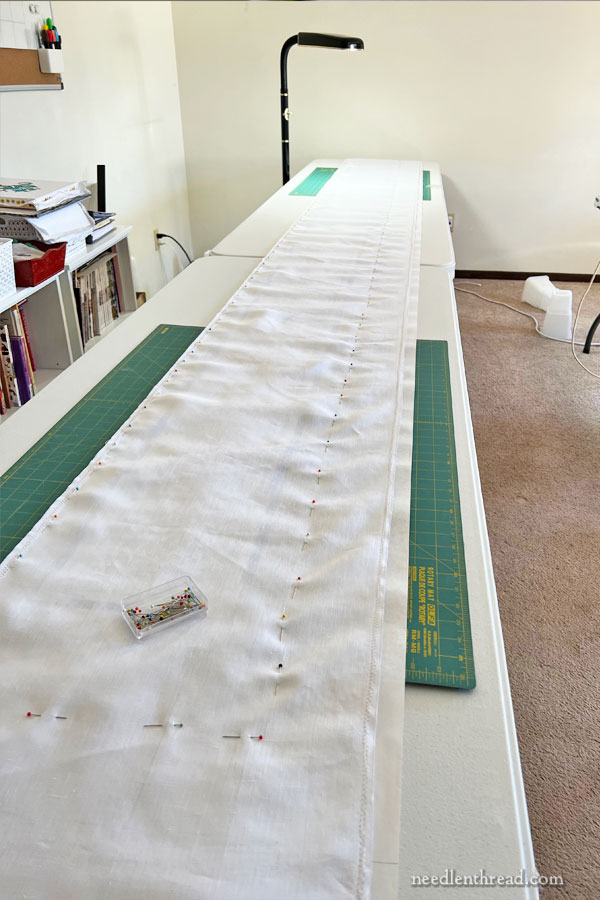
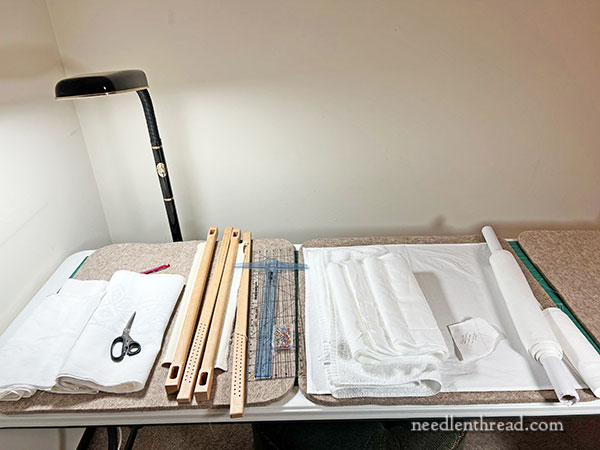
We set up a test piece to try small segments. We mounted the fabric on a slate frame, using the rollers to expose enough of the fabric to transfer two sections (out of 32) of the design.
Using the side arms or slats of the slate frame, we put tension between the rollers, so that the fabric was under tension horizontally. To achieve vertical tension on the design, we pinned the sides of the linen to heavy wool ironing mats on the work table, pinning one side along a straight line, and then pinning the other side, pulling it slightly taut.
This gave us enough tension to effect a very neat transfer with good joins on the repeat, that followed the grain of the fabric well and kept the design in a straight line.
This makes sense, and it works well.
Still Time Consuming, But…
This process is still time consuming, but it is not nearly as time consuming as other methods. And the result is a pristine, crisp transfer.
The time consuming parts of the process are preparing the transfers, working with the framed-up fabric (rolling, unrolling, pinning), and then fixing the transfers very carefully to the fabric, making sure the joins between the repeats on the design are precise.
In order to make sure the repeats are lining up, we have to prepare each transfer by marking the back of it. We use a light pad, and we trace the edges of the design so we can see where the new transfer will meet up with the previously transferred repeat.
We also trace the horizontal line that run across the top of the entire cutwork design. This is what we measure to the edge with, to make sure the design stays straight along the fabric. If one design repeat were to shift off that line even an 1/8″, by 24 repeats later, the design could be 6″ off its path!
We also trace the exact edge of the repeat design, which is where we cut the paper.
Now that we’ve worked out a method that will create a precise, clean, clear design transfer, we’ve got everything set up and we’re ready to do the job on the prepared linens.
This is not something that we want to make a mistake on. Imagine getting down to the 30th repeat and the pattern shifting! Or … I don’t know! … accidentally transferring one of the design repeats upside down!
That would be hilariously not funny.
So now, we will work carefully and slowly through the process of the design transfer.
I’ll let you know how it goes!
Wish me luck! LOL!
I enjoy these posts very much. I really appreciate your thinking as you approach a work I would find overwhelming. Saying a prayer for guidance and a sure transfer. What a beautiful offering to the Lord!
How awesome it must be to work on such an important piece and I’m sure you’re actually enjoying the challenge. What a privilege it must be for the folks working under your tutelage.
You don’t need luck, but I will be praying for you! Thank you for documenting this process. I love these kinds of projects (as in very complicated and high stakes) once in awhile.
What an undertaking! I am am sure all will go well!! I enjoy reading about this process and look forward to the next steps.
My motto in life: Do you want it good or do you want it fast? Impossible to have it both ways.
Mary,
This is amazing! Thank you for sharing this info. I hope that your work gets noticed by artists, artisans. and conservators around the world.
Beth B
I am really fascinated with the enormous project you are working on. The logistics of transferring the design to the fabric is quite a project. I think your work is so beautiful. I am very interested in following your progression. Thanks for the post today.
I have this image of Anastasia Dolby, Hinda Hands, Alice Dryden and Lucy Vaughn Hayden Mackrille watching raptly through the celestial gates and smiling with satisfaction. What a clever technique, Mary!
Yikes. Well, they would have had a good chuckle, cuz we really messed up on that particular transfer. However, third time’s a charm – on Friday, we got it right.
What are you actually using to mark it with? Pencil? Pen? Chalk?
Wow, what a process. It’s fascinating, but I admit I do not envy you for undertaking it 🙂 I suppose another consideration was how durable the transfer method is? I’m guessing some methods might have the very real danger of the pattern being worn off while being worked on?
Where did you get the pattern printed? I’m wondering if it’s not too dear cost-wise, if having transfers professionally printed might make more sense than trying to mark patterns by hand? Especially if one has trouble finding good supplies and tools.
@Sunshine – I always heard a similar saying, except with the 3rd option of “cheap” added, and you can only get 2 of the 3 things at once.
I have a commercial set-up for this purpose. I produce a whole line of pre-transferred, ready-to-stitch items this way. It’s not just a matter of the printing of the design. There are other aspects involved, not the least of which is creating the printable image of the design as a vector, and then experimenting with the line weight and the density and tone of ink, etc., to get the transfer right. It takes a lot of work and time, a fairly big learning curve, and for most people embroidering at home, it would be much more time consuming and work intensive than a one-off, hand-transferred design would be. Hope that helps!
Mary:
Brava! You are a marvel! You would have to be to be able to consider transferring 18 feet of pattern on to its linen fun!
Amazing! Truly amazing!
Regards
Maggie
PS ditto the comments saying that it is a privilege to do this work. Taking a page from your book, I offered to do some stitching for my church long ago. I could so imagine what a blessing that would be. Sadly it was not to be.
Hi my mom used to embroider pictures and I am looking for transfers as my sister as taken up the Hobby and we cannot locate the Old paper transfers large enough to create a picture can you help
Hi, Jayne, if you’re located in the US and you’re looking for iron-on paper transfers, they sell them at places like Hobby Lobby in the needlework section. Most of them are “Aunt Martha” patterns, but they have some other ones as well. Hope that helps!