


Lots of little loose ends to tie up today here in the studio and on the website. Bear with me! It’s been a crazy, wild ride this week and last on this end of the stick. Golly!
But first, today, I want to show you, calmly, some bits of stitching that will most likely finish up my coverage for quite a while of the whitework linens we’ve been talking about. (Well, I don’t say that with certitude, but maybe more with hope. Remember, they’re not my project!)
In figuring out this whole cutwork project and trying to make sense of it, I explored different ways that it could be stitched. I always picture a certain “aesthetic” for this type of ecclesiastical whitework – clean, crisp, white, tidy. And satin stitch checks all the boxes, really, when it comes to simple elegance in whitework.
We talked earlier about buttonhole stitch vs satin stitch for this cutwork here.
I’m trying to keep the approach as simple as possible for those who will be doing the work.
After some more time playing around with the stitching, it seemed to me that I could pare the whole process down to four parts, with the ultimate result being cutwork featuring elegant satin stitch with whipped bars.
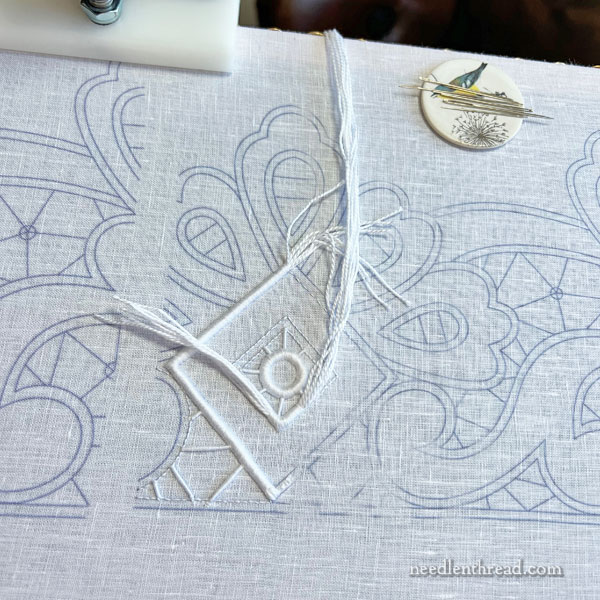
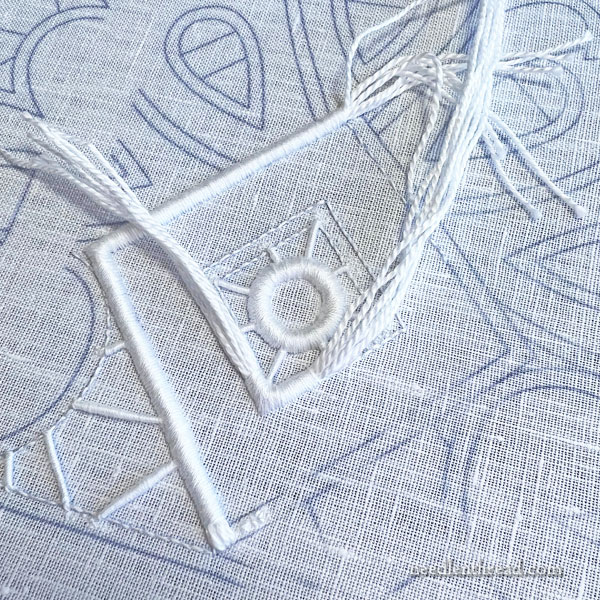
Incidentally, on the practice piece I’m playing around with, you can see that there are two partial designs transferred. The one on the left is larger than the one on the right. There are three cloths being made – one with the larger design, and two with the smaller.
I’d already played a bit with the large design, so I wanted to test some ideas on the smaller design, since those cloths were being handed off first.
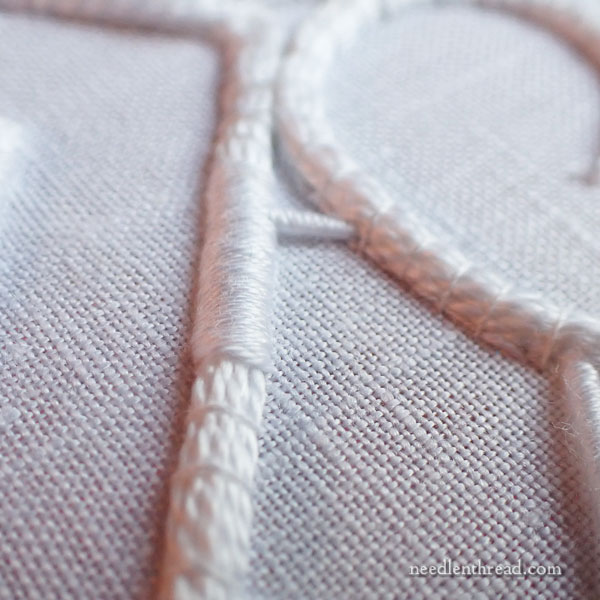
So, the four “levels” or stages of stitching in this method of satin stitch worked over string padding, with whipped bars for the cutwork supports, include, in this order:
1. A reverse running stitch outline along all the design edges that will be satin stitched
2. Whipped bars created during the above outlining process
3. Laying the string padding
4. Working the satin stitch
When I first started testing ideas, I didn’t sew the string padding down. I just tensioned it slightly in my left hand while satin stitching with my right. But after working this way a little bit, it seemed to make more sense to lay down all the string padding and sew it down with a fine white sewing thread.
An obvious reason for this is that it just gets all the padding done and out of the way. But it also lays out the order of work for the satin stitch – you can see where you need to go and how you need to get there, especially in areas where parts of the design butt up next to each other. In these areas, the shared pathways can be satin stitched together if the padding is in place.
I also figured that stitching down the string padding would make it easier for the newbie to get comfortable with the piece. It will free up both stitching hands, too, so the embroiderer won’t have to mess with the string padding with one hand while working the satin stitch with the other, like you usually do with overcast stitching.
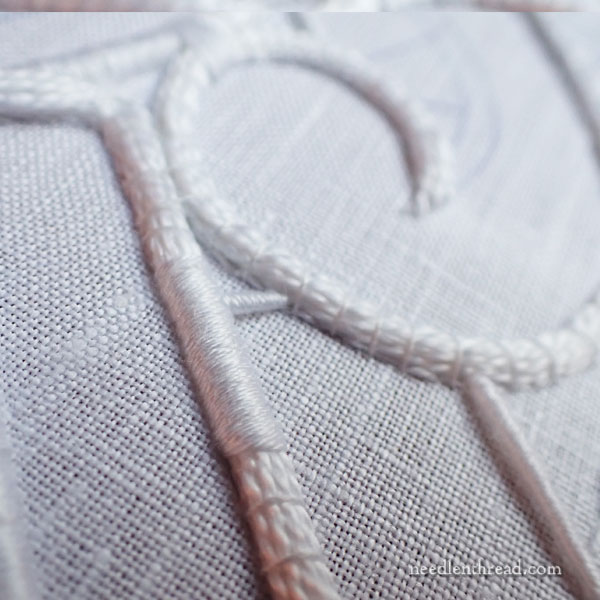
Of course, there was the concern that the sewing threads might alter the look of the satin stitched top layer somehow, but they really don’t.
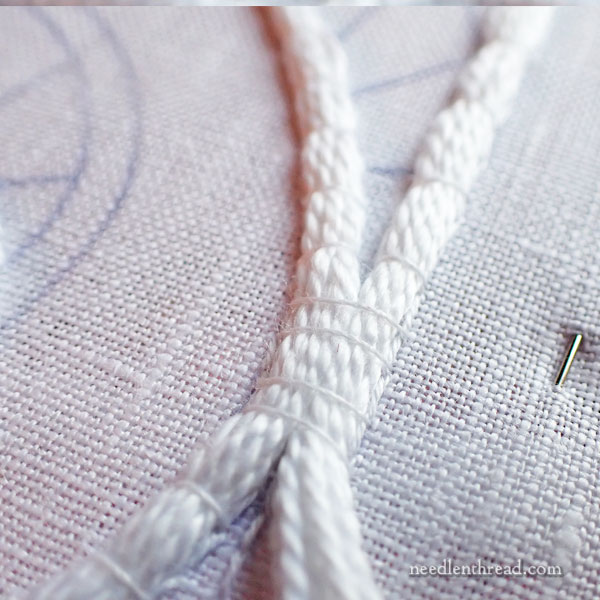
With satin stitch, I like to stitch shared pathways as one, if possible, and then branch off the shared pathway into the smaller satin stitched lines. So I put the string padding together wherever the outlines followed parallel pathways for a little bit, just to see how it would play out with the satin stitch.

I always like seeing this approach in monogramming. I like it here, too.
Wow. My satin stitch looks seriously crammed together here, though.
Ah well…. it’s only practice, right?! Heh heh.
No Chain Stitch
I eliminated the whole idea of an inner chain stitch line on the design (we talked about that in the previous article).
Instead, the whole space between the parallel edge lines on the design will be satin stitch over string padding. I think this will give a more secure edge, since the satin stitch will sit a bit deeper into the linen along the cutwork edges.
And Th…Th…That’s All, Folks!
I hope that’s all for now on this project. We’ll see! It seems that one of the volunteers won’t be able to start embroidering before Easter-ish, so I might keep that linen in the studio and maybe get it jump started. We’ll see.
In Other News…
In the meantime, here are the other newsy bits that have made Studio Life a bit wild and crazy lately!
Jo Butcher Books
You might remember that I reviewed Jo Butcher’s new book here at the beginning of last week, and opened up pre-orders for the book – something that I never do on principle, because I don’t like selling if I don’t have the thing in hand to ship.
But, since the folks at Inspirations had sent me the UPS tracking number and my boxes were already en route within the US, I was pretty darned confident that I’d be able to ship them this past Wednesday. And that’s the way things should have played out.
Unfortunately, the boxes that arrived were all the current issue of Inspirations Magazine, which I didn’t order. Oh, the irony! So the real shipment is again speeding its way to me across the highways of the US. They should be here in the first part of next week apparently. They will go out to you as soon as they get here!
Perhaps I should have known better. Four out of five shipments of books in the past 8 months have been near-disasters. All I can figure is that it has to be me. I can’t imagine that other businesses have these types of problems this consistently. One can but chuckle in disbelief, really…
I apologize Big Time for the delay, and if you have ordered the book, I promise it will be on its way to you as soon as it is in my hands.
Bee-Jeweled Pincushion Kits
If you requested advanced notice for the Bee-Jeweled Pincushion, an email went out to you yesterday. The kits are ready and they will ship in batches today and Monday. They’re going out priority, so they should get to you relatively quickly.
If you want a supply kit for the Bee-Jeweled Pincushion project we’ve been exploring here on the website, you’ll find the remaining available kits right here! If they run out, I will try to prepare more, but wow! There was some sticky stuff going on in the supply chain with this last run, so … it might be a little bit longer this time. I’ll do my best!
Coming Up
Next week, we’ll continue with the Bee-Jeweled Pincushion, now that you have time to finish the greenery on yours. Of course, no pressure – there’s no deadline.
I’ve also been fiddling with embroidery frames lately. We have to have a talk, you and me, about that… and about the mess I’ve been making while exploring theories.
Beads. We’ll talk beads at some point, too! Yay! Sparklies!
Have a wonderful weekend!
What is the reverse running stitch you mention for the outline?
Reverse running stitch is running stitch first in one direction, then returning and filling the gap. It takes a lot less thread (and there’s a lot less build up) compared to backstitch, but the look is essentially the same on the front of the fabric.
Like Holbein stitch?
Really like seeing this behind-the-scenes (or under-the-stitches) setup. So informative. Love the simplicity of the techniques you’ve decided on, too.
Too many questions, so feel free to ignore one or three!
Feel dumb asking this, but what’s reverse running stitch? Does that just flip the stitch size and gap so, if the gap would be Amm and the stitch Bmm for running, the gap would be Bmm and the stitch Amm for reverse running? Like I say, probably a dumb question.
Do you use cotton sewing thread? Cotton seems hard to get these days, so I wondered if it mattered.
Is it a special kind of string? It doesn’t look much like regular string!
I mentioned in an earlier blog post on this that it’s perle cotton. I haven’t had a problem getting cotton sewing thread, but this is just all purpose thread. Reverse running stitch is running stitch in one direction, and filling the gap in the other.
Ah, sorry. Obviously didn’t read carefully enough about the perle cotton. Thanks for answering all of my questions!
Oh Mary, you and your work are SO special. I am AMAZED at the intricate beauty of the whitework and your determination to get it “just right”. Getting your emails every week is like opening up a treasure chest. Thank you so much for sharing your gift of creation! Have a wonderful weekend!!!
🙂 Thanks, Kit!
Enjoyed today’s email very much … once I could get around the title!! LOL! I must have a bit of dyslexia in me or something, but every time I saw the title in my inbox, it drew me up short. My hubby and I had a good laugh over it! Happy weekend, Mary! 🙂
This is exquisite work and, Oh, the patience.
Really interested in this article. I have an antique (1700’s?) curtain panel in poor condition that I want to attempt to stabilize one day. Working with something 6′ long is a bit daunting.
Three questions: how will the panel – physically – be divided (cut?) between stitchers?
How will it be put back together?
What frame will the embroiderers use to stitch? hoop? slate frame?
Would love to see a picture of the work when it is in progress.
While I am typing – is there a way to contribute to your website/business on a annual on one time basis? I HATE monthly deductions. It is a good way to attract problems.
Thank you!
Lois
Hi, Lois – the panel won’t be cut. They’re working the full yardage of the whole thing. Each one (there are three being made) is mounted on a slate frame, and the excess fabric is rolled on the rollers of the slate frame.
I don’t know if I’ll be able to share progress photos. Once it’s out of my hands, I don’t think I’ll see it again!
I’m working on the yearly option for Patreon. It’s a bit of a difficulty, but I’m trying to work out a solution. Thanks for asking!
It’s a good idea to tack down the padding far ahead of the working area. I think it would get to be a hassle to deal with those tails in addition to the satin stitching. Will the people stitching the linens be working together (as in physically)? I’m wondering how everyone will keep that satin stitching the same size. At least I imagine there’d be widely differing tension put on those stitches without some sort of control(?). I’d probably end up with different sizes doing it on my own depending on my mood! Will there be reference samples for each stitcher so they know what size to aim?
Bummer on the (not)book shipment, at least they aren’t in the bottom of the ocean in a container.
No, they aren’t working together. They are three separate cloths worked by three separate people. The size is dictated by the design.
True about the bottom of the ocean! LOL!
I forgot another question (or 2, 3) about the trailing threads –
1. at the end of a line (like in photo 4), it looks like the threads get run to the back individually and secured to make a nice pointy end?
2. for closed designs like the squares and circles, do the ends get run to the back and secured? Or do they simply lay loose and the next thread gets put end to end with it? 3. in those closed designs, are the thread endings are staggered, not all in the same place, to prevent an obvious start/end showing in the satin stitching?
I don’t recall you ever writing about trailing threads, at least in depth. I did find it briefly mentioned back when you were doing the monogram posts in 2015-2016.
They’re staggered to bring things to a point. I had a hard time meeting the circle join, and there’s a bit of a lump where the join is. In fact, I found that sinking the threads to the back – staggered – and pulling the ends out of the way while sewing the bundle down with sewing thread – and then cutting the ends off worked best. Better not to build up oversewn areas on the back where things could get a bit thick. And the padding threads will be completely covered and secured with the satin stitching on top of the regular sewing thread that is holding them all in place.
Mary,
Since some time I follow your website. I just read about the shipments of the books. Well, you are not the only one, I hear often problems with shipments and/or postal deliveries, specially since the virus is going around.
Your altar piece will be beautiful, but it’s a big job, even the preparation of it.
Good luck,
Lyn