


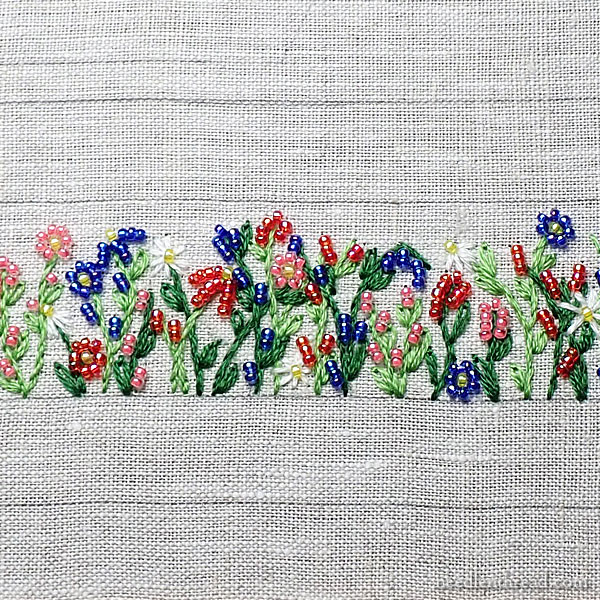
It’s time to bling up the Bee-Jeweled Pincushion with a sumptuous line of beaded flowers along the pincushion’s sides!
This is, to me, the really fun part of this project, but it takes a little time. There’s also a method and order to it that you want to follow, especially if you are relying on the materials kit for the pincushion.
If you’re just joining in here on Needle ‘n Thread, the project that we’re working on is called the Bee-Jeweled Pincushion. You can find all the previous articles on this project listed in this Bee-Jeweled Pincushion Index, so that you can stitch your own pincushion, too. The pincushion is the first in the Stitch Snippets, 2022 series of step-by-step embroidery projects that you’ll find developing here on Needle ‘n Thread throughout this year.
If you happen to be a member over on my Patreon page, you’ve already seen this lesson on adding the beads. I’ll be uploading the finish work lesson over there early this week.
So let’s look at how to bead this little thing up!
You can find the supply list for the pincushion project here. You’ll notice that I used all 15/0 seed beads. I like Miyuki beads, but any 15/0 will do if you’re making substitutions. Because the pincushion is pretty small, 11/0 beads are a bit large for this. Stick with 15/0 if you can!
I used Fireline (crystal, 6 lb) as my beading thread. Fireline is a monofilament fishing line, and it works well for bead embroidery. BUT – big warning:
Don’t Use Your Good Embroidery Scissors to Cut Fireline. It’s not good for your scissors! Use a cheaper pair of craft scissors, use wire cutters if you want. But don’t use your good scissors!
Why Fireline? Well, mostly it’s because I know people can find it locally. You can find it in any fishing section of a sporting goods store or any big box store that has a fishing section.
Still, you don’t have to use Fireline. You can use embroidery floss (use one strand of a coordinating color to the bead), or you could even use a strong quilting thread in a white (which blends pretty well with the ground fabric) or a natural that matches the ground fabric.
Additionally, you can use nylon beading thread that’s sold for beading. The next kit for the next Stitch Snippets project will introduce you to Miyuki’s nylon beading thread, which I really love using.
Truly, though, if you don’t want to go to the expense of an additional beading thread or of buying Fireline and the like, you can very easily get away with one strand of embroidery floss in a coordinating color.
Remember that substitutions may alter the finished look of a project. But it won’t look bad! There’s nothing wrong with working with what you have!
That said, it’s good to get familiar with different materials for different techniques. It’s a learning experience that moves you forward on your embroidery journey, so that you can make sound decisions on future projects based on your own likes, dislikes, and other experiences.
The Needle
I use a #10 short beading needle for this type of embroidery with beads. If you purchased the kit for this project, it’s the smallest needle.
Sewing on Beads
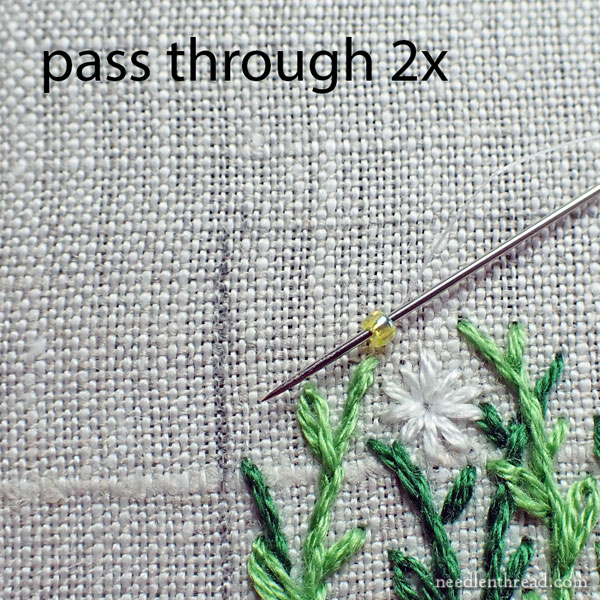
When sewing on single beads, pass through each bead twice.
When sewing on lines of beads or circles of beads, pass through once, couch between the beads (or at least between every other bead, depending on the configuration) and then pass through a second time.
To sew on a bead, you sew it on as if the bead is sitting on your fabric like a tire sits on the road. The hole is parallel to your fabric, not lying face up as if you’re looking down into a donut.
To sew on a bead or a line of beads, you bring your needle and thread to the front of the fabric where you want the bead to be, string your bead onto the needle and thread (or a number of beads) and then you take the needle and thread to the back of the fabric on the other of the bead, or at the end of the line of beads, or, if you’re sewing on a circle of beads, you take the needle to the back of the fabric right next to where you came up.
There’s nothing complicated about sewing on beads. It’s not rocket science. You just need to leave enough space for your beads to sit on the fabric (or to arch up off the fabric, depending on what you want them to do) when you pass back down into the fabric.
Configurations of Flowers and Stitching Path
You can work different configurations of flowers along the stem line, and you can mix them up however you want to.
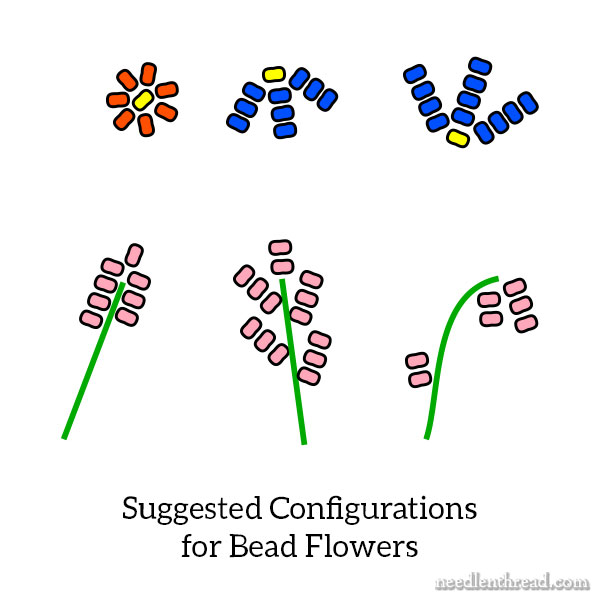
These are some simple flower configurations for the beads. You might fiddle around with other ideas, too.
I also scattered in single beads here and there as “buds” on the sides of stems, nestled by the leaves on the stems, and so forth.
Work along the stem line in such a way that you don’t have to backtrack to add beads, because this will just waste thread.
In the kit, you’ve got 3 yards of Fireline. The most I used was 2 yards and 4 inches in the two times the samples were stitched. So there is plenty of Fireline in the kit, but if you bead more than I did, or if you backtrack often, or if you cut the thread often and toss the leftovers, you may run out.
I used about 18″ per cut and progressed along the stem line, stitching bead flowers and adding the yellow beads to the centers of the white flowers as I went, without backtracking.
The bead flowers and single beads are sewn sometimes at the top of the stems, sometimes in the middle of stems, sometimes at the base, so that there’s depth to the flower line. Don’t just sew bead flowers on straight across the tops of the stems!
Step-by-Step & Tips
Let’s look at a couple step-by-step examples of sewing on beads.
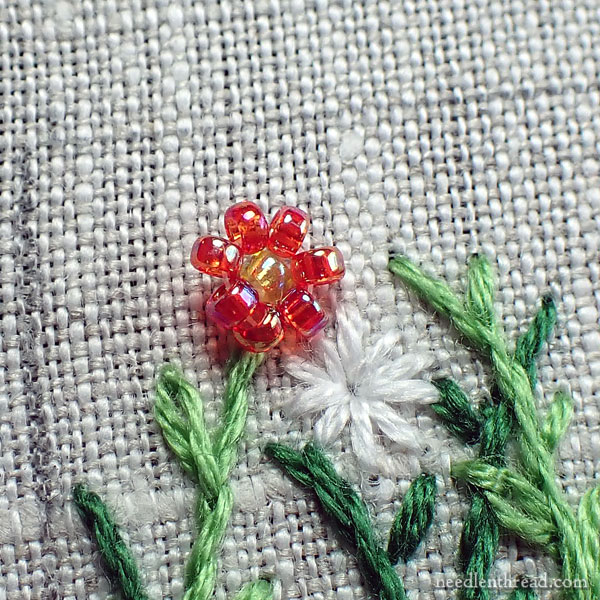
Here, I’m going to add a round daisy-like bead flower at the top of the stem. I started by sewing on a yellow bead as the center of the flower, a little bit above the top of the stem (maybe 1/8″ above the top of the stem).
Pass through the single yellow bead twice.
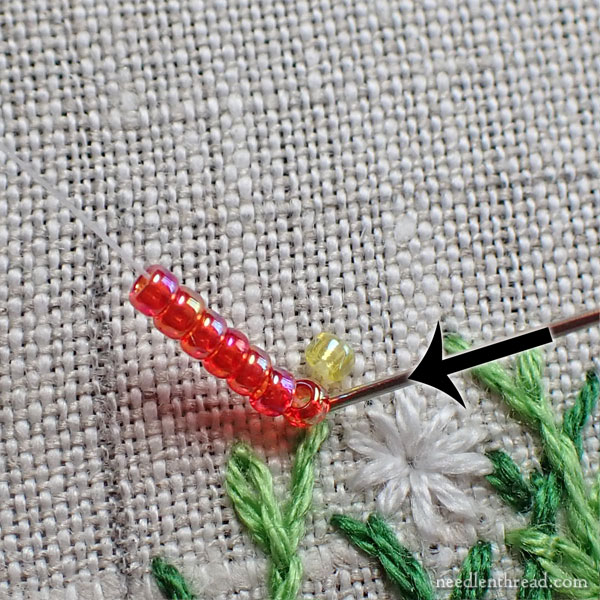
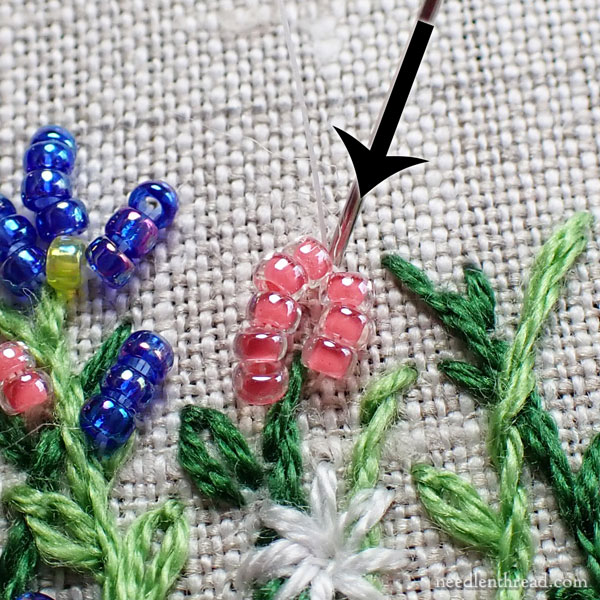
Then, I brought the needle up below the yellow bead right around the top of the stem, and I picked up seven red seed beads with my needle and threaded them onto the thread.
Then, I took the needle and thread to the back of the fabric just to the right of where I came up, so that, when I pulled through, a circle of red beads would form around the yellow center bead.
When I first pulled through, the beads formed a circle, but they looked a bit wonky. That’s ok! Now we’ll make some adjustments…
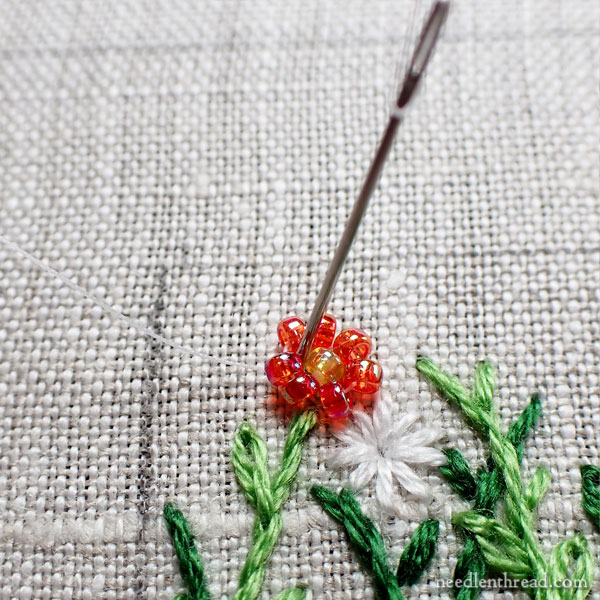
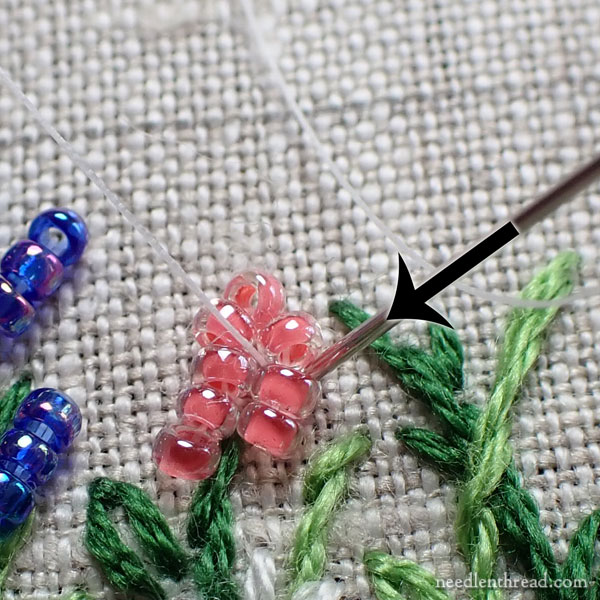
Come up between two beads on the circle, and just outside the thread that’s passing through the beads.
Then, take a couching stitch over that thread that’s passing through the beads. That is, just take a tiny stitch right over that thread, and pull through firmly. This will pull the two beads on each side of the couching stitch into place.
Do this around the whole flower – or at least in three places around the flower. You don’t necessarily have to couch between each bead. You just want to couch down the thread passing between the beads enough to neaten the flower up.
Now, at this point, when you finish your last couching stitch, you can then come up between two beads – where you first began the bead circle is a good spot – and you can take the needle through the center of all the beads around the circle again, and then pass back down into the fabric when you get back to your starting point, and pull firmly. This will help tighten up the circle.
Note: You don’t necessarily have to pass through the beads on the circle a second time. If you’re satisfied with the look of the flower after couching between several beads around the flower, that’s fine! Passing through a second time helps an unruly bit of beads come into line a bit better, but if you like the way the look already, it’s not necessary on this project.
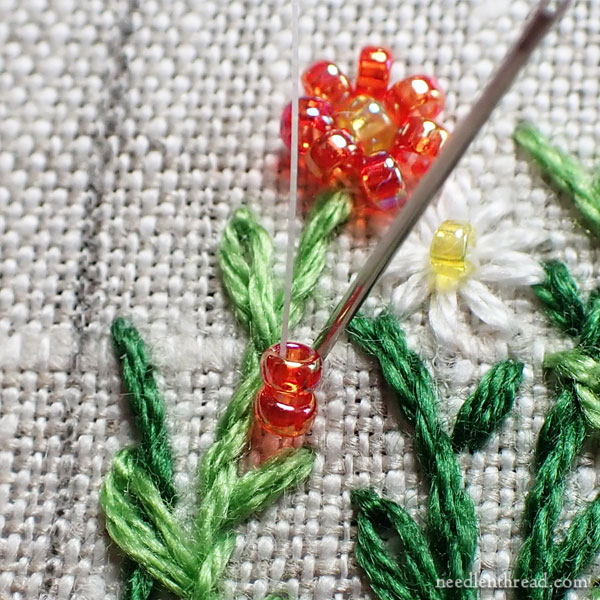
When you stitch down two beads in a line, bring your needle and thread up into the fabric where you want the two beads to begin, pick up two beads and string them onto your thread, and then pass down into the fabric where you want the two beads to end.
Then, couch over the thread running through the beads between the two beads, just to pull the beads into line with each other and situate them onto the fabric.
There’s no need to pass through the two beads again, really. You can if you feel they’re not secure, or if they seem like they aren’t lining up well. But you don’t have to.
Note: If you’re working with floss or sewing thread, I’d be inclined to pass through a second time. If you’re working with Fireline or a nylon beading thread, I probably wouldn’t bother passing through a second time on this configuration.
When sewing on three beads or more in a row, pick up the beads, sew them on, couch between each bead, and then pass through a second time.
The longer your bead line, the more helpful a second pass through the beads will be, to align them nicely.
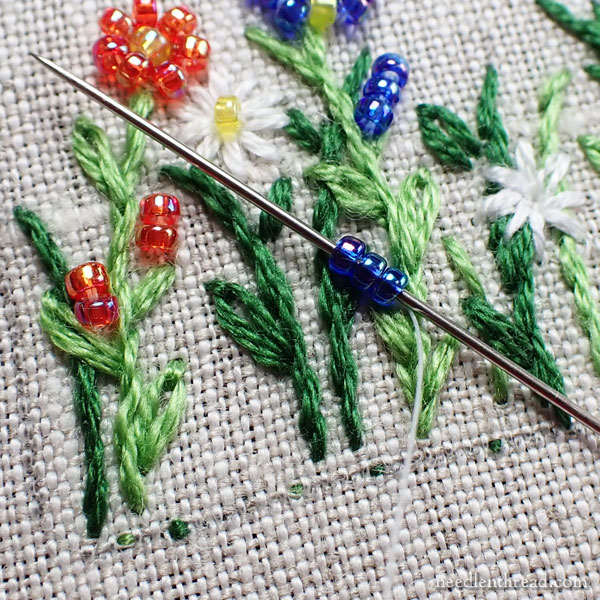
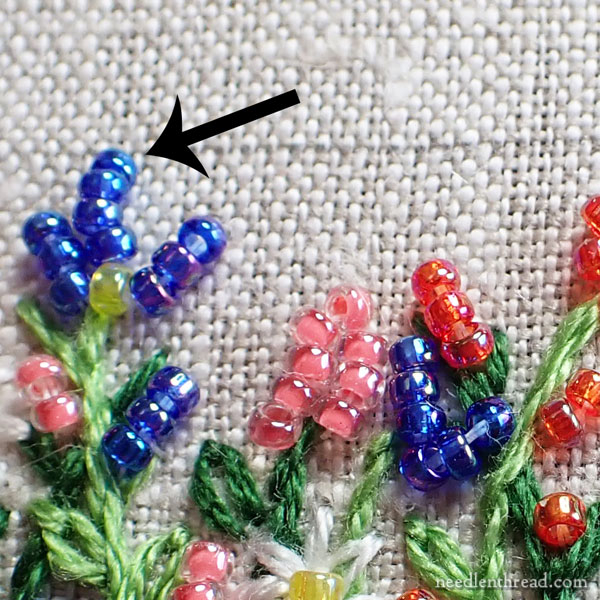
When sewing on the configuration of flowers that have two lines going up on each side of a stem, I brought my needle and thread to the front on one side of the stem.
I threaded on about 8 beads, and I took the needle and thread to the back on the other side of the stem, slightly higher on the stem than where I started the bead line (ie, no directly across from where I started).
Then, I brought my needle to the front at the top of the stem, and I treated the bead line like a daisy stitch, couching over the bead thread between two beads as you would with a daisy stitch, to anchor the whole line in place. Then, I couched between the beads at the “turn” at the top of the flower head, to situate them.
I didn’t always pass through twice on these flower heads, because I liked them a little “messy” or out of line. I think they look better when they aren’t perfectly straight and rigid. But that’s just me! You might want a more rigid look, and if so, couching between every bead and then passing through the center of the whole line again will pull the whole flower head into a more rigid presentation.
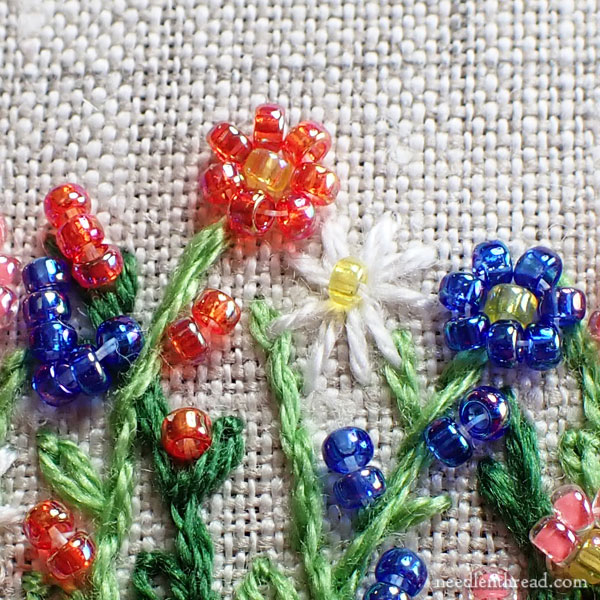
Beads, glorious beads! There’s no absolute pattern for placement of each bead and flower. Play around and do what you want as you move across the stem line.
Don’t forget the yellow beads in the centers of the white floss flowers!
Watch the Top!
Don’t come too close to the top of the design line that marks out the top edge of the sides!
This flower was right on the design line, and it had to come out.
Try to keep your flowers at least 1/8″ below that line!
Next Up!
Our next lesson will cover the construction of the pincushion. You’re almost there!
If you’d like to catch up on previous installments of this series, you’ll find them listed in the Bee-Jeweled Project Index here.
If you have any questions or comments, feel free to join in the conversation using the comment form!
Mary, having done a lot of beading on quilts, I have discovered a little trick for making that single bead sit up like a tire rather than rolling over to give the donut look. When you take your two passes through the bead, make them so the thread forms a tiny x if you could see it without the bead in place. I also knot somewhat frequently. That way if a thread breaks, only a few beads can slip off. I always use beading thread, but think this might be even more important when using a soft thread such as floss.
Have my kit and plan to get started soon. I need a new pincushion and this one certainly caught my fancy.
Thanks, Linda! That’s very good advice! It’s a little harder on these tiny beads with the Fireline – there’s not that much room to manipulate the passes into an X, but it’s a method that works great with finer nylon threads or floss, especially when using 11/0 beads or larger.
I usually knot between each close cluster of beads, so usually about two-three times in each section of this.
Thanks again! Very good points!
Hi:
This project looks like so much fun! When beading with Fireline, or other nylon, what is your method in starting and ending the line?
Thank you for sharing your lovely designs.
Charlie
Exactly the same way I start and end the floss. 🙂
Hi Mary, I really would like to see a picture of the whole beaded flower area. Actually I would have liked to see a picture of the whole stems area. Too late for that I guess. I am not very creative and would like to duplicate exactly what you have stitched. Thanks, Alice
Hi, Alice, it’s kind of difficult to show the whole line, because it is very narrow and long. By the time that’s cropped into the size compatible for the website, it would be a very small picture. Each section of the sides is merely a repeat of the section before, though to keep it interesting, just change up the colors. So, instead of a red daisy looking flower, stitch a pink one, etc. If you want to play around more with it, you can alter the stem shapes and so forth, but that’s not necessary. Occasionally, for example, I added a bent tip to the top of a stem on one stitched sample. But on the second instructional sample I stitched, I just stitched the stems exactly as they were on the pattern.
This is a beautiful project and I have thoroughly enjoyed the floss embroidery.
I’m new to beading and thought this would be a good place to start – since it’s not a big project. (I think I was wrong! LOL!) I have read your instructions several times and I’m not clear on how to secure the thread/fireline when starting a new piece. Do I knot it? Capture it with the beading stitches? Run it under the embroidery? Thanks for your help!
I start the thread the same way I do for the floss part, with a knot on top (that I later cut), and a few tiny tacking stitches in the area that I’ll be stitching, where they won’t show.
Thank you so much for this wonderful project! I am almost done with my head flowers, but I just realized that they are indeed too close to the design line (the design line had faded and I was going by the seam allowance line on the outside). Would it be OK to draw a slightly higher line and just make the whole cushion a slightly taller? Thank you!
Hi, Mirna, as long as you have enough fabric in the seam allowance to accommodate (and your interfacing call also be enlarged), there’s no reason why it wouldn’t work.
I have never done beading but am finally attempting it on the bee-jeweled pincushion. I was really having trouble picking up the beads from their little boxy containers – spilling some out on the floor never to be seen again. Then I looked through your web pages and came upon the most amazing “trick” – using silicone – or tacky mats. Not wanting to make yet another trip to JoAnn’s, I remembered I had purchased a couple different sizes of baking silicone sheets that I never use. The small one is 8 X 10″ and fits over the arm of my chair. I’ll eventually cut the sheet as you suggested to put in a gift card tin. But for now, this is a miracle! The beads just hug the mat and I can apply them so much more quickly. I’m actually really liking this process!! Thanks so much!