


Today’s the day!! Hip hip hurray!
Today, we launch the materials kit for Little Blooms: a Mini Snap Purse – the first Stitch Snippets stitch-along project for 2023! I’m so excited to get this project underway!
In Monday’s preview, which you can read here, I explained how the Stitch Snippets stitch-alongs work and what you can expect as we progress through the project together.
Today, besides letting you know that the materials kit is now available here in the shop, I’ll give you the details about what’s in the kit, what supplies you’ll need to complete the project, and a little bit about substitutions for those who want to make the project but can’t get the kit.
We’ll also chat about some timing details, so you can anticipate the beginning of the project.
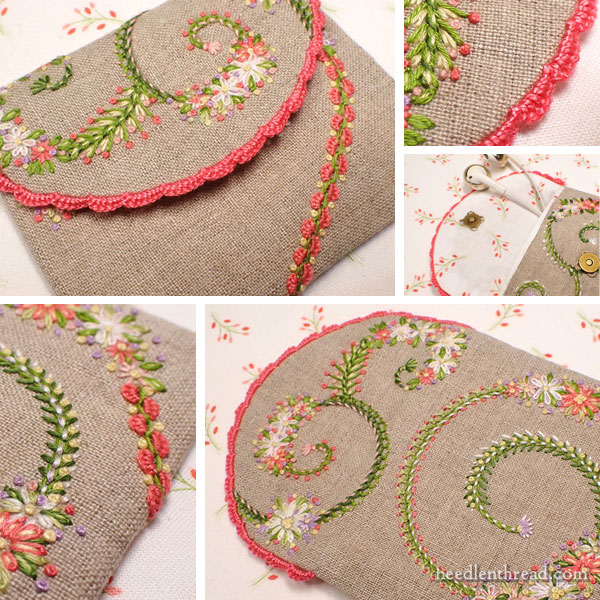
The materials kit that’s available today offers all the materials you need to embroider and finish Little Blooms into a mini snap purse. The kit includes:
- high quality embroidery linen in a dark natural for the ground fabric
- coordinating quilting cotton (by Moda) for the lining
- cotton floche in eight lovely colors
- perle cotton for the scalloped trim
- a mini magnetic snap
- two fine English needles
Tools to Have on Hand
You’ll need to provide a hoop or stretcher bar frame. This is very important – it makes a big difference in the outcome.
If you use stretcher bars, I used 11″ x 8″ bars for one sample. The long sides were tacked on top of the frame and the short sides were tacked on the sides. It worked well.
When working other samples for the project, I used the 5.5″ x 7″ square-round hoop, which accommodated the project well enough for me. If you like a good amount of fabric beyond your hoop, you might end up wanting to extend the long sides of the fabric. We will talk about that when we get into the project. You’ll have to move the square-round hoop once to cover the whole design.
I also worked some samples for the project with a 5″ round hoop. A round hoop is a universally good tool to have in your repertoire for any hand embroidery projects, and 5″ is a great size – not too big, not too small. You’ll have to move the hoop twice to cover the whole design area.
You can also use a 4″ hoop. You’ll just have to move it around more frequently.
Design Transfer Tools
You can use your own favorite method for design transfer. As one of the learning goals in this project, though, I want to show you a transfer method that is easy and accurate for fabric that’s harder to trace on.
To transfer the design for this project, I use a modified form of prick-and-pounce, only without the pounce. If you want to use the same approach, you’ll need something to pierce your paper with and you’ll need a Micron pen in size 005 (.20mm) in black or dark grey. You’ll also need a pricking mat. We’ll talk about all this as the project unfolds.
And Other Tools
You’ll need small, sharp scissors for the embroidery.
You’ll definitely want some method for thread management! I use thread drops – they work great for this project.
It’s a good idea to have fabric scissors on hand for cutting the fabric when it’s finishing time.
To finish the project, you’ll need sewing thread in natural to match the ground fabric and in white or a contrasting color (we will talk about this).
Sewing Pins! You’ll need sewing pins! Never underestimate the necessity of sewing pins for finish work!
A small hand-sewing needle. I like to use a sharp when I’m sewing by hand, but this is up to you. You might just use the embroidery needles in the kit.
Substitutions
For those who can’t get the kit, or don’t want to get the kit, no problem – you can work this project with your own supplies. The outcome may be different, but that’s ok!
I’ll give details on fabric and thread substitutions as the project progresses. Floche is made by DMC, and the color numbers are the same as the color numbers for DMC stranded cotton floss. This means you can substitute DMC stranded cotton for the floche, by matching the color numbers. The thread won’t look the same on some of the stitches, but again, that’s ok! This is something we will cover as we get into the project.
Shipping Times & Project Timing
We will begin shipping the kits via Priority Mail next week, to the US and Canada. Regretfully, I don’t ship internationally, except to Canada. I’m very sorry about this! If you are interested in knowing why I don’t ship internationally at this time, please read my shipping policies here.
The stitch-along will not officially commence on the website until week after next, so that the kits have time to arrive.
If We Sell Out…
We really tried to prepare the right number of kits in order to avoid a fast sell-out, so that you don’t end the day disappointed if you wanted the materials kit!
If we sell out of the materials kit today, we will do another kit run as quickly as we can. Some materials in the kits may change (especially the lining fabric, which has become harder to find than when we first started this project). We will do our best! It takes a huge amount of time to prepare kits, so please be patient with us.
Can’t Wait!
I’ve loved all our Stitch Snippet projects so far. Each one has been progressively more fun to develop, put together, and share with you.
So I’m extra excited about getting this first stitch-along for 2023 underway! I know it’s later in the year than I wanted it to be, but I think we’re going to have a good time with it. Hopefully, you’ll find it worth the wait!
Have a great weekend! I’ll see you next week for some other embroidery-related content that’s been building up here in on my computer!
I cannot wait to start! I am a complete sewing novice though. Does anyone have recommendations for fabric scissors? I have a collection of random, bargain bin scissors around the house, which have been mis-used over the years. It’s time for me to invest in some nice, dedicated fabric scissors, but I have no idea what to look for.
Kai makes decent fabric shears that won’t break the bank and that work well!
Mary, Mary —
What are the dimensions of Little Blooms: a mini snap-purse.
I bet I missed that in a previous note, but !!
I need to know!
Christine
It’s mini! It about 3.75” wide and about 3” high when made up.
Uh-oh…sold out! Glad I got mine early! 🙂
Yes, I have to admit I was surprised! We are working on more starting next week!
I’m so excited to get this project! I had set an alarm to alert me when the website was open for orders!
I literally just received my kit (2 minutes ago) and I LOVE it! Oh my gosh, the thread colors are so much more beautiful in person! I am especially wild about the peachy pink–they’re all beautiful and so bright, but that peachy group…magnificent.
If any of you are uncertain about this kit, it’s a perfectly coordinated, wonderful kit! Even the lining fabric matches and is such a sweet print! As soon as the kit restocks, I’ll be buying two more of them to gift to my two favorite people–that’s how much I love it.
To Mary and her crew–thank you so much for putting this kit together and for the colors you’ve chosen!