


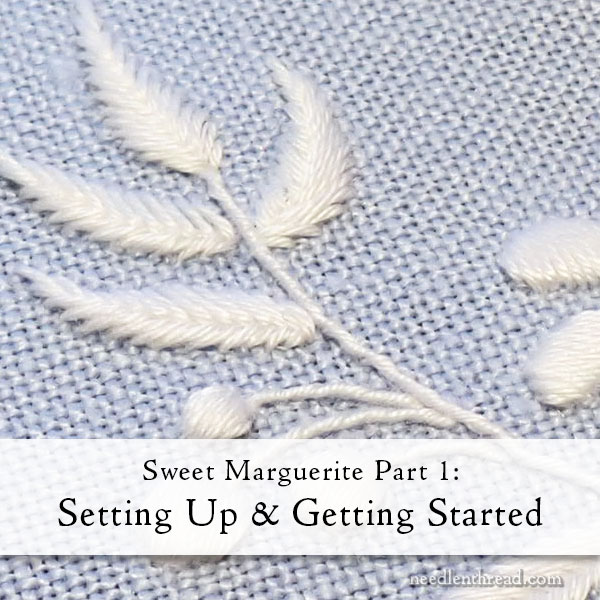
Today, we start Sweet Marguerite, a small accent linen with a touch of whitework and a decorative hemstitch.
If you don’t have a kit for Sweet Marguerite, we still have a couple colors of the kit in stock here and ready to ship. It’s a great way to have all the supplies on hand!
Please read through the entire article carefully before you begin.
We’ll be talking about materials to use for the project (for those who do not have a kit) and we’ll discuss preparing the fabric and setting it up for stitching.
If you’re a member of the Needle ‘n Thread community on Patreon, I’ve already posted a downloadable PDF over there that takes you through the transfer method that I used with this project.
We won’t be able to cover the transfer process here on the blog today, because it’s just too much information for one blog article, but we will get to it on Monday.
As always, if you have your own favorite methods of doing things and those methods work well for you, stick with them! There are always different ways to do things in the embroidery world, and I promise that none of the embroidery police are going to be checking up on how you work your own project!
I hope you enjoy this project. Let’s get started!
Let’s talk about materials!
Materials for Sweet Marguerite
For fabric, I used a 37 count even-weave linen. You don’t have to use even-weave for this project, but the linen should be close to even-weave. You’ll need a relatively high count linen with a full weave that will support the surface embroidery, but that will also work well for drawn thread work. You’ll need a 9″ or 10″ square.
For thread, I used coton a broder #25 in B5200.
A 4″ hoop is ideal for this project.
You’ll need an embroidery needle (I use a #7 crewel needle). If you want, you can add a tapestry needle (#26), but it isn’t absolutely necessary. I just used the #7 crewel.
Additional tools and supplies include sewing thread in a contrasting color to your ground fabric so you can easily see it; white sewing thread; pins; Scotch tape (cellophane tape); a pencil or micron pen; tissue paper; embroidery scissors; and tweezers.
To Pre-Shrink or Not?
Some very accomplished embroiderers never pre-shrink their linen when working household linens like this piece. And given the small size of the accent linen, it’s not entirely necessary to pre-shrink the linen.
That said, I always pre-shrink linen when I’m embroidering something like a table cloth, runner, or the like, because I don’t want surprises at the end of the process. I don’t want to find out that a tablecloth that’s supposed to be 36″ square ended up 35″ x 34.5″ (linen often shrinks more in one direction than the other). I also don’t want to find out that the there was so much shrink-room in the linen, that it affected my final stitching by causing puckers or distortions. So, in general, I do pre-shrink my linen before stitching this type of decorative household linen.
It’s easy enough to pre-shrink a piece of linen this small. Place the linen in a clean bowl in the sink, and soak it on an alternating schedule of hot soak followed by cold soak three times. Use the hottest tap water you can possibly manage for the hot soaks and the coldest for the cold soaks. Soak the linen a good 5 – 10 minutes each time, or longer. (You can leave it and go about some other task and come back to switch it out to the next temperature.) For the final hot soak, use boiling water and leave the linen to cool to room temp, then soak in cold water one more time before removing from the water, laying it flat on a clean towel, folding the towel on top of the linen, and pressing with your hands to remove excess moisture.
Allow the linen to mostly dry, and then, while still barely damp, iron with a hot, dry iron, following the grain (not the diagonal). Leave the linen sitting for an hour or so (or overnight) to ensure that it is completely dry.
At this point, measure the linen again, and make it square by trimming to approximately 9″ square. If you can get a whole 10″ out of your linen, that’s fine, too – your accent piece will be slightly larger, in that case. You just want to make sure your linen is cut square.
When you trim your linen, trim along the line provided by the fabric threads. Cut right along the thread.
Neaten the Edge
Once your linen is trimmed to square, neaten the edge by whip stitching around it with sewing thread.
Work the whip stitches around the perimeter of the fabric, about 1/2″ into the fabric and about 1/2″ apart, all the way around. This will help prevent your fabric from fraying.
Often, especially on much larger linens, you can just use a sewing machine to neaten the edge, by zigzag or overcast stitching around the edge of the fabric. On this small of a linen, you don’t want the bulk that the extra machine sewing would add, so it is best to neaten the edge by hand with a whip stitch.
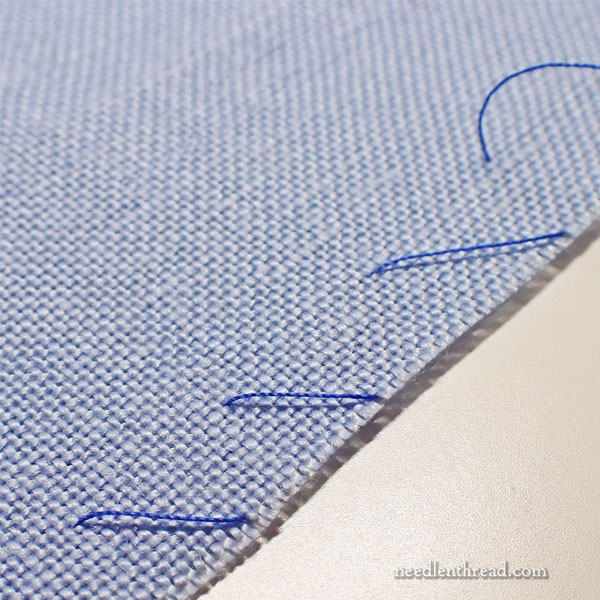
Baste in the Hemstitch Area
Now, you’ll baste in the hemstitch area. Refer to the diagram below.

Using sewing thread, you’re going to baste a frame of two parallel lines, starting 1″ inside the linen, on all four sides. This is represented by the dashed lines in the diagram.
Begin by measuring in 1″ on each side and basting a line, following the weave of the fabric. The basting stitches can be large-ish (1/2″).
Then, if you’re using 37 count linen, count 6 threads in from the line you basted, and baste a second line.
If you’re using a different thread count on your linen, measure about 3/16″ into the linen from the first line to baste the inside line. At the most, you can make this 1/4″ wide, but don’t go any larger than that! A 3/16″ width is about perfect.
These two basted lines will mark the decorative hemstitched border.
Download the Embroidery Design
This is the embroidery design for the project:
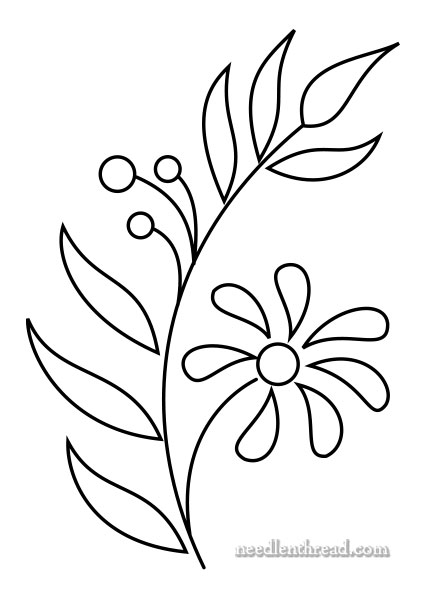
Here’s the downloadable PDF for the embroidery design.
Save the PDF to your computer and print it from your computer. When you print it, choose “actual size” in your printer settings. It should print at 2.5″ high.
Next!
On Monday, we’ll talk about the design transfer process, and we’ll also discuss alternatives to the process.
Have a great weekend!
Dear Mary,
I hope you can tell me the name of the manufacturer of the blue evenweave linen. I’ve been online for upwards of an hour and can’t find 37 count evenweave in blue. Who makes this wonderful linen?
Christine
Nope, sorry – Sotema.
Edit: Oh dear! My answer above is an edit. I answered incorrectly first – I said it was a Graziano linen – and then I realized I’d answered incorrectly, and that’s why I wrote “nope, sorry” – I didn’t mean I couldn’t tell you! I means “nope, sorry, not Graziano – but Sotema.” I just re-read the comment and it sounds like I was saying “no” ti telling you what linen to look for! Not intended to sound like that!
You didn’t specify in the directions and I am still a newbie with your stitch kits and project instructions, so I am unsure of the thread I should use to baste. I assume the whip stitches around the edge will be taken out since you show them in the contrast color. Will the basting stitches be taken out later so do them in a contrasting color thread I can see, or do I need to do them in the white thread because they will be left?
Thank you and I am looking forward to learning from you through Sweet Marguerite!
Yes, use the sewing thread to baste. The basting is removed.
Hi – I purchased the kit and extra 12 x 12 pieces of linen via your site. I pre-shrunk per instructions. Now the kit linen is a little less than 9×9 and the extra linen is approx 11.5 x 11.5. What is more important with this type of project, the dimensions or just making sure the fabric is as square as possible?
Just making sure it’s square. You can cut that thing as far down as 8″ if you want. The finished piece is small.
When squaring off my fabric, do I cut off the selvedge edge to make the 9″ square? After the preshrinking process, my square measures about 9 1/4″ X slightly more than 9 1/2″. If I cut off the selvedge, it will be about 9″. Or does the selvedge not matter because we are measuring in 1″? Sorry for all the questions but I am really excited to learn a bit of cutwork, having admired it for so many years. Thank you for this opportunity!
You can cut the square off as small as 8″ if you need to – so yes, you can cut the selvedge. I actually made one sample with the selvedge, so you don’t have to cut it off, but sure, you can trim it down. I’ll cover all that today.
Hi Mary,
The piece of blue linen I received includes the selvedge. I assume it is okay to cut through the selvedge and have an edge that is okay for hemstitching? To get a 9″ square piece, I will need to cut through the selvedge, not cut it completely off. Just want to be sure before I square up my fabric.
Thanks,
Joan
You can cut it off. It’s ok if the piece goes as small as 8″ square. I should have been a little more clear on the size of the fabric and finished sizes.
This is such a lovely little project! Unfortunately I’ve already run into a small dilemma.
I’ve pre-shrunk my fabric, and now it measures just barely 9 inches (including the selvage) by about 8.75 inches. Obviously I won’t be able to get a 9″ square out of that…should I just cut my square smaller (maybe 8.5″?) and then proceed with the rest of the instructions as written? (Or would I need to adjust the other measurements too?) And can I leave the selvage on, or does it need to be trimmed off? (If so, I would need to make my square even smaller.)
That’s fine! I will clarify this today! Just use it – the finished pieces will vary in size, but rarely will they be smaller than 6″ square. So if you have around 8.75″ that’s fine. You can easily go as small as 8.
The linen that came in the kit Sweet Marguerite I ordered was under 9 inch square. Do I need to cut it down to 8” or 8 1/2” square.
Thank you!
You can trim it to as small as 8 – if you can trim to 8.5, that’s good. The project is not confined to a specific size, as much as it requires the piece of fabric to be cut square, on the thread.