


We’ll call this Sweet Marguerite Part 1.5 because we’re finishing the set-up that we started on Friday.
If you’re a member on Patreon, these preliminary steps have already been covered in the PDF, so you won’t receive another PDF or posting for this.
However, there are some questions here that came up over the weekend, so please read the whole article so that we’re all on the same page.
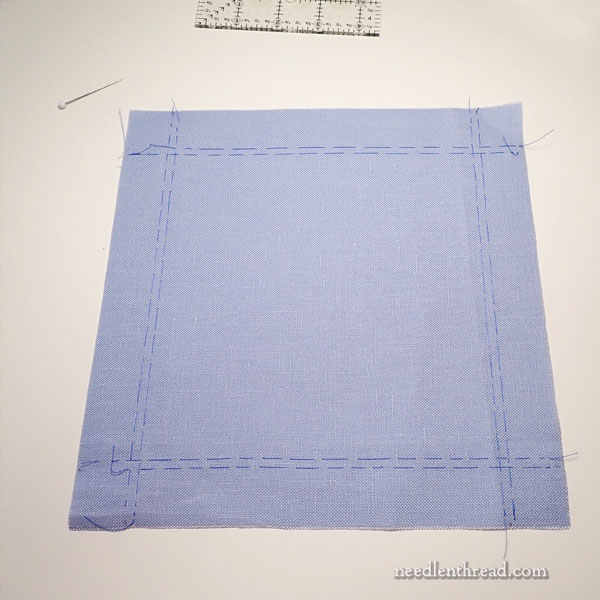
So this is where we left off on Friday – basting the drawn thread “frame” about an inch inside the fabric edge.
About Basting & Sizing
Two questions that came up over the weekend have to do with the sizing of the linen after shrinking (if you chose to shrink), especially if there is selvedge on the edge of your linen, and about basting.
1. The size of the linen is not as important as getting it squared off. I did work one sample with the selvedge, and it didn’t turn out too bad, so you can actually leave the selvedge if you want, but I would just go ahead and cut it off, even if it reduces the size of your linen to smaller than 9″ (which it most likely will, if you have shrunk your linen). It will make the whole finishing part easier and you’ll have a more pleasing finish, I think, if you cut it off.
Overall, in your fabric preparation, it is the squaring off the of the linen that you want to achieve. It doesn’t matter too much how small the trimmed linen ends up (within reason). The finished samples I’ve made range of 6.5″ (finished) to 7.25″ (finished). You can go as small as an 8″ square and you’ll still end up with about a 6.25″ / 6.5″ square, finished.
1. Baste with sewing thread. The basting threads will be removed. They are just there to mark where the drawn thread area will be. We won’t do any drawn thread until the embroidery is complete. Several folks have asked if they can just withdraw the threads instead of baste. No. Don’t do that! You’re going to be hooping up your fabric and working embroidery inside that hoop, and you’d have to hoop up areas where the threads are withdrawn. You don’t want to do that. We’ll do the withdrawing of threads later, but you need the basting threads to mark where those withdrawn threads will be.
A Note on Shrinking
As I mentioned Friday, no, you do not have to pre-shrink your fabric. On larger table cloths and such, I would. On this, it doesn’t matter so much. It’s a learning piece, and it’s very small. On the samples, I worked with some pieces that were pre-shrunk, and I worked with some that weren’t.
Some folks have asked if they could just thrown the linen in with their laundry. I wouldn’t. It’s a small piece. It can be easily handled in the sink without the over-wrinkling that would come from the laundry. If you want to shrink it, do it in the sink. If it’s a matter of not wanting to go through the process, then just skip it.
Transfer: Two Birds, One Stone
Regarding the transfer process, a few notes before we get into it:
1. If you already have a tried-and-true transfer method, use it. Just keep in mind a few points: a. you’re stitching with white threads, so you don’t want something that will come off on the thread; b. the fabric is not super easy to see through, so tracing might not be the way to go; and c. you’ll want to be able to cover your transfer lines completely as you stitch.
2. The process I’m using here can be fiddly. Take your time. It pays off in two ways: a. you don’t have transfer lines to worry about; and b. you don’t have any extra threads to remove after you’ve transferred through the tissue paper.
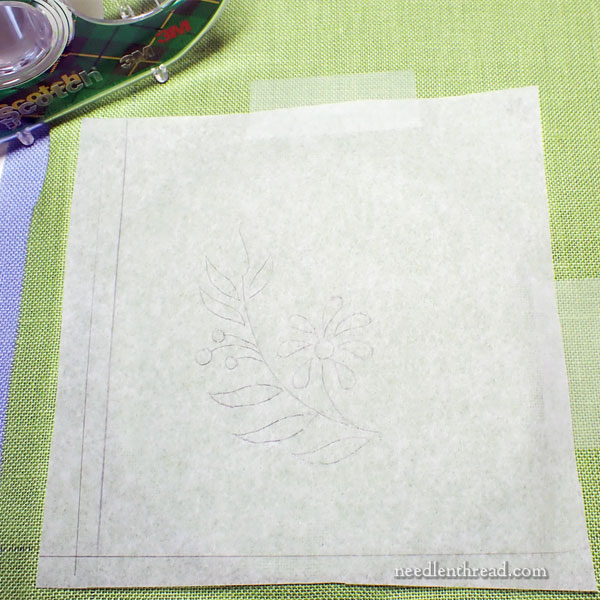
Trace the design on a piece of tissue paper. You can use a pencil (hard lead) or a micron art pen or the like. I always find a finer line is easier to stitch precisely.
If you purchased the kit, you have the printed design and you have a piece of tissue paper in the kit.

Lay your flat, ironed fabric down on the table and place your tissue-paper with the design on it, on the fabric, situating it as shown in the diagram above (which was included in Part 1 as well).
Turn the design so that it “cradles” in the corner of the basted frame. Measure about 3/4″ from the inside thread of the frame to the outermost element on the design, on the side and base of the design, as shown in the diagram above.
Use some scotch tape (cellophane tape) to hold your design in place on the fabric.
Then, put the inner ring of your hoop flat on your table, lay your fabric with the tissue paper on it over the inner ring of your hoop, situating it so that the design is within the ring of the hoop (so you can embroider the whole thing – this is why a 4″ hoop is the ideal hoop size), and then push your outer ring of the hoop over the fabric-and-tissue paper and inner ring.
Gently work the fabric taut if necessary and tighten the ring if necessary, just as you would when you hoop up any project.
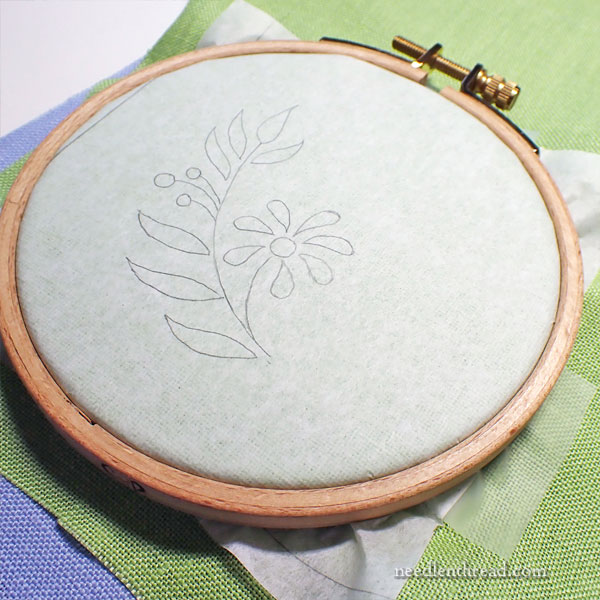
If all the tissue paper is not within the ring of the outer hoop, then take your sewing thread and baste (you can use large stitches so it goes quickly) around the design through the tissue paper and fabric, just to hold the tissue paper in place so it doesn’t shift.
Now you’re ready to do the design transfer – which is really just the first stage of stitching the project.
A Note About Stitches
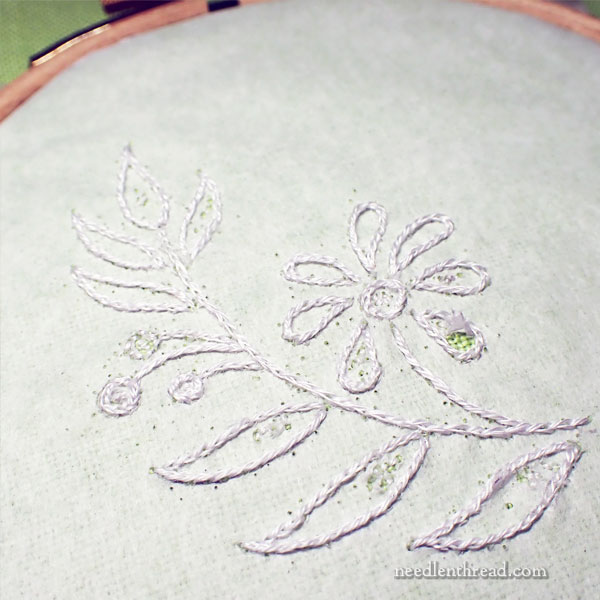
On this sample, I used split stitch for this whole process. The split stitch ends up underneath all the embroidery, as padding. The only exception on the first sample I stitched was the stem, which ended up being split stitch in the final, finished embroidery. On my final sample (which was blue), the stem is whipped backstitch.
Especially for beginners and anyone who has trouble with split stitch (split from underneath), I recommend that you backstitch all the stems. You can whip the backstitch later to turn it into a smooth line.
If split stitch that’s split from underneath is difficult for you, you can use backstitch or split backstitch for all the outlining.
Here are some articles and tutorials to help you decide what you want to use:
The difference between split stitch and split backstitch
Backstitch vs split stitch (Despite this article, if you want to use it on this project for the padding, go ahead! I’m just including this article so that you are aware of the choices and the why’s and wherefore’s)
So, for the transfer and the beginning stages of the embroidery, you’ll going to split stitch (or backstitch, or a combination) the whole design, using the coton a broder #25 (one strand, as it comes off the skein).
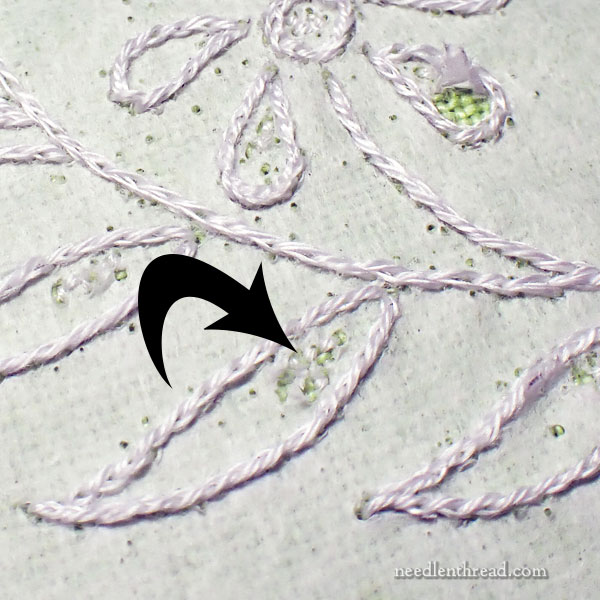
In the photo above, you can see where I stitched small holding stitches inside the elements to start and end threads.
Try, as much as possible, not to carry threads across the back of design, beyond the design lines.
As you work small elements like the circles, keep your stitches pretty small so that they go around the circle as smoothly as possible.
And keep in mind that all these stitches will be covered with satin stitch (or other stitches), so if they don’t look exactly perfect, it’s ok. They’re padding.
(That said, you do want to be as precise as possible, because it is your transfer. If you get the design “off” here, then it will likely be “off” in the final embroidery.)
In the next installment, we will remove the tissue paper and progress with the embroidery!
Previous Lessons
We will shortly have an index where I will list all the articles for this project, but in the meantime, if you’re just joining in, you’ll find the previous (the first) installment of this project here.
If you would like a materials kit, they are available here. We may only have the pink and the yellow left, but don’t worry! They are gorgeous colors – a glorious pink with a light hint of lavender about it, and a delicious, warm, deep buttery-yellow.
Stay tuned for more on this project and other delightful bits of embroidery chit-chat!
Happy Monday!
Absolutely, I definitely want to know what distinguishes one stitch from another. Your explanations and instructions are great, and I appreciate all of your efforts and the knowledge that you share in helping me learn this art! You’re a fantastic teacher!
Hi Mary,
I outlined the design but now, I’ve got a couple of questions.
1. Do I pad the elements before satin stitching, or
2. Do I fill the design by using one thread only.
Your work is always beautiful and work always looks so lush, I instantly think 2 strands of thread.
(…I got a funny feeling just now that you haven’t gotten that far! Maybe I got ahead of myself when I went to an older story to read about filling dots. I think I’ll wait for your next blog.)
I think we did talk about padding already – it’s in the next installment after this one: https://www.needlenthread.com/2023/07/sweet-marguerite-part-2-tidy-up-whitework-foundations.html We’ve also done the satin stitch one: https://www.needlenthread.com/2023/08/sweet-marguerite-part-3-satin-stitch.html
Coton a broder is only worked with one strand. It’s never doubled in the needle – it comes right off the skein in the one strand that’s ready to use.
Hi Mary. I tried this method of transfer; first mistake was using TRACING paper instead of tissue paper, and it was much too stiff. Re-drew the design on tissue paper, and while I was working on it in my hoop, the tissue just SHREDDED. I managed to complete the transfer but it was frustrating. Any thoughts on how to prevent damaging the delicate paper? Are some tissue papers better than others?
You can always mount your fabric in your hoop (taking care to keep it straight and taut, but not warped) and then tack your tissue paper on. That way, you’re not putting your hoop over the tissue paper.
Yes, there are different degrees of quality in tissue paper. I usually go for the more “crisp” wrapping paper-type tissue paper, if I’m using tissue paper. But I really prefer a tracing paper – I don’t know if it. has a specific name – that’s sold with drafting and art supplies. It comes in a kind of muted yellow or yellow-ish color, and it’s definitely more “tracing paper” than tissue paper, but it’s very thin and light and crisp. It comes on a roll. And I think it’s 7 lb tracing paper. It works quite well. Best approach after doing the lines is to use the tip of your needle to split the tracing paper away from your stitches by dragging the tip of your needle right along your line of tacking stitches, so that the paper splits, and then remove the paper.