


Happy Monday! I hope you had a wonderful weekend – mine was hairy! But I’ll tell you more about that, and show you some fuzzy stuff, a little later.
The last time we visited Sweet Marguerite, we cleaned up the tissue paper from the transfer and we stitched the foundations and padding.
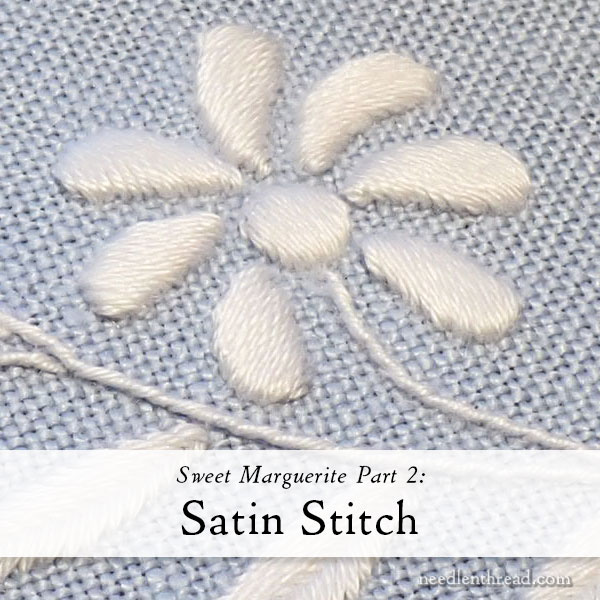
Today we’re going to tackle the satin stitch!
If you’re a member on Patreon, I’m still working on the complete PDF for you, that covers all the embroidery. I’ll have it up for you soon!
First, I just want to say this: Don’t let the satin stitch intimidate you! I’ve heard from many stitchers who get discouraged with satin stitch. It is a technique that requires practice. While it’s simple in concept, if your satin stitch doesn’t turn out “perfect” on the first try, that’s ok! With practice, it will improve.
The whole point of the satin stitch is to achieve a nice, smoothly stitched element. I’m going to share a few tips today that will help you achieve that.
Before we start with the satin stitch, though, let’s get the stems on this project embroidered the way we want them.
If you worked backstitch when you transferred your design, now’s the time to whip the backstitch. You can find directions for whip stitching the backstitch here.
The most important point to take away is this: when you whip a stitch, you always pass your needle in the same direction on the stitches as you work your way up or down the line. If you are right handed, work down the line towards you, and whip from right to left.
If you are left handed, work up the line away from you, with the needle passing from left to right under the stitches.
If you split stitched the stem when you transferred – and you like the look of your split stitch – then your stems are already stitched and you don’t have to do anything else with them.
If you want to cover up your split stitch line with something a little heavier, you can stem stitch directly over the split stitch. Consider the split stitch your design line, and work the stem stitch over the split stitch line, starting each stitch above the line and ending each stitch just below the line. You can find instructions for stem stitch here. Keep in mind that this will make a considerably heavier stem.
If, at this point, you wish you had backstitched the line, but you split stitched it instead, you can pick out the split stitch and just backstitch the stem in its place. There will be enough of a hint of the former split stitch in the fabric to follow the line. You can also refer to the design that is published here. I only bring up this latter point because we ran into the same situation with a couple samples. We changed our mind and wanted to eliminate the split stitch from the transfer and work a different stitch.
You can also work any type of other stitch for the stem that you want. We tried chain, whipped chain, coral stitch, stem stitch, stem stitch over the split stitch, trailing (overcast stitch or satin stitch over the split stitch – this took waaaaay too long) and the backstitch. We settled on the whipped backstitch because it gave us a fine line that was quick and easy.
With the stems finished, let’s talk satin stitch.
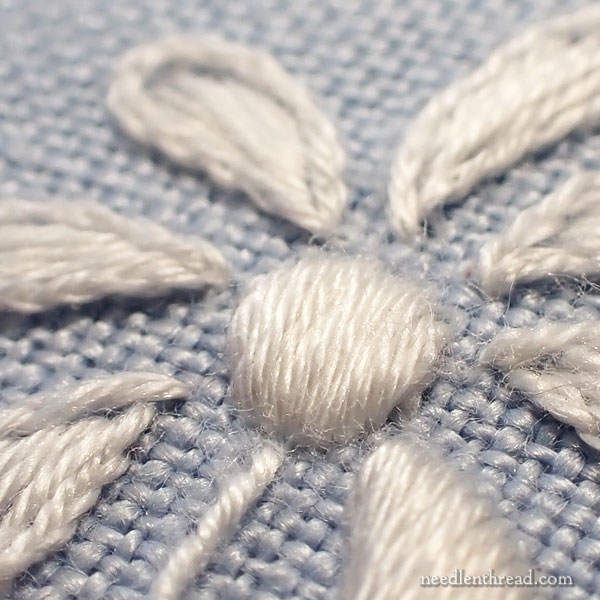
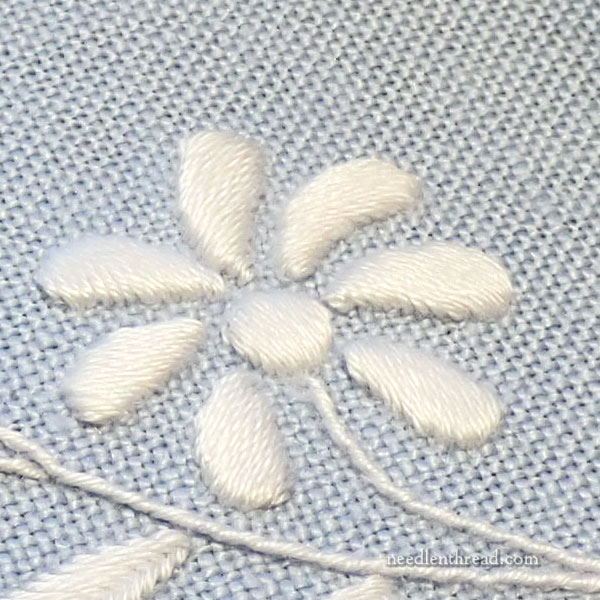
The first thing we’ll do is the center of the daisy, and you’ll use the same techniques to satin stitch the dots on the left side of the stem.
If you’re new to satin stitch or you have trouble with satin stitched dots, these two articles – in the order given below – would be good to read:
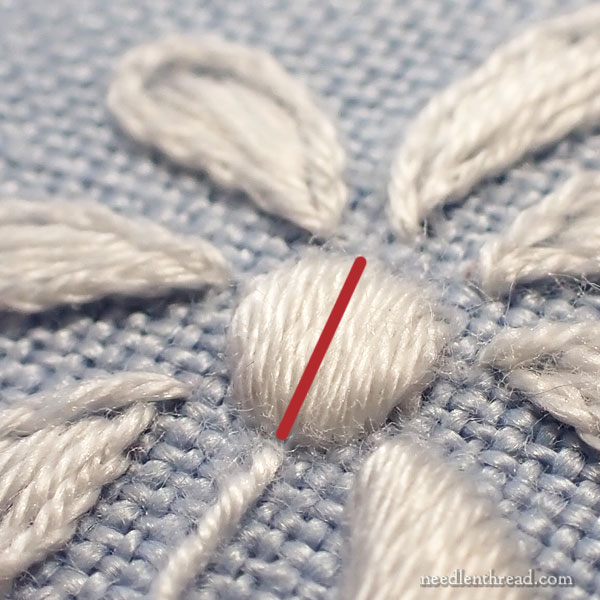
For the orientation of the satin stitch dot in the middle of the daisy (and on the left side of the design), I made the stem the center of the dot and worked the vertical satin stitches in pretty much the same direction as the step that connects to the element or dot. This is indicated by the red line in the photo above.
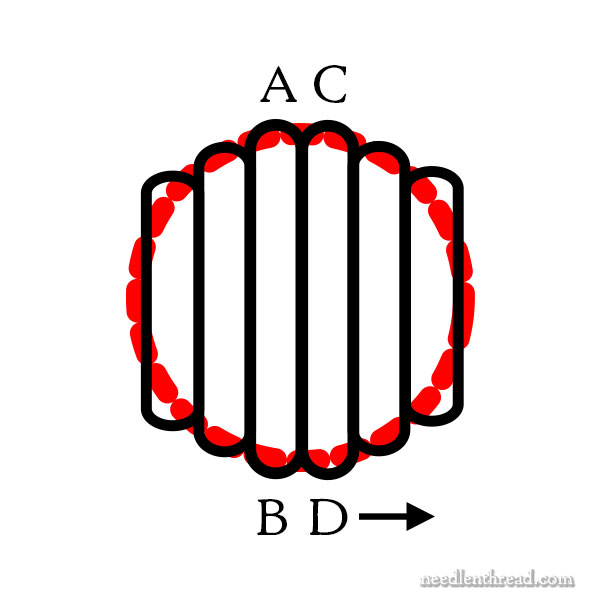
When you stitch the satin stitch dot, start just to the left of center, and work your first satin stitch from A to B. Then, work to either the left or right side of the dot to the edge, and then go back to center and work the other half of the dot.
Use the diagram above as a guide for the concept, but not for the exact number of stitches!
Now, these dots are not huge, so they’re not going to require a lot of stitches – maybe ten or twelve stitches total. The center will likely start with about 3 satin stitches that are the same size across the middle (widest) part of the dot.
As you approach the edge of the dot, you won’t necessarily cover the entire split stitch line just on the edge. It might actually barely show – and that’s ok. It will provide the roundness of the side. You don’t want your side stitches getting smaller and smaller, or you’ll end up with something akin to an American football rather than a round dot.
Work the satin stitches according to the diagram above – come up at A, down at B, up at C, down at D, etc. – so that the thread on the back of the fabric passes from B to C in a long stitch. Don’t try to do a “surface satin stitch” here (that would be up at A, down at B, up at D, down at C) where you step sideways when you start a new stitch. This may prohibit the stitch from lying smooth and parallel on the front of the fabric.
Points to Remember
1. Work from the approximate center out to the edge. Return to the center and work to the other edge.
2. You do not have to cover the edge absolutely. Don’t try to cram smaller and smaller stitches onto the edge, because it will warp the shape.
3. Your stitches should pass over the length of the dot on the back of the fabric, too.
4. Each stitch on the front should lie parallel to each other, without overlapping the previous stitch. You don’t want space to show between the stitches, but you don’t want to cram them together too much, where they would look bumpy or overlap the previous stitch.
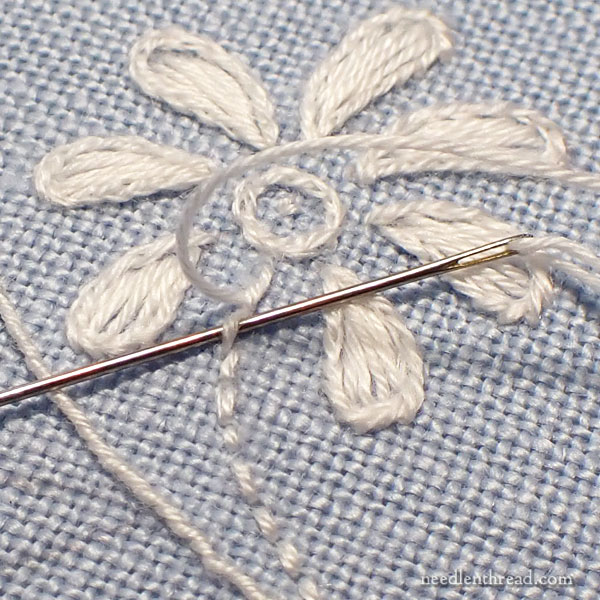
To end the satin stitch on the back, pass your working thread underneath the stitches in one direction and then in another, and then clip it.
Satin Stitched Petals
Now we’re going to tackle the petals, which are slightly more complicated.
Now, if you find this complicated or you feel you aren’t quite ready for this approach, don’t worry. You can default to working the satin stitch across the short direction of the petal, starting in the center like you did with the dot, and working parallel lines up to the top of the petal and then going back to center and working parallel lines down to the narrow tip on the petal. This will create a “horizontal” stitch across the petal, and that’s fine.
But if you can manage a slanted satin stitch, this will make your petals look a little more natural, since the stitch will move with the curve of the petals.
The diagram below indicates how to establish and maintain a slanted satin stitch on the petal:
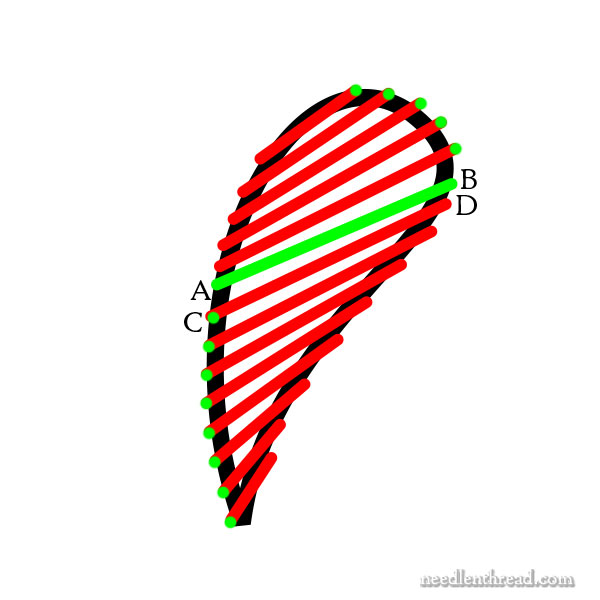
If you look at the diagram closely, you will see that the lines representing the stitches aren’t exactly parallel.
Start within the petal, close to the middle of the area, with a slanted line, indicated by the green line in the diagram. Come up at A and down at B.
From here, work the lower half of the petal. You’ll be bringing the needle to the front where the green dot are and taking it down on the opposite side.
But notice, as you work down the petal in the diagram, that the spacing on the left side of the petal (where the green dots are) is farther apart, and the spacing is closer together on the right side of the petal (where the stitch passes to the back of the fabric).
When you bring your needle up into the fabric on the green dots, come straight up from the back of the fabric, with the needle perpendicular to the fabric, and a little ways down the petal from the previous stitch, but when you go down into the fabric on the right side, your stitch is going to hug closer to the previous stitch. You might even angle your needle a bit down towards the fabric, holding it parallel to the design line, pushing the tip towards the end of the previous stitch, so that you can get really close to that previous stitch. You don’t want to go down in the same hole, but you want to go down pretty close to it – almost like you’re pushing under that stitch, by coming in at that angle. But don’t enter the fabric quite in the same hole.
Working in this method, with the start of the stitches on the left = fanning out away from each other a little and the ends snuggling up close to each other, you will be able to maintain a nice angle across the petal. And as you work down to the tip, the stitches will turn naturally and cover the tip.
After you finish the lower part of the petal, move to the upper part by passing your working thread under the stitches on the back so you can emerge above the green line in the diagram, and over on the right side of the petal.
Notice that the green starting dots are on the right side of the petal. On the upper portion of the petal, the stitches will begin on the right side, fanning the spacing out a bit, and end on the left side, working closer to the previous stitch.
As you get to the rounded top of the petal, your final stitch should cover your curved outline just like it did on the edges of the satin stitched dot. It may just barely cover that outline. Don’t try to keep cramming stitches around the curved tip, or the petal will get tight and wonky.
As you work each petal, turn your hoop so that the petal you are working on is in approximately the same upward orientation as the petal on the diagram, so that you can maintain the same stitch direction on each petal as much as possible.
Further Satin Stitch Tips
You can find additional tips for working the satin stitch in this article, Ten Tips for a Sensational Satin Stitch.
The Rest of the Project
You can find the index for the previous articles in this project here.
If you would like to join in on the project and you need a materials kit, you will find the materials kits available here.
In the next installment, we will embroider the leaves. Then, we will move on to the drawn thread and decorative hem stitch!
Wonderful instructions and diagrams! In Japanese Embroidery, we do a LOT of satin stitch, and these are many of the same tips I use as an instructor. I may borrow these!
I still haven’t heard from you about my kit I bought from you. The linen is only 8 X 9. Is an eight inch piece of linen ok to use or should I get a different piece of linen? I also can’t access your Patreon account even though I purchased it. Help ! Kathleen
Hi, Kathleen – Have you emailed me directly at mary(at)needlenthread(dot)com? I can’t find an email from you, I’m afraid (matching the email address you used when you left your comment).
Reduce the linen to 8 x 8 (or 7.75 x 7.75 – whichever it takes to get the largest square piece you can manage from the linen). The linen does not have to be a specific size, as long as it’s in that 7.75″ – 9″ range. We talked about this in the “sizing” article earlier. You’ll find that here: https://www.needlenthread.com/2023/07/sweet-marguerite-1-5-finishing-the-set-up-sizing-information.html
Members on Patreon have to sign in when you go to the Patreon page. There’s a login in the corner of the page – that’s where you enter your username and password. Once you’re signed in, you should see the content. I have used your email address that you used when you left this comment to search the member list on Patreon and you don’t come up, so perhaps you used a different email address when you signed up? Or maybe when you signed up you accidentally misspelled your email address? You might check into the sign-up information that you used, to make sure that there’s no misspelling or anything?
Well, Mary —
I thought I was on a roll after I finished the outside basting and was ready to outline the flower design.
That’s when all heck broke loose.
1. After the very first poke of the needle, the tissue paper started falling apart, so I…
2. Scotch-taped the design and got it done, but the tape was hard to get off, so…
3. I soaked it in warm water a few times, tried tweezers, then decided on a used toothbrush, which…
4. Apparently had last been used to scrub a stain with bleach: It turned my blue cloth greenish, which…
5. Was when I remembered I could have used paper Solvy to print the photo (it dissolves in water!)
Why didn’t I think of this sooner?
It is, after all, a learning piece.
Boy did I learn!
Hi, Chris – do you mean the tissue paper fell apart when doing the split stitching? Was it the tissue paper in the kit? The tissue paper in the kit should stand up to stitching. I use it all the time for this type of transferring. It may eventually split when an element is finished – for example, outlining a leaf with split stitch may result in the tissue paper inside the leaf shape separating – but normally, it will stay intact for stitching the design. I’m sorry you had such a rough go of it – the bleach on the toothbrush!!!! Yikes!
My satin stitches don’t look as soft and fuzzy as your examples. I’m using the thread that came with the kit, which seems quite smooth and doesn’t seem to plump up like your yarn does. Am I doing something wrong?
Perhaps you’re pulling the thread too tightly? It’s the same thread that’s in the kit. Your stitches should lie right next to each other, and your tension should be light – just enough for the stitch to sit on the padding nicely, but not pull. Also, as you stitch, if your thread is twisting up on you, drop your needle occasionally towards the floor (hanging on the thread) so that the thread untwists. If your thread is twisting, it’s adding more twist to the fibers that make up the thread, which makes the thread itself tighter.
I have been embroidering for over 60 years and I wanted to try something I have not tried before,I had some large Irish linen table cloths with the printed designs already on and thought embroidering the design in whit or ecru ,I found your instructions very clear and precise and very keen to start,after all I have all the time in the world.Please send any posts or tutorials you have or any white work.
I have been inspired and cant wait to start.
Hilda