


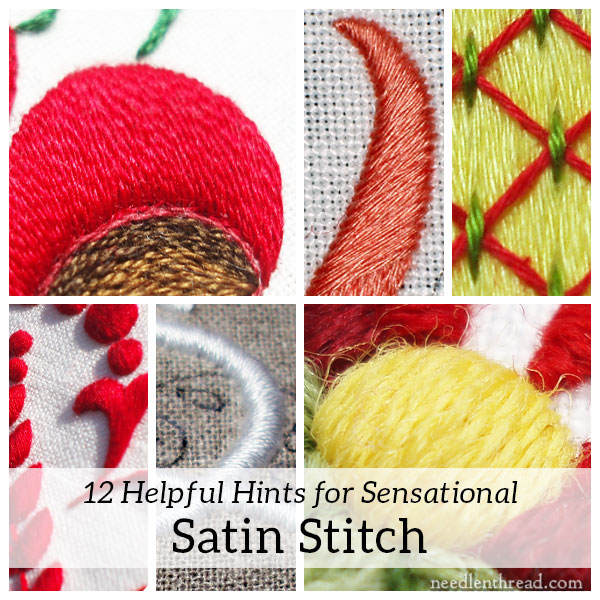
If I had to pick an embroidery stitch that I have mixed feelings about, it’s the satin stitch.
I love it – I consider it the Queen of Embroidery Stitches. It screams elegance. Refinement. Style.
But on the other hand, there’s one thing I don’t like about it: sometimes, it’s a hard stitch to get right!
There have been times when I’ve been satin stitching along, all perfectly happy, when suddenly, I notice my direction has shifted. Or my stitches aren’t as silky smooth as they should be. Or the edge is wobbly.
Satin stitch is one of those stitches that either looks absolutely terrific….or not very terrific at all.
When it looks good, it looks good.
But when satin stitch looks bumpy and clumpy and wobbly ….wellllll. It just doesn’t sing the same way.
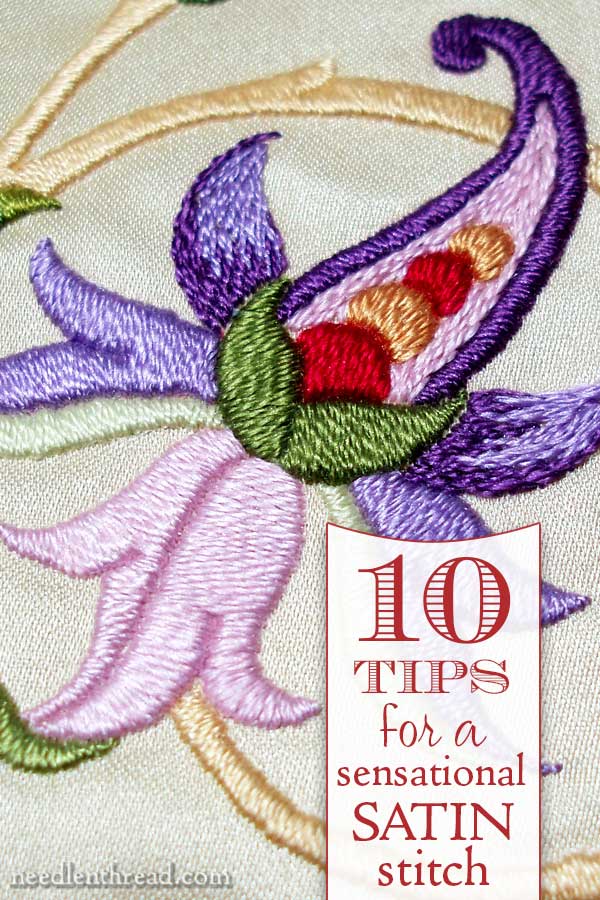
If you’ve experienced difficulties with satin stitch, these ten tips will help you produce a sensational satin stitch!
Satin Stitch Tip #1: The Thread Makes a Difference
Some threads work better than others for achieving a smooth satin stitch. Using a non-divisible thread with a softer twist for the top-most layer of satin stitch will give you the best results when you want to achieve a smooth surface.
For example, using a single strand of embroidery floss works better than using two strands in the needle at once. This includes cotton floss (like DMC), stranded silk (like Soie d’Alger, Soie de Paris, Silk Mill silk, Madeira silk, Caron Waterlilies, and so forth)
Some threads are, by their very structure, non-divisible, like floche or coton a broder. Both of these threads work up into a beautiful satin stitch. They come off the skein in a single thread (they aren’t meant to be split), they have a soft, low twist that gives them a good “spread”, and they have a nice sheen.
Threads like perle cotton are also non-divisible, but they have a tighter twist, which makes for a bumpier looking surface when using them for satin stitch.
Here are some articles that will help you understand these threads and concepts:
Comparing cotton embroidery threads
Cotton Floche vs Coton a Broder
Satin Stitch Tip #2: The Fabric Makes a Difference
If your embroidery project is going to include satin stitch, choose a ground fabric that has a high count and a firm, full weave. Fabrics with spaces between the warp and weft threads make it more difficult to achieve a smooth, straight edge with satin stitch.
If your fabric has a more open weave, consider backing it with a high count cotton muslin, to give your satin stitches something to hold onto.
When I embroidered this monogrammed needle book, the design was originally intended to be a counted cross stitch design. I decided to alter the kit a little and work with surface embroidery stitches instead, including a satin stitched monogram. Because the fabric was meant for counted work, I ran into some difficulties getting a really smooth edge on my satin stitch.
Satin Stitch Tip #3: Keep it Small
Satin stitch works best when it is used in a relatively small area. The larger the area, the more prone the stitches will be to loosening up.
If your satin stitch is padded, you can get away with a larger area to cover – up to, for example, an inch-long satin stitch. But this only because the padding will provide support and friction to help keep your stitches in place.
Otherwise, 3/8″ – 1/2″ for a satin stitch is a good rule of thumb. You can make modifications, depending on the weight of the thread you’re using and so forth, but for one strand of regular floss, anything over half an inch gets into dangerous territory – and, if your stitching isn’t padded, half an inch might even be too long!
Some Notes on Satin Stitch is an article I wrote previously that illustrates the question of stitch length.
Satin Stitch Tip #4: Stitch the Right Outline First
In this case, I’m not talking about an outline around the outside of finished satin stitch, but rather an outline over the design line, over which you work the satin stitch.
On any satin stitching except the tiniest satin stitched elements, an outline that you stitch over will help you keep a nice, smooth, crisp edge on your satin stitch.
But not just any outline! Split stitch works best. Why split stitch and not backstitch? Or split stitch, as opposed to split backstitch? Here are some articles that will help clarify:
The Backstitch vs. The Split Stitch
Split Stitch vs Split Backstitch
Satin Stitch Tip #5: Start in the Middle & Slant your Stitches
You’ll find a whole article on starting satin stitch in the middle of a shape and slanting your stitches. It does make a difference on certain types of shapes!
Satin Stitch Tip #6: Circles in Satin Stitch
When you satin stitch a circle or dot, don’t satin stitch all the way to the edge. These two articles will show you how to satin stitch a perfect dot:
How to Pad a Satin Stitch Dot
How to Satin Stitch a Perfect Dot
Satin Stitch Tip #7: Fan your Stitches when Taking a Curve
This article on embroidering around a curve with satin stitch will explain everything!
Satin Stitch Tip #8: Try Surface Satin Stitch for Certain Techniques
There’s a difference between regular satin stitch (where, on the back of the fabric, the thread passes in a long stitch just like it does on the front of the fabric) and surface satin stitch, where you end one stitch and step over to the side a tiny bit to start the next stitch.
You can find information on surface satin stitch here. There are certain techniques where surface satin stitch comes in handy, especially when working with very long surface satin stitches (or laid threads) that will be secured by other stitching on top of them.
Satin Stitch Tip #9: Step Your Stitches to fill Irregular Shapes
When filling an irregular shape with satin stitch, sometimes you might want to “step” your satin stitches. This article on stepping your satin stitches will explain how to do this.
In the article, the stitch is actually surface satin stitch, but the concept applies equally to satin stitch.
Satin Stitch Tip #10: How to bring Satin Stitch to a Sharp Point
Especially for small leaves, it’s helpful to know how to satin stitch to a sharp point. That link will take you to an article that shows you how!
Ah, you thought it was 10 tips! So did I! But here are two more worth knowing:
Satin Stitch Tip #11: Saving Expensive Thread
If you’re embroidering padded satin stitch with a more expensive thread, like silk as opposed to cotton, this article will show you how to save your more expensive thread for a beautiful satin stitch surface.
Satin Stitch Tip #12: Use a Laying Tool
If you must embroider some satin stitch with more than one strand of thread in the needle, then consider using a laying tool while you stitch. A laying tool will help you keep those stitches smooth!
Here’s information on what a laying tool is, and here’s a tutorial on how to use a laying tool for satin stitch.
Further Reading on Satin Stitch
This article on satin stitch recaps also explores how to improve the satin stitch, if you want to check it out!
How About You?
Do you have any favorite satin stitch tips you’d like to share with everyone? Feel free to chime in below!

Psst, Mary — you have two #2’s and two #5’s. It’s 12 tips — bonus! 🙂
Oh gosh, how did I miss that? Thanks, Cheryl!
How did you miss it? Brain hiccup would be my diagnosis. 🙂
Definitely!
This is excellent. I definitely have to pin it and then share it on Facebook. I’m familiar with some of the things you’ve said here because I follow your blog. But that’s not to say I’ll be able to remember them all. 🙂
Thanks, Irene!
Mary… This is wonderful! While you have given all of these helpful hints over the years, this summary sheet — where all of your tips are in one spot — is fantastic! I will definitely bookmark this page so that when I am doing satin stitch again I can reference it!
Glad you like it, Bonnie!
Dear Mary
I agree with that the Satin Stitch is a lovely stitch although a difficult one and the 12 tips included in the posts above are very, very useful. You cover every event on tips and techniques in the smooth stitching of the Satin stitch and a really good idea to have them all in one post, I shall certainly use this as reference when I am contemplating the Satin stitch for a project. You have worked really hard with all these tips and techniques on the Satin stitch so thank you for these references fantastic. I hope you have a great weekend.
Regards Anita Simmance
Mary,
An excellent article and tips. I stitch in my bedroom because it is the only room where I can keep the confusion out of sight. For me, it works.
Ann B.
Mary, thank you for this fantastic compilation of tutorials where one tutorial leads to the next one. I appreciate very much how much work you put into this.
Thank you!
Wonderful tips that just may have me trying to do the satin stitch. It has been my dreaded one for a long time.
Thank you. I just finished reading/studying this article and all the referenced articles. No matter how long one has been working with counted thread, doing those same stitches in a more creative way with surface embroidery is like switching instruments. I learned a lot. I think I could have done a better job in some areas of Tanja’s Jacobean embroidery. I’ll do better next time.
Dear Mary, hi!
Very interesting article. Satin stiich is one of my favourite stitches! I am not really good in it, so your article is very helpfull in my case. I have been practicing on prederteminated shapes, for example, a heart, I never knows how start (from center to one side first and then the other, or start from a side to the center, I don´t know if I am clear enough, excuse my English, please!!)
Best wishes!!
Paula.
Mary – I don’t think we can ever thank you enough for all your work that you so generously share with us. I am always amazed and so appreciative of the knowledge you have – I always learn so much from you.
Sometimes i only have time to read through it quickly and don’t always get to leave you a Comment, but I sincerely appreciate all the effort you put into this blog. The amount of information available here is amazing.
I love the look of satin stitch, but I always kind of dread it because it never really looks as nice as I hope. There are so many great tips here – I’m going to reread all of these and the links and I may improve my satin stitch yet!!
Thank you so much.
Barb
Thank you, Barb!
Thank you, Mary! Satin stitch is one technique (of many) that I Must Improve – as you say, it’s one that really shows up my lack of skill.
Dear Mary,
Fantastic! I look at the beautiful monograms in satin stitch on old linen, smooth as silk and worked in cotton, and not a thread out of place decades and many washes later. I wonder if I could ever stitch as well. With your tutelage I’m sure I can. Thank you for a very comprehensive coverage of satin stitch. We will be stitching like pros. No excuses!
One Mary to another! Thank you for sharing your satin stitch tips all together. I have never liked my efforts at this stitch but since discovering outlining am much happier.
Your site is just so very helpful! I’m making a ring pillow for my daughter’s upcoming April wedding. I’ve learned what thread best to use…I found the Monogram from your archive…even found and studied the monogram books you’ve mentioned. But these tips really gave me the confidence to start…and I have been stitching all day! After creating the padded base, I even started the satin stitch in the middle of the design and have a nice stitch slant! Thanks ever so much for being a great coach! This monogram ring pillow will be really special!
Hi Mary,
You know how I said that your achievements are already prodigious? Well, look at what you’ve discovered just about satin stitch, that you’re then also making available for us all to learn from. Just satin stitch?! Q.E.D. Thank you so much for putting together what is really a Satin Stitching book for us, it’s wonderful. 😀
well i’ll be pinning this one :-/ ever since i started this embroidery thing, satin stitch – and long and short stitch, actually – have been my points of discouragement. i just can’t seem to get them right… even over a split stitch outline, i can’t keep the edges straight, and can’t seem to keep the lines even as they should be. i suppose it will just take practice… but these tips all gathered in one place is super helpful! i’m not giving up yet 🙂
Hi Mary – I love satin stitch and use it a lot, so I’ve read this post and all the links carefully. Thanks for giving us so much useful information and collecting it in one place. Jane
The beginning of your article reminded me of a poem my grandmother used say to me when my hair wasn’t laying right — There was a little girl, who had a little curl, right in the middle of her forehead. When she was good, she was very, very good, and when she was bad, she was horrid.
That’s the way my satin stitches used to look. Now, with your tutoring, I think I could get two flowers to mirror each other. I have had lots of embroidered pieces that I dumped, or other-wise got rid of, because my stitches were just awful on part of the design.
Thank you very much Mary for collecting this all together. I have done very little satin stitch so far. It’s really good to have your wonderful tips to refer to when I do do some (which is likely not very far away.
Wow, the same day this went up, I was teaching a class on Bayeux embroidery which includes surface satin stitch. I’ve passed along the link to this day’s blog.
Hi Mary –
I also have a tip to add to your list for the perfect satin stitch.
Thread comes in a certain twist (Z or S). All threads should be threaded in the needle the same direction and “come up through the fabric and down through the fabric” in the same direction. If you don’t do this, the satin stitch can look like corduroy.
Thanks.
Judy
Mary, thank you for such a wonderful tips. I really love your site. For me it`s as an inspiration.
I would like very much to translate your advices from this post into Russian and publish them in my blog, of course, along with your authorship and source. I think, for our needle women, your tips will be also useful Would you mind?
Mary – A thousand thanks for your embroidery information. I’m back into embroidery lately after lots of years of not doing any. Those dishtowels I did as a kid! Thanks also for the links you provided to early needlework patterns. I love that people have been kind enough to share some of those treasured patterns.
Barbara
This is amazing. Thank you so much!
In another entry on satin stitch you mentioned “burnishing”. What is this and how do I do it?
Thank you
Hi! I’m very new at embroidery and I just read what must be all your articles on satin stitch (I clicked on every link related to it :p), and it all seems like a big help, I can’t wait to try some of your tips!
I especially appreciate the occasional diagram you make to illustrate your points, as it can be clearer than photos sometimes, even more for non-english people like myself 🙂 It really helps me visualise what I’m actually supposed to do! So thanks ♥
I’m not clear on something, though: I get that you use split stitch to trace the outline of a shape before filling it then satin stiching over the whole thing. Do you satin stich *outside* that split stitch outline, or more *into*? I mean, sometimes on the photos I can see a little bit of what I think is the split stitch outline and I just wanted to make sure it wasn’t a coincidence, because I like the visual 😮
…I hope that was understandable ^^” Thanks for the many tutorials, in any case! Have a great day 🙂
Hi, Lily – thanks for your comment! You satin stitch over the split stitch line entirely, not into it. This helps lift the edge and give you a clean, sharp finish along the edge. I hope that helps!
Came across your 10 tips for SS when looking for tutorial on SS. My very first cross stitch pattern is Physician’s Prayer (a gift for granddgtr who received her doctorate this winter. Am doing the lettering. It is working out in back stitch with DMC floss. My question: I see the pattern does the title in maybe 3/8”count Aida cloth. Do u think the satin stitch in the threads you recommend is what I should use? Should I outline the pattern line first as you recommend
Hi, Angelina – I’m not quite sure what you mean by 3/8” count Aida cloth? Aida cloth usually goes by threads per inch. Do you know how many threads per inch your cloth is? In any case, with satin stitch used in counted cross stitch on Aida cloth, no, you wouldn’t outline first underneath the satin stitch. They just mean long straight stitches following the chart, rather than cross stitches.
Excellent tips and basics in the linked tutorials! Thank you! I need to stitch the eyes of elephants onto a baby quilt! Will be first time in forever that I’ve done any embroidery!
This article is SO informative and easy to read thank you
I’ve been looking all over the internet to find a good way to finish a satin stitch. It always seems like the finished stitches on the back are too loose to just tunnel the floss through like you would on a tighter stitch.
Hi, Cal – I run through the back of a short run of stitches, then take a small backstitch and run it the rest of the way. If you’re laundering something with satin stitch on it, the threads will tighten a bit with laundering, and you shouldn’t have a problem.
Hello Mary,
I have a beginner question, please. Is satin stitch always padded? I would like a slightly flatter look for a project.
Thank you, Sarah
Hi, Sarah – No, satin stitch is not always padded. If you want something nice and flat, don’t pad it!
I’m struggling with the direction of stitches on satin stitch crosses, particularly when there are scroll figures on the ends. Could you address that issue sometime please?
Your tips are always very helpful. You spoke of thread called cloche, what is it? Bonnie
Hi, Bonnie – it’s floche, and you can read about it here: https://needlenthread.wpengine.com/2010/01/cotton-floche-whats-not-to-love.html
Hello! My sister bought me an embroidery kit for Christmas, and I am brand new to this form of artwork. I have enjoyed it so far, and for the most part I have used the vague instructions from the kit to teach myself some basic hand embroidery. After “completing” my first kit, my boyfriend gifted me 3 more kits, (from a different company). And, after completing one kit, and (very loosely) following the (vague) instructions; I have decided to hop on the inter webs for some instructions on proper technique and tips. I have found your guides to be much more helpful; thank you! However, this has opened my eyes to the seemingly endless tips, techniques, and variations of this craft, and I am feeling a little overwhelmed. So, my question is: Do you have any tips or, perhaps another article, with tips for ‘bad habits’ to avoid as a beginner?
Hi, Shelbie –
Wow! It sounds like you’ve jumped in with both feet! Welcome to the world of needlework!
Well, I do have this article on six bad habits to avoid: https://www.needlenthread.com/2017/10/im-guilty-6-bad-stitching-habits.html
On a more positive note, this article on 10 stitches to know might be helpful:
https://www.needlenthread.com/2014/10/ten-embroidery-stitches-to-know.html
Hope these come in handy for you! 🙂
Mary,
I live all your tutorials. I have learned so much on how to improve my embroidery. Thank you for sharing all your excellent knowledge!!! I read every tutorial numerous times.
cam